搭建微服务架构、实现服务调用
OpenFeign:Spring Cloud声明式服务调用组件
OpenFeign 全称 Spring Cloud OpenFeign,它是 Spring 官方推出的一种声明式服务调用与负载均衡组件,它的出现就是为了替代进入停更维护状态的 Feign。
OpenFeign 常用注解
使用 OpenFegin 进行远程服务调用时,常用注解如下表。
| 注解 | 说明 |
|---|---|
| @FeignClient | 该注解用于通知 OpenFeign 组件对 @RequestMapping 注解下的接口进行解析,并通过动态代理的方式产生实现类,实现负载均衡和服务调用。 |
| @EnableFeignClients | 该注解用于开启 OpenFeign 功能,当 Spring Cloud 应用启动时,OpenFeign 会扫描标有 @FeignClient 注解的接口,生成代理并注册到 Spring 容器中。 |
| @RequestMapping | Spring MVC 注解,在 Spring MVC 中使用该注解映射请求,通过它来指定控制器(Controller)可以处理哪些 URL 请求,相当于 Servlet 中 web.xml 的配置。 |
| @GetMapping | Spring MVC 注解,用来映射 GET 请求,它是一个组合注解,相当于 @RequestMapping(method = RequestMethod.GET) 。 |
| @PostMapping | Spring MVC 注解,用来映射 POST 请求,它是一个组合注解,相当于 @RequestMapping(method = RequestMethod.POST) 。 |
1. 创建主工程(Maven Project)
由于本案例中,会涉及到多个由 Spring Boot 创建的微服务,为了方便管理,这里我们采用 Maven 的多 Module 结构(即一个 Project 包含多个 Module)来构建工程。
创建一个名为 Telecom 的 Maven 主工程 ,然后在该主工程的 pom.xml 中使用 dependencyManagement 来管理 Spring Cloud 的版本,内容如下。
<project xmlns="http://maven.apache.org/POM/4.0.0"
         xmlns:xsi="http://www.w3.org/2001/XMLSchema-instance"
         xsi:schemaLocation="http://maven.apache.org/POM/4.0.0 http://maven.apache.org/xsd/maven-4.0.0.xsd">
    <modelVersion>4.0.0modelVersion>

    <groupId>com.aqgroupId>
    <artifactId>TelecomartifactId>
    <packaging>pompackaging>
    <version>1.0-SNAPSHOTversion>
    <modules>
        <module>Telecom-service-cloud-apimodule>
        <module>Telecom-service-cloud-eureka-7001module>
        <module>Telecom-service-cloud-provider-user-8001module>
        <module>Telecom-service-cloud-consumer-user-feignmodule>
    modules>


    <parent>
        <groupId>org.springframework.bootgroupId>
        <artifactId>spring-boot-starter-parentartifactId>
        <version>2.3.6.RELEASEversion>
        <relativePath/>
    parent>

    <properties>
        <maven.compiler.source>8maven.compiler.source>
        <maven.compiler.target>8maven.compiler.target>
        <project.build.sourceEncoding>UTF-8project.build.sourceEncoding>
        <maven.compiler.source>1.8maven.compiler.source>
        <maven.compiler.target>1.8maven.compiler.target>
        <junit.version>4.12junit.version>
        <log4j.version>1.2.17log4j.version>
        <lombok.version>1.16.18lombok.version>
    properties>

    <dependencyManagement>
        <dependencies>

            <dependency>
                <groupId>org.springframework.cloudgroupId>
                <artifactId>spring-cloud-dependenciesartifactId>
                <version>Hoxton.SR12version>
                <type>pomtype>
                <scope>importscope>
            dependency>
        dependencies>
    dependencyManagement>
    <build>
        <finalName>microservicecloudfinalName>
        <resources>
            <resource>
                <directory>src/main/resourcesdirectory>
                <filtering>truefiltering>
            resource>
        resources>
        <plugins>
            <plugin>
                <groupId>org.apache.maven.pluginsgroupId>
                <artifactId>maven-resources-pluginartifactId>
                <configuration>
                    <delimiters>
                        <delimit>$delimit>
                    delimiters>
                configuration>
            plugin>
        plugins>
    build>
project>
2. 创建公共子模块(Maven Module)
- 在主工程下,创建一个名为 Telecom-service-cloud-api 的 Maven Module:Telecom-service-cloud-api,其 pom.xml 配置如下。
<project xmlns="http://maven.apache.org/POM/4.0.0"
         xmlns:xsi="http://www.w3.org/2001/XMLSchema-instance"
         xsi:schemaLocation="http://maven.apache.org/POM/4.0.0 http://maven.apache.org/xsd/maven-4.0.0.xsd">
    <parent>
        <artifactId>TelecomartifactId>
        <groupId>com.aqgroupId>
        <version>1.0-SNAPSHOTversion>
    parent>
    <modelVersion>4.0.0modelVersion>

    <artifactId>Telecom-service-cloud-apiartifactId>

    <properties>
        <maven.compiler.source>8maven.compiler.source>
        <maven.compiler.target>8maven.compiler.target>
    properties>

    <dependencies>
        <dependency>
            <groupId>org.projectlombokgroupId>
            <artifactId>lombokartifactId>
        dependency>
    dependencies>
project>
注:Telecom-service-cloud-api 是整个工程的公共子模块,它包含了一些其他子模块共有的内容,例如实体类、公共工具类、公共依赖项等。当其他子模块需要使用公共子模块中的内容时,只需要在其 pom.xml 引入公共子模块的依赖即可。
- 在 Telecom-service-cloud-api 的 com.aq 包下,创建一个名为 userInfo 的实体类,代码如下。
package com.aq.entity;

import lombok.Data;

@Data
public class UserInfo {

    private String id;
    private String name;
    private String sex;
    private Integer age;

}
3. 搭建服务注册中心
- 在主工程下创建一个名为 Telecom-service-cloud-eureka-7001 的 Spring Boot Module 作为服务注册中心,并在其 pom.xml 中引入以下依赖。
<project xmlns="http://maven.apache.org/POM/4.0.0"
         xmlns:xsi="http://www.w3.org/2001/XMLSchema-instance"
         xsi:schemaLocation="http://maven.apache.org/POM/4.0.0 http://maven.apache.org/xsd/maven-4.0.0.xsd">
    <parent>
        <artifactId>TelecomartifactId>
        <groupId>com.aqgroupId>
        <version>1.0-SNAPSHOTversion>
    parent>
    <modelVersion>4.0.0modelVersion>

    <artifactId>Telecom-service-cloud-eureka-7001artifactId>

    <properties>
        <maven.compiler.source>8maven.compiler.source>
        <maven.compiler.target>8maven.compiler.target>
    properties>

    <dependencies>
        <dependency>
            <groupId>org.springframework.bootgroupId>
            <artifactId>spring-boot-starter-webartifactId>
        dependency>

        <dependency>
            <groupId>org.springframework.cloudgroupId>
            <artifactId>spring-cloud-starter-netflix-eureka-serverartifactId>
        dependency>

        <dependency>
            <groupId>org.springframework.bootgroupId>
            <artifactId>spring-boot-devtoolsartifactId>
            <scope>runtimescope>
            <optional>trueoptional>
        dependency>
        <dependency>
            <groupId>org.projectlombokgroupId>
            <artifactId>lombokartifactId>
            <optional>trueoptional>
        dependency>
        <dependency>
            <groupId>org.springframework.bootgroupId>
            <artifactId>spring-boot-starter-testartifactId>
            <scope>testscope>
        dependency>
    dependencies>
    <build>
        <plugins>
            <plugin>
                <groupId>org.springframework.bootgroupId>
                <artifactId>spring-boot-maven-pluginartifactId>
                <configuration>
                    <excludes>
                        <exclude>
                            <groupId>org.projectlombokgroupId>
                            <artifactId>lombokartifactId>
                        exclude>
                    excludes>
                configuration>
            plugin>
        plugins>
    build>

project>
- 在 Telecom-service-cloud-eureka-7001 的类路径(/resouces 目录)下,添加一个配置文件 application.yml,配置内容如下
server:
  port: 7001  #该 Module 的端口号
eureka:
  instance:
    hostname: localhost #eureka服务端的实例名称,
  client:
    register-with-eureka: false #false表示不向注册中心注册自己。
    fetch-registry: false #false表示自己端就是注册中心,我的职责就是维护服务实例,并不需要去检索服务
    service-url:
      defaultZone: http://${eureka.instance.hostname}:${server.port}/eureka/ #单机版服务注册中心
-
在 Telecom-service-cloud-eureka-7001 的主启动类上使用 @EnableEurekaServer 注解开启服务注册中心功能,接受其他服务的注册,代码如下
package com.aq;

import org.springframework.boot.SpringApplication;
import org.springframework.boot.autoconfigure.SpringBootApplication;
import org.springframework.cloud.netflix.eureka.server.EnableEurekaServer;

@SpringBootApplication
@EnableEurekaServer //开启 Eureka server,接受其他微服务的注册
public class TelecomServiceCloudEureka7001Application {
    public static void main(String[] args) {
        SpringApplication.run(TelecomServiceCloudEureka7001Application.class, args);
    }
}
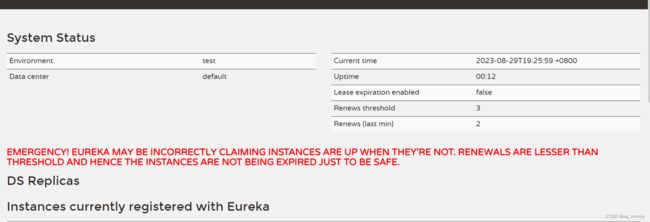
- 启动 Telecom-service-cloud-eureka-7001 ,使用浏览器访问 Eureka 服务注册中心主页,地址为“http://localhost:7001/”,结果如下图。
4. 搭建服务提供者
- 在主工程下创建一个名为 Telecom-service-cloud-provider-user-8001 的 Spring Boot Module,并在其 pom.xml 中引入以下依赖。
<project xmlns="http://maven.apache.org/POM/4.0.0"
         xmlns:xsi="http://www.w3.org/2001/XMLSchema-instance"
         xsi:schemaLocation="http://maven.apache.org/POM/4.0.0 http://maven.apache.org/xsd/maven-4.0.0.xsd">
    <parent>
        <artifactId>TelecomartifactId>
        <groupId>com.aqgroupId>
        <version>1.0-SNAPSHOTversion>
    parent>
    <modelVersion>4.0.0modelVersion>

    <artifactId>Telecom-service-cloud-provider-user-8001artifactId>

    <properties>
        <maven.compiler.source>8maven.compiler.source>
        <maven.compiler.target>8maven.compiler.target>
    properties>

    <dependencies>

        <dependency>
            <groupId>org.springframework.bootgroupId>
            <artifactId>spring-boot-starter-webartifactId>
        dependency>

        <dependency>
            <groupId>org.springframework.bootgroupId>
            <artifactId>spring-boot-devtoolsartifactId>
            <scope>runtimescope>
            <optional>trueoptional>
        dependency>

        <dependency>
            <groupId>org.springframework.bootgroupId>
            <artifactId>spring-boot-starter-testartifactId>
            <scope>testscope>
        dependency>

        <dependency>
            <groupId>com.aqgroupId>
            <artifactId>Telecom-service-cloud-apiartifactId>
            <version>${project.version}version>
        dependency>

        <dependency>
            <groupId>junitgroupId>
            <artifactId>junitartifactId>
            <version>4.12version>
        dependency>

        <dependency>
            <groupId>mysqlgroupId>
            <artifactId>mysql-connector-javaartifactId>
            <version>5.1.49version>
        dependency>

        <dependency>
            <groupId>ch.qos.logbackgroupId>
            <artifactId>logback-coreartifactId>
        dependency>

        <dependency>
            <groupId>org.mybatis.spring.bootgroupId>
            <artifactId>mybatis-spring-boot-starterartifactId>
            <version>2.2.0version>
        dependency>

        <dependency>
            <groupId>org.springframeworkgroupId>
            <artifactId>springloadedartifactId>
            <version>1.2.8.RELEASEversion>
        dependency>

        <dependency>
            <groupId>org.springframework.cloudgroupId>
            <artifactId>spring-cloud-starter-netflix-eureka-clientartifactId>
        dependency>

        <dependency>
            <groupId>org.springframework.bootgroupId>
            <artifactId>spring-boot-starter-actuatorartifactId>
        dependency>
    dependencies>
    <build>
        <plugins>

            <plugin>
                <groupId>org.mybatis.generatorgroupId>
                <artifactId>mybatis-generator-maven-pluginartifactId>
                <version>1.4.0version>
                <configuration>
                    <configurationFile>src/main/resources/mybatis-generator/generatorConfig.xmlconfigurationFile>
                    <verbose>trueverbose>

                    <overwrite>trueoverwrite>
                configuration>
                <dependencies>

                    <dependency>
                        <groupId>mysqlgroupId>
                        <artifactId>mysql-connector-javaartifactId>
                        <version>5.1.49version>
                    dependency>
                    <dependency>
                        <groupId>org.mybatis.generatorgroupId>
                        <artifactId>mybatis-generator-coreartifactId>
                        <version>1.4.0version>
                    dependency>
                dependencies>
            plugin>
            <plugin>
                <groupId>org.springframework.bootgroupId>
                <artifactId>spring-boot-maven-pluginartifactId>
            plugin>
        plugins>
    build>

project>
- 在Telecom-service-cloud-provider-user-8001 类路径(/resources 目录)下,添加配置文件 application.yml,配置内容如下。
server:
  port: 8001 #服务端口号
spring:
  application:
    name: microServiceCloudProviderUser  #微服务名称,对外暴漏的微服务名称,十分重要
  ################################################## JDBC 通用配置  ##########################################
  datasource:
    username: root        #数据库登陆用户名
    password: 123456        #数据库登陆密码
    url: jdbc:mysql://127.0.0.1:3306/zsq?serverTimezone=Asia/Shanghai&useUnicode=true&characterEncoding=utf-8&zeroDateTimeBehavior=convertToNull&useSSL=false&allowPublicKeyRetrieval=true
    driver-class-name: com.mysql.jdbc.Driver                  #数据库驱动
############################### 不检查 spring.config.import=configserver:##################
#  cloud:
#    config:
#      enabled: false
###################################### MyBatis 配置 ######################################
mybatis:
  # 指定 mapper.xml 的位置
  mapper-locations: classpath:mybatis/mapper/*.xml
  configuration:
    #默认开启驼峰命名法,可以不用设置该属性
    map-underscore-to-camel-case: true
########################################### Spring cloud 自定义服务名称和 ip 地址###############################################
eureka:
  client: #将客户端注册到 eureka 服务列表内
    service-url:
      defaultZone: http://127.0.0.1:7001/eureka  #这个地址是 7001注册中心在 application.yml 中暴露出来额注册地址 (单机版)
  instance:
    instance-id: spring-cloud-provider-8001 #自定义服务名称信息
    prefer-ip-address: true  #显示访问路径的 ip 地址
########################################## spring cloud 使用 Spring Boot actuator 监控完善信息###################################
# Spring Boot 2.50对 actuator 监控屏蔽了大多数的节点,只暴露了 heath 节点,本段配置(*)就是为了开启所有的节点
management:
  endpoints:
    web:
      exposure:
        include: "*"   # * 在yaml 文件属于关键字,所以需要加引号
info:
  app.name: Telecom-service-cloud-provider-user-8001
  company.name: com.aq
  build.aetifactId: @project.artifactId@
  build.version: @project.version@
- 在 com.aq.dao 包下创建一个名为 UserInfoDao 的接口,代码如下。
package com.aq.dao;

import com.aq.entity.UserInfo;
import org.apache.ibatis.annotations.Mapper;

import java.util.List;

@Mapper
public interface UserInfoDao {

    List<UserInfo> queryList();
}
- 在 resources/mybatis/mapper/ 目录下,创建一个名为 UserInfoMapper.xml 的 MyBatis 映射文件,配置内容如下。
DOCTYPE mapper PUBLIC "-//mybatis.org//DTD Mapper 3.0//EN" "http://mybatis.org/dtd/mybatis-3-mapper.dtd">
<mapper namespace="com.aq.dao.UserInfoDao">

    <select id="queryList" resultType="com.aq.entity.UserInfo">
        select * from user_info
    select>

mapper>
- 在 com.aq.service 包下创建一个名为 UserInfoService 的接口,代码如下。
package com.aq.service;

import com.aq.entity.UserInfo;

import java.util.List;

public interface UserInfoService {


    // 查询所有数据
    List<UserInfo> queryList();
}
- 在 com.aq.serviceimpl 包下创建一个名为 UserInfoServiceImpl 的实现,代码如下。
package com.aq.service.impl;

import com.aq.dao.UserInfoDao;
import com.aq.entity.UserInfo;
import com.aq.service.UserInfoService;
import org.springframework.beans.factory.annotation.Autowired;
import org.springframework.stereotype.Service;

import java.util.List;

@Service
public class UserInfoServiceImpl implements UserInfoService {

    @Autowired
    private UserInfoDao userInfoDao;


    @Override
    public List<UserInfo> queryList() {
        return  userInfoDao.queryList();
    }
}
-
在 com.aq.controller 包下创建一个名为 UserInfoController 的 Controller 类,代码如下。
package com.aq.controller; import com.aq.entity.UserInfo; import com.aq.service.UserInfoService; import org.springframework.beans.factory.annotation.Autowired; import org.springframework.web.bind.annotation.GetMapping; import org.springframework.web.bind.annotation.RequestMapping; import org.springframework.web.bind.annotation.RestController; import java.util.List; @RestController @RequestMapping(value = "/userInfo") public class UserInfoController { @Autowired private UserInfoService userInfoService; @GetMapping("/queryList") public List<UserInfo> queryList() { return userInfoService.queryList(); } } -
在 Telecom-service-cloud-provider-user-8001 的主启动类上,使用 @EnableEurekaClient 注解开启 Eureka 客户端功能,将服务注册到服务注册中心(Eureka Server),代码如下。
package com.aq;

import org.springframework.boot.SpringApplication;
import org.springframework.boot.autoconfigure.SpringBootApplication;
import org.springframework.cloud.netflix.eureka.EnableEurekaClient;

@SpringBootApplication
@EnableEurekaClient // Spring cloud Eureka 客户端,自动将本服务注册到 Eureka Server 注册中心中
public class TelecomServiceCloudProviderUser8001Application {
    public static void main(String[] args) {
        SpringApplication.run(TelecomServiceCloudProviderUser8001Application.class,args);
    }
}
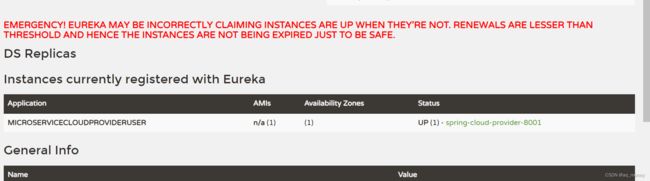
- 依次启动 Telecom-service-cloud-eureka-7001 和 Telecom-service-cloud-provider-user-8001,使用浏览器访再次问 Eureka 服务注册中心主页(http://localhost:7001/),如下图。
10.在 MySQL 的 数据库中执行以下 SQL,准备测试数据。
/*
 Navicat Premium Data Transfer

 Source Server         : zsq
 Source Server Type    : MySQL
 Source Server Version : 50739
 Source Host           : localhost:3306
 Source Schema         : zsq

 Target Server Type    : MySQL
 Target Server Version : 50739
 File Encoding         : 65001

 Date: 29/08/2023 21:15:04
*/

SET NAMES utf8mb4;
SET FOREIGN_KEY_CHECKS = 0;

-- ----------------------------
-- Table structure for user_info
-- ----------------------------
DROP TABLE IF EXISTS `user_info`;
CREATE TABLE `user_info`  (
  `id` varchar(10) CHARACTER SET utf8 COLLATE utf8_general_ci NOT NULL,
  `name` varchar(50) CHARACTER SET utf8 COLLATE utf8_general_ci NULL DEFAULT NULL,
  `sex` varchar(10) CHARACTER SET utf8 COLLATE utf8_general_ci NULL DEFAULT NULL,
  `age` int(11) NULL DEFAULT NULL,
  PRIMARY KEY (`id`) USING BTREE
) ENGINE = InnoDB CHARACTER SET = utf8 COLLATE = utf8_general_ci ROW_FORMAT = Dynamic;

-- ----------------------------
-- Records of user_info
-- ----------------------------
INSERT INTO `user_info` VALUES ('1', '曾舒琪', '男', 25);

SET FOREIGN_KEY_CHECKS = 1;
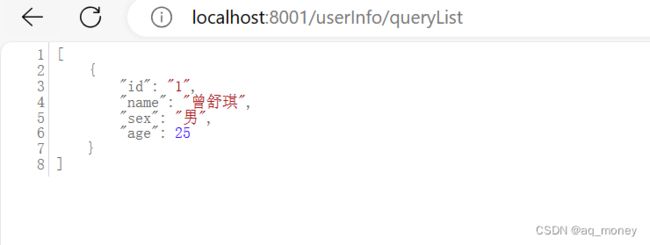
- 使用浏览器访问“localhost:8001/userInfo/queryList”,结果如下图。
5.调用
- 在 Telecom 下创建一个名为 Telecom-service-cloud-consumer-user-feign 的 Spring Boot 模块,并在 pom.xml 中添加以下依赖。
<project xmlns="http://maven.apache.org/POM/4.0.0"
         xmlns:xsi="http://www.w3.org/2001/XMLSchema-instance"
         xsi:schemaLocation="http://maven.apache.org/POM/4.0.0 http://maven.apache.org/xsd/maven-4.0.0.xsd">
    <parent>
        <artifactId>TelecomartifactId>
        <groupId>com.aqgroupId>
        <version>1.0-SNAPSHOTversion>
    parent>
    <modelVersion>4.0.0modelVersion>

    <artifactId>Telecom-service-cloud-consumer-user-feignartifactId>

    <properties>
        <maven.compiler.source>8maven.compiler.source>
        <maven.compiler.target>8maven.compiler.target>
    properties>

    <dependencies>
        <dependency>
            <groupId>com.aqgroupId>
            <artifactId>Telecom-service-cloud-apiartifactId>
            <version>${project.version}version>
        dependency>
        <dependency>
            <groupId>org.springframework.bootgroupId>
            <artifactId>spring-boot-starter-webartifactId>
        dependency>
        <dependency>
            <groupId>org.projectlombokgroupId>
            <artifactId>lombokartifactId>
            <optional>trueoptional>
        dependency>
        <dependency>
            <groupId>org.springframework.bootgroupId>
            <artifactId>spring-boot-starter-testartifactId>
            <scope>testscope>
        dependency>

        <dependency>
            <groupId>org.springframework.cloudgroupId>
            <artifactId>spring-cloud-starter-netflix-eureka-clientartifactId>
        dependency>

        <dependency>
            <groupId>org.springframework.cloudgroupId>
            <artifactId>spring-cloud-starter-netflix-ribbonartifactId>
        dependency>

        <dependency>
            <groupId>org.springframework.cloudgroupId>
            <artifactId>spring-cloud-starter-openfeignartifactId>
        dependency>
    dependencies>
    <build>
        <plugins>
            <plugin>
                <groupId>org.springframework.bootgroupId>
                <artifactId>spring-boot-maven-pluginartifactId>
                <configuration>
                    <excludes>
                        <exclude>
                            <groupId>org.projectlombokgroupId>
                            <artifactId>lombokartifactId>
                        exclude>
                    excludes>
                configuration>
            plugin>
        plugins>
    build>

project>
- 在 Telecom-service-cloud-consumer-user-feign 下的类路径(即 /resources 目录)下,添加一个 application.yml,配置内容如下。
server:
  port: 80
eureka:
  client:
    register-with-eureka: false #服务消费者可以不向服务注册中心注册服务
    service-url:
      defaultZone: http://127.0.0.1:7001/eureka/
    fetch-registry: true  #服务消费者客户端需要去检索服务
- 在 com.aq.client包下创建一个名为 Client 的接口,并在该接口上使用 @FeignClient 注解实现对服务接口的绑定,代码如下。
package com.aq.client;

import com.aq.entity.UserInfo;
import org.springframework.cloud.openfeign.FeignClient;
import org.springframework.web.bind.annotation.GetMapping;

import java.util.List;

// 此url表示你本机的服务
@FeignClient(url = "http://127.0.0.1:8001", name = "client", contextId = "client")
public interface Client {

    @GetMapping("/userInfo/queryList")
    List<UserInfo> queryList();
}
- 在 com.aq.controller 包下,创建一个名为 ClientController 的 Controller 类,代码如下。
package com.aq.controller;

import com.aq.client.Client;
import com.aq.entity.UserInfo;
import org.springframework.beans.factory.annotation.Autowired;
import org.springframework.web.bind.annotation.GetMapping;
import org.springframework.web.bind.annotation.RequestMapping;
import org.springframework.web.bind.annotation.RestController;

import java.util.List;

@RestController
@RequestMapping(value = "/client")
public class ClientController {

    // 启动的时候加载不到bean 设置false
    @Autowired(required = false)
    private Client client;


    @GetMapping("/getClientInfo")
    public List<UserInfo> getClientInfo() {
        return  client.queryList();
    }
}
-
在主启动类上添加 @EnableFeignClients 注解开启 OpenFeign 功能,代码如下。
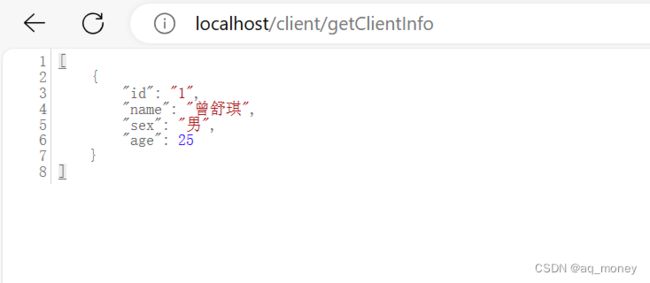
package com.aq; import org.springframework.boot.SpringApplication; import org.springframework.boot.autoconfigure.SpringBootApplication; import org.springframework.cloud.openfeign.EnableFeignClients; @SpringBootApplication @EnableFeignClients public class TelecomServiceCloudConsumerUserFeignApplication { public static void main(String[] args) { SpringApplication.run(TelecomServiceCloudConsumerUserFeignApplication.class, args); } }- 依次启动服务注册中心集群、服务提供者以及Telecom-service-cloud-consumer-user-feign,启动完成后,使用浏览器访问“localhost/client/getClientInfo”,结果如下图。
- 通过 @FeignClient 实现多个服务之间的调用。