yum使用总结
介绍
yum 主要功能是更方便的添加/删除/更新RPM 包,自动解决包的倚赖性问题,便于管理大量系统的更新问题。
yum 可以同时配置多个资源库(Repository),简洁的配置文件(/etc/yum.conf),自动解决增加或删除rpm 包时遇到的依赖性问题,保持与RPM 数据库的一致性。
配置
yum 的配置文件分为两部分:main 和repository
main 部分定义了全局配置选项,整个yum 配置文件应该只有一个main。常位于/etc/yum.conf 中。
repository 部分定义了每个源/服务器的具体配置,可以有一到多个。常位于/etc/yum.repo.d 目录下的各文件中。
CentOS-Base.repo 是yum 网络源的配置文件
CentOS-Media.repo 是yum 本地源的配置文件
修改yum镜像源
centos6
1.备份
mv -f /etc/yum.repos.d/CentOS-Base.repo /etc/yum.repos.d/CentOS-Base.repo.backup
2.修改CentOS-Base.repo
# CentOS-Base.repo
#
# The mirror system uses the connecting IP address of the client and the
# update status of each mirror to pick mirrors that are updated to and
# geographically close to the client.  You should use this for CentOS updates
# unless you are manually picking other mirrors.
#
# If the mirrorlist= does not work for you, as a fall back you can try the
# remarked out baseurl= line instead.
#
#

[base]
name=CentOS-6.6 - Base
baseurl=http://mirrors.aliyun.com/centos-vault/6.6/os/x86_64/
gpgcheck=1
gpgkey=http://mirrors.aliyun.com/centos-vault/RPM-GPG-KEY-CentOS-6

[updates]
name=CentOS-6.6 - Updates
baseurl=http://mirrors.aliyun.com/centos-vault/6.6/updates/x86_64/
gpgcheck=1
gpgkey=http://mirrors.aliyun.com/centos-vault/RPM-GPG-KEY-CentOS-6

[extras]
name=CentOS-6.6 - Extras
baseurl=http://mirrors.aliyun.com/centos-vault/6.6/extras/x86_64/
gpgcheck=1
gpgkey=http://mirrors.aliyun.com/centos-vault/RPM-GPG-KEY-CentOS-6

[centosplus]
name=CentOS-6.6 - Plus
baseurl=http://mirrors.aliyun.com/centos-vault/6.6/centosplus/x86_64/
gpgcheck=1
enabled=0
gpgkey=http://mirrors.aliyun.com/centos-vault/RPM-GPG-KEY-CentOS-6

[contrib]
name=CentOS-6.6 - Contrib
baseurl=http://mirrors.aliyun.com/centos-vault/6.6/contrib/x86_64/
gpgcheck=1
enabled=0
gpgkey=http://mirrors.aliyun.com/centos-vault/RPM-GPG-KEY-CentOS-6
3.清理默认缓存包
yum clean all
4.生成yum源缓存
yum makecache
centos7
1.更新之前请先安装wget,下载repo要用
yum install -y wget2.备份并下阿里云的base和epel源
mv -f /etc/yum.repos.d/CentOS-Base.repo /etc/yum.repos.d/CentOS-Base.repo.backup
wget -O /etc/yum.repos.d/CentOS-Base.repo http://mirrors.aliyun.com/repo/Centos-7.repo#mv /etc/yum.repos.d/epel.repo /etc/yum.repos.d/epel.repo.backup
#wget -O /etc/yum.repos.d/epel.repo http://mirrors.aliyun.com/repo/epel-7.repo3.清理默认缓存包
yum clean all4.生成yum源缓存
yum makecache5.更新yum源
yum -y update
常用命令
yum install xxx 安装xxx软件
yum -y install xxx 静默安装xxx软件
yum info xxx 查看xxx软件的信息yum deplist ansible 查看依赖
yum remove xxx 删除软件包
yum list 列出软件包
yum clean 清除缓冲和就的包
yum provides xxx 以xxx为关键字搜索包(提供的信息为关键字)
yum search xxx 搜索软件包(以名字为关键字)
yum groupupdate xxx 更新xxx软件分组
yum grouplist xxx
yum groupremove xxx
yum groupinfoinfo xxx这三个都是一组为单位进行升级 列表和删除的操作。。比如 "Mysql Database"就是一个组会同时操作相关的所有软件包;
yum update 系统升级
yum list available 列出所有升级源上的包;
yum list updates 列出所有升级源上的可以更新包;
yum list installed 列出已经安装的包;
yun update kernel 升级内核;
搜索下载
yum search +软件名或者关键字 //查找相关功能的包,然后下载,如:
yum search iperf3
yum search ifconfig找到后安装
yum install +找到的包名
更新
检查可更新的rpm包
#yum check-update
更新所有的rpm包
#yum update
更新指定的rpm包,如更新kernel和kernel source
#yum update kernel kernel-source
大规模的版本升级,与yum update不同的是,连旧的淘汰的包也升级
#yum upgrade
卸载
#搜索
rpm -qa |grep -i mysql
#卸载 如果都是yum下载的可以这样
yum remove mysql-community-libs-5.7.38-1.el7.x86_64
yum remove mysql-community-common-5.7.38-1.el7.x86_64#如果不是yum安装的这样卸载
rpm -e --nodeps 文件包名称
#注意还需要查找并删除相关目录
find / -name mysql 然后逐一删除#删除配置文件
rm -rf /etc/my.cnf
#删除安装日志,防止重新安装无法记录密码
rm -rf /var/log/mysqld.log
应用实例
yum安装nginx
新增nginx的yum源
vi /etc/yum.repos.d/nginx.repo
[nginx-stable]
name=nginx stable repo
baseurl=http://nginx.org/packages/centos/$releasever/$basearch/
gpgcheck=1
enabled=1
gpgkey=https://nginx.org/keys/nginx_signing.key
安装默认版本
yum -y install gcc gcc-c++ autoconf pcre pcre-devel make automake
yum -y install wget vim httpd-tools
yum -y install nginx
安装指定版本
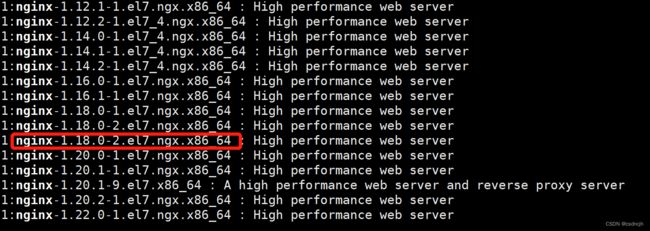
yum search nginx --showduplicates
结果
安装
yum -y install nginx-1.18.0-2.el7.ngx.x86_64
nginx rpm合集
Index of /packages/centos/7/x86_64/RPMS/
使用
rpm -ivh http://nginx.org/packages/centos/7/x86_64/RPMS/nginx-1.14.2-1.el7_4.ngx.x86_64.rpmyum安装指定版本mysql
如果需要卸载:
linux下彻底卸载MySQL_linux完全卸载mysql_清纯男孩的博客-CSDN博客
1、下载mysql rpm包
cd /usr/local/src
wget https://dev.mysql.com/get/mysql80-community-release-el7-3.noarch.rpm
2、安装下载的rpm包
yum localinstall mysql80-community-release-el7-3.noarch.rpm
或
sudo rpm -Uvh mysql80-community-release-el6-n.noarch.rpm
3、查看yum存储库中的mysql版本,默认最新的enabled,需要改成需要的版本
yum repolist all | grep mysql
4、修改为需要的版本,机禁用yum存储库中mysql不需要的版本和开启需要的版本
yum-config-manager --disable mysql80-community
yum-config-manager --enable mysql57-community
或
手动编辑/etc/yum.repos.d/mysql-community.repo 文件来选择,把默认版本的enabled=1改为0,需要版本的enabled=1
5、安装mysql
yum install mysql-community-server --nogpgcheck
--nogpgcheck (不校验数字签名)
如果报错 Public key for mysql-community-client-8.0.33-1.el7.x86_64.rpm is not installed
则需要
rpm --import https://repo.mysql.com/RPM-GPG-KEY-mysql-2022
6、5.7版本mysql第一次启动自动生成临时密码,可通过查看日志找到
grep 'temporary password' /var/log/mysqld.log
如果这个文件为空:
删除原来安装过的mysql残留的数据(这一步非常重要,问题就出在这)
rm -rf /var/log/mysqld.log
重启mysqld服务
systemctl restart mysqld
再去找临时密码
grep 'temporary password' /var/log/mysqld.log
7、修改密码,按提示修改
sudo mysql_secure_installation
但是密码要求是很复杂的,需要关闭复杂密码,在my.cnf中加入
plugin-load=validate_password.so
validate-password=OFF
再执行修改密码即可设置简单密码
下载完成以后,如果需要更换data目录
1.创建路径
mkdir mysql
2.移动文件
mv /var/lib/mysql/* /mysql
3.修改mysql数据库目录权限
vi /etc/my.cnf
datadir=/mysql
socket=/mysql/mysql.sock[client]
socket=/data/mysql/mysql.sock
4.修改配置文件
chown mysql:mysql -R /mysql/
5.重启服务:
systemctl restart mysqld
来源:https://blog.csdn.net/Yi999888/article/details/115915071
注意:client的配置也要修改,否则命令行连接时候会报错
Can't connect to local MySQL server through socket '/var/lib/mysql/mysql.sock'
[client]
socket=/data/mysql/mysql.sock
最主要是要调大下面两个参数
# 允许最大连接数
max_connections=10240
max_connect_errors = 40960
如果selinux造成启动报错,需要临时关闭selinux
sudo setenforce 0
如果防火墙阻拦了,需要开放端口
firewall-cmd --zone=public --add-port=3306/tcp --permanent
firewall-cmd --reload使用初始化密码,进入客户端,需要修改密码:
注意设置密码按照复杂度要求设置:
update user set authentication_string='' where user='root';
flush privileges;
mysql8 创建用户
create user 'xx'@'%' identified by 'xxx';
grant all privileges on *.* to 'xx'@'%' with grant option;
flush privileges;
navicat连接服务器报错:Client does not support authentication protocol requested by server解决方案
1.修改加密方式
ALTER USER 'root'@'%' IDENTIFIED BY 'password' PASSWORD EXPIRE NEVER;解释:我这里的user是root,host是%;password是登录密码;
2.设置密码
ALTER USER 'user'@'host' IDENTIFIED WITH mysql_native_password BY 'password';

FLUSH PRIVILEGES;
来源:navicat连接服务器报错:Client does not support authentication protocol requested by server解决办法_navicat显示client_hayhead的博客-CSDN博客
mysql5 创建用户
grant all privileges on *.* to xx@'%' identified by 'xx' with grant option;
flush privileges;
离线安装
准备一台相同环境,可联网的服务器,配置好yum源
yum deplist ansible
执行结果:
安装yum-utils
yum -y install yum-utils
repotrack下载 ansible 全量依赖包
repotrack ansible -p /root/local_ansible
将local_ansible拷贝到不联网服务器,在不联网服务器中进入local_ansible目录
cd local_ansible
#当执行下面的语句后,系统会自动选出所需的依赖包进行安装,不需要的就会自动清理。
rpm -ivh *.rpm --nodeps --force
来源
linux yum安装指定版本mysql - it610.com
yum 下载全量依赖 rpm 包及离线安装(终极解决方案)_tfner123的博客-CSDN博客_yum离线安装
CentOS7 完全卸载yum 安装 mysql - 那个吧..你懂的! - 博客园
yum search 的用法 - 简书

