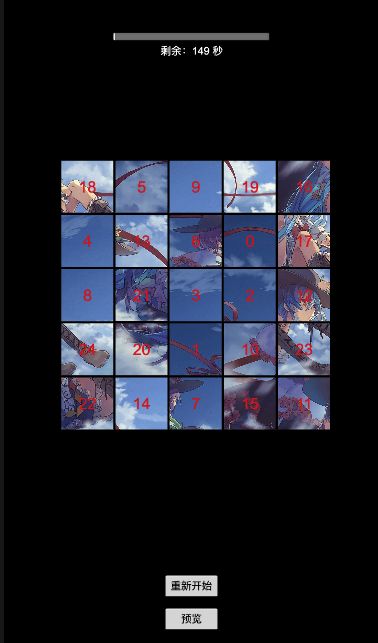
cocosCreator 之 拼图Demo
版本: 3.8.0
环境:Mac
简介
闲暇之余,参考网友分享的Demo: cocos_creator_learn 里面有个拼图的Demo。
使用2.4.8版本实现的,最近在学习3.8版本的creator,通过实战来提升下对cocosCreator的使用不失为一种好的方法。
先看下Demo效果图:
拼图的原理还是比较简单的, 将一张大图切块后,按照固定行列进行布局, 通过移动图块来进行交换。大概的思路:
- 获取大图的
SpriteFrame,然后根据Rect来获取指定图块。 - 图块的位置设置按照固定行列进行位置排列, 并将这些图块的节点
addChild到父节点中 - 所有的图块存储到
Array的数组中,主要用于交换和检测拼图是否成功 - 图块支持触摸事件,当图块的触摸点移动到对应的图块位置后,进行位置交换
与原有的Demo相比,做了一些调整:
- 支持设置行列的设定,通过参数
rankNum可以设置3~6之间固定行列的图块展现 - 增加了预览页面的显示
- 增加了倒计时的检测,时间结束则游戏结束
- 增加了重新开始
关于Demo的详细代码实现可参考个人Gitee: CutPicture
实现
代码中有着比较详细的注释,理解起来也比较容易,这里就说明下大概的流程相关。主要的UI资源有:
main.scene主场景文件, 对应脚本MainScene.tsblockItem.prefab图块预制体,固定大小100*100,对应脚本blockItem.tspreviewLayer预览页面, 内嵌脚本组件previewLayer.tspic.jpg图资源,已使用TinyPng压缩
主场景的示意图:
MainScene组件的主要参数有:
pic Prefab图块预制体pic Sprite Frame图片的精灵帧资源Block Nodes图块的父节点,位置居中Progress Bar进度条, 倒计时显示Time Label倒计时文本Rank Num行列数的设置Max Time最大时间设置
对于Demo的详细实现,就不一一复制粘贴代码实现了。 只说明下大概的实现:
预览页面
按钮点击是通过MainScene的clickPreviewEvent实现, 事件添加到按钮的ClickEvents中:
// mainScene.ts
public clickPreviewEvent() {
  // 通过resources.load动态加载预制体进行添加
  resources.load("prefab/previewLayer", Prefab, (err, prefab) => {
    if (err) {
      return console.error(err);
    }
    const layerNode = instantiate(prefab);
    layerNode.parent = this.node;
  });
}
预览页面的实现,注意增加BlockInputEvents防止页面透点
@ccclass('previewLayer')
export class previewLayer extends Component {
	protected start(): void {
    // this.scheduleOnce(()=> {
    //     this.node.destroy();
    // }, 2);
  }
  // 增加个触摸事件的点击即可
  protected onEnable(): void {
    this.node.on(Node.EventType.TOUCH_END, this.touchEndEvent, this);
  }

  protected onDisable(): void {
    this.node.off(Node.EventType.TOUCH_END, this.touchEndEvent, this);
  }

  private touchEndEvent() {
    this.node.destroy();
  }
}
如果想拓展自动关闭,打开注释掉代码也可以。
倒计时
倒计时没有使用schedule定时器的实现, 使用的是脚本回调方法update
@property(ProgressBar)
progressBar: ProgressBar = null;        // 进度条
@property(Label)
timeLabel: Label = null;                // 时间文本

private _curTime = 0;

// 重置下事件相关,避免刷新显示卡顿
onLoad() {
  this._curTime = 0;
  this.progressBar.progress = 0;
  this.timeLabel.string = `剩余:${this.maxTime} 秒`
}

update(deltaTime: number) {
  if (this._curTime >= this.maxTime) {
    this.timeLabel.string = "时间到,游戏结束"
    return;
  }
  this._curTime += deltaTime;

  // 更新进度
  this.progressBar.progress = this._curTime / this.maxTime;
  const remainTime = Math.ceil(this.maxTime - this._curTime);
  this.timeLabel.string = `剩余:${remainTime} 秒`
}
图块
图块的构建,它是通过SpriteFrame设置rect来设定的
// mainScene.ts
private createSegments() {
  this.blockNodes.removeAllChildren();
  // 创建图块
  for (let i = 0; i < this.rankNum; ++i) {
    for (let j = 0; j < this.rankNum; ++j) {
      const realIndex = i * this.rankNum + j;
      const node = instantiate(this.picPrefab);
      const nodeSize = node.getComponent(UITransform).contentSize;
      const maxLen = nodeSize.width * this.rankNum;
      // 设置图块的位置
      const posX = -maxLen/2 + j * (nodeSize.width + 4) + nodeSize.width/2;
      const posY = maxLen/2 + -i * (nodeSize.height + 4);
      node.setPosition(posX, posY, 0);
      // 获取图块的脚本,并初始化
      node.getComponent(blockItem).init(this.picSpriteFrame, realIndex, this.rankNum);
      node.parent = this.blockNodes;
      // 保存到数组中
      picNodes[realIndex] = node;
    }
  }
}

// blockItem.ts
public init(sp: SpriteFrame, realIndex: number, rankNum: number) {
  this._realIndex = realIndex;
  // 根据行数来设定截取图块的宽高度
  let picWidth = sp.width/Math.floor(rankNum);
  // 根据真实索引或获取行列索引,用于计算哪个位置的图块
  const rowIndex = Math.floor(realIndex/rankNum);     // 行索引
  const colIndex = realIndex % rankNum;               // 列索引

  const sprite = this.node.getComponent(Sprite);
  // 增加clone的使用,避免直接修改rect导致原有的SpriteFrame的Rect发生改变
  let spriteFrame = sp.clone();
  // 获取指定区域的图块
  spriteFrame.rect = new Rect(colIndex * picWidth, rowIndex * picWidth, picWidth, picWidth);
  sprite.spriteFrame = spriteFrame;
}
图块在触摸时,注意几个点:
- 透明度的改变,简单的使用就是通过编译器的组件
UIOpactiy - 注意保存原有的位置,避免松开图块后回不到原来的位置或者交换后位置错误
- 设置节点层级,这个尤为重要
节点的层级可通过setSiblingIndex来设定,如果没有设置层级,会出现如下的问题:
- 移动图块可能会显示在其他图块的下面
- 移动图块移动在某个图块的下面,松开图块,该移动图块收到的事件是
Cancel而不是End
private touchStartEvent(event: EventTouch) {
  // 设置透明度
  this._uiOpacity.opacity = 180;
  // 选择图块的索引
  this._selectIndex = this._realIndex;
  // 选择图块的位置
  this._selectPos = this.node.getPosition();
  // 设置层级
  this.node.setSiblingIndex(100);
}

private touchEndEvent(event: EventTouch) {
  // 恢复层级
  this._uiOpacity.opacity = 255;
  // 检测是否有相交,返回[相交索引,相交的图块]
  const data = this.getCrossData(event.getUILocation());
  if (data && data.index !== null) {
    console.log("有相交,索引为", data.index);
    // 交换位置
    let crossNode = data.node;
    let crossPos = data.node.getPosition();
    this.node.setPosition(crossPos);
    data.node.setPosition(this._selectPos);
  }
  else {
    this.node.setPosition(this._selectPos);
    console.log("没有相交")
  }
  this.node.setSiblingIndex(0);
  this._selectIndex = -1;
}
大概的流程也就是如此了, 本Demo如果做为实战项目开发, 建议对图块相关可以拓展一个图块管理器,用于:
- 创建图块
- 生成随机图块
- 图块交换位置
- 图块检测拼接成功等
祝大家学习使用愉快!

