Linux之远程连接服务器ssh、telnet
什么是远程连接服务器
远程连接服务器通过文字或图形接口方式来远程登录系统,让你在远程终端前登录linux主机以取得可操作主机接口(shell),而登录后的操作感觉就像是坐在系统前面一样。
远程连接服务器的功能
- 分享主机运算能力
- 服务器类型有限度开放连接
- 工作站类型,只对内网开放
常见远程连接工具
- RDP(remote desktop protocal )协议,windows远程桌面管理(图形界面)
- elenet CLI界面下远程管理,几乎所有操作系统都有(内容明文传输),端口 : 23
- ssh CLI界面下的远程管理,几乎所有操作系统都有(内容加密传输) 类unix系统下主要 ,端口: 22
- RFB (remote frame buffer) 图形化远程管理协议 VNC (Virtual NetworkComputing)使用的协议。(在linux unix Macos 下的图形界面远程管理工具)
如何实现拒绝用户远程连接
- vim /etc/passwd修改当前用户的shell为:/sbin/nolongin
- usermod -L 锁定 -U实现解锁
- passwd -l 锁定用户密码
SSH
SSH(Secure Shell Protocol,安全的壳程序协议) 为建立在应用层基础上的安全协议。SSH 是目前较可靠,专为远程登录会话和其他网络服务提供安全性的协议。利用 SSH 协议可以有效防止远程管理过程中的信息泄露问题。SSH最初是UNIX系统上的一个程 序,后来又迅速扩展到其他操作平台。SSH在正确使用时可弥补网络中的漏洞。SSH客户端适用于多种平台。几乎所有UNIX平台—包括HP-UX、Linux、AIX、Solaris、Digital UNIX、Irix,以及其他平台,都可运行SSH。
SSH验证方式
基于口令的安全验证
只要你知道自己帐号和口令,就可以登录到远程主机。所有传输的数据都会被加密,但是不能保证你正在连接的服务器就是你想连接的服务器。可能会有别的服务器在冒充真正的服务器,也就是受到“中间人”这种方式的攻击。
基于密匙的安全验证
需要依靠密匙,也就是你必须为自己创建一对密匙,并把公用密匙放在需要访问的服务器上。如果你要连接到SSH服务器上,客户端软件就会向服务器发出请求,请求用你的密匙进行安全验证。服务器收到请求之后,先在该服务器上你的主目录下寻找你的公用密匙,服务器就用公用密匙加密“质询”(challenge)并把它发送给客户端软件。客户端软件收到“质询”之后就可以用你的私人密匙解密再把它发送给服务器。
SSH特点
- 是安全的加密协议,用于远程连接Linux服务器
- 默认端口是22,安全协议版本是SSH2
- 服务器端主要包含2个服务功能SSH连接和SFTP服务器
- SSH客户端包含ssh连接命令和远程拷贝scp命令等
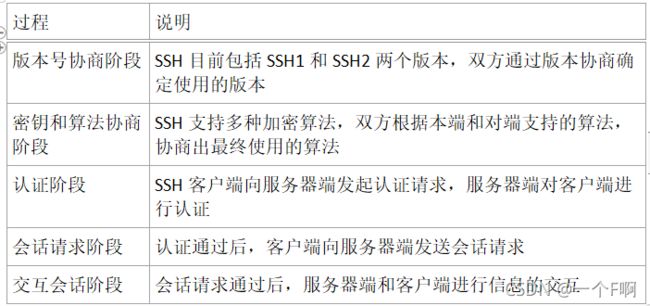
ssh连接过程图
ssh配置文件详解
[root@redhat ~]# vim /etc/ssh/sshd_config
:set nu 设置行号展示如下:
17.#Port 22 监听端口,默认监听22端口 【默认可修改】
18.#AddressFamily any IPV4和IPV6协议家族用哪个,any表示二者均有
19.#ListenAddress 0.0.0.0 指明监控的地址,0.0.0.0表示本机的所有地址 【默认可修改】
20.#ListenAddress :: 指明监听的IPV6的所有地址格式
22.# The default requires explicit activation of protocol 1
23.#Protocol 2 使用SSH第二版本
25.# HostKey for protocol version 1 一版的SSH支持以下一种秘钥形式
26.#HostKey /etc/ssh/ssh_host_key
27.# HostKeys for protocol version 2 使用第二版本发送秘钥,支持以下四种秘钥认证的存放位置
28.HostKey /etc/ssh/ssh_host_rsa_key rsa私钥认证 【默认】
29.#HostKey /etc/ssh/ssh_host_dsa_key dsa私钥认证
30.HostKey /etc/ssh/ssh_host_ecdsa_key ecdsa私钥认证
31.HostKey /etc/ssh/ssh_host_ed25519_key ed25519私钥认证
35.#ServerKeyBits 1024 主机秘钥长度
40.# Logging
41.# obsoletes QuietMode and FascistLogging
42.#SyslogFacility AUTH
43.SyslogFacility AUTHPRIV 当有人使用ssh登录系统的时候,SSH会记录信息,信息保存在/var/log/secure里面
44.#LogLevel INFO 日志的等级
45.# Authentication:
48.#LoginGraceTime 2m 登录的宽限时间,默认2分钟没有输入密码,则自动断开连接
49.#PermitRootLogin yes 是否允许管理员远程登录,'yes’表示允许
50.#StrictModes yes 是否让sshd去检查用户主目录或相关文件的权限数据
51.#MaxAuthTries 6 最大认证尝试次数,最多可以尝试6次输入密码。之后需要等待某段时间后才能再次输入密码
52.#MaxSessions 10 允许的最大会话数
59.AuthorizedKeysFile .ssh/authorized_keys 选择基于密钥验证时,客户端生成一对公私钥之后,会将公钥放到.ssh/authorizd_keys里面
79.PasswordAuthentication yes 是否允许支持基于口令的认证
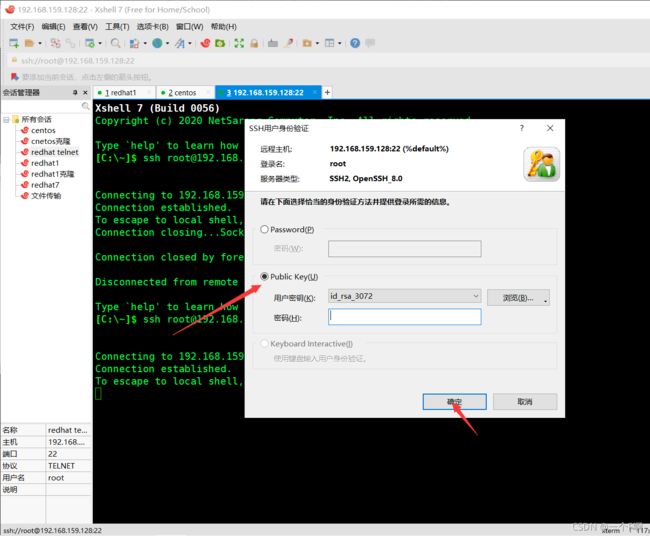
83.ChallengeResponseAuthentication no 是否允许使用键盘输入身份验证,也就是xshell的第三个登录方式
129.#UseDNS yes 是否反解DNS,如果想让客户端连接服务器端快一些,这个可以改为no
146.Subsystem sftp /usr/libexec/openssh/sftp-server 支持 SFTP ,如果注释掉,则不支持sftp连接
154.AllowUsers user1 user2 登录白名单(默认没有这个配置,需要自己手动添加),允许远程登录的用户。如果名单中没有的用户,则提示拒绝登录
加密技术
- 对称密钥加密------共享密钥加密(对称密钥加密):
加密和解密同用一个密钥,加密时就必须将密钥传送给对方
- 非对称密钥加密系统—公开密钥加密(非对称密钥加密):
公开密钥加密使用一对非对称的密钥。
一把叫做私有密钥,一把叫做公开密钥。私有密钥不能让其他任何人知道,而公开密钥则可以随意发布,任何人都可以获得。使用此加密方式,发送密文的一方使用公开密钥进行加密处理,对方收到被加密的信息后,再使用自己的私有密钥进行解密。利用这种方式,不需要发送用来解密的私有密钥,也不必担心密钥被攻击者窃听盗走

区别:
- 非对称加密与对称加密的不同之处在于,为了在单个方向上发送数据,需要两个相关的一组密钥。其中一个密钥称为私钥,而另一个称为公钥。
- 非对称加解密的效率要远远小于对称加解密
- 非对称秘钥相比对称秘钥更加安全
SFTP协议
SFTP (Secure File Transfer Protocol)的缩写,安全文件传送协议。可以为传输文件提供一种安全的网络的加密方法。sftp 与 ftp 有着几乎一样的语法和功能。SFTP 为 SSH的其中一部分,是一种传输档案至 Blogger 伺服器的安全方式。SFTP本身没有单独的守护进程,它必须使用sshd守护进程(端口号默认是22)来完成相应的连接和答复操作,所以从某种意义上来说,SFTP并不像一个服务器程序,而更像是一个客户端程序。SFTP同样是使用加密传输认证信息和传输的数据,所以,使用SFTP是非常安全的。但是,由于这种传输方式使用了加密/解密技术,所以传输效率比普通的FTP要低得多。
上传/下载文件的格式:
将文件由本机上传到远程主机:put [本机文件] ,文件会存储到当前远程主机的目录下。
将文件由远程主机下载下来:get [远程主机文件],文件会存储在当前本机所在的目录当中。
TELNET
Telnet是电信(Telecommunications)和网络(Networks)的联合缩写,这是一种在UNIX平台上最为人所熟知的网络协议。
Telnet使用端口23,它是专门为局域网设计的。
Telnet不是一种安全通信协议,因为它并不使用任何安全机制,通过网络/互联网传输明文格式的数据,包括密码,所以谁都能嗅探数据包,获得这个重要信息。
Telnet中没有使用任何验证策略及数据加密方法,因而带来了巨大的安全威胁,这就是为什么telnet不再用于通过公共网络访问网络设备和服务器。
案例
1、修改ssh服务端口号
修改配置文件
[root@redhat ~]# vim /etc/ssh/sshd_conf
Port 2222
重启服务、关闭防火墙
[root@redhat ~]# systemctl restart sshd
[root@redhat ~]# systemctl stop firewalld
测试
[root@redhat ~]# ssh 192.168.159.128 -p 2222
2、拒绝root用户远程登录
修改配置文件
[root@redhat ~]# vim /etc/ssh/sshd_config
PermitRootLogin no
重启服务
[root@redhat ~]# systemctl restart sshd
测试
重复提示重新输入密码实则已经拒绝
[root@redhat ~]# ssh [email protected]
[email protected]'s password:
Permission denied, please try again.
[email protected]'s password:
Permission denied, please try again.
[email protected]'s password:
Permission denied, please try again.
3、允许特定用户ssh登录,其他用户都无法登录
修改配置文件
[root@redhat ~]# vim /etc/ssh/sshd_config
//追加如下
AllowUsers huang
重启服务
[root@redhat ~]# systemctl restart sshd
测试
[root@redhat ~]# ssh [email protected]
[email protected]'s password:
密登录
创建密钥对
ssh-keygen - 生成、管理和转换认证密钥 -t制定类型 RSA
如果不指定一直回车即可
[root@redhat ~]# ssh-keygen -t rsa
Generating public/private rsa key pair.
Enter file in which to save the key (/root/.ssh/id_rsa):   //指定密钥存放路径,不指定回车即可
Enter passphrase (empty for no passphrase):   //指定密钥密码,不指定回车即可
Enter same passphrase again:
Your identification has been saved in /root/.ssh/id_rsa.
Your public key has been saved in /root/.ssh/id_rsa.pub.
The key fingerprint is:
SHA256:0xEi2dFHT113d92Ng4HFjNpKOrNd1RavKaL95prG9WI root@redhat
The key's randomart image is:
+---[RSA 3072]----+
|      .ooo.B+o.o@|
|      ....+.=o+ X|
|         o.. ..+ |
|        o.... o .|
|       oS... . o |
|      + ..o o o  |
|       = = o o   |
|      . o +.E .  |
|         .o*o.   |
+----[SHA256]-----+
[root@redhat ~]# ll /root/.ssh/
total 8
-rw-------. 1 root root 2590 Sep  2 23:20 id_rsa
-rw-r--r--. 1 root root  565 Sep  2 23:20 id_rsa.pub
对端是否有.ssh目录,没有则创建
[root@bogon ~]# mkdir .ssh
复制该公钥文件到对端的该目录下
注意:对端需要有这个目录否则无法实现传输
[root@redhat ~]#  scp /root/.ssh/id_rsa.pub [email protected]:/root/.ssh/authorized_keys
[email protected]'s password:
id_rsa.pub                                                                         100%  565   442.4KB/s   00:00
对端查看是否有这个密钥文件
[root@bogon ~]# ll /root/.ssh
total 4
-rw-r--r--. 1 root root 565 Sep  2 23:33 authorized_keys
测试
[root@redhat ~]# ssh 192.168.159.135
Last login: Thu Sep  2 22:00:21 2021 from 192.168.159.1
[root@bogon ~]#    //对端
第二种发送公钥文件的方式此方式需要指定对端的目录,自动创建
[root@redhat ~]# ssh-copy-id /root/.ssh/ -i 192.168.159.135
/usr/bin/ssh-copy-id: INFO: Source of key(s) to be installed: "/root/.ssh/id_rsa.pub"
/usr/bin/ssh-copy-id: ERROR: Too many arguments.  Expecting a target hostname, got: '/root/.ssh/' '192.168.159.135'

Usage: /usr/bin/ssh-copy-id [-h|-?|-f|-n] [-i [identity_file]] [-p port] [[-o <ssh -o options>] ...] [user@]hostname
	-f: force mode -- copy keys without trying to check if they are already installed
	-n: dry run    -- no keys are actually copied
	-h|-?: print this help
[root@redhat ~]# ssh-copy-id -i /root/.ssh/id_rsa.pub  192.168.159.135
/usr/bin/ssh-copy-id: INFO: Source of key(s) to be installed: "/root/.ssh/id_rsa.pub"
/usr/bin/ssh-copy-id: INFO: attempting to log in with the new key(s), to filter out any that are already installed
/usr/bin/ssh-copy-id: INFO: 1 key(s) remain to be installed -- if you are prompted now it is to install the new keys
[email protected]'s password:

Number of key(s) added: 1

Now try logging into the machine, with:   "ssh '192.168.159.135'"
and check to make sure that only the key(s) you wanted were added.
对端查看
[root@bogon ~]# ll .ssh
total 4
-rw-------. 1 root root 565 Sep  3 00:21 authorized_keys
测试跟第一种方式一样
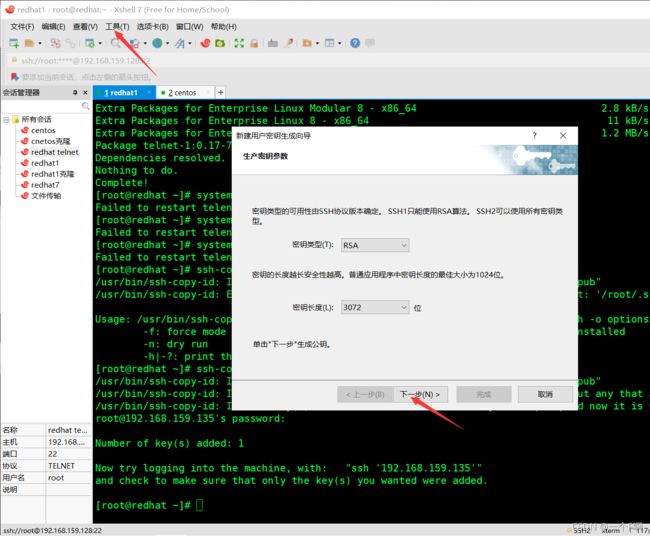
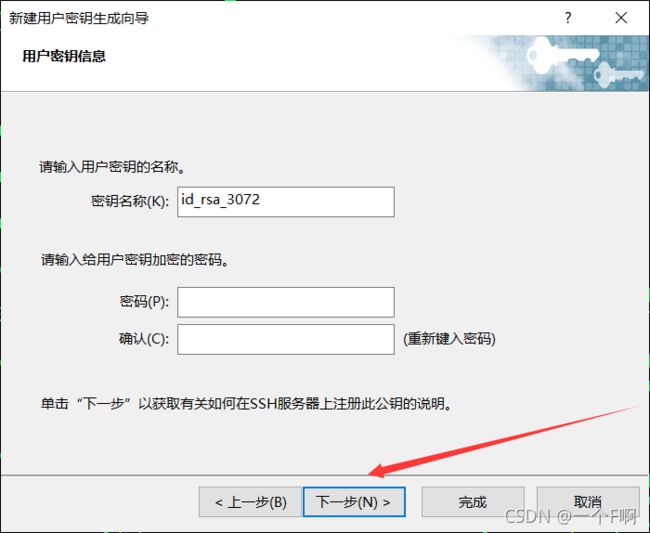
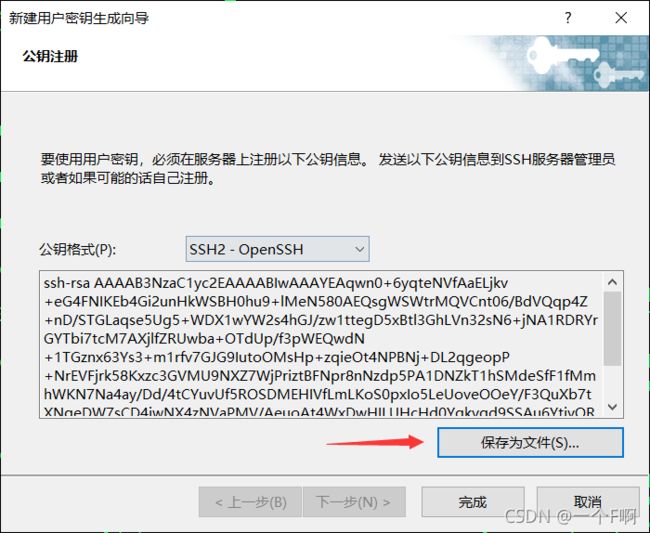
5、通过xshell使用证书进行登录
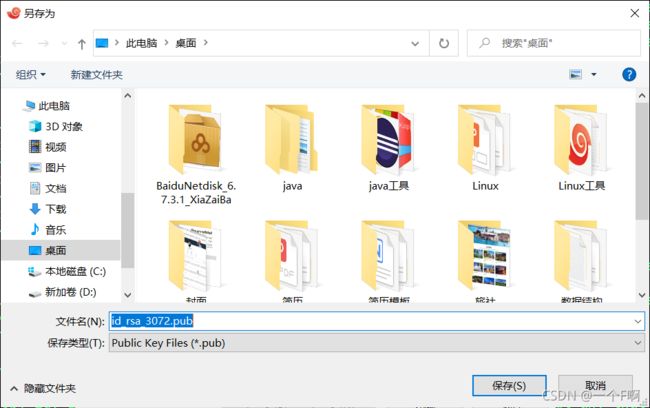
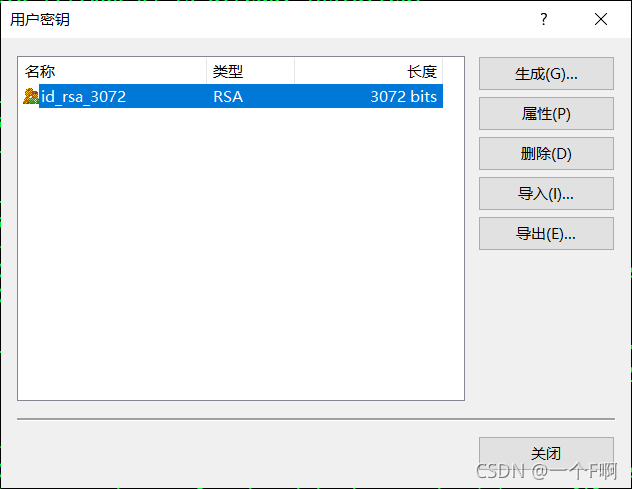
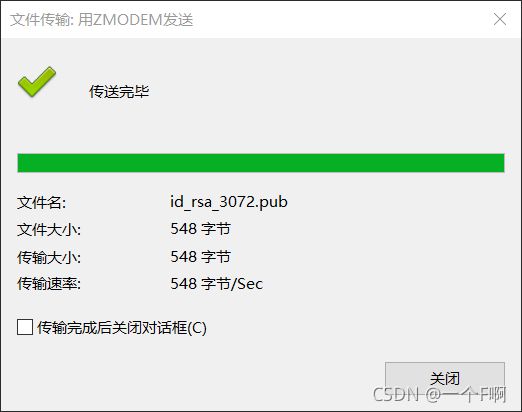
linux端的.ssh目录使用rz收取公钥文件
[root@redhat .ssh]# ll
total 16
-rw-------. 1 root root 2590 Sep  2 23:20 id_rsa
-rw-r--r--. 1 root root  548 Sep  3 01:06 id_rsa_3072.pub
-rw-r--r--. 1 root root  565 Sep  2 23:20 id_rsa.pub
-rw-r--r--. 1 root root  177 Sep  2 23:28 known_hosts
[root@redhat .ssh]# mv id_rsa_3072.pub authorized_keys
[root@redhat .ssh]# ls
authorized_keys  id_rsa  id_rsa.pub  known_hosts
6、客户端使用sftp实现文件传输
put加载客户端本地路径上传
get下载服务器端内容到本地
远程连接默认连接到用户的家目录
[root@redhat ~]# sftp 192.168.159.135
Connected to 192.168.159.135.
sftp>  //按tab补出
bye       cd        chdir     chgrp     chmod     chown     df        dir       exit      get       help
lcd       lchdir    lls       lmkdir    ln        lpwd      ls        lumask    mkdir     mget      mput
progress  put       pwd       quit      reget     rename    reput     rm        rmdir     symlink   version
!         ?
sftp> pwd
Remote working directory: /root
sftp> ls  //查看135主机家目录中的文件
Desktop                Documents              Downloads              Music                  Pictures
Public                 Templates              Videos                 anaconda-ks.cfg
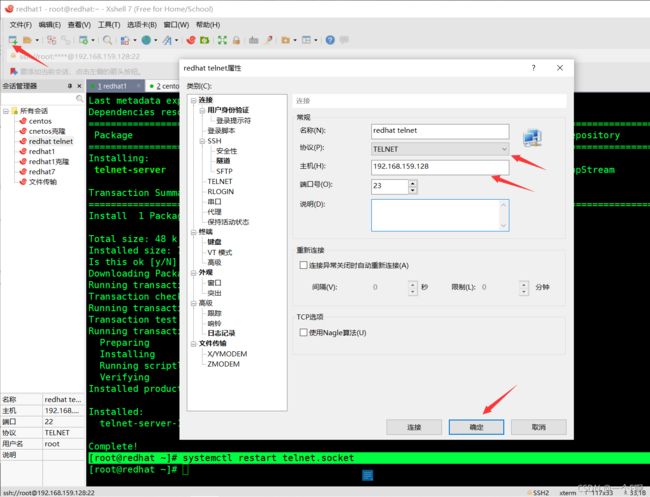
使用telnet实现登录
装服务
[root@redhat ~]# yum install telnet-server -y
启服务
[root@redhat ~]# systemctl restart telnet.socket

