【第二季】【SpringBoot+Vue】前后端分离项目实战笔记
配套视频在b站:【第二季】全网最简单但实用的SpringBoot+Vue前后端分离项目实战
SpringBoot+Vue项目实战 第二季
一、些许优化
刷新丢失其它标签页
-
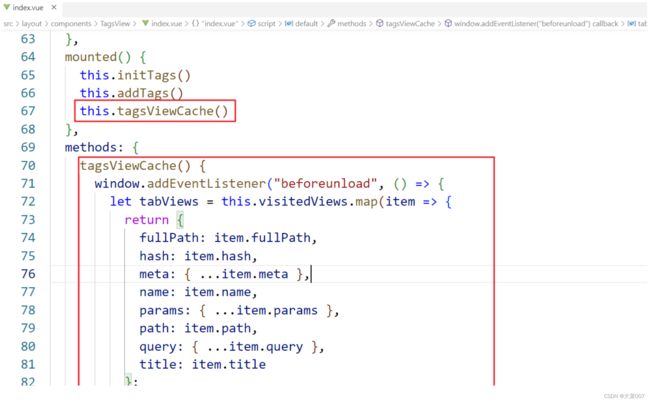
缓存已打开标签页
tagsViewCache() {
    window.addEventListener("beforeunload", () => {
        let tabViews = this.visitedViews.map(item => {
            return {
                fullPath: item.fullPath,
                hash: item.hash,
                meta: { ...item.meta },
                name: item.name,
                params: { ...item.params },
                path: item.path,
                query: { ...item.query },
                title: item.title
            };
        });
        sessionStorage.setItem("tabViews", JSON.stringify(tabViews));
    });
    let oldViews = JSON.parse(sessionStorage.getItem("tabViews")) || [];
    if (oldViews.length > 0) {
        this.$store.state.tagsView.visitedViews = oldViews;
    }
},
-
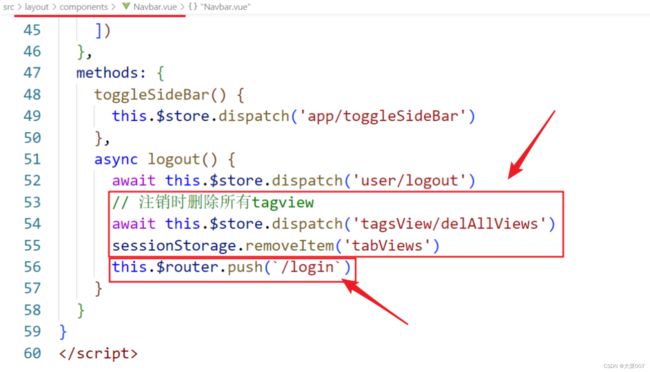
注销时删除所有tagview
// 注销时删除所有tagview
await this.$store.dispatch('tagsView/delAllViews')
sessionStorage.removeItem('tabViews')
二、Swagger整合
Swagger-UI可以动态地根据注解生成在线API文档。
常用注解
- @Api:用于修饰Controller类,生成Controller相关文档信息
- @ApiOperation:用于修饰Controller类中的方法,生成接口方法相关文档信息
- @ApiParam:用于修饰接口中的参数,生成接口参数相关文档信息
- @ApiModelProperty:用于修饰实体类的属性,当实体类是请求参数或返回结果时,直接生成相关文档信息
整合步骤:
-
添加依赖
<dependency> <groupId>io.springfoxgroupId> <artifactId>springfox-boot-starterartifactId> <version>3.0.0version> dependency> -
swagger配置类
@Configuration @EnableOpenApi @EnableWebMvc public class SwaggerConfig { @Bean public Docket api() { return new Docket(DocumentationType.OAS_30) .apiInfo(apiInfo()) .select() .apis(RequestHandlerSelectors.basePackage("com.lantu")) .paths(PathSelectors.any()) .build(); } private ApiInfo apiInfo() { return new ApiInfoBuilder() .title("神盾局特工管理系统接口文档") .description("全网最简单的SpringBoot+Vue前后端分离项目实战") .version("1.0") .contact(new Contact("qqcn", "http://www.qqcn.cn", "[email protected]")) .build(); } } -
控制器根据需要添加swagger注解
-
测试:http://localhost:9999/swagger-ui/index.html
三、Jwt整合
JSON Web Token (JWT)是一个开放标准(RFC 7519),它定义了一种紧凑的、自包含的方式,用于作为JSON对象在各方之间安全地传输信息。该信息可以被验证和信任,因为它是数字签名的。
jwt形式举例:
eyJhbGciOiJIUzI1NiJ9.eyJqdGkiOiI5MjAzOThjZi1hYThiLTQzNWUtOTIxYS1iNGQ3MDNmYmZiZGQiLCJzdWIiOiJ7XCJwaG9uZVwiOlwiMTIzNDIzNFwiLFwidXNlcm5hbWVcIjpcInpoYW5nc2FuXCJ9IiwiaXNzIjoic3lzdGVtIiwiaWF0IjoxNjc3MTE4Njc2LCJleHAiOjE2NzcxMjA0NzZ9.acc7H6-6ACqcgNu5waqain7th7zJciP-41z-qgWeaSY
⑴ 整合步骤
-
pom
<dependency> <groupId>io.jsonwebtokengroupId> <artifactId>jjwtartifactId> <version>0.9.1version> dependency> -
工具类
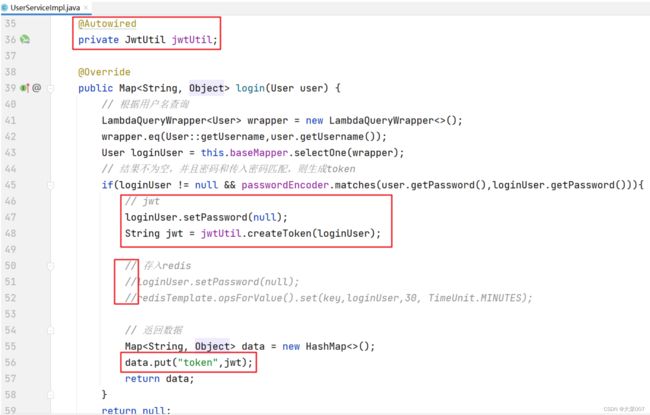
@Component public class JwtUtil { // 有效期 private static final long JWT_EXPIRE = 30*60*1000L; //半小时 // 令牌秘钥 private static final String JWT_KEY = "123456"; public String createToken(Object data){ // 当前时间 long currentTime = System.currentTimeMillis(); // 过期时间 long expTime = currentTime+JWT_EXPIRE; // 构建jwt JwtBuilder builder = Jwts.builder() .setId(UUID.randomUUID()+"") .setSubject(JSON.toJSONString(data)) .setIssuer("system") .setIssuedAt(new Date(currentTime)) .signWith(SignatureAlgorithm.HS256, encodeSecret(JWT_KEY)) .setExpiration(new Date(expTime)); return builder.compact(); } private SecretKey encodeSecret(String key){ byte[] encode = Base64.getEncoder().encode(key.getBytes()); SecretKeySpec aes = new SecretKeySpec(encode, 0, encode.length, "AES"); return aes; } public Claims parseToken(String token){ Claims body = Jwts.parser() .setSigningKey(encodeSecret(JWT_KEY)) .parseClaimsJws(token) .getBody(); return body; } public <T> T parseToken(String token,Class<T> clazz){ Claims body = Jwts.parser() .setSigningKey(encodeSecret(JWT_KEY)) .parseClaimsJws(token) .getBody(); return JSON.parseObject(body.getSubject(),clazz); } } -
测试工具类
-
修改登录逻辑
-
测试登录
问题思考:
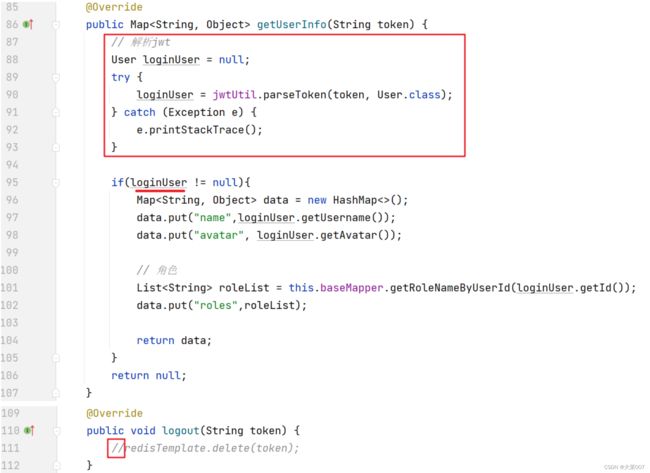
登录后续请求如何验证jwt ?
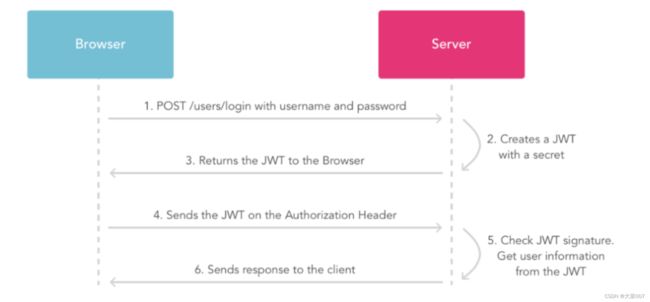
⑵ JWT验证拦截器
定义拦截器
@Component
@Slf4j
public class JwtValidateInterceptor implements HandlerInterceptor {
    @Autowired
    private JwtUtil jwtUtil;

    @Override
    public boolean preHandle(HttpServletRequest request, HttpServletResponse response, Object handler) throws Exception {
        String token = request.getHeader("X-Token");
        System.out.println(request.getRequestURI() +" 待验证:"+token);
        if(token != null){
            try {
                jwtUtil.parseToken(token);
                log.debug(request.getRequestURI() + " 放行...");
                return true;
            } catch (Exception e) {
                e.printStackTrace();
            }
        }
        log.debug(request.getRequestURI() + " 禁止访问...");
        response.setContentType("application/json;charset=utf-8");
        response.getWriter().write(JSON.toJSONString(Result.fail(20003,"jwt令牌无效,请重新登录")));
        return false;
    }
}
注册拦截器
@Configuration
public class MyWebConfig implements WebMvcConfigurer {
    @Autowired
    private JwtValidateInterceptor jwtValidateInterceptor;

    @Override
    public void addInterceptors(InterceptorRegistry registry) {
        InterceptorRegistration registration = registry.addInterceptor(jwtValidateInterceptor);
        registration.addPathPatterns("/**")
                .excludePathPatterns(
                        "/user/login",
                        "/user/info",
                        "/user/logout",
                        "/error",
                        "/swagger-ui/**",
                        "/swagger-resources/**",
                        "/v3/**");
    }
}
⑶ Swagger授权配置
@Configuration
@EnableOpenApi
@EnableWebMvc
public class SwaggerConfig {
    @Bean
    public Docket api() {
        return new Docket(DocumentationType.OAS_30)
                .apiInfo(apiInfo())
                .select()
                .apis(RequestHandlerSelectors.basePackage("com.lantu"))
                .paths(PathSelectors.any())
                .build()
                .securitySchemes(Collections.singletonList(securityScheme()))
                .securityContexts(Collections.singletonList(securityContext()));
    }

    private SecurityScheme securityScheme() {
        //return new ApiKey("Authorization", "Authorization", "header");
        return new ApiKey("X-Token", "X-Token", "header");
    }

    private SecurityContext securityContext() {
        return SecurityContext.builder()
                .securityReferences(defaultAuth())
                .forPaths(PathSelectors.regex("^(?!auth).*$"))
                .build();
    }

    private List<SecurityReference> defaultAuth() {
        AuthorizationScope authorizationScope = new AuthorizationScope("global", "accessEverything");
        AuthorizationScope[] authorizationScopes = new AuthorizationScope[1];
        authorizationScopes[0] = authorizationScope;
        return Collections.singletonList(
                new SecurityReference("X-Token", authorizationScopes));
    }

    private ApiInfo apiInfo() {
        return new ApiInfoBuilder()
                .title("神盾局特工管理系统接口文档")
                .description("全网最简单的SpringBoot+Vue前后端分离项目实战")
                .version("1.0")
                .contact(new Contact("老蔡", "https://space.bilibili.com/431588578", "[email protected]"))
                .build();
    }
}
四、角色管理
1. 基本功能
⑴ 预览效果

⑵ 前端
role.vue
查询
{{(searchModel.pageNo-1) * searchModel.pageSize + scope.$index + 1}}
roleManage.js
import request from '@/utils/request'

export default{
  // 分页查询角色列表
  getRoleList(searchModel){
    return request({
      url: '/role/list',
      method: 'get',
      params: {
        roleName: searchModel.roleName,
        pageNo: searchModel.pageNo,
        pageSize: searchModel.pageSize
      }
    });
  },
  // 新增
  addRole(role){
    return request({
      url: '/role',
      method: 'post',
      data: role
    });
  },
  // 修改
  updateRole(role){
    return request({
      url: '/role',
      method: 'put',
      data: role
    });
  },
  // 保存角色数据
  saveRole(role){
    if(role.roleId == null || role.roleId == undefined){
      return this.addRole(role);
    }
    return this.updateRole(role);
  },
  // 根据id查询
  getRoleById(id){
    return request({
      url: `/role/${id}`,
      method: 'get'
    });
  },
  // 根据id删除
  deleteRoleById(id){
    return request({
      url: `/role/${id}`,
      method: 'delete'
    });
  },

}
⑶ 后端
RoleController
@RestController
@RequestMapping("/role")
public class RoleController {

    @Autowired
    private IRoleService roleService;

    @GetMapping("/list")
    public Result<Map<String,Object>> getUserList(@RequestParam(value = "roleName",required = false) String roleName,
                                                  @RequestParam(value = "pageNo") Long pageNo,
                                                  @RequestParam(value = "pageSize") Long pageSize){
        LambdaQueryWrapper<Role> wrapper = new LambdaQueryWrapper<>();
        wrapper.eq(StringUtils.hasLength(roleName),Role::getRoleName,roleName);
        wrapper.orderByDesc(Role::getRoleId);

        Page<Role> page = new Page<>(pageNo,pageSize);
        roleService.page(page, wrapper);

        Map<String,Object> data = new HashMap<>();
        data.put("total",page.getTotal());
        data.put("rows",page.getRecords());

        return Result.success(data);

    }

    @PostMapping
    public Result<?> addRole(@RequestBody Role role){
        roleService.save(role);
        return Result.success("新增角色成功");
    }

    @PutMapping
    public Result<?> updateRole(@RequestBody Role role){
        roleService.updateById(role);
        return Result.success("修改角色成功");
    }

    @GetMapping("/{id}")
    public Result<Role> getRoleById(@PathVariable("id") Integer id){
        Role role = roleService.getById(id);
        return Result.success(role);
    }

    @DeleteMapping("/{id}")
    public Result<Role> deleteRoleById(@PathVariable("id") Integer id){
        roleService.removeById(id);
        return Result.success("删除角色成功");
    }

}
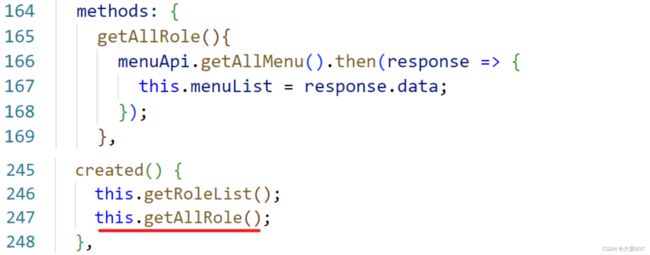
2. 角色权限设置显示
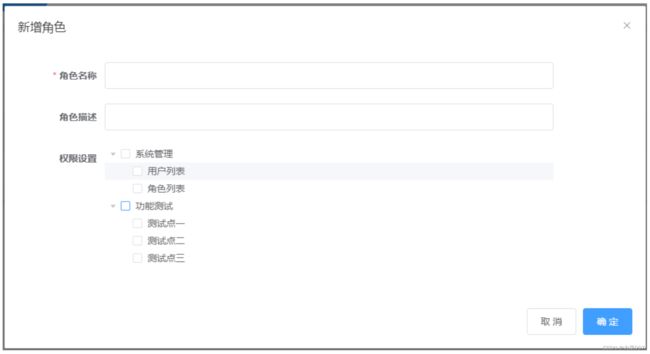
⑴ 前端
menuManage.js
import request from '@/utils/request'

export default{
  // 查询所有菜单数据
  getAllMenu(){
    return request({
      url: '/menu',
      method: 'get',
    });
  },
}
role.vue
<el-form-item
              prop="roleDesc"
              label="权限设置"
              :label-width="formLabelWidth"
              >
    <el-tree
             :data="menuList"
             :props="menuProps"
             node-key="menuId"
             show-checkbox
             style="width:85%"
             default-expand-all
             >el-tree>
el-form-item>

⑵ 数据库
x_menu表新增数据
delete from x_menu;
insert into `x_menu` (`menu_id`, `component`, `path`, `redirect`, `name`, `title`, `icon`, `parent_id`, `is_leaf`, `hidden`) values('1','Layout','/sys','/sys/user','sysManage','系统管理','userManage','0','N','0');
insert into `x_menu` (`menu_id`, `component`, `path`, `redirect`, `name`, `title`, `icon`, `parent_id`, `is_leaf`, `hidden`) values('2','sys/user','user',NULL,'userList','用户列表','user','1','Y','0');
insert into `x_menu` (`menu_id`, `component`, `path`, `redirect`, `name`, `title`, `icon`, `parent_id`, `is_leaf`, `hidden`) values('3','sys/role','role',NULL,'roleList','角色列表','roleManage','1','Y','0');
insert into `x_menu` (`menu_id`, `component`, `path`, `redirect`, `name`, `title`, `icon`, `parent_id`, `is_leaf`, `hidden`) values('4','Layout','/test','/test/test1','test','功能测试','form','0','N','0');
insert into `x_menu` (`menu_id`, `component`, `path`, `redirect`, `name`, `title`, `icon`, `parent_id`, `is_leaf`, `hidden`) values('5','test/test1','test1','','test1','测试点一','form','4','Y','0');
insert into `x_menu` (`menu_id`, `component`, `path`, `redirect`, `name`, `title`, `icon`, `parent_id`, `is_leaf`, `hidden`) values('6','test/test2','test2','','test2','测试点二','form','4','Y','0');
insert into `x_menu` (`menu_id`, `component`, `path`, `redirect`, `name`, `title`, `icon`, `parent_id`, `is_leaf`, `hidden`) values('7','test/test3','test3','','test3','测试点三','form','4','Y','0');
⑶ 后端
Menu类中新增
@TableField(exist = false)
@JsonInclude(JsonInclude.Include.NON_EMPTY)
private List<Menu> children;

@TableField(exist = false)
private Map<String,Object> meta = new HashMap<>();
public Map<String,Object> getMeta(){
    meta.put("title",this.title);
    meta.put("icon",this.icon);
    return this.meta;
}
MenuController
@RestController
@RequestMapping("/menu")
public class MenuController {
    @Autowired
    private IMenuService menuService;

    @GetMapping
    public Result<?> getAllMenu(){
        List<Menu> menuList =  menuService.getAllMenu();
        return Result.success(menuList);
    }

}
MenuSeviceImpl
@Override
public List<Menu> getAllMenu() {
    // 一级菜单
    LambdaQueryWrapper<Menu> wrapper = new LambdaQueryWrapper();
    wrapper.eq(Menu::getParentId,0);
    List<Menu> menuList = this.list(wrapper);
    // 子菜单
    setMenuChildren(menuList);
    return menuList;
}

private void setMenuChildren(List<Menu> menuList) {
    if(menuList != null) {
        for (Menu menu:menuList) {
            LambdaQueryWrapper<Menu> subWrapper = new LambdaQueryWrapper();
            subWrapper.eq(Menu::getParentId, menu.getMenuId());
            List<Menu> subMenuList = this.list(subWrapper);
            menu.setChildren(subMenuList);
            // 递归
            setMenuChildren(subMenuList);
        }
    }
}
3. 角色权限新增提交
⑴ 前端
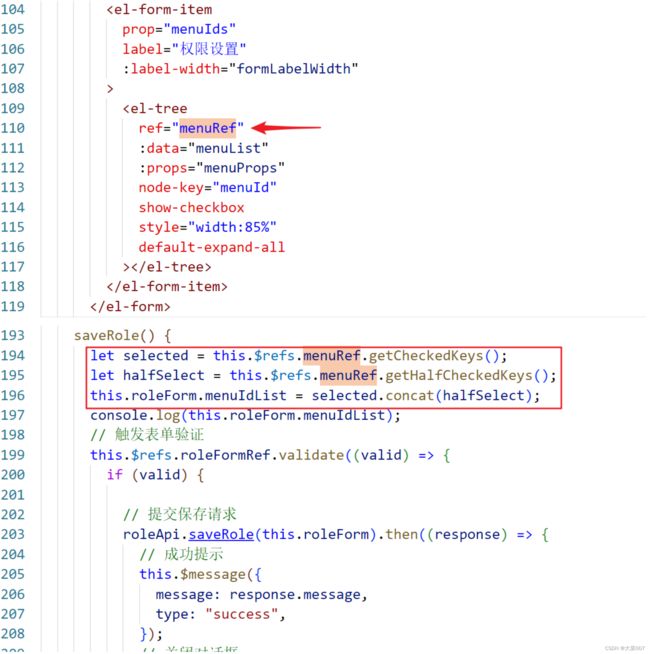
⑵ 后端

4. 角色权限回显
⑴ 前端

⑵ 后端
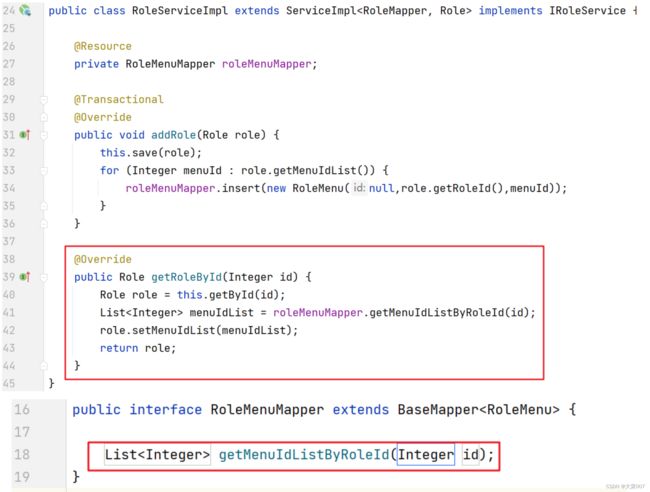
RoleMenuMapper.xml
DOCTYPE mapper PUBLIC "-//mybatis.org//DTD Mapper 3.0//EN" "http://mybatis.org/dtd/mybatis-3-mapper.dtd">
<mapper namespace="com.lantu.sys.mapper.RoleMenuMapper">
    <select id="getMenuIdListByRoleId" parameterType="Integer" resultType="Integer">
        select
            a.`menu_id`
        from x_role_menu a, x_menu b
        where a.`menu_id` = b.`menu_id`
          and b.`is_leaf` = 'Y'
          and a.`role_id` = #{roleId}
    select>
mapper>
5. 角色权限修改提交
⑴ 后端
RoleServiceImpl新增
@Override
@Transactional
public void updateRole(Role role) {
    // 更新role表
    this.updateById(role);
    // 清除原有权限
    LambdaQueryWrapper<RoleMenu> wrapper = new LambdaQueryWrapper<>();
    wrapper.eq(RoleMenu::getRoleId,role.getRoleId());
    roleMenuMapper.delete(wrapper);
    //新增权限
    for (Integer menuId : role.getMenuIdList()) {
        roleMenuMapper.insert(new RoleMenu(null,role.getRoleId(),menuId));
    }
}
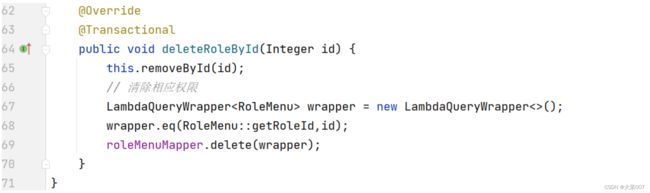
6. 角色删除时删相关权限
⑴ 后端
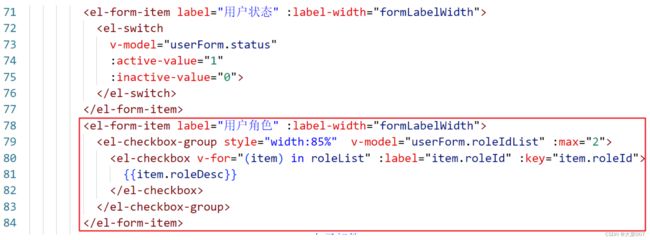
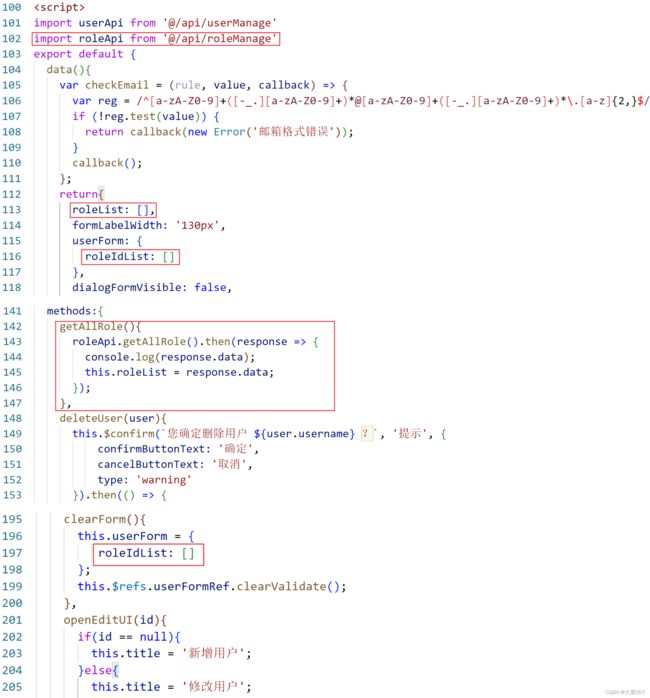
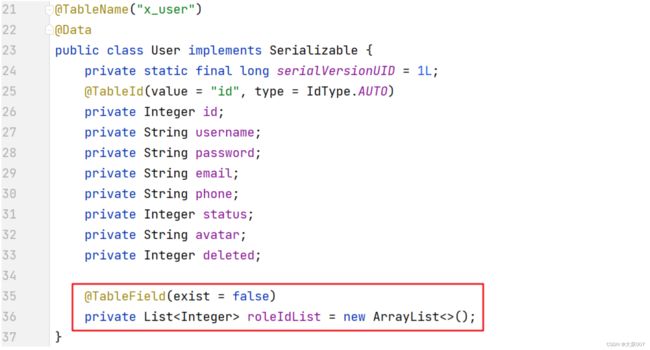
五、用户角色设置
1. 角色展示
⑴ 前端
roleManage.js
// 查询所有角色列表
getAllRole(){
    return request({
        url: '/role/all',
        method: 'get'
    });
},
user.vue
⑵ 后端
RoleController

2. 新增用户时提交角色
⑴ 后端
UserServiceImpl

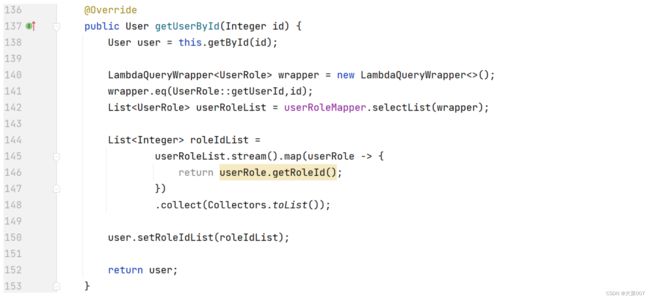
3. 角色回显
⑴ 后端
UserServiceImpl
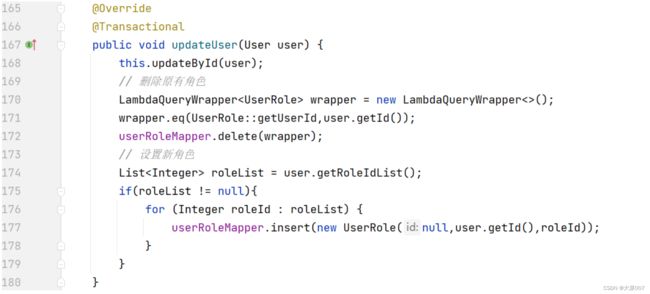
4. 修改用户时提交角色
⑴ 后端
UserServiceImpl
5. 用户删除时删相关角色
⑴ 后端
UserServiceImpl

六、动态路由
1. 根据用户查询菜单
⑴ 后端
MenuMapper.xml
<select id="getMenuListByUserId" resultType="Menu">
    SELECT *
    FROM x_menu a,
    x_role_menu b,
    x_user_role c
    WHERE a.`menu_id` = b.`menu_id`
    AND b.`role_id` = c.`role_id`
    AND a.`parent_id` = #{pid}
    AND c.`user_id` = #{userId}
select>
yml
type-aliases-package: com.lantu.*.entity
MenuMapper.java
public interface MenuMapper extends BaseMapper<Menu> {
    public List<Menu> getMenuListByUserId(@Param("userId") Integer userId,
                                          @Param("pid") Integer pid);
}
MenuServiceImpl
@Override
    public List<Menu> getMenuListByUserId(Integer userId) {
        // 一级菜单
        List<Menu> menuList = this.getBaseMapper().getMenuListByUserId(userId, 0);
        // 子菜单
        setMenuChildrenByUserId(userId, menuList);
        return menuList;
    }

    private void setMenuChildrenByUserId(Integer userId, List<Menu> menuList) {
        if (menuList != null) {
            for (Menu menu : menuList) {
                List<Menu> subMenuList = this.getBaseMapper().getMenuListByUserId(userId, menu.getMenuId());
                menu.setChildren(subMenuList);
                // 递归
                setMenuChildrenByUserId(userId,subMenuList);
            }
        }
    }
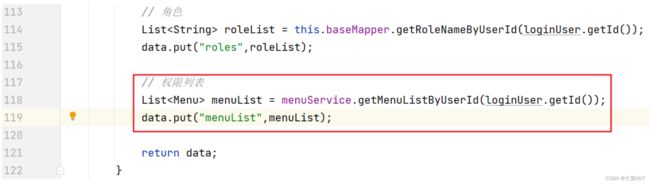
通过user/info接口返回数据
UserServiceImpl
2. 前端动态路由处理
⑴ 修改原路由配置
src\router\index.js,保留基础路由,其它的删掉或注释
export const constantRoutes = [
  {
    path: '/login',
    component: () => import('@/views/login/index'),
    hidden: true
  },
  {
    path: '/404',
    component: () => import('@/views/404'),
    hidden: true
  },
  {
    path: '/',
    component: Layout,
    redirect: '/dashboard',
    children: [{
      path: 'dashboard',
      name: 'Dashboard',
      component: () => import('@/views/dashboard/index'),
      meta: { title: '首页', icon: 'dashboard', affix:true ,noCache: false}
    }]
  },
]
⑵ 获取菜单数据并保存至Vuex
src\store\modules\user.js
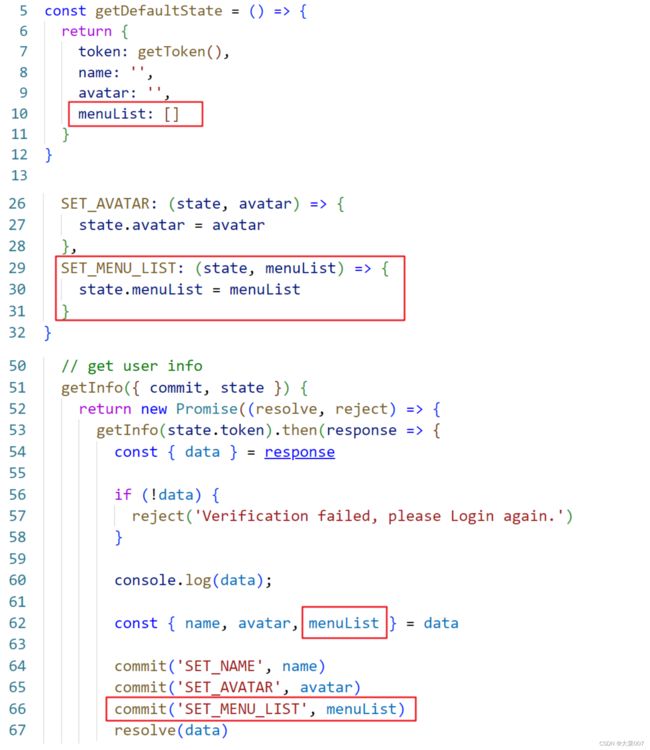
src\store\getters.js

⑶ 路由转换
修改src目录下的permission.js
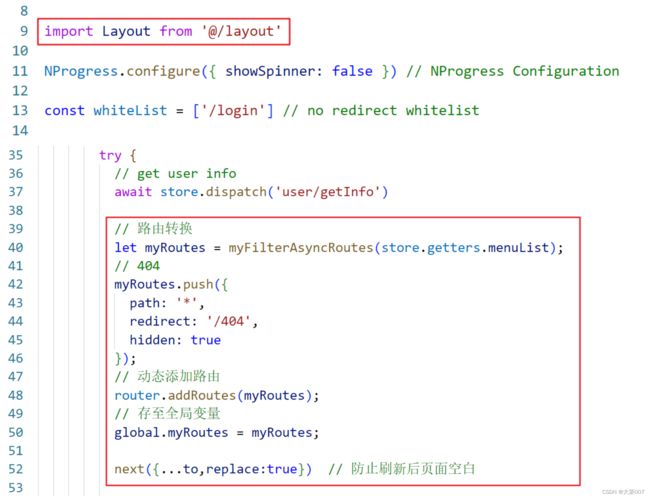

import Layout from '@/layout'
// 路由转换
let myRoutes = myFilterAsyncRoutes(store.getters.menuList);
// 404
myRoutes.push({
    path: '*',
    redirect: '/404',
    hidden: true
});
// 动态添加路由
router.addRoutes(myRoutes);
// 存至全局变量
global.myRoutes = myRoutes;

next({...to,replace:true})  // 防止刷新后页面空白
function myFilterAsyncRoutes(menuList) {
  menuList.filter(menu => {
    if (menu.component === 'Layout') {
      menu.component = Layout
      console.log(menu.component);
    } else {
      menu.component = require(`@/views/${menu.component}.vue`).default
    }
    // 递归处理子菜单
    if (menu.children && menu.children.length) {
      menu.children = myFilterAsyncRoutes(menu.children)
    }
    return true
  })
  return menuList;
}
⑷ 路由合并
src\layout\components\Sidebar\index.vue

测试预期结果,不同角色的用户登录后展示的菜单列表不一样。
至此,虽然实现动态菜单功能,但并没有解决安全问题,大家可以思考存在什么问题?