微服务架构学习-进阶篇--08,分布式配置中心(上)
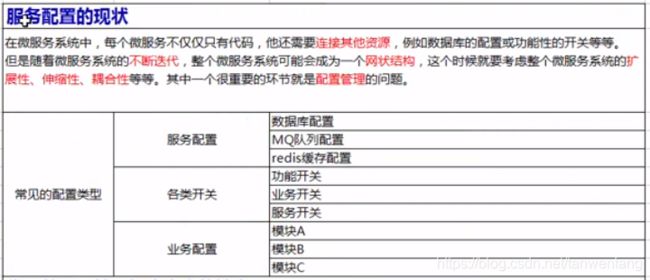
第一节,为什么需要配置中心?它解决了什么问题?
第二节,编写配置中心的服务端
(1)在e-book模块下新建子模块config,在config模块下新建maven项目,命名为config-server。
(2)修改配置文件,加入如下依赖:
	org.springframework.boot
	spring-boot-starter-web


	org.springframework.cloud
	spring-cloud-config-server
(3)修改配置文件。
spring.application.name=config-server
server.port=8121

eureka.client.serviceUrl.defaultZone=http://user:123456@eureka1:8761/eureka/,http://user:123456@eureka2:8762/eureka/

spring.cloud.config.label=master
spring.cloud.config.server.git.uri=https://github.com/tanwenfang/GitRepository.git
spring.cloud.config.server.git.search-paths=config
(4)添加启动类。
package com.twf.config.server;

import org.springframework.boot.SpringApplication;
import org.springframework.boot.autoconfigure.SpringBootApplication;
import org.springframework.cloud.config.server.EnableConfigServer;
import org.springframework.cloud.netflix.eureka.EnableEurekaClient;

@SpringBootApplication
@EnableConfigServer
@EnableEurekaClient
public class ConfigServerApplication {

	public static void main(String[] args) {
		SpringApplication.run(ConfigServerApplication.class, args);
	}
}
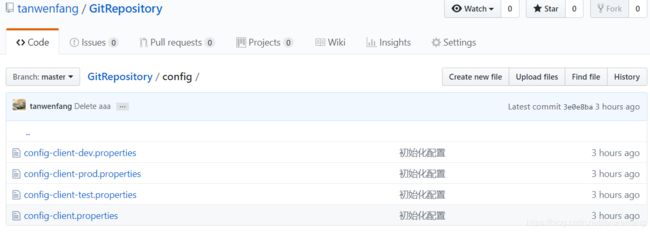
(5)在GitHub上新建4个配置文件,目录如下:https://github.com/tanwenfang/GitRepository/tree/master/config,
文件如下:

里面随便写点啥。
(6)然后浏览器访问http://localhost:8121/config-client/dev,界面如下:

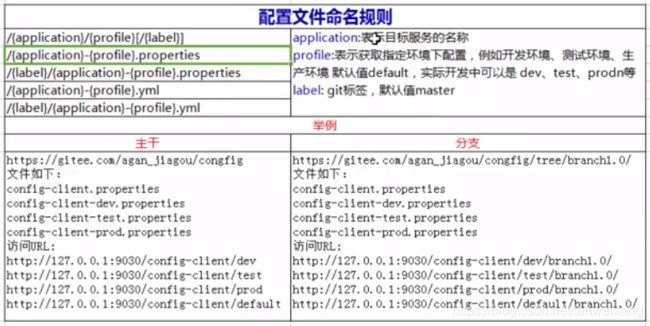
(7)配置文件命名规则。

我们上面用的是第二种。
第三节,编写配置中心的客户端
(1)在config模块下新建maven项目,命名为config-client。
(2)修改pom文件,添加依赖:
	org.springframework.boot
	spring-boot-starter-web


	org.springframework.cloud
	spring-cloud-starter-config
(3)添加配置文件,命名为bootstrap.properties(一定要命名为bootstrap,否则会报错,因为bootstrap会在application之前被加载),添加如下配置:
spring.application.name=config-client
server.port=8122

eureka.client.serviceUrl.defaultZone=http://user:123456@eureka1:8761/eureka/,http://user:123456@eureka2:8762/eureka/


#默认false,这里设置true,表示开启读取配置中心的配置
spring.cloud.config.discovery.enabled=true
#对应eureka中的配置中心serviceId,默认是configserver
spring.cloud.config.discovery.serviceId=config-server
#指定环境
spring.cloud.config.profile=dev
#git标签
spring.cloud.config.label=master
(4)添加启动类。
package com.twf.config.client;

import org.springframework.boot.SpringApplication;
import org.springframework.boot.autoconfigure.SpringBootApplication;
import org.springframework.cloud.netflix.eureka.EnableEurekaClient;

@SpringBootApplication
@EnableEurekaClient
public class ConfigClientApplication {

	public static void main(String[] args) {
		SpringApplication.run(ConfigClientApplication.class, args);
	}
}
(5)添加一个测试类,用于获取配置中心中的配置。
package com.twf.config.client.controller;

import org.springframework.beans.factory.annotation.Value;
import org.springframework.web.bind.annotation.RequestMapping;
import org.springframework.web.bind.annotation.RestController;

@RestController
public class TestController {

	@Value("${book.config}")
	private String msg;

	@RequestMapping("/test")
	public String test() {
		return this.msg;
	}
}
(6)启动config-server和该项目,浏览器访问http://localhost:8122/test,结果如下:

这个配置就是配置中心里面的配置文件config-client-dev.properties中的配置内容。
第四节,配置中心的原理讲解

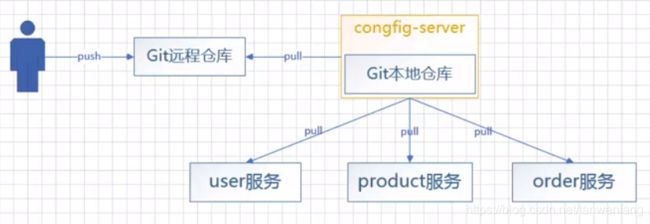
我们在git上将config-client-dev.properties的内容改为“book.config=dev1.1“,然后启动config-server,再启动config-client。浏览器访问http://localhost:8122/test,浏览器显示“dev1.1”,后台打印如下:

可见重启之后,远程仓库的配置修改已经同步到本地仓库,我们查看本地仓库C:\Users\twf\AppData\Local\Temp\config-repo-538154066878725364\config,打开config-client-dev.properties,内容也是“book.config=dev1.1”
第五节,在git端修改配置后,如何让客户端生效
上面例子为了使配置文件生效,是重新启动了服务的。那么如何在不重启服务的情况下更新配置信息呢?
(1)在config模块下新建maven项目,命名为config-client-refresh,拷贝config-client的文件和代码到该新建项目。
(2)修改pom文件:
	org.springframework.boot
	spring-boot-starter-web


	org.springframework.cloud
	spring-cloud-starter-config


	org.springframework.boot
	spring-boot-starter-actuator
(3)修改配置文件。
spring.application.name=config-client
server.port=8123

eureka.client.serviceUrl.defaultZone=http://user:123456@eureka1:8761/eureka/,http://user:123456@eureka2:8762/eureka/


#默认false,这里设置true,表示开启读取配置中心的配置
spring.cloud.config.discovery.enabled=true
#对应eureka中的配置中心serviceId,默认是configserver
spring.cloud.config.discovery.serviceId=config-server
#指定环境
spring.cloud.config.profile=dev
#git标签
spring.cloud.config.label=master


#springboot 默认开启了权限拦截会导致 /refresh出现401,拒绝访问
management.security.enabled=false
(4)修改测试类。
package com.twf.config.client.refresh.controller;

import org.springframework.beans.factory.annotation.Value;
import org.springframework.cloud.context.config.annotation.RefreshScope;
import org.springframework.web.bind.annotation.RequestMapping;
import org.springframework.web.bind.annotation.RestController;

@RestController
@RefreshScope  // 局部刷新
public class TestController {

	@Value("${book.config}")
	private String msg;

	@RequestMapping("/test")
	public String test() {
		return this.msg;
	}
}
(5)在e-book模块下新建maven项目,命名为commons。
(6)修改pom文件,添加依赖。
	org.apache.httpcomponents
	httpclient
	4.5.4


	commons-logging
	commons-logging
	1.2
(7)拷贝一个发请求的http工具类,如下:
package com.twf.commons;
import java.io.IOException;
import java.net.URI;
import java.util.ArrayList;
import java.util.List;
import java.util.Map;


import org.apache.http.NameValuePair;
import org.apache.http.client.entity.UrlEncodedFormEntity;
import org.apache.http.client.methods.CloseableHttpResponse;
import org.apache.http.client.methods.HttpGet;
import org.apache.http.client.methods.HttpPost;
import org.apache.http.client.utils.URIBuilder;
import org.apache.http.entity.ContentType;
import org.apache.http.entity.StringEntity;
import org.apache.http.impl.client.CloseableHttpClient;
import org.apache.http.impl.client.HttpClients;
import org.apache.http.message.BasicNameValuePair;
import org.apache.http.util.EntityUtils;

public class HttpClientUtil {

	public static void main(String[] args) {
		String url="http://127.0.0.1:8123/refresh";   // 重点在这里

		String html=HttpClientUtil.doPost(url);
		System.out.println(html);
	}

    public static String doGet(String url, Map param) {

        // 创建Httpclient对象
        CloseableHttpClient httpclient = HttpClients.createDefault();

        String resultString = "";
        CloseableHttpResponse response = null;
        try {
            // 创建uri
            URIBuilder builder = new URIBuilder(url);
            if (param != null) {
                for (String key : param.keySet()) {
                    builder.addParameter(key, param.get(key));
                }
            }
            URI uri = builder.build();

            // 创建http GET请求
            HttpGet httpGet = new HttpGet(uri);

            // 执行请求
            response = httpclient.execute(httpGet);
            // 判断返回状态是否为200
            if (response.getStatusLine().getStatusCode() == 200) {
                resultString = EntityUtils.toString(response.getEntity(), "UTF-8");
            }
        } catch (Exception e) {
            e.printStackTrace();
        } finally {
            try {
                if (response != null) {
                    response.close();
                }
                httpclient.close();
            } catch (IOException e) {
                e.printStackTrace();
            }
        }
        return resultString;
    }

    public static String doGet(String url) {
        return doGet(url, null);
    }

    public static String doPost(String url, Map param) {
        // 创建Httpclient对象
        CloseableHttpClient httpClient = HttpClients.createDefault();
        CloseableHttpResponse response = null;
        String resultString = "";
        try {
            // 创建Http Post请求
            HttpPost httpPost = new HttpPost(url);
            // 创建参数列表
            if (param != null) {
                List paramList = new ArrayList<>();
                for (String key : param.keySet()) {
                    paramList.add(new BasicNameValuePair(key, param.get(key)));
                }
                // 模拟表单
                UrlEncodedFormEntity entity = new UrlEncodedFormEntity(paramList,"utf-8");
                httpPost.setEntity(entity);
            }
            // 执行http请求
            response = httpClient.execute(httpPost);
            resultString = EntityUtils.toString(response.getEntity(), "utf-8");
        } catch (Exception e) {
            e.printStackTrace();
        } finally {
            try {
                response.close();
            } catch (IOException e) {
                // TODO Auto-generated catch block
                e.printStackTrace();
            }
        }

        return resultString;
    }

    public static String doPost(String url) {
        return doPost(url, null);
    }

    public static String doPostJson(String url, String json) {
        // 创建Httpclient对象
        CloseableHttpClient httpClient = HttpClients.createDefault();
        CloseableHttpResponse response = null;
        String resultString = "";
        try {
            // 创建Http Post请求
            HttpPost httpPost = new HttpPost(url);
            // 创建请求内容
            StringEntity entity = new StringEntity(json, ContentType.APPLICATION_JSON);
            httpPost.setEntity(entity);
            // 执行http请求
            response = httpClient.execute(httpPost);
            resultString = EntityUtils.toString(response.getEntity(), "utf-8");
        } catch (Exception e) {
            e.printStackTrace();
        } finally {
            try {
                response.close();
            } catch (IOException e) {
                // TODO Auto-generated catch block
                e.printStackTrace();
            }
        }

        return resultString;
    }
}
(8)重启config-server,config-client-refresh。
(9)浏览器访问http://localhost:8123/test,此时显示的是“dev4.0”,我们在git上,将其改为“dev5.0”,再访问,现在还是“dev4.0”,我们执行HttpClientUtil这个工具类,成功之后,再刷新http://localhost:8123/test,发现已经返回“dev5.0”了。此时,我们达到了在不重启服务的情况下更新配置信息的目的。
(10)源码点这里。


