cobbler自动化安装CentOS、windows和ubuntu
环境介绍
同时玩cobbler3.3和cobbler2.8.5
cobbler3.3
系统CentOS8.3
VMware虚拟机
桥接到物理网络
IP: 192.168.1.33
cobbler2.8.5
系统CentOS7.9
VMWare虚拟机
桥接到物理网络
IP:192.168.1.33
安装cobbler3.3
yum源修改
cat /etc/yum.repo.d/Centos8.repo

[base]
name=CentOS-$releasever - Base - mirrors.aliyun.com
baseurl=http://mirrors.aliyun.com/centos/$releasever/BaseOS/$basearch/os/
        http://mirrors.aliyuncs.com/centos/$releasever/BaseOS/$basearch/os/
        http://mirrors.cloud.aliyuncs.com/centos/$releasever/BaseOS/$basearch/os/
gpgcheck=1
gpgkey=http://mirrors.aliyun.com/centos/RPM-GPG-KEY-CentOS-Official

[extras]
name=CentOS-$releasever - Extras - mirrors.aliyun.com
baseurl=http://mirrors.aliyun.com/centos/$releasever/extras/$basearch/os/
        http://mirrors.aliyuncs.com/centos/$releasever/extras/$basearch/os/
        http://mirrors.cloud.aliyuncs.com/centos/$releasever/extras/$basearch/os/
gpgcheck=1
gpgkey=http://mirrors.aliyun.com/centos/RPM-GPG-KEY-CentOS-Official

[centosplus]
name=CentOS-$releasever - Plus - mirrors.aliyun.com
baseurl=http://mirrors.aliyun.com/centos/$releasever/centosplus/$basearch/os/
        http://mirrors.aliyuncs.com/centos/$releasever/centosplus/$basearch/os/
        http://mirrors.cloud.aliyuncs.com/centos/$releasever/centosplus/$basearch/os/
gpgcheck=1
enabled=0
gpgkey=http://mirrors.aliyun.com/centos/RPM-GPG-KEY-CentOS-Official

[PowerTools]
name=CentOS-$releasever - PowerTools - mirrors.aliyun.com
baseurl=http://mirrors.aliyun.com/centos/$releasever/PowerTools/$basearch/os/
        http://mirrors.aliyuncs.com/centos/$releasever/PowerTools/$basearch/os/
        http://mirrors.cloud.aliyuncs.com/centos/$releasever/PowerTools/$basearch/os/
gpgcheck=1
enabled=0
gpgkey=http://mirrors.aliyun.com/centos/RPM-GPG-KEY-CentOS-Official

[AppStream]
name=CentOS-$releasever - AppStream - mirrors.aliyun.com
baseurl=http://mirrors.aliyun.com/centos/$releasever/AppStream/$basearch/os/
        http://mirrors.aliyuncs.com/centos/$releasever/AppStream/$basearch/os/
        http://mirrors.cloud.aliyuncs.com/centos/$releasever/AppStream/$basearch/os/
gpgcheck=1
gpgkey=http://mirrors.aliyun.com/centos/RPM-GPG-KEY-CentOS-Official


yum clean all
yum makecache
防火墙
systemctl disable --now firewalld

setenforce 0
sed -i 's/SELINUX=enforcing/SELINUX=disabled/g' /etc/selinux/config
安装cobbler
yum -y install epel-release rsync rsync-daemon

# rocky9.1上不用执行此三行
yum module list | grep cobbler
dnf module enable cobbler:3 -y
yum list all | grep cobbler

yum -y install httpd dhcp-server tftp tftp-server cobbler cobbler-web pykickstart
安装cobbler2.8.5
yum源
wget -O /etc/yum.repos.d/CentOS-Base.repo https://mirrors.aliyun.com/repo/Centos-7.repo
wget -O /etc/yum.repos.d/epel.repo http://mirrors.aliyun.com/repo/epel-7.repo
防火墙
systemctl disable --now firewalld

setenforce 0
sed -i 's/SELINUX=enforcing/SELINUX=disabled/g' /etc/selinux/config
安装cobbler
yum install -y dhcp cobbler cobbler-web debmirror pykickstart syslinux
cobbler 配置
cobbler3.3和cobbler2.8.5大同小异
systemctl enable --now httpd
systemctl enable --now cobblerd
systemctl enable --now rsyncd
systemctl enable --now tftp
配置cobbler
sed -i 's/^server: 127.0.0.1/server: 192.168.1.33/' /etc/cobbler/settings.yaml
sed -i "s/next_server: 127.0.0.1/next_server: 192.168.1.33/" /etc/cobbler/settings.yaml
sed -i "s#manage_dhcp: false#manage_dhcp: true#" /etc/cobbler/settings.yaml

# 检查配置问题
cobbler check

# 解决 reposync is not installed, install yum-utils or dnf-plugins-core
# 解决 yumdownloader is not installed, install yum-utils or dnf-plugins-core
yum -y install yum-utils

# 解决 some network boot-loaders are missing from /var/lib/cobbler/loaders
yum -y install syslinux*
cp /usr/share/syslinux/pxelinux.0 /var/lib/cobbler/loaders/
cp /usr/share/syslinux/menu.c32 /var/lib/cobbler/loaders/
ls /var/lib/cobbler/loaders/
配置dhcp
[root@localhost ~]# cat /etc/cobbler/dhcp.template

ddns-update-style interim;

allow booting;
allow bootp;

ignore client-updates;
set vendorclass = option vendor-class-identifier;

option system-arch code 93 = unsigned integer 16;

subnet 192.168.0.0 netmask 255.255.0.0 {
     option routers             192.168.1.1;
     option domain-name-servers 192.168.1.33;
     option subnet-mask         255.255.0.0;
     range dynamic-bootp        192.168.32.100 192.168.32.254;
     default-lease-time         21600;
     max-lease-time             43200;
     next-server                $next_server;


# systemctl restart httpd cobblerd
cobbler sync
安装CentOS8
导入
mkdir /centos8
mount -o loop,ro CentOS-Stream-8-20230710.0-x86_64-dvd1.iso /centos8

cobbler import --path=/centos8 --name=MyC8 --arch=x86_64
cobbler list
cobbler distro report --name MyC8-x86_64

# 删除
cobbler profile remove --name MyC8-x86_64
cobbler distro remove --name MyC8-x86_64
创建kickstarts自动安装脚本
# 生成密码
openssl passwd -1 'root'

# cobbler profile get-autoinstall --name MyC8-x86_64 > /var/lib/cobbler/templates/centos8.ks # 适用cobbler3
# cobbler profile getks --name centos7-x86_64 > /var/lib/cobbler/kickstarts/centos7.ks # 适用cobbler2.8.5

# 检查ks文件语法
cobbler validate-autoinstalls

# 配置绑定ks
# cobbler profile edit --name MyC8-x86_64 --autoinstall centos8.ks # 适用cobbler3

# 配置修改内核参数,以统一网卡名称
cobbler profile edit --name MyC8-x86_64 --kernel-options='net.ifnames=0 biosdevname=0'

# 打印
cobbler profile report --name MyC8-x86_64

# 同步
cobbler sync

systemctl restart httpd cobblerd rsyncd dhcpd
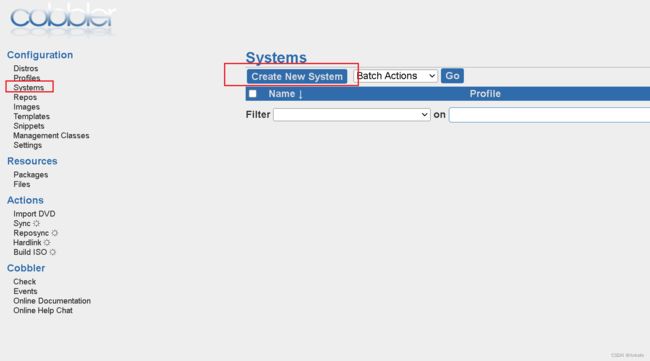
定制安装
使用https访问到cobbler的网页 https://192.168.1.33/cobbler_web/
账号密码都为cobbler
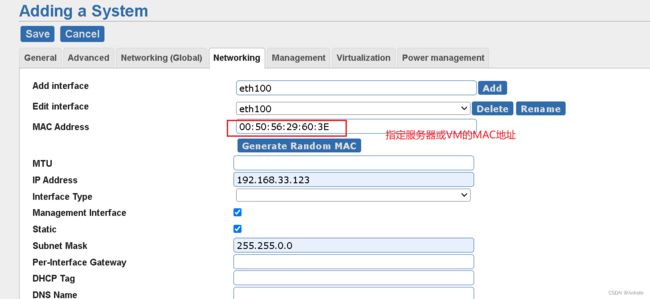
创建系统
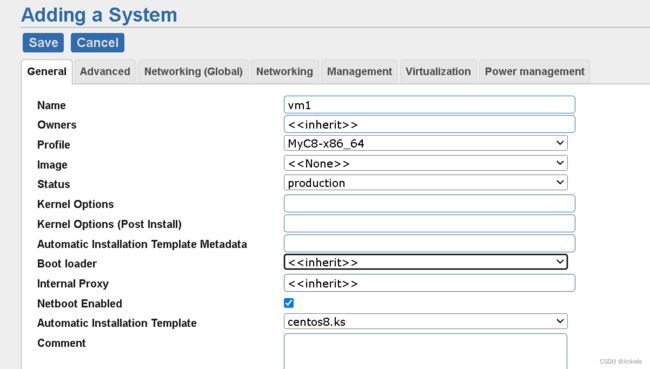

执行cobbler sync
然后便可以开启VMware虚拟机,玩一玩PXE启动虚拟机了
安装ubuntu20.04.6
以下均在cobbler2.8.5上操作
目前仅成功ubuntu-18.04.5-server-amd64.iso
安装依赖软件
yum -y install debmirror
配置debmirror
sed -i 's/@dists="sid";/#@dists="sid";/g' /etc/debmirror.conf
sed -i 's/@arches="i386";/#@arches="i386";/g' /etc/debmirror.conf
需要注意的是,如果你使用的是 cobbler,那你应该使用 ubuntu-20.04-legacy-server-amd64.iso,而不是 live-server(应该是缺少netboot),Ubuntu 20.04 已没有 server
配置ubuntu18045.seed
# ankele comment out 1 from csdn
# cd /var/lib/cobbler/kickstart/sample.seed
# Mostly based on the Ubuntu installation guide
# https://help.ubuntu.com/18.04/installation-guide/
# Debian sample
# https://www.debian.org/releases/stable/example-preseed.txt

# Preseeding only locale sets language, country and locale.
d-i debian-installer/locale string en_US.UTF-8

# Keyboard selection.
# Disable automatic (interactive) keymap detection.
d-i console-setup/ask_detect boolean false
d-i keyboard-configuration/xkb-keymap select us
d-i keyboard-configuration/toggle select No toggling
d-i keyboard-configuration/layoutcode string us
d-i keyboard-configuration/variantcode string

# netcfg will choose an interface that has link if possible. This makes it
# skip displaying a list if there is more than one interface.
#set $myhostname = $getVar('hostname',$getVar('name','cobbler')).replace("_","-")
#d-i netcfg/choose_interface select auto
#d-i netcfg/choose_interface select ens33
#d-i netcfg/get_hostname string helmsman
#d-i netcfg/choose_interface select auto
#d-i netcfg/dhcp_failed note
#d-i netcfg/dhcp_options select Do not configure the network at this time
#d-i netcfg/get_hostname string keqi-server
#d-i netcfg/get_domain string keqi-server
# ankele comment out 1 from csdn
# d-i netcfg/enable boolea false

# If non-free firmware is needed for the network or other hardware, you can
# configure the installer to always try to load it, without prompting. Or
# change to false to disable asking.
# d-i hw-detect/load_firmware boolean true

# NTP/Time Setup
d-i time/zone string Asia/Shanghai
d-i clock-setup/ntp-server string ntp1.aliyun.com
d-i clock-setup/utc boolean true
d-i clock-setup/ntp boolean true


# Setup the installation source
d-i mirror/country string manual
d-i mirror/http/hostname string $http_server
d-i mirror/http/directory string $install_source_directory
d-i mirror/http/proxy string

#set $os_v = $getVar('os_version','')
#if $breed == "ubuntu" and $os_v and $os_v.lower() != 'precise'
# Required at least for ubuntu 12.10+ , so test os_v is not precise. Olders versions are not supported anymore
d-i live-installer/net-image string http://$http_server/cobbler/links/$distro_name/install/filesystem.squashfs
#end if

# Suite to install.
# d-i mirror/suite string precise
# d-i mirror/udeb/suite string precise

# Components to use for loading installer components (optional).
#d-i mirror/udeb/components multiselect main, restricted

# Disk Partitioning
# Use LVM, and wipe out anything that already exists


d-i partman-auto/disk string /dev/sda
d-i partman-auto/choose_recipe select atomic
d-i partman-auto/method string lvm
d-i partman-auto-lvm/guided_size string 100%
d-i partman-lvm/confirm boolean true
d-i partman-lvm/confirm_nooverwrite boolean true
d-i partman-lvm/device_remove_lvm boolean true
d-i partman-md/device_remove_md boolean true
d-i partman-partitioning/confirm_write_new_label boolean true
d-i partman/choose_partition select finish
d-i partman/confirm boolean true
d-i partman/confirm_nooverwrite boolean true
d-i partman/default_filesystem string ext4
d-i partman/mount_style select uuid
# You can choose one of the three predefined partitioning recipes:
# - atomic: all files in one partition
# - home:   separate /home partition
# - multi:  separate /home, /usr, /var, and /tmp partitions
d-i partman-auto/choose_recipe select atomic

# If you just want to change the default filesystem from ext3 to something
# else, you can do that without providing a full recipe.
# d-i partman/default_filesystem string ext4

# root account and password
d-i passwd/root-login boolean true
d-i passwd/root-password-crypted password $1$L2xUdTaN$J5OHlZxtjUmbA6HzD.4Iq/

# skip creation of a normal user account.
d-i passwd/make-user boolean false

# You can choose to install restricted and universe software, or to install
# software from the backports repository.
d-i apt-setup/restricted boolean true
d-i apt-setup/universe boolean true
d-i apt-setup/backports boolean true

# Uncomment this if you don't want to use a network mirror.
# d-i apt-setup/use_mirror boolean false

# Select which update services to use; define the mirrors to be used.
# Values shown below are the normal defaults.
d-i apt-setup/services-select multiselect security
d-i apt-setup/security_host string mirrors.aliyun.com
d-i apt-setup/security_path string /ubuntu

$SNIPPET('preseed_apt_repo_config')

# Enable deb-src lines
# d-i apt-setup/local0/source boolean true

# URL to the public key of the local repository; you must provide a key or
# apt will complain about the unauthenticated repository and so the
# sources.list line will be left commented out
# d-i apt-setup/local0/key string http://local.server/key

# By default the installer requires that repositories be authenticated
# using a known gpg key. This setting can be used to disable that
# authentication. Warning: Insecure, not recommended.
# d-i debian-installer/allow_unauthenticated boolean true

# Package selection
# Default for minimal
tasksel tasksel/first multiselect standard
# Default for server
# tasksel tasksel/first multiselect standard, web-server
# Default for gnome-desktop
# tasksel tasksel/first multiselect standard, gnome-desktop

# Individual additional packages to install
# wget is REQUIRED otherwise quite a few things won't work
# later in the build (like late-command scripts)
d-i pkgsel/include string openssh-server vim

# Debian needs this for the installer to avoid any question for grub
# Please verify that it suit your needs as it may overwrite any usb stick
#if $breed == "debian"
d-i grub-installer/grub2_instead_of_grub_legacy boolean true
d-i grub-installer/bootdev string /dev/sda
#end if

# Use the following option to add additional boot parameters for the
# installed system (if supported by the bootloader installer).
# Note: options passed to the installer will be added automatically.
d-i debian-installer/add-kernel-opts string $kernel_options_post

# Avoid that last message about the install being complete.
d-i finish-install/reboot_in_progress note

## Figure out if we're kickstarting a system or a profile
#if $getVar('system_name','') != ''
#set $what = "system"
#else
#set $what = "profile"
#end if

# This first command is run as early as possible, just after preseeding is read.
# d-i preseed/early_command string [command]
d-i preseed/early_command string wget -O- \
   http://$http_server/cblr/svc/op/script/$what/$name/?script=preseed_early_default | \
      /bin/sh -s

      # This command is run immediately before the partitioner starts. It may be
      # useful to apply dynamic partitioner preseeding that depends on the state
      # of the disks (which may not be visible when preseed/early_command runs).
      # d-i partman/early_command \
      #       string debconf-set partman-auto/disk "\$(list-devices disk | head -n1)"

      # This command is run just before the install finishes, but when there is
      # still a usable /target directory. You can chroot to /target and use it
      # directly, or use the apt-install and in-target commands to easily install
      # packages and run commands in the target system.
      # d-i preseed/late_command string [command]
      d-i preseed/late_command string wget -O- \
         http://$http_server/cblr/svc/op/script/$what/$name/?script=preseed_late_default | \
            chroot /target /bin/sh -s
注意,seed文件中不能包含中文
file /var/lib/cobbler/kickstarts/ubuntu18045.seed
/var/lib/cobbler/kickstarts/ubuntu18045.seed: ASCII text
导入
cobbler import --path=/ubuntu1804 --name=ubuntu18045 --kickstart=/var/lib/cobbler/kickstarts/ubuntu18045.seed --arch=x86_64
导入后会自动生成两个profile,其中一个是xxx-hwe-xxx,可以干掉它,我们仅使用ubuntu18045-x86_64
安装windows系统
仅在cobbler2.8.5下测试通过
准备工作
windows ADK
windows PE add-on for ADK
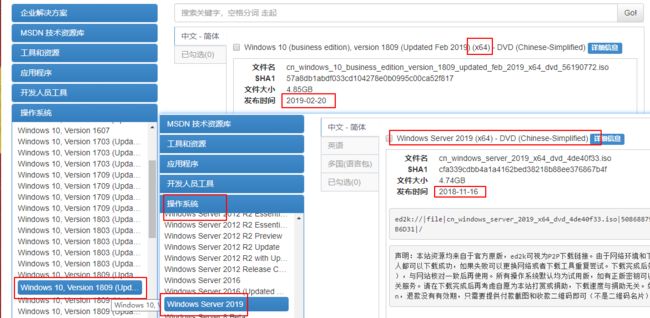
然后到msdn i tell u 下载windows ISO
安装ADK和WinPE
安装ADK时,仅用勾选部署工具即可
安装winPE时,默认勾选Windows预安装环境
安装完成后,以管理员身份运行部署和映像工具环境
定制 PE
在部署和映像工具环境交互框中执行如下命令
windows 10
copype amd64 c:\winpe # 本地生成winpe目录

Dism /mount-image /imagefile:c:\winpe\media\sources\boot.wim /index:1 /mountdir:c:\winpe\mount # dism挂载WinPE的启动文件到mount目录

echo net use z: \\192.168.1.33/share >> c:\winpe\mount\Windows\System32\startnet.cmd # 将启动命令硬编码写死到 winpe 的 startnet.cmd 文件里
# 此处硬编码可以改为域名,便可动态设置smb主机

echo z:\win10\setup.exe /unattend:z:\win10\win10_x64_bios_auto.xml >> c:\winpe\mount\Windows\System32\startnet.cmd # 自动应答

Dism /unmount-image /mountdir:c:\winpe\mount /commit # 卸载WinPE的挂载
MakeWinPEMedia /ISO c:\winpe c:\winpe\winpe_win10_amd64.iso # 生成win10 PE镜像
window server 2019
####windows 2019 winpe制作###
copype amd64 c:\winpe2019 # 本地生成winpe目录

Dism /mount-image /imagefile:c:\winpe2019\media\sources\boot.wim /index:1 /mountdir:c:\winpe\mount
echo ping -n 5 -l 69 192.168.1.33>> C:\winpe2019\mount\Windows\System32\startnet.cmd
echo net use z: \\192.168.1.33/share >> c:\winpe2019\mount\Windows\System32\startnet.cmd
echo z:\win2019\setup.exe /unattend:z:\win2019\win2019_x64_bios_auto.xml >> c:\winpe2019\mount\Windows\System32\startnet.cmd

Dism /unmount-image /mountdir:c:\winpe2019\mount /commit
MakeWinPEMedia /ISO c:\winpe2019 c:\winpe2019\winpe_win2019_amd64.iso
报错
若在执行第二条命令时报错
Failed to load the provider: D:\tools_install\Windows Kits\10\Assessment and Deployment Kit\Deployment Tools\AMD64\DISM\MetaDeployProvider.dll. - CDISMProviderStore::Internal_GetProvider(hr:0x8007007e)
...
[4024] ImageUnmarshallHandle: Reconstituting wim at c:\winpe\media\sources\boot.wim.
[4024] [0xc1420127] WIMMountImageHandle:(1120)
[4024] [0x80070002] StateStoreRemoveMountedImage:(1124): 系统找不到指定的文件。
[4024] [0x80070002] WIMMountImageHandle:(1332): 系统找不到指定的文件。
可以执行(没啥卵用)
dism.exe /online /cleanup-image /restorehealth
换个名字
比如copype amd64 c:\winpe1 缓存 copype amd64 c:\winpe2
配置Cobbler Server
导入Cobbler
首先将上一步创建的PE文件winpe_winxx_amd64.iso传递到Cobbler服务器上
cobbler distro add --name=windows_xx_x64 --kernel=/var/lib/tftpboot/memdisk --initrd=/root/winpe_winxx_amd64.iso --kopts="raw iso"
touch /var/lib/cobbler/kickstarts/winxx_x64_bios_auto.xml
cobbler profile add --name=windows_xx_x64 --distro=windows_xx_x64 --kickstart=/var/lib/cobbler/kickstarts/winxx_x64_bios_auto.xml
做好的/var/lib/cobbler/kickstarts/winpe.xml for win10见文章末尾
配置samba
安装
yum -y install samba
配置
cat /etc/samba/smb.conf
...
[share]
comment = share directory目录
path = /iso/
directory mask = 0755
create mask = 0755
guest ok=yes
writable=yes
启动
systemctl enable --now smb
挂载winxx ISO
mkdir /iso
mkfs.xfs /dev/sdb
mount /dev/sdb /iso
mkdir /iso/winxx
mount -o loop,ro /root/cn_windows_xx_business_edition_version_1809_updated_sept_2018_x64_dvd_84ac403f.iso /mnt/
cp -r /mnt/* /iso/winxx
umount /mnt
cp winxx_x64_bios_auto.xml /iso/xx
自动化安装
从 vmware 创建一台内存 4G,cpu2 核,磁盘 60G 的空盘,win10 虚拟机,记得选 BIOS,别选 UEFI
然后开机
进入后选择windows_10_x64(若在cobbler_web 的system中创建指定了此system的profile,并指定了MAC地址,则不用再手动选择)
做好的win10_x64_bios_auto.xml
win10的xml中没有适配远程连接,密码zhizhizhi
#### 特别注意此处,使用全中文,或许不能成功设置,会让你手动选择语言
en-US
0804:{81D4E9C9-1D3B-41BC-9E6C-4B40BF79E35E}{FA550B04-5AD7-411f-A5AC-CA038EC515D7}
zh-CN
zh-CN
zh-CN
zh-CN
en-US
0804:{81D4E9C9-1D3B-41BC-9E6C-4B40BF79E35E}{FA550B04-5AD7-411f-A5AC-CA038EC515D7}
zh-CN
zh-CN
zh-CN
zh-CN
1
Primary
100
true
2
Primary
true
NTFS
1
1
0x27
true
NTFS
C
2
2
0
true
0
2
false
true
wocao
wocao
VK7JG-NPHTM-C97JM-9MPGT-3V66T
1
Primary
100
true
2
Primary
true
NTFS
1
1
0x27
true
NTFS
C
2
2
0
true
0
2
false
true
zhizhizhi
zhizhizhi
VK7JG-NPHTM-C97JM-9MPGT-3V66T
false
false
1
1
0804:{81D4E9C9-1D3B-41BC-9E6C-4B40BF79E35E}{FA550B04-5AD7-411f-A5AC-CA038EC515D7}
zh-CN
zh-CN
zh-CN
zh-CN
0804:{81D4E9C9-1D3B-41BC-9E6C-4B40BF79E35E}{FA550B04-5AD7-411f-A5AC-CA038EC515D7}
zh-CN
zh-CN
zh-CN
zh-CN
true
true
0
0
zhizhizhi-PC
VK7JG-NPHTM-C97JM-9MPGT-3V66T
zhizhizhi-PC
VK7JG-NPHTM-C97JM-9MPGT-3V66T
true</PlainText>
</Password>
<Enabled>true</Enabled>
<Username>zhizhizhi</Username>
</AutoLogon>
<OOBE>
<HideEULAPage>true</HideEULAPage>
<HideOEMRegistrationScreen>true</HideOEMRegistrationScreen>
<HideOnlineAccountScreens>true</HideOnlineAccountScreens>
<HideWirelessSetupInOOBE>true</HideWirelessSetupInOOBE>
<NetworkLocation>Work</NetworkLocation>
<SkipUserOOBE>true</SkipUserOOBE>
<SkipMachineOOBE>true</SkipMachineOOBE>
<ProtectYourPC>1</ProtectYourPC>
</OOBE>
<UserAccounts>
<LocalAccounts>
<LocalAccount wcm:action="add">
<Password>
<Value></Value>
<PlainText>true</PlainText>
</Password>
<Description>zhizhizhi</Description>
<DisplayName>zhizhizhi</DisplayName>
<Group>Administrators</Group>
<Name>zhizhizhi</Name>
</LocalAccount>
</LocalAccounts>
</UserAccounts>
<RegisteredOrganization>zhizhizhi</RegisteredOrganization>
<RegisteredOwner>zhizhizhi</RegisteredOwner>
<DisableAutoDaylightTimeSet>false</DisableAutoDaylightTimeSet>
<FirstLogonCommands>
<SynchronousCommand wcm:action="add">
<Description>Control Panel View</Description>
<Order>1</Order>
<CommandLine>reg add "HKEY_CURRENT_USER\Software\Microsoft\Windows\CurrentVersion\Explorer\ControlPanel" /v StartupPage /t REG_DWORD /d 1 /f</CommandLine>
<RequiresUserInput>true</RequiresUserInput>
</SynchronousCommand>
<SynchronousCommand wcm:action="add">
<Order>2</Order>
<Description>Control Panel Icon Size</Description>
<RequiresUserInput>false</RequiresUserInput>
<CommandLine>reg add "HKEY_CURRENT_USER\Software\Microsoft\Windows\CurrentVersion\Explorer\ControlPanel" /v AllItemsIconView /t REG_DWORD /d 0 /f</CommandLine>
</SynchronousCommand>
<SynchronousCommand wcm:action="add">
<Order>3</Order>
<RequiresUserInput>false</RequiresUserInput>
<CommandLine>cmd /C wmic useraccount where name="zhizhizhi" set PasswordExpires=false</CommandLine>
<Description>Password Never Expires</Description>
</SynchronousCommand>
</FirstLogonCommands>
<TimeZone>China Standard Time</TimeZone>
</component>
<component name="Microsoft-Windows-Shell-Setup" processorArchitecture="amd64" publicKeyToken="31bf3856ad364e35" language="neutral" versionScope="nonSxS"
xmlns:wcm="http://schemas.microsoft.com/WMIConfig/2002/State"
xmlns:xsi="http://www.w3.org/2001/XMLSchema-instance">
<AutoLogon>
<Password>
<Value></Value>
<PlainText>true</PlainText>
</Password>
<Enabled>true</Enabled>
<Username>zhizhizhi</Username>
</AutoLogon>
<OOBE>
<HideEULAPage>true</HideEULAPage>
<HideOEMRegistrationScreen>true</HideOEMRegistrationScreen>
<HideOnlineAccountScreens>true</HideOnlineAccountScreens>
<HideWirelessSetupInOOBE>true</HideWirelessSetupInOOBE>
<NetworkLocation>Work</NetworkLocation>
<SkipUserOOBE>true</SkipUserOOBE>
<SkipMachineOOBE>true</SkipMachineOOBE>
<ProtectYourPC>1</ProtectYourPC>
</OOBE>
<UserAccounts>
<LocalAccounts>
<LocalAccount wcm:action="add">
<Password>
<Value></Value>
<PlainText>true</PlainText>
</Password>
<Description>zhizhizhi</Description>
<DisplayName>zhizhizhi</DisplayName>
<Group>Administrators</Group>
<Name>zhizhizhi</Name>
</LocalAccount>
</LocalAccounts>
</UserAccounts>
<RegisteredOrganization>zhizhizhi</RegisteredOrganization>
<RegisteredOwner>zhizhizhi</RegisteredOwner>
<DisableAutoDaylightTimeSet>false</DisableAutoDaylightTimeSet>
<FirstLogonCommands>
<SynchronousCommand wcm:action="add">
<Description>Control Panel View</Description>
<Order>1</Order>
<CommandLine>reg add "HKEY_CURRENT_USER\Software\Microsoft\Windows\CurrentVersion\Explorer\ControlPanel" /v StartupPage /t REG_DWORD /d 1 /f</CommandLine>
<RequiresUserInput>true</RequiresUserInput>
</SynchronousCommand>
<SynchronousCommand wcm:action="add">
<Order>2</Order>
<Description>Control Panel Icon Size</Description>
<RequiresUserInput>false</RequiresUserInput>
<CommandLine>reg add "HKEY_CURRENT_USER\Software\Microsoft\Windows\CurrentVersion\Explorer\ControlPanel" /v AllItemsIconView /t REG_DWORD /d 0 /f</CommandLine>
</SynchronousCommand>
<SynchronousCommand wcm:action="add">
<Order>3</Order>
<RequiresUserInput>false</RequiresUserInput>
<CommandLine>cmd /C wmic useraccount where name="zhizhizhi" set PasswordExpires=false</CommandLine>
<Description>Password Never Expires</Description>
</SynchronousCommand>
</FirstLogonCommands>
<TimeZone>China Standard Time</TimeZone>
</component>
</settings>
</unattend>
</code></pre>
<h3>做好的win2019_x64_bios_auto.xml</h3>
<p>适配了远程连接,密码wocao</p>
<pre><code><?xml version="1.0" encoding="utf-8"?>
<unattend xmlns="urn:schemas-microsoft-com:unattend">
<settings pass="windowsPE">
<component name="Microsoft-Windows-International-Core-WinPE" processorArchitecture="x86"
publicKeyToken="31bf3856ad364e35" language="neutral" versionScope="nonSxS"
xmlns:wcm="http://schemas.microsoft.com/WMIConfig/2002/State"
xmlns:xsi="http://www.w3.org/2001/XMLSchema-instance">
<SetupUILanguage>
<UILanguage>en-US</UILanguage>
</SetupUILanguage>
<InputLocale>0c09:00000409</InputLocale>
<SystemLocale>zh-CN</SystemLocale>
<UILanguage>zh-CN</UILanguage>
<UILanguageFallback>zh-CN</UILanguageFallback>
<UserLocale>zh-CN</UserLocale>
</component>
<component name="Microsoft-Windows-International-Core-WinPE" processorArchitecture="amd64"
publicKeyToken="31bf3856ad364e35" language="neutral" versionScope="nonSxS"
xmlns:wcm="http://schemas.microsoft.com/WMIConfig/2002/State"
xmlns:xsi="http://www.w3.org/2001/XMLSchema-instance">
#### 特别注意此处,使用全中文,或许不能成功设置,会让你手动选择语言
<SetupUILanguage>
<UILanguage>en-US</UILanguage>
</SetupUILanguage>
<InputLocale>0c09:00000409</InputLocale>
<SystemLocale>zh-CN</SystemLocale>
<UILanguage>zh-CN</UILanguage>
<UILanguageFallback>zh-CN</UILanguageFallback>
<UserLocale>zh-CN</UserLocale>
</component>
<component name="Microsoft-Windows-Setup" processorArchitecture="x86"
publicKeyToken="31bf3856ad364e35" language="neutral" versionScope="nonSxS"
xmlns:wcm="http://schemas.microsoft.com/WMIConfig/2002/State"
xmlns:xsi="http://www.w3.org/2001/XMLSchema-instance">
<DiskConfiguration>
<Disk wcm:action="add">
<CreatePartitions>
<CreatePartition wcm:action="add">
<Order>1</Order>
<Type>Primary</Type>
<Size>100</Size>
</CreatePartition>
<CreatePartition wcm:action="add">
<Extend>true</Extend>
<Order>2</Order>
<Type>Primary</Type>
</CreatePartition>
</CreatePartitions>
<ModifyPartitions>
<ModifyPartition wcm:action="add">
<Active>true</Active>
<Format>NTFS</Format>
<Label>System Reserved</Label>
<Order>1</Order>
<PartitionID>1</PartitionID>
<TypeID>0x27</TypeID>
</ModifyPartition>
<ModifyPartition wcm:action="add">
<Active>true</Active>
<Format>NTFS</Format>
<Label>OS</Label>
<Letter>C</Letter>
<Order>2</Order>
<PartitionID>2</PartitionID>
</ModifyPartition>
</ModifyPartitions>
<DiskID>0</DiskID>
<WillWipeDisk>true</WillWipeDisk>
</Disk>
</DiskConfiguration>
<ImageInstall>
<OSImage>
<InstallFrom>
<MetaData wcm:action="add">
<Key>/IMAGE/NAME</Key>
<Value>Windows Server 2019 SERVERSTANDARD</Value>
</MetaData>
</InstallFrom>
<InstallTo>
<DiskID>0</DiskID>
<PartitionID>2</PartitionID>
</InstallTo>
<InstallToAvailablePartition>false</InstallToAvailablePartition>
</OSImage>
</ImageInstall>
<UserData>
<AcceptEula>true</AcceptEula>
<FullName>wocao</FullName>
<Organization>wocao</Organization>
<ProductKey>
<Key>N69G4-B89J2-4G8F4-WWYCC-J464C</Key>
</ProductKey>
</UserData>
</component>
<component name="Microsoft-Windows-Setup" processorArchitecture="amd64"
publicKeyToken="31bf3856ad364e35" language="neutral" versionScope="nonSxS"
xmlns:wcm="http://schemas.microsoft.com/WMIConfig/2002/State"
xmlns:xsi="http://www.w3.org/2001/XMLSchema-instance">
<DiskConfiguration>
<Disk wcm:action="add">
<CreatePartitions>
<CreatePartition wcm:action="add">
<Order>1</Order>
<Type>Primary</Type>
<Size>100</Size>
</CreatePartition>
<CreatePartition wcm:action="add">
<Extend>true</Extend>
<Order>2</Order>
<Type>Primary</Type>
</CreatePartition>
</CreatePartitions>
<ModifyPartitions>
<ModifyPartition wcm:action="add">
<Active>true</Active>
<Format>NTFS</Format>
<Label>System Reserved</Label>
<Order>1</Order>
<PartitionID>1</PartitionID>
<TypeID>0x27</TypeID>
</ModifyPartition>
<ModifyPartition wcm:action="add">
<Active>true</Active>
<Format>NTFS</Format>
<Label>OS</Label>
<Letter>C</Letter>
<Order>2</Order>
<PartitionID>2</PartitionID>
</ModifyPartition>
</ModifyPartitions>
<DiskID>0</DiskID>
<WillWipeDisk>true</WillWipeDisk>
</Disk>
</DiskConfiguration>
#### 特别注意此处,需要提前指定安装镜像,否则会安装过程中会让你手动选择
<ImageInstall>
<OSImage>
<InstallFrom>
<MetaData wcm:action="add">
<Key>/IMAGE/NAME</Key>
<Value>Windows Server 2019 SERVERSTANDARD</Value>
</MetaData>
</InstallFrom>
<InstallTo>
<DiskID>0</DiskID>
<PartitionID>2</PartitionID>
</InstallTo>
<InstallToAvailablePartition>false</InstallToAvailablePartition>
</OSImage>
</ImageInstall>
<UserData>
<AcceptEula>true</AcceptEula>
<FullName>wocao</FullName>
<Organization>wocao</Organization>
<ProductKey>
<Key>N69G4-B89J2-4G8F4-WWYCC-J464C</Key>
</ProductKey>
</UserData>
</component>
</settings>
<settings pass="offlineServicing">
<component name="Microsoft-Windows-LUA-Settings" processorArchitecture="x86"
publicKeyToken="31bf3856ad364e35" language="neutral" versionScope="nonSxS"
xmlns:wcm="http://schemas.microsoft.com/WMIConfig/2002/State"
xmlns:xsi="http://www.w3.org/2001/XMLSchema-instance">
<EnableLUA>false</EnableLUA>
</component>
</settings>
<settings pass="offlineServicing">
<component name="Microsoft-Windows-LUA-Settings" processorArchitecture="amd64"
publicKeyToken="31bf3856ad364e35" language="neutral" versionScope="nonSxS"
xmlns:wcm="http://schemas.microsoft.com/WMIConfig/2002/State"
xmlns:xsi="http://www.w3.org/2001/XMLSchema-instance">
<EnableLUA>false</EnableLUA>
</component>
</settings>
<settings pass="generalize">
<component name="Microsoft-Windows-Security-SPP" processorArchitecture="x86"
publicKeyToken="31bf3856ad364e35" language="neutral" versionScope="nonSxS"
xmlns:wcm="http://schemas.microsoft.com/WMIConfig/2002/State"
xmlns:xsi="http://www.w3.org/2001/XMLSchema-instance">
<SkipRearm>1</SkipRearm>
</component>
</settings>
<settings pass="generalize">
<component name="Microsoft-Windows-Security-SPP" processorArchitecture="amd64"
publicKeyToken="31bf3856ad364e35" language="neutral" versionScope="nonSxS"
xmlns:wcm="http://schemas.microsoft.com/WMIConfig/2002/State"
xmlns:xsi="http://www.w3.org/2001/XMLSchema-instance">
<SkipRearm>1</SkipRearm>
</component>
</settings>
<settings pass="specialize">
<component name="Microsoft-Windows-International-Core" processorArchitecture="x86"
publicKeyToken="31bf3856ad364e35" language="neutral" versionScope="nonSxS"
xmlns:wcm="http://schemas.microsoft.com/WMIConfig/2002/State"
xmlns:xsi="http://www.w3.org/2001/XMLSchema-instance">
<InputLocale>0c09:00000409</InputLocale>
<SystemLocale>zh-CN</SystemLocale>
<UILanguage>zh-CN</UILanguage>
<UILanguageFallback>zh-CN</UILanguageFallback>
<UserLocale>zh-CN</UserLocale>
</component>
<component name="Microsoft-Windows-International-Core" processorArchitecture="amd64"
publicKeyToken="31bf3856ad364e35" language="neutral" versionScope="nonSxS"
xmlns:wcm="http://schemas.microsoft.com/WMIConfig/2002/State"
xmlns:xsi="http://www.w3.org/2001/XMLSchema-instance">
<InputLocale>0c09:00000409</InputLocale>
<SystemLocale>zh-CN</SystemLocale>
<UILanguage>zh-CN</UILanguage>
<UILanguageFallback>zh-CN</UILanguageFallback>
<UserLocale>zh-CN</UserLocale>
</component>
<component name="Microsoft-Windows-Security-SPP-UX" processorArchitecture="x86"
publicKeyToken="31bf3856ad364e35" language="neutral" versionScope="nonSxS"
xmlns:wcm="http://schemas.microsoft.com/WMIConfig/2002/State"
xmlns:xsi="http://www.w3.org/2001/XMLSchema-instance">
<SkipAutoActivation>true</SkipAutoActivation>
</component>
<component name="Microsoft-Windows-Security-SPP-UX" processorArchitecture="amd64"
publicKeyToken="31bf3856ad364e35" language="neutral" versionScope="nonSxS"
xmlns:wcm="http://schemas.microsoft.com/WMIConfig/2002/State"
xmlns:xsi="http://www.w3.org/2001/XMLSchema-instance">
<SkipAutoActivation>true</SkipAutoActivation>
</component>
<component name="Microsoft-Windows-SQMApi" processorArchitecture="x86"
publicKeyToken="31bf3856ad364e35" language="neutral" versionScope="nonSxS"
xmlns:wcm="http://schemas.microsoft.com/WMIConfig/2002/State"
xmlns:xsi="http://www.w3.org/2001/XMLSchema-instance">
<CEIPEnabled>0</CEIPEnabled>
</component>
<component name="Microsoft-Windows-SQMApi" processorArchitecture="amd64"
publicKeyToken="31bf3856ad364e35" language="neutral" versionScope="nonSxS"
xmlns:wcm="http://schemas.microsoft.com/WMIConfig/2002/State"
xmlns:xsi="http://www.w3.org/2001/XMLSchema-instance">
<CEIPEnabled>0</CEIPEnabled>
</component>
<component name="Microsoft-Windows-Shell-Setup" processorArchitecture="x86"
publicKeyToken="31bf3856ad364e35" language="neutral" versionScope="nonSxS"
xmlns:wcm="http://schemas.microsoft.com/WMIConfig/2002/State"
xmlns:xsi="http://www.w3.org/2001/XMLSchema-instance">
<ComputerName>INSTCK0-PC</ComputerName>
<ProductKey>N69G4-B89J2-4G8F4-WWYCC-J464C</ProductKey>
</component>
<component name="Microsoft-Windows-Shell-Setup" processorArchitecture="amd64"
publicKeyToken="31bf3856ad364e35" language="neutral" versionScope="nonSxS"
xmlns:wcm="http://schemas.microsoft.com/WMIConfig/2002/State"
xmlns:xsi="http://www.w3.org/2001/XMLSchema-instance">
<ComputerName>-PC-wocao</ComputerName>
<ProductKey>N69G4-B89J2-4G8F4-WWYCC-J464C</ProductKey>
</component>
<component name="Networking-MPSSVC-Svc" processorArchitecture="amd64" publicKeyToken="31bf3856ad364e35" language="neutral" versionScope="nonSxS" xmlns:wcm="http://schemas.microsoft.com/WMIConfig/2002/State" xmlns:xsi="http://www.w3.org/2001/XMLSchema-instance">
#### 特别注意此处,关闭防火墙
<!-- WLSD Disable windows firewall -->
<!-- <DomainProfile_EnableFirewall>false</DomainProfile_EnableFirewall> -->
<PrivateProfile_EnableFirewall>false</PrivateProfile_EnableFirewall>
<PublicProfile_EnableFirewall>false</PublicProfile_EnableFirewall>
</component>
</settings>
<settings pass="oobeSystem">
<component name="Microsoft-Windows-Shell-Setup" processorArchitecture="x86"
publicKeyToken="31bf3856ad364e35" language="neutral" versionScope="nonSxS"
xmlns:wcm="http://schemas.microsoft.com/WMIConfig/2002/State"
xmlns:xsi="http://www.w3.org/2001/XMLSchema-instance">
<AutoLogon>
<Password>
<Value>wocao</Value>
<PlainText>true</PlainText>
</Password>
<Enabled>true</Enabled>
<Username>wocao</Username>
</AutoLogon>
<OOBE>
<HideEULAPage>true</HideEULAPage>
<HideOEMRegistrationScreen>true</HideOEMRegistrationScreen>
<HideOnlineAccountScreens>true</HideOnlineAccountScreens>
<HideWirelessSetupInOOBE>true</HideWirelessSetupInOOBE>
<NetworkLocation>Work</NetworkLocation>
<SkipUserOOBE>true</SkipUserOOBE>
<SkipMachineOOBE>true</SkipMachineOOBE>
<ProtectYourPC>3</ProtectYourPC>
</OOBE>
<UserAccounts>
<LocalAccounts>
<LocalAccount wcm:action="add">
<Password>
<Value>wocao</Value>
<PlainText>true</PlainText>
</Password>
<Description></Description>
<DisplayName>wocao</DisplayName>
<Group>Administrators</Group>
<Name>wocao</Name>
</LocalAccount>
</LocalAccounts>
</UserAccounts>
<RegisteredOrganization>wocao</RegisteredOrganization>
<RegisteredOwner>wocao</RegisteredOwner>
<DisableAutoDaylightTimeSet>false</DisableAutoDaylightTimeSet>
<FirstLogonCommands>
<SynchronousCommand wcm:action="add">
<Description>Control Panel View</Description>
<Order>1</Order>
<CommandLine>reg add
"HKEY_CURRENT_USER\Software\Microsoft\Windows\CurrentVersion\Explorer\ControlPanel"
/v StartupPage /t REG_DWORD /d 1 /f</CommandLine>
<RequiresUserInput>true</RequiresUserInput>
</SynchronousCommand>
<SynchronousCommand wcm:action="add">
<Order>2</Order>
<Description>Control Panel Icon Size</Description>
<RequiresUserInput>false</RequiresUserInput>
<CommandLine>reg add
"HKEY_CURRENT_USER\Software\Microsoft\Windows\CurrentVersion\Explorer\ControlPanel"
/v AllItemsIconView /t REG_DWORD /d 0 /f</CommandLine>
</SynchronousCommand>
<SynchronousCommand wcm:action="add">
<Order>3</Order>
<RequiresUserInput>false</RequiresUserInput>
<CommandLine>cmd /C wmic useraccount where name="wocao" set
PasswordExpires=false</CommandLine>
<Description>Password Never Expires</Description>
</SynchronousCommand>
</FirstLogonCommands>
<TimeZone>AUS Eastern Standard Time</TimeZone>
</component>
<component name="Microsoft-Windows-Shell-Setup" processorArchitecture="amd64"
publicKeyToken="31bf3856ad364e35" language="neutral" versionScope="nonSxS"
xmlns:wcm="http://schemas.microsoft.com/WMIConfig/2002/State"
xmlns:xsi="http://www.w3.org/2001/XMLSchema-instance">
<AutoLogon>
<Password>
<Value>wocao</Value>
<PlainText>true</PlainText>
</Password>
<Enabled>true</Enabled>
<Username>wocao</Username>
</AutoLogon>
<OOBE>
<HideEULAPage>true</HideEULAPage>
<HideOEMRegistrationScreen>true</HideOEMRegistrationScreen>
<HideOnlineAccountScreens>true</HideOnlineAccountScreens>
<HideWirelessSetupInOOBE>true</HideWirelessSetupInOOBE>
<NetworkLocation>Home</NetworkLocation>
<SkipUserOOBE>true</SkipUserOOBE>
<SkipMachineOOBE>true</SkipMachineOOBE>
<ProtectYourPC>3</ProtectYourPC>
</OOBE>
<UserAccounts>
<LocalAccounts>
<LocalAccount wcm:action="add">
<Password>
<Value>wocao</Value>
<PlainText>true</PlainText>
</Password>
<Description></Description>
<DisplayName>wocao</DisplayName>
<Group>Administrators</Group>
<Name>wocao</Name>
</LocalAccount>
</LocalAccounts>
</UserAccounts>
<RegisteredOrganization>wocao</RegisteredOrganization>
<RegisteredOwner>wocao</RegisteredOwner>
<DisableAutoDaylightTimeSet>false</DisableAutoDaylightTimeSet>
#### 特别注意此处,允许远程连接
<!-- WLSD Enable RDP -->
<FirstLogonCommands>
<SynchronousCommand wcm:action="add">
<CommandLine>reg add "HKEY_LOCAL_MACHINE\SYSTEM\CurrentControlSet\Control\Terminal Server" /v fDenyTSConnections /t REG_DWORD /d 0 /f</CommandLine>
<Order>1</Order>
<RequiresUserInput>false</RequiresUserInput>
</SynchronousCommand>
</FirstLogonCommands>
<TimeZone>AUS Eastern Standard Time</TimeZone>
</component>
</settings>
</unattend>
</code></pre>
<h1>参考</h1>
<p>windows answer file generator</p>
<p>cobbler 安装ubuntu18.04.5</p>
<p>cobbler批量自动化部署Windows10和Server2019</p>
<p>cobbler之安装windows server 2019(win10)</p>
</div>
</div>
</div>
</div>
</div>
<!--PC和WAP自适应版-->
<div id="SOHUCS" sid="1697630459426582528"></div>
<script type="text/javascript" src="/views/front/js/chanyan.js"></script>
<!-- 文章页-底部 动态广告位 -->
<div class="youdao-fixed-ad" id="detail_ad_bottom"></div>
</div>
<div class="col-md-3">
<div class="row" id="ad">
<!-- 文章页-右侧1 动态广告位 -->
<div id="right-1" class="col-lg-12 col-md-12 col-sm-4 col-xs-4 ad">
<div class="youdao-fixed-ad" id="detail_ad_1"> </div>
</div>
<!-- 文章页-右侧2 动态广告位 -->
<div id="right-2" class="col-lg-12 col-md-12 col-sm-4 col-xs-4 ad">
<div class="youdao-fixed-ad" id="detail_ad_2"></div>
</div>
<!-- 文章页-右侧3 动态广告位 -->
<div id="right-3" class="col-lg-12 col-md-12 col-sm-4 col-xs-4 ad">
<div class="youdao-fixed-ad" id="detail_ad_3"></div>
</div>
</div>
</div>
</div>
</div>
</div>
<div class="container">
<h4 class="pt20 mb15 mt0 border-top">你可能感兴趣的:(裸金属,云计算,windows,cobbler,PXE,裸金属)</h4>
<div id="paradigm-article-related">
<div class="recommend-post mb30">
<ul class="widget-links">
<li><a href="/article/1902687035550920704.htm"
title="云原生边缘计算:分布式智能的时代黎明" target="_blank">云原生边缘计算:分布式智能的时代黎明</a>
<span class="text-muted">桂月二二</span>
<a class="tag" taget="_blank" href="/search/%E4%BA%91%E5%8E%9F%E7%94%9F/1.htm">云原生</a><a class="tag" taget="_blank" href="/search/%E8%BE%B9%E7%BC%98%E8%AE%A1%E7%AE%97/1.htm">边缘计算</a><a class="tag" taget="_blank" href="/search/%E5%88%86%E5%B8%83%E5%BC%8F/1.htm">分布式</a>
<div>引言:从集中式算力到万物智联的范式裂变AT&T边缘节点部署超5000个,特斯拉自动驾驶系统每节点200TOPS算力。国家电网通过边缘计算实现毫秒级电网故障隔离,菜鸟物流分拣效率提升400%。IDC预测2027年边缘基础设施支出将达亿,宝马汽车工厂设备预测性维护准确率达9亿运维成本。一、边缘计算范式进化论1.1算力拓扑结构演变世代大型主机中心化云计算分布式雾计算去中心化边缘计算泛在化神经形态计算体计</div>
</li>
<li><a href="/article/1902682115355504640.htm"
title="常用的pdf技术有哪些?--笔记" target="_blank">常用的pdf技术有哪些?--笔记</a>
<span class="text-muted">我不是彭于晏灬</span>
<a class="tag" taget="_blank" href="/search/pdf/1.htm">pdf</a><a class="tag" taget="_blank" href="/search/%E7%AC%94%E8%AE%B0/1.htm">笔记</a>
<div>常用的pdf技术有哪些?1.iTextPDF:iText是著名的开放项目,是用于生成PDF文档的一个java类库。通过iText不仅可以生成PDF或rtf的文档,而且可以将XML、Html文件转化为PDF文件。Openoffice:openoffice是开源软件且能在windows和linux平台下运行,可以灵活的将word或者Excel转化为PDF文档。JasperReport:是一个强大、灵活</div>
</li>
<li><a href="/article/1902681233381453824.htm"
title="Onlyoffice 更新字体" target="_blank">Onlyoffice 更新字体</a>
<span class="text-muted">acheding</span>
<a class="tag" taget="_blank" href="/search/%E5%BC%80%E6%BA%90/1.htm">开源</a><a class="tag" taget="_blank" href="/search/%E6%80%A7%E8%83%BD%E4%BC%98%E5%8C%96/1.htm">性能优化</a>
<div>复制Windows字体包,即C:\Windows\Fonts文件夹中字体。进入onlyOffice容器dockerexec-itonlyofficebash进入字体包目录cd/var/www/onlyoffice/documentserver/core-fonts删除所有字体库rm-rf\*进入字体缓存目录cd/var/www/onlyoffice/documentserver/fonts删除所有</div>
</li>
<li><a href="/article/1902681107065794560.htm"
title="cocos2dx : 解决中文乱码问题" target="_blank">cocos2dx : 解决中文乱码问题</a>
<span class="text-muted">^随风~~</span>
<a class="tag" taget="_blank" href="/search/Cocos2d-x/1.htm">Cocos2d-x</a><a class="tag" taget="_blank" href="/search/C%2B%2B/1.htm">C++</a><a class="tag" taget="_blank" href="/search/%E4%B9%B1%E7%A0%81/1.htm">乱码</a>
<div>在使用cocos2dx的时候,代码里面使用了中文或者是在cocosstudio编辑器里面使用了中文,显示的时候会出现乱码问题,下面提供几个解决方案:方案一:最前面加上命令:#pragmaexecution_character_set("utf-8")方案二:使用XML文件:问题与解决方法在windows环境下使用visualstudio开发cocos2d-x,由于visualstudio默认编码为</div>
</li>
<li><a href="/article/1902656013656453120.htm"
title="最完整的webpack Dll打包与采坑总结" target="_blank">最完整的webpack Dll打包与采坑总结</a>
<span class="text-muted">仰望星空的代码</span>
<a class="tag" taget="_blank" href="/search/Vue.js%E8%B8%A9%E5%9D%91%E8%AE%B0/1.htm">Vue.js踩坑记</a><a class="tag" taget="_blank" href="/search/vue.js/1.htm">vue.js</a><a class="tag" taget="_blank" href="/search/webpack/1.htm">webpack</a><a class="tag" taget="_blank" href="/search/dll%E6%89%93%E5%8C%85/1.htm">dll打包</a><a class="tag" taget="_blank" href="/search/%E6%89%93%E5%8C%85%E4%BC%98%E5%8C%96/1.htm">打包优化</a>
<div>webpack已经成为前端主流的项目打包工具,对于前端开发必不可少。在前端项目依赖第三方库过多,项目比较大文件比较多时,webpack打包的速度也会被拖成蜗牛,是时候优化一下webapck的打包速度了。在优化打包速度方面有不少方法方式,其中一个比较重要的方式是DllPlugin。DllPlugin把第三方库打包成动态链接库(动态链接库:windows系统中库文件概念,这里是借用了这一概念。),Dl</div>
</li>
<li><a href="/article/1902624242176946176.htm"
title="Beekeeper Studio:高颜值且免费的SQL开发工具" target="_blank">Beekeeper Studio:高颜值且免费的SQL开发工具</a>
<span class="text-muted">开源项目精选</span>
<a class="tag" taget="_blank" href="/search/sql/1.htm">sql</a><a class="tag" taget="_blank" href="/search/%E6%95%B0%E6%8D%AE%E5%BA%93/1.htm">数据库</a>
<div>BeekeeperStudio是一款免费开源的SQL开发和数据库管理工具,具有美观高效、简单易用的特点。BeekeeperStudio基于Vue.js开发,遵循MIT开源协议,支持Windows、Linux以及macOS平台。Stars数17842Forks数1170主要特点安全连接:除了正常的连接,也可以使用SSL加密连接或通过SSH隧道连接;SQL自动补全:代码编辑器支持语法高亮和表名自动补全</div>
</li>
<li><a href="/article/1902616042719473664.htm"
title="使用 Python 的 pyttsx3 库进行文本转语音" target="_blank">使用 Python 的 pyttsx3 库进行文本转语音</a>
<span class="text-muted">Bingjia_Hu</span>
<a class="tag" taget="_blank" href="/search/python/1.htm">python</a><a class="tag" taget="_blank" href="/search/%E5%BC%80%E5%8F%91%E8%AF%AD%E8%A8%80/1.htm">开发语言</a><a class="tag" taget="_blank" href="/search/pyttsx3/1.htm">pyttsx3</a>
<div>1.什么是pyttsx3?1.1pyttsx3是一个Python库,它可以将文本转换为语音。与其他文本转语音库(如gTTS)不同,pyttsx3不依赖于网络服务,它使用本地的TTS(Text-to-Speech)引擎,这使得它在离线状态下也能正常工作1.2pyttsx3支持多平台(Windows、Linux和macOS),且可以对语音的音量、语速以及语音类型等进行控制2.安装pyttsx3要使用p</div>
</li>
<li><a href="/article/1902612760508821504.htm"
title="都快3202年了,你还不会用Java生成计算机统一标识符" target="_blank">都快3202年了,你还不会用Java生成计算机统一标识符</a>
<span class="text-muted">Heping_Ge2333</span>
<a class="tag" taget="_blank" href="/search/java/1.htm">java</a>
<div>Java生成计算机统一标识符计算机统一标识符的概念什么是计算机统一标识符?计算机统一标识符就相当于每台电脑每个系统的“身份证”。它是唯一的。通常,计算机统一标识符是根据电脑的硬件情况(主板、cpu的序列号,mac地址)和系统情况(windows/linux/unix)生成的。Java语言的实现下面这段代码浅浅的实现了计算机统一标识符importlombok.Data;importlombok.ex</div>
</li>
<li><a href="/article/1902604813233876992.htm"
title="Ubuntu Qt: no service found for - “org.qt-project.qt.mediaplayer“" target="_blank">Ubuntu Qt: no service found for - “org.qt-project.qt.mediaplayer“</a>
<span class="text-muted">wkm956</span>
<a class="tag" taget="_blank" href="/search/qt/1.htm">qt</a><a class="tag" taget="_blank" href="/search/%E5%BC%80%E5%8F%91%E8%AF%AD%E8%A8%80/1.htm">开发语言</a><a class="tag" taget="_blank" href="/search/ubuntu/1.htm">ubuntu</a>
<div>1、前言在一次项目过程中,因项目需求,需要将windows开发的Qt项目迁移到ubuntu系统中,且在某个功能项中需要播放音频,在windows系统中能够正常运行,但在ubuntu系统中却显示defaultServiceProvider::requestService():noservicefoundfor-"org.qt-project.qt.mediaplayer"错误,在网上查找资料后解决问</div>
</li>
<li><a href="/article/1902603049914920960.htm"
title="python安装scipy库出错_解决scipy安装(pip install scipy)失败,以及其他问题" target="_blank">python安装scipy库出错_解决scipy安装(pip install scipy)失败,以及其他问题</a>
<span class="text-muted">weixin_39663933</span>
<div>解决scipy安装(pipinstallscipy)失败,以及其他问题解决:1.在scipy官方库中并没有适合Windows的python3.6相关版本,故需要在网址http://www.lfd.uci.edu/~gohlke/pythonlibs/#scipy下载适合的版本,下载如:scipy‑0.19.1‑cp36‑cp36m‑win32.whl2.Windows中scipy安装成功后,还会存</div>
</li>
<li><a href="/article/1902600150681972736.htm"
title="✨❤️CSDN标题党❤️,创意无极限,那不直接全网站都花的飞起?" target="_blank">✨❤️CSDN标题党❤️,创意无极限,那不直接全网站都花的飞起?</a>
<span class="text-muted">少年,又是你</span>
<a class="tag" taget="_blank" href="/search/icons/1.htm">icons</a><a class="tag" taget="_blank" href="/search/ui%E8%AE%BE%E8%AE%A1/1.htm">ui设计</a><a class="tag" taget="_blank" href="/search/%E6%90%9C%E7%B4%A2%E5%BC%95%E6%93%8E/1.htm">搜索引擎</a><a class="tag" taget="_blank" href="/search/%E5%A4%A7%E6%95%B0%E6%8D%AE/1.htm">大数据</a><a class="tag" taget="_blank" href="/search/%E7%99%BE%E5%BA%A6/1.htm">百度</a>
<div>这只是一张图。❤️CSDN标题党❤️想法由来如何化为己用总结想法由来那这个想法之初呢,是因为我看到好多博主的标题啊,文章中都存在一些精美的小图片,那我身为一个男生看这些都有些心动啊,实在是精美。那的确为了流量,大家也都是攒足了劲。那我就在想,这些是什么呢?我一搜发现,原来是表情符号。那我不知道你们的电脑是怎么样的,我反正只要按了windows键+句号(.)即可在任何应用程序中使用表情符号。好使的不</div>
</li>
<li><a href="/article/1902587778982539264.htm"
title="在Qt代码中使用Windows事件机制WaitForMultipleObjects、SetEvent" target="_blank">在Qt代码中使用Windows事件机制WaitForMultipleObjects、SetEvent</a>
<span class="text-muted">令狐掌门</span>
<a class="tag" taget="_blank" href="/search/%E6%B7%B1%E5%85%A5%E6%B5%85%E5%87%BAC%2B%2B/1.htm">深入浅出C++</a><a class="tag" taget="_blank" href="/search/Qt%E5%BC%80%E5%8F%91%E6%8A%80%E6%9C%AF/1.htm">Qt开发技术</a><a class="tag" taget="_blank" href="/search/qt/1.htm">qt</a><a class="tag" taget="_blank" href="/search/windows/1.htm">windows</a><a class="tag" taget="_blank" href="/search/%E5%BC%80%E5%8F%91%E8%AF%AD%E8%A8%80/1.htm">开发语言</a><a class="tag" taget="_blank" href="/search/SetEvent/1.htm">SetEvent</a>
<div>在Qt开发客户端时,经常使用信号槽来处理控件或窗口之间的事件,如果是Windows系统,也可以用windows事件来代替Qt的信号槽,本篇博客来介绍这种用法。首先需要介绍本篇本篇博客需要用到的几个WindowsAPI:一、需要用到的WindowsAPIWaitForMultipleObjectsWaitForMultipleObjects是WindowsAPI中一个用于同步操作的函数。它主要用于等</div>
</li>
<li><a href="/article/1902579456048951296.htm"
title="安全地自动重新启动 Windows 资源管理器Bat脚本" target="_blank">安全地自动重新启动 Windows 资源管理器Bat脚本</a>
<span class="text-muted">小云很优秀</span>
<a class="tag" taget="_blank" href="/search/%E5%BC%80%E5%8F%91%E5%B7%A5%E5%85%B7/1.htm">开发工具</a><a class="tag" taget="_blank" href="/search/%E5%AE%89%E5%85%A8/1.htm">安全</a><a class="tag" taget="_blank" href="/search/windows/1.htm">windows</a><a class="tag" taget="_blank" href="/search/batch%E5%91%BD%E4%BB%A4/1.htm">batch命令</a><a class="tag" taget="_blank" href="/search/microsoft/1.htm">microsoft</a>
<div>安全地自动重新启动Windows资源管理器脚本可以直接运行的Windows批处理脚本,用于安全地自动重新启动Windows资源管理器。该脚本会在杀死资源管理器之前检查是否有其他进程正在使用资源管理器相关的文件。Bat脚本@echoofftitle资源管理器安全重启工具color0A::检查是否以管理员权限运行netsession>nul2>&1if%errorLevel%neq0(echo此脚本需</div>
</li>
<li><a href="/article/1902577943226413056.htm"
title="Python个人学习笔记(17):模块(sys、pickle&json)" target="_blank">Python个人学习笔记(17):模块(sys、pickle&json)</a>
<span class="text-muted">NEET_LH</span>
<a class="tag" taget="_blank" href="/search/%E6%A8%B5%E5%A4%AB%E8%80%81%E5%B8%88Python%E9%9B%B6%E5%9F%BA%E7%A1%80%E8%AF%BE%E7%A8%8B/1.htm">樵夫老师Python零基础课程</a><a class="tag" taget="_blank" href="/search/%E4%B8%AA%E4%BA%BA%E5%AD%A6%E4%B9%A0%E7%AC%94%E8%AE%B0/1.htm">个人学习笔记</a><a class="tag" taget="_blank" href="/search/python/1.htm">python</a><a class="tag" taget="_blank" href="/search/%E5%AD%A6%E4%B9%A0/1.htm">学习</a><a class="tag" taget="_blank" href="/search/%E7%AC%94%E8%AE%B0/1.htm">笔记</a>
<div>五、sys模块sys.exit():退出while1:print(123)sys.exit(0)#程序退出,0是正常退出,1是非正常退出,记录在日志中sys.version:得到当前解释器的运行环境sys.platform:运行平台,win32=windows代码:print(sys.version)print(sys.platform)结果:3.13.0(tags/v3.13.0:60403a5</div>
</li>
<li><a href="/article/1902576555956170752.htm"
title="智能护栏报警系统提升高速公路安全" target="_blank">智能护栏报警系统提升高速公路安全</a>
<span class="text-muted">德克西尔DrKsir</span>
<a class="tag" taget="_blank" href="/search/%E6%99%BA%E6%85%A7%E6%8A%A4%E6%A0%8F/1.htm">智慧护栏</a><a class="tag" taget="_blank" href="/search/%E5%AE%89%E5%85%A8/1.htm">安全</a>
<div>在车流如织的高速公路上,金属护栏如同沉默的守护者,时刻准备着在危急时刻力挽狂澜。传统养护人员用脚步丈量护栏安全的日子,正在被一场技术革命悄然改写。一种基于物联网的智能监测系统,正以毫米级感知能力重塑高速公路安全防线。这套智能报警系统的核心,是遍布护栏的"神经元网络"。每隔30米安装的MEMS传感器,能够捕捉到微小的变化。当车辆与护栏发生碰撞,传感器会迅速完成碰撞定位。在浙江某高速路段,这套系统刚投</div>
</li>
<li><a href="/article/1902564704778252288.htm"
title="腾讯云与阿里云,哪个更好些?" target="_blank">腾讯云与阿里云,哪个更好些?</a>
<span class="text-muted">云计算开发者小李</span>
<a class="tag" taget="_blank" href="/search/%E9%98%BF%E9%87%8C%E4%BA%91/1.htm">阿里云</a><a class="tag" taget="_blank" href="/search/%E8%85%BE%E8%AE%AF%E4%BA%91/1.htm">腾讯云</a>
<div>借用一部电视剧的名字:都挺好!根据IDC最新的数据统计显示,国内前二的云计算平台分别是阿里云、腾讯云,分别背靠阿里、腾讯两大互联网集团,接下来我们就简单的介绍下两大平台。阿里云:国内最早成立的云计算平台,并且一开始就是独立运营,马爸爸宣称每年投入10亿,连续投入10年,最终阿里云的发展没有让阿里人失望,目前已成长为超千亿美元的独角兽,阿里云也由最早的带有明显淘系特色的云平台成长为综合性的云计算平台</div>
</li>
<li><a href="/article/1902562058092736512.htm"
title="智慧交通是什么,可以帮助我们解决什么问题?" target="_blank">智慧交通是什么,可以帮助我们解决什么问题?</a>
<span class="text-muted">Guheyunyi</span>
<a class="tag" taget="_blank" href="/search/%E8%BF%90%E7%BB%B4/1.htm">运维</a><a class="tag" taget="_blank" href="/search/%E5%A4%A7%E6%95%B0%E6%8D%AE/1.htm">大数据</a><a class="tag" taget="_blank" href="/search/%E4%BA%BA%E5%B7%A5%E6%99%BA%E8%83%BD/1.htm">人工智能</a><a class="tag" taget="_blank" href="/search/%E4%BF%A1%E6%81%AF%E5%8F%AF%E8%A7%86%E5%8C%96/1.htm">信息可视化</a><a class="tag" taget="_blank" href="/search/%E5%89%8D%E7%AB%AF/1.htm">前端</a>
<div>智慧交通是什么?智慧交通(SmartTransportation)是指利用物联网(IoT)、大数据、人工智能(AI)、云计算、5G通信等先进技术,对交通系统进行智能化管理和优化,以提高交通效率、减少拥堵、降低事故率、提升出行体验,并实现交通资源的合理配置和可持续发展。智慧交通的核心是通过数据采集、分析和应用,实现交通系统的智能化、自动化和协同化,从而构建一个高效、安全、绿色、便捷的交通生态系统。智</div>
</li>
<li><a href="/article/1902561428024389632.htm"
title="火山云服务器在市场中的用户占有量" target="_blank">火山云服务器在市场中的用户占有量</a>
<span class="text-muted">苹果企业签名分发</span>
<a class="tag" taget="_blank" href="/search/%E6%9C%8D%E5%8A%A1%E5%99%A8/1.htm">服务器</a><a class="tag" taget="_blank" href="/search/%E7%81%AB%E5%B1%B1%E5%BC%95%E6%93%8E/1.htm">火山引擎</a>
<div>火山云服务器(即字节跳动旗下的火山引擎云服务)作为云计算市场的新兴参与者,其用户占有量目前尚未进入行业前列,但凭借字节跳动的技术背景和资源支持,正在逐步扩大市场渗透。以下是综合市场现状的分析:---###**1.整体市场格局**-**中国云计算市场前三**:阿里云、华为云、腾讯云占据主导地位(合计超60%份额)。-**第二梯队**:天翼云、AWS中国、百度智能云、京东云等。-**火山引擎**:属于</div>
</li>
<li><a href="/article/1902554876618010624.htm"
title="Electron对接语音唤醒Windows SDK" target="_blank">Electron对接语音唤醒Windows SDK</a>
<span class="text-muted">蚂蚁二娘</span>
<a class="tag" taget="_blank" href="/search/electron/1.htm">electron</a><a class="tag" taget="_blank" href="/search/windows/1.htm">windows</a><a class="tag" taget="_blank" href="/search/c%2B%2B/1.htm">c++</a>
<div>一、项目主要依赖vuevue-cli-plugin-electron-builderelectronffi-napinodejs操作c++的dll库ref-napic++类型转换js-audio-recorder录音插件二、下载SDK设置好唤醒词后,下载windowsSdk,项目需要/bin目录下的msc_x64.dll和msc.dll(分别是64位和32位的dll,按需使用),以及/bin/ms</div>
</li>
<li><a href="/article/1902554623244300288.htm"
title="批处理脚本基础知识快速掌握" target="_blank">批处理脚本基础知识快速掌握</a>
<span class="text-muted">感叹号的豆浆</span>
<a class="tag" taget="_blank" href="/search/c%2B%2B/1.htm">c++</a>
<div>一、批处理脚本概述定义批处理脚本是一种基于命令行的自动化脚本语言,通过.bat或.cmd文件保存,由Windows系统的cmd.exe解释器执行。核心作用自动化重复性任务(如文件操作、系统配置)批量处理文件(搜索、复制、删除)集成命令行工具(如ping、netstat)简单的系统管理(服务控制、注册表操作)执行环境原生支持:WindowsCMD.EXEPowerShell兼容:可通过&或call调</div>
</li>
<li><a href="/article/1902554620991959040.htm"
title="批处理脚本NTP服务Windows操作系统时间同步设置" target="_blank">批处理脚本NTP服务Windows操作系统时间同步设置</a>
<span class="text-muted">感叹号的豆浆</span>
<a class="tag" taget="_blank" href="/search/windows/1.htm">windows</a><a class="tag" taget="_blank" href="/search/%E8%87%AA%E7%84%B6%E8%AF%AD%E8%A8%80%E5%A4%84%E7%90%86/1.htm">自然语言处理</a>
<div>脚本如下:///创建时间同步服务@echooff@echooff&&@chcp65001>nulsetlocalenabledelayedexpansion::设置版本号set"o=cls&echo"&set“z=&&echo.&echo按任意键或等待15秒后自动退出本界面&&timeout/t15&&exit”modeconlines=10cols=60&&netsession1>NUL2>NU</div>
</li>
<li><a href="/article/1902550581134815232.htm"
title="零基础怎么开始学网络安全(非常详细)零基础入门到精通,收藏这一篇就够了" target="_blank">零基础怎么开始学网络安全(非常详细)零基础入门到精通,收藏这一篇就够了</a>
<span class="text-muted">程序员羊羊</span>
<a class="tag" taget="_blank" href="/search/web%E5%AE%89%E5%85%A8/1.htm">web安全</a><a class="tag" taget="_blank" href="/search/%E5%AE%89%E5%85%A8/1.htm">安全</a><a class="tag" taget="_blank" href="/search/%E7%BD%91%E7%BB%9C/1.htm">网络</a><a class="tag" taget="_blank" href="/search/php/1.htm">php</a><a class="tag" taget="_blank" href="/search/%E5%AD%A6%E4%B9%A0/1.htm">学习</a>
<div>一、学习建议1.了解基础概念:开始之前,了解网络安全的基本概念和术语是很重要的。你可以查找网络安全入门教程或在线课程,了解网络安全领域的基本概念,如黑客、漏洞、攻击类型等。2.网络基础知识:学习计算机网络基础知识,了解网络通信原理,不同网络协议(如TCP/IP)的工作方式,以及网络拓扑结构等。3.操作系统知识:了解常见的操作系统,特别是Windows和Linux。掌握基本的命令行操作和系统管理技能</div>
</li>
<li><a href="/article/1902540361725702144.htm"
title="通信之光接口" target="_blank">通信之光接口</a>
<span class="text-muted">玖Yee</span>
<a class="tag" taget="_blank" href="/search/%E4%BF%A1%E6%81%AF%E4%B8%8E%E9%80%9A%E4%BF%A1/1.htm">信息与通信</a>
<div>光接口即光纤接口,是用于连接光纤线缆的物理接口。常见类型FC接口(配线架):FerruleConnector的缩写,外部加强采用金属套,紧固方式为螺丝扣,是单模网络中常见连接设备,有牢靠、防灰尘的优点,但安装时间稍长。 SC接口:外形为矩形,采用插针与耦合套筒结构,尺寸与FC型相同,插针端面多采用PC或APC性研磨方式,紧固方式为插拔销闩式,无需旋转,使用方便,被广泛应用于光猫、光纤收发器等设备。</div>
</li>
<li><a href="/article/1902515023561945088.htm"
title="一款适用于 Windows 、Mac 和 Linux 的屏幕录制与截图软件。" target="_blank">一款适用于 Windows 、Mac 和 Linux 的屏幕录制与截图软件。</a>
<span class="text-muted">Mbblovey</span>
<a class="tag" taget="_blank" href="/search/%E5%BC%80%E5%8F%91%E8%AF%AD%E8%A8%80/1.htm">开发语言</a><a class="tag" taget="_blank" href="/search/%E5%BC%80%E6%BA%90%E8%BD%AF%E4%BB%B6/1.htm">开源软件</a><a class="tag" taget="_blank" href="/search/%E7%94%B5%E8%84%91/1.htm">电脑</a><a class="tag" taget="_blank" href="/search/java/1.htm">java</a>
<div>Screenrec是一款适用于Windows、Mac和Linux的屏幕录制与截图软件。软件本身可以免费使用,只需要登录即可使用全部功能。当咱们打开软件后,电脑右边就会出现一个小漂浮窗。点击上方的图标就能一键开启视频录制、截屏等功能。Screenrec很有意思的是可以在开始录制屏幕的同时录制咱们的网络摄像头视频和麦克风音频。在录制完成后大家可能会发现右下角软件会给大家发出一个提醒。这就是它的另一个特</div>
</li>
<li><a href="/article/1902512115617427456.htm"
title="python-56-基于Vue和Flask进行前后端分离的项目开发示例实战" target="_blank">python-56-基于Vue和Flask进行前后端分离的项目开发示例实战</a>
<span class="text-muted">皮皮冰燃</span>
<a class="tag" taget="_blank" href="/search/python3/1.htm">python3</a><a class="tag" taget="_blank" href="/search/python/1.htm">python</a><a class="tag" taget="_blank" href="/search/vue.js/1.htm">vue.js</a><a class="tag" taget="_blank" href="/search/flask/1.htm">flask</a>
<div>文章目录1创建Vue前端项目1.1运行demo1.2实现需求2flask部署上述dist(前后端未分离)2.1代码app.py2.2运行访问3nginx部署(前后端分离)3.1nginx前端服务3.3.1windows安装nginx3.3.2修改nginx.conf配置文件3.3.3启动nginx3.3.3停止nginx3.2启动后端服务3.2.1app.py(去除前端渲染)3.2.2启动flas</div>
</li>
<li><a href="/article/1902501264109924352.htm"
title="TDE透明加密技术:免改造实现华为云ECS中数据库和文件加密存储" target="_blank">TDE透明加密技术:免改造实现华为云ECS中数据库和文件加密存储</a>
<span class="text-muted">安 当 加 密</span>
<a class="tag" taget="_blank" href="/search/%E5%8D%8E%E4%B8%BA%E4%BA%91/1.htm">华为云</a><a class="tag" taget="_blank" href="/search/%E6%95%B0%E6%8D%AE%E5%BA%93/1.htm">数据库</a>
<div>在数字经济与云计算深度融合的今天,华为云ECS(弹性云服务器)已成为企业数字化转型的核心载体,承载着数据库、文件存储、AI训练等关键业务。然而,云上数据安全形势日益严峻:2024年全球云环境勒索攻击同比激增210%,密钥泄露、权限失控、合规失效成为企业上云的三大痛点。作为国内数据安全领域的领军者,上海安当推出的TDE透明加密技术,以“存储层无感加密、密钥全生命周期管理、动态防勒索”为核心,为华为云</div>
</li>
<li><a href="/article/1902460906852380672.htm"
title="USB摄像头数据获取——libuvc" target="_blank">USB摄像头数据获取——libuvc</a>
<span class="text-muted">jbjhzstsl</span>
<a class="tag" taget="_blank" href="/search/linux/1.htm">linux</a>
<div>优点:跨平台支持:libuvc是一个跨平台的库,可以在不同的操作系统上使用,包括Linux、Windows和macOS等。简单易用:libuvc提供了一套简单易用的API,使得使用摄像头设备变得更加简便,尤其适合快速开发原型和简单应用。封装性好:libuvc封装了许多底层细节,如视频格式转换、缓冲区管理等,简化了开发过程。缺点:功能有限:相对于V4L2,libuvc提供的功能相对有限,可能无法满足</div>
</li>
<li><a href="/article/1902454483024146432.htm"
title="在WINDOWS中如何运行VBS脚本,多种运行方式" target="_blank">在WINDOWS中如何运行VBS脚本,多种运行方式</a>
<span class="text-muted">涛涛讲AI</span>
<a class="tag" taget="_blank" href="/search/AI%E7%BC%96%E7%A8%8B/1.htm">AI编程</a><a class="tag" taget="_blank" href="/search/%E5%BC%80%E5%8F%91%E8%AF%AD%E8%A8%80/1.htm">开发语言</a><a class="tag" taget="_blank" href="/search/ecmascript/1.htm">ecmascript</a><a class="tag" taget="_blank" href="/search/VBA/1.htm">VBA</a>
<div>今天有个哥们问我如何运行VBS脚本,我整理了如下内容。欢迎来到涛涛聊AI,要运行VBS(VisualBasicScript)脚本,你可以按照以下步骤操作:编写VBS脚本:打开一个文本编辑器(如记事本)。输入VBScript代码。例如,以下代码会弹出一个消息框:MsgBox"Hello,World!"将文件保存为以.vbs为扩展名的文件,例如hello.vbs。运行VBS脚本:双击运行:找到你保存的</div>
</li>
<li><a href="/article/1902448936291987456.htm"
title="Docker入门篇:安装与加速" target="_blank">Docker入门篇:安装与加速</a>
<span class="text-muted">slamml</span>
<a class="tag" taget="_blank" href="/search/Docker/1.htm">Docker</a><a class="tag" taget="_blank" href="/search/docker/1.htm">docker</a><a class="tag" taget="_blank" href="/search/%E5%AE%B9%E5%99%A8/1.htm">容器</a><a class="tag" taget="_blank" href="/search/%E8%BF%90%E7%BB%B4/1.htm">运维</a>
<div>今天接着上一篇文章来写,本来计划以paopaorobot/dvo为例带入docker的基本操作,然后中间插播一下docker的安装和加速,但是发现写的有点罗嗦,刚写完安装与加速就挺大篇幅了,所以决定将docker基本操作放到下一篇介绍,对不住~对不住~。docker安装在这里,针对Windows、Ubuntu平台介绍docker的安装。Windows平台(本机win7)前提要求机器是64bit的,</div>
</li>
<li><a href="/article/1902446920178135040.htm"
title="io.lettuce.core.RedisCommandExecutionException: NOAUTH Authentication required可能不是密码问题" target="_blank">io.lettuce.core.RedisCommandExecutionException: NOAUTH Authentication required可能不是密码问题</a>
<span class="text-muted">专注_每天进步一点点</span>
<a class="tag" taget="_blank" href="/search/08Redis/1.htm">08Redis</a><a class="tag" taget="_blank" href="/search/java/1.htm">java</a><a class="tag" taget="_blank" href="/search/redis/1.htm">redis</a>
<div>背景我用的版本是:io.lettucelettuce-core6.1.10.RELEASE问题描述本地(windows环境)和测试环境redis连接都没有问题,生产环境报错:io.lettuce.core.RedisCommandExecutionException:NOAUTHAuthenticationrequired解决办法(1)第一反应肯定是密码错误,然而检查了密码并没有问题(2)客户端版</div>
</li>
<li><a href="/article/70.htm"
title="PHP如何实现二维数组排序?" target="_blank">PHP如何实现二维数组排序?</a>
<span class="text-muted">IT独行者</span>
<a class="tag" taget="_blank" href="/search/%E4%BA%8C%E7%BB%B4%E6%95%B0%E7%BB%84/1.htm">二维数组</a><a class="tag" taget="_blank" href="/search/PHP/1.htm">PHP</a><a class="tag" taget="_blank" href="/search/%E6%8E%92%E5%BA%8F%E3%80%80/1.htm">排序 </a>
<div>二维数组在PHP开发中经常遇到,但是他的排序就不如一维数组那样用内置函数来的方便了,(一维数组排序可以参考本站另一篇文章【PHP中数组排序函数详解汇总】)。二维数组的排序需要我们自己写函数处理了,这里UncleToo给大家分享一个PHP二维数组排序的函数:
代码:
functionarray_sort($arr,$keys,$type='asc'){
$keysvalue= $new_arr</div>
</li>
<li><a href="/article/197.htm"
title="【Hadoop十七】HDFS HA配置" target="_blank">【Hadoop十七】HDFS HA配置</a>
<span class="text-muted">bit1129</span>
<a class="tag" taget="_blank" href="/search/hadoop/1.htm">hadoop</a>
<div>基于Zookeeper的HDFS HA配置主要涉及两个文件,core-site和hdfs-site.xml。
测试环境有三台
hadoop.master
hadoop.slave1
hadoop.slave2
hadoop.master包含的组件NameNode, JournalNode, Zookeeper,DFSZKFailoverController</div>
</li>
<li><a href="/article/324.htm"
title="由wsdl生成的java vo类不适合做普通java vo" target="_blank">由wsdl生成的java vo类不适合做普通java vo</a>
<span class="text-muted">darrenzhu</span>
<a class="tag" taget="_blank" href="/search/VO/1.htm">VO</a><a class="tag" taget="_blank" href="/search/wsdl/1.htm">wsdl</a><a class="tag" taget="_blank" href="/search/webservice/1.htm">webservice</a><a class="tag" taget="_blank" href="/search/rpc/1.htm">rpc</a>
<div>开发java webservice项目时,如果我们通过SOAP协议来输入输出,我们会利用工具从wsdl文件生成webservice的client端类,但是这里面生成的java data model类却不适合做为项目中的普通java vo类来使用,当然有一中情况例外,如果这个自动生成的类里面的properties都是基本数据类型,就没问题,但是如果有集合类,就不行。原因如下:
1)使用了集合如Li</div>
</li>
<li><a href="/article/451.htm"
title="JAVA海量数据处理之二(BitMap)" target="_blank">JAVA海量数据处理之二(BitMap)</a>
<span class="text-muted">周凡杨</span>
<a class="tag" taget="_blank" href="/search/java/1.htm">java</a><a class="tag" taget="_blank" href="/search/%E7%AE%97%E6%B3%95/1.htm">算法</a><a class="tag" taget="_blank" href="/search/bitmap/1.htm">bitmap</a><a class="tag" taget="_blank" href="/search/bitset/1.htm">bitset</a><a class="tag" taget="_blank" href="/search/%E6%95%B0%E6%8D%AE/1.htm">数据</a>
<div> 路漫漫其修远兮,吾将上下而求索。想要更快,就要深入挖掘 JAVA 基础的数据结构,从来分析出所编写的 JAVA 代码为什么把内存耗尽,思考有什么办法可以节省内存呢? 啊哈!算法。这里采用了 BitMap 思想。
首先来看一个实验:
指定 VM 参数大小: -Xms256m -Xmx540m </div>
</li>
<li><a href="/article/578.htm"
title="java类型与数据库类型" target="_blank">java类型与数据库类型</a>
<span class="text-muted">g21121</span>
<a class="tag" taget="_blank" href="/search/java/1.htm">java</a>
<div>很多时候我们用hibernate的时候往往并不是十分关心数据库类型和java类型的对应关心,因为大多数hbm文件是自动生成的,但有些时候诸如:数据库设计、没有生成工具、使用原始JDBC、使用mybatis(ibatIS)等等情况,就会手动的去对应数据库与java的数据类型关心,当然比较简单的数据类型即使配置错了也会很快发现问题,但有些数据类型却并不是十分常见,这就给程序员带来了很多麻烦。
&nb</div>
</li>
<li><a href="/article/705.htm"
title="Linux命令" target="_blank">Linux命令</a>
<span class="text-muted">510888780</span>
<a class="tag" taget="_blank" href="/search/linux%E5%91%BD%E4%BB%A4/1.htm">linux命令</a>
<div>系统信息
arch 显示机器的处理器架构(1)
uname -m 显示机器的处理器架构(2)
uname -r 显示正在使用的内核版本
dmidecode -q 显示硬件系统部件 - (SMBIOS / DMI)
hdparm -i /dev/hda 罗列一个磁盘的架构特性
hdparm -tT /dev/sda 在磁盘上执行测试性读取操作
cat /proc/cpuinfo 显示C</div>
</li>
<li><a href="/article/832.htm"
title="java常用JVM参数" target="_blank">java常用JVM参数</a>
<span class="text-muted">墙头上一根草</span>
<a class="tag" taget="_blank" href="/search/java/1.htm">java</a><a class="tag" taget="_blank" href="/search/jvm%E5%8F%82%E6%95%B0/1.htm">jvm参数</a>
<div>-Xms:初始堆大小,默认为物理内存的1/64(<1GB);默认(MinHeapFreeRatio参数可以调整)空余堆内存小于40%时,JVM就会增大堆直到-Xmx的最大限制
-Xmx:最大堆大小,默认(MaxHeapFreeRatio参数可以调整)空余堆内存大于70%时,JVM会减少堆直到 -Xms的最小限制
-Xmn:新生代的内存空间大小,注意:此处的大小是(eden+ 2</div>
</li>
<li><a href="/article/959.htm"
title="我的spring学习笔记9-Spring使用工厂方法实例化Bean的注意点" target="_blank">我的spring学习笔记9-Spring使用工厂方法实例化Bean的注意点</a>
<span class="text-muted">aijuans</span>
<a class="tag" taget="_blank" href="/search/Spring+3/1.htm">Spring 3</a>
<div>方法一:
<bean id="musicBox" class="onlyfun.caterpillar.factory.MusicBoxFactory"
factory-method="createMusicBoxStatic"></bean>
方法二:
</div>
</li>
<li><a href="/article/1086.htm"
title="mysql查询性能优化之二" target="_blank">mysql查询性能优化之二</a>
<span class="text-muted">annan211</span>
<a class="tag" taget="_blank" href="/search/UNION/1.htm">UNION</a><a class="tag" taget="_blank" href="/search/mysql/1.htm">mysql</a><a class="tag" taget="_blank" href="/search/%E6%9F%A5%E8%AF%A2%E4%BC%98%E5%8C%96/1.htm">查询优化</a><a class="tag" taget="_blank" href="/search/%E7%B4%A2%E5%BC%95%E4%BC%98%E5%8C%96/1.htm">索引优化</a>
<div>
1 union的限制
有时mysql无法将限制条件从外层下推到内层,这使得原本能够限制部分返回结果的条件无法应用到内层
查询的优化上。
如果希望union的各个子句能够根据limit只取部分结果集,或者希望能够先排好序在
合并结果集的话,就需要在union的各个子句中分别使用这些子句。
例如 想将两个子查询结果联合起来,然后再取前20条记录,那么mys</div>
</li>
<li><a href="/article/1213.htm"
title="数据的备份与恢复" target="_blank">数据的备份与恢复</a>
<span class="text-muted">百合不是茶</span>
<a class="tag" taget="_blank" href="/search/oracle/1.htm">oracle</a><a class="tag" taget="_blank" href="/search/sql/1.htm">sql</a><a class="tag" taget="_blank" href="/search/%E6%95%B0%E6%8D%AE%E6%81%A2%E5%A4%8D/1.htm">数据恢复</a><a class="tag" taget="_blank" href="/search/%E6%95%B0%E6%8D%AE%E5%A4%87%E4%BB%BD/1.htm">数据备份</a>
<div> 数据的备份与恢复的方式有: 表,方案 ,数据库;
数据的备份:
导出到的常见命令;
参数 说明
USERID 确定执行导出实用程序的用户名和口令
BUFFER 确定导出数据时所使用的缓冲区大小,其大小用字节表示
FILE 指定导出的二进制文</div>
</li>
<li><a href="/article/1340.htm"
title="线程组" target="_blank">线程组</a>
<span class="text-muted">bijian1013</span>
<a class="tag" taget="_blank" href="/search/java/1.htm">java</a><a class="tag" taget="_blank" href="/search/%E5%A4%9A%E7%BA%BF%E7%A8%8B/1.htm">多线程</a><a class="tag" taget="_blank" href="/search/thread/1.htm">thread</a><a class="tag" taget="_blank" href="/search/java%E5%A4%9A%E7%BA%BF%E7%A8%8B/1.htm">java多线程</a><a class="tag" taget="_blank" href="/search/%E7%BA%BF%E7%A8%8B%E7%BB%84/1.htm">线程组</a>
<div>有些程序包含了相当数量的线程。这时,如果按照线程的功能将他们分成不同的类别将很有用。
线程组可以用来同时对一组线程进行操作。
创建线程组:ThreadGroup g = new ThreadGroup(groupName);
&nbs</div>
</li>
<li><a href="/article/1467.htm"
title="top命令找到占用CPU最高的java线程" target="_blank">top命令找到占用CPU最高的java线程</a>
<span class="text-muted">bijian1013</span>
<a class="tag" taget="_blank" href="/search/java/1.htm">java</a><a class="tag" taget="_blank" href="/search/linux/1.htm">linux</a><a class="tag" taget="_blank" href="/search/top/1.htm">top</a>
<div>上次分析系统中占用CPU高的问题,得到一些使用Java自身调试工具的经验,与大家分享。 (1)使用top命令找出占用cpu最高的JAVA进程PID:28174 (2)如下命令找出占用cpu最高的线程
top -Hp 28174 -d 1 -n 1
32694 root 20 0 3249m 2.0g 11m S 2 6.4 3:31.12 java </div>
</li>
<li><a href="/article/1594.htm"
title="【持久化框架MyBatis3四】MyBatis3一对一关联查询" target="_blank">【持久化框架MyBatis3四】MyBatis3一对一关联查询</a>
<span class="text-muted">bit1129</span>
<a class="tag" taget="_blank" href="/search/Mybatis3/1.htm">Mybatis3</a>
<div>
当两个实体具有1对1的对应关系时,可以使用One-To-One的进行映射关联查询
One-To-One示例数据
以学生表Student和地址信息表为例,每个学生都有都有1个唯一的地址(现实中,这种对应关系是不合适的,因为人和地址是多对一的关系),这里只是演示目的
学生表
CREATE TABLE STUDENTS
(
</div>
</li>
<li><a href="/article/1721.htm"
title="C/C++图片或文件的读写" target="_blank">C/C++图片或文件的读写</a>
<span class="text-muted">bitcarter</span>
<a class="tag" taget="_blank" href="/search/%E5%86%99%E5%9B%BE%E7%89%87/1.htm">写图片</a>
<div>先看代码:
/*strTmpResult是文件或图片字符串
* filePath文件需要写入的地址或路径
*/
int writeFile(std::string &strTmpResult,std::string &filePath)
{
int i,len = strTmpResult.length();
unsigned cha</div>
</li>
<li><a href="/article/1848.htm"
title="nginx自定义指定加载配置" target="_blank">nginx自定义指定加载配置</a>
<span class="text-muted">ronin47</span>
<div>进入 /usr/local/nginx/conf/include 目录,创建 nginx.node.conf 文件,在里面输入如下代码:
upstream nodejs {
server 127.0.0.1:3000;
#server 127.0.0.1:3001;
keepalive 64;
}
server {
liste</div>
</li>
<li><a href="/article/1975.htm"
title="java-71-数值的整数次方.实现函数double Power(double base, int exponent),求base的exponent次方" target="_blank">java-71-数值的整数次方.实现函数double Power(double base, int exponent),求base的exponent次方</a>
<span class="text-muted">bylijinnan</span>
<a class="tag" taget="_blank" href="/search/double/1.htm">double</a>
<div>
public class Power {
/**
*Q71-数值的整数次方
*实现函数double Power(double base, int exponent),求base的exponent次方。不需要考虑溢出。
*/
private static boolean InvalidInput=false;
public static void main(</div>
</li>
<li><a href="/article/2102.htm"
title="Android四大组件的理解" target="_blank">Android四大组件的理解</a>
<span class="text-muted">Cb123456</span>
<a class="tag" taget="_blank" href="/search/android/1.htm">android</a><a class="tag" taget="_blank" href="/search/%E5%9B%9B%E5%A4%A7%E7%BB%84%E4%BB%B6%E7%9A%84%E7%90%86%E8%A7%A3/1.htm">四大组件的理解</a>
<div> 分享一下,今天在Android开发文档-开发者指南中看到的:
App components are the essential building blocks of an Android </div>
</li>
<li><a href="/article/2229.htm"
title="[宇宙与计算]涡旋场计算与拓扑分析" target="_blank">[宇宙与计算]涡旋场计算与拓扑分析</a>
<span class="text-muted">comsci</span>
<a class="tag" taget="_blank" href="/search/%E8%AE%A1%E7%AE%97/1.htm">计算</a>
<div>
怎么阐述我这个理论呢? 。。。。。。。。。
首先: 宇宙是一个非线性的拓扑结构与涡旋轨道时空的统一体。。。。
我们要在宇宙中寻找到一个适合人类居住的行星,时间非常重要,早一个刻度和晚一个刻度,这颗行星的</div>
</li>
<li><a href="/article/2356.htm"
title="同一个Tomcat不同Web应用之间共享会话Session" target="_blank">同一个Tomcat不同Web应用之间共享会话Session</a>
<span class="text-muted">cwqcwqmax9</span>
<a class="tag" taget="_blank" href="/search/session/1.htm">session</a>
<div>实现两个WEB之间通过session 共享数据
查看tomcat 关于 HTTP Connector 中有个emptySessionPath 其解释如下:
If set to true, all paths for session cookies will be set to /. This can be useful for portlet specification impleme</div>
</li>
<li><a href="/article/2483.htm"
title="springmvc Spring3 MVC,ajax,乱码" target="_blank">springmvc Spring3 MVC,ajax,乱码</a>
<span class="text-muted">dashuaifu</span>
<a class="tag" taget="_blank" href="/search/spring/1.htm">spring</a><a class="tag" taget="_blank" href="/search/jquery/1.htm">jquery</a><a class="tag" taget="_blank" href="/search/mvc/1.htm">mvc</a><a class="tag" taget="_blank" href="/search/Ajax/1.htm">Ajax</a>
<div>
springmvc Spring3 MVC @ResponseBody返回,jquery ajax调用中文乱码问题解决
Spring3.0 MVC @ResponseBody 的作用是把返回值直接写到HTTP response body里。具体实现AnnotationMethodHandlerAdapter类handleResponseBody方法,具体实</div>
</li>
<li><a href="/article/2610.htm"
title="搭建WAMP环境" target="_blank">搭建WAMP环境</a>
<span class="text-muted">dcj3sjt126com</span>
<a class="tag" taget="_blank" href="/search/wamp/1.htm">wamp</a>
<div>这里先解释一下WAMP是什么意思。W:windows,A:Apache,M:MYSQL,P:PHP。也就是说本文说明的是在windows系统下搭建以apache做服务器、MYSQL为数据库的PHP开发环境。
工欲善其事,必须先利其器。因为笔者的系统是WinXP,所以下文指的系统均为此系统。笔者所使用的Apache版本为apache_2.2.11-</div>
</li>
<li><a href="/article/2737.htm"
title="yii2 使用raw http request" target="_blank">yii2 使用raw http request</a>
<span class="text-muted">dcj3sjt126com</span>
<a class="tag" taget="_blank" href="/search/http/1.htm">http</a>
<div>Parses a raw HTTP request using yii\helpers\Json::decode()
To enable parsing for JSON requests you can configure yii\web\Request::$parsers using this class:
'request' =&g</div>
</li>
<li><a href="/article/2864.htm"
title="Quartz-1.8.6 理论部分" target="_blank">Quartz-1.8.6 理论部分</a>
<span class="text-muted">eksliang</span>
<a class="tag" taget="_blank" href="/search/quartz/1.htm">quartz</a>
<div>转载请出自出处:http://eksliang.iteye.com/blog/2207691 一.概述
基于Quartz-1.8.6进行学习,因为Quartz2.0以后的API发生的非常大的变化,统一采用了build模式进行构建;
什么是quartz?
答:简单的说他是一个开源的java作业调度框架,为在 Java 应用程序中进行作业调度提供了简单却强大的机制。并且还能和Sp</div>
</li>
<li><a href="/article/2991.htm"
title="什么是POJO?" target="_blank">什么是POJO?</a>
<span class="text-muted">gupeng_ie</span>
<a class="tag" taget="_blank" href="/search/java/1.htm">java</a><a class="tag" taget="_blank" href="/search/POJO/1.htm">POJO</a><a class="tag" taget="_blank" href="/search/%E6%A1%86%E6%9E%B6/1.htm">框架</a><a class="tag" taget="_blank" href="/search/Hibernate/1.htm">Hibernate</a>
<div>POJO--Plain Old Java Objects(简单的java对象)
POJO是一个简单的、正规Java对象,它不包含业务逻辑处理或持久化逻辑等,也不是JavaBean、EntityBean等,不具有任何特殊角色和不继承或不实现任何其它Java框架的类或接口。
POJO对象有时也被称为Data对象,大量应用于表现现实中的对象。如果项目中使用了Hiber</div>
</li>
<li><a href="/article/3118.htm"
title="jQuery网站顶部定时折叠广告" target="_blank">jQuery网站顶部定时折叠广告</a>
<span class="text-muted">ini</span>
<a class="tag" taget="_blank" href="/search/JavaScript/1.htm">JavaScript</a><a class="tag" taget="_blank" href="/search/html/1.htm">html</a><a class="tag" taget="_blank" href="/search/jquery/1.htm">jquery</a><a class="tag" taget="_blank" href="/search/Web/1.htm">Web</a><a class="tag" taget="_blank" href="/search/css/1.htm">css</a>
<div>效果体验:http://hovertree.com/texiao/jquery/4.htmHTML文件代码:
<!DOCTYPE html>
<html xmlns="http://www.w3.org/1999/xhtml">
<head>
<title>网页顶部定时收起广告jQuery特效 - HoverTree<</div>
</li>
<li><a href="/article/3245.htm"
title="Spring boot内嵌的tomcat启动失败" target="_blank">Spring boot内嵌的tomcat启动失败</a>
<span class="text-muted">kane_xie</span>
<a class="tag" taget="_blank" href="/search/spring+boot/1.htm">spring boot</a>
<div>根据这篇guide创建了一个简单的spring boot应用,能运行且成功的访问。但移植到现有项目(基于hbase)中的时候,却报出以下错误:
SEVERE: A child container failed during start
java.util.concurrent.ExecutionException: org.apache.catalina.Lif</div>
</li>
<li><a href="/article/3372.htm"
title="leetcode: sort list" target="_blank">leetcode: sort list</a>
<span class="text-muted">michelle_0916</span>
<a class="tag" taget="_blank" href="/search/Algorithm/1.htm">Algorithm</a><a class="tag" taget="_blank" href="/search/linked+list/1.htm">linked list</a><a class="tag" taget="_blank" href="/search/sort/1.htm">sort</a>
<div>Sort a linked list in O(n log n) time using constant space complexity.
====analysis=======
mergeSort for singly-linked list
====code======= /**
* Definition for sin</div>
</li>
<li><a href="/article/3499.htm"
title="nginx的安装与配置,中途遇到问题的解决" target="_blank">nginx的安装与配置,中途遇到问题的解决</a>
<span class="text-muted">qifeifei</span>
<a class="tag" taget="_blank" href="/search/nginx/1.htm">nginx</a>
<div>我使用的是ubuntu13.04系统,在安装nginx的时候遇到如下几个问题,然后找思路解决的,nginx 的下载与安装
wget http://nginx.org/download/nginx-1.0.11.tar.gz
tar zxvf nginx-1.0.11.tar.gz
./configure
make
make install
安装的时候出现</div>
</li>
<li><a href="/article/3626.htm"
title="用枚举来处理java自定义异常" target="_blank">用枚举来处理java自定义异常</a>
<span class="text-muted">tcrct</span>
<a class="tag" taget="_blank" href="/search/java/1.htm">java</a><a class="tag" taget="_blank" href="/search/enum/1.htm">enum</a><a class="tag" taget="_blank" href="/search/exception/1.htm">exception</a>
<div>在系统开发过程中,总少不免要自己处理一些异常信息,然后将异常信息变成友好的提示返回到客户端的这样一个过程,之前都是new一个自定义的异常,当然这个所谓的自定义异常也是继承RuntimeException的,但这样往往会造成异常信息说明不一致的情况,所以就想到了用枚举来解决的办法。
1,先创建一个接口,里面有两个方法,一个是getCode, 一个是getMessage
public </div>
</li>
<li><a href="/article/3753.htm"
title="erlang supervisor分析" target="_blank">erlang supervisor分析</a>
<span class="text-muted">wudixiaotie</span>
<a class="tag" taget="_blank" href="/search/erlang/1.htm">erlang</a>
<div>当我们给supervisor指定需要创建的子进程的时候,会指定M,F,A,如果是simple_one_for_one的策略的话,启动子进程的方式是supervisor:start_child(SupName, OtherArgs),这种方式可以根据调用者的需求传不同的参数给需要启动的子进程的方法。和最初的参数合并成一个数组,A ++ OtherArgs。那么这个时候就有个问题了,既然参数不一致,那</div>
</li>
</ul>
</div>
</div>
</div>
<div>
<div class="container">
<div class="indexes">
<strong>按字母分类:</strong>
<a href="/tags/A/1.htm" target="_blank">A</a><a href="/tags/B/1.htm" target="_blank">B</a><a href="/tags/C/1.htm" target="_blank">C</a><a
href="/tags/D/1.htm" target="_blank">D</a><a href="/tags/E/1.htm" target="_blank">E</a><a href="/tags/F/1.htm" target="_blank">F</a><a
href="/tags/G/1.htm" target="_blank">G</a><a href="/tags/H/1.htm" target="_blank">H</a><a href="/tags/I/1.htm" target="_blank">I</a><a
href="/tags/J/1.htm" target="_blank">J</a><a href="/tags/K/1.htm" target="_blank">K</a><a href="/tags/L/1.htm" target="_blank">L</a><a
href="/tags/M/1.htm" target="_blank">M</a><a href="/tags/N/1.htm" target="_blank">N</a><a href="/tags/O/1.htm" target="_blank">O</a><a
href="/tags/P/1.htm" target="_blank">P</a><a href="/tags/Q/1.htm" target="_blank">Q</a><a href="/tags/R/1.htm" target="_blank">R</a><a
href="/tags/S/1.htm" target="_blank">S</a><a href="/tags/T/1.htm" target="_blank">T</a><a href="/tags/U/1.htm" target="_blank">U</a><a
href="/tags/V/1.htm" target="_blank">V</a><a href="/tags/W/1.htm" target="_blank">W</a><a href="/tags/X/1.htm" target="_blank">X</a><a
href="/tags/Y/1.htm" target="_blank">Y</a><a href="/tags/Z/1.htm" target="_blank">Z</a><a href="/tags/0/1.htm" target="_blank">其他</a>
</div>
</div>
</div>
<footer id="footer" class="mb30 mt30">
<div class="container">
<div class="footBglm">
<a target="_blank" href="/">首页</a> -
<a target="_blank" href="/custom/about.htm">关于我们</a> -
<a target="_blank" href="/search/Java/1.htm">站内搜索</a> -
<a target="_blank" href="/sitemap.txt">Sitemap</a> -
<a target="_blank" href="/custom/delete.htm">侵权投诉</a>
</div>
<div class="copyright">版权所有 IT知识库 CopyRight © 2000-2050 E-COM-NET.COM , All Rights Reserved.
<!-- <a href="https://beian.miit.gov.cn/" rel="nofollow" target="_blank">京ICP备09083238号</a><br>-->
</div>
</div>
</footer>
<!-- 代码高亮 -->
<script type="text/javascript" src="/static/syntaxhighlighter/scripts/shCore.js"></script>
<script type="text/javascript" src="/static/syntaxhighlighter/scripts/shLegacy.js"></script>
<script type="text/javascript" src="/static/syntaxhighlighter/scripts/shAutoloader.js"></script>
<link type="text/css" rel="stylesheet" href="/static/syntaxhighlighter/styles/shCoreDefault.css"/>
<script type="text/javascript" src="/static/syntaxhighlighter/src/my_start_1.js"></script>
</body>
</html>