【openresty】利用 JWT 实现令牌校验 | 模拟注册登录流程 | RunnerGo 自动化测试
文章目录
-
- 一、什么是 JWT
-
- JWT 组成部分
- JWT 优点
- 二、JWT 安装&使用
-
- 添加 JWT 库路径
- 三、安装 http 客户端
- 四、项目代码
- 五、RunnerGo 自动化测试接口
-
- 1. 创建接口
- 2. 创建场景
- 3. 创建自动化测试
一、什么是 JWT
JWT(JSON Web Token)是一种基于 JSON 的开放标准(RFC 7519),它定义了一种简洁的、自包含的协议格式,用于在通信双方传递 json 对象,常用来实现分布式用户认证。
它通常用于用户的登录鉴权,进行身份验证和信息交换。大致流程:
- 用户使用账号、密码登录,请求发送到 Authentication Server。
- Authentication Server 进行用户验证(查询数据库等),创建 JWT 字符串返回给客户端。
- 客户端请求接口访问资源时,请求头携带 JWT。
- Application Server 验证 JWT 合法性,做相应处理。
JWT 组成部分
JWT主要由三部分组成,通过点号分隔:头部(Header)、载荷(Payload)和签名(Signature)。
- Header
{ "typ": "JWT", "alg": "HS256" }
JWT 头部主要由两部分组成:令牌的类型(typ)、加密签名的哈希算法(alg)。这部分内容用 Base64 编码后构成 JWT 的第一部分。
- Payload
JWT 第二部分是 Payload,也是一个 Json 对象,除了包含自定义的数据外,JWT规范还定义了一些预定义的字段,用于存储有关令牌的标准信息。这些预定义字段通常称为 Claims,分为三个类别:注册声明(Registered Claims)、公共声明(Public Claims)和私有声明(Private Claims)。
以下是JWT Payload中的七个默认的注册声明字段(Registered Claims):
-
iss (issuer):发布令牌的实体,即签发者
-
sub (subject):令牌的主题
-
aud (audience):令牌接收者
-
exp (expiration time):令牌的过期时间,UNIX 时间戳
-
nbf (Not Before):令牌的生效时间,UNIX 时间戳
-
iat (Issued At):令牌的发布时间,UNIX 时间戳
-
jti (JWT ID):JWT的唯一标识符,用于标识该 JWT
还可以添加公共声明和私有声明来存储其他自定义的数据:
{
  "iss": "app",
  "sub": "user123",
  "exp": 1679680000,
  "roles": ["user", "admin"],
  "device": "mobile",

  "custom_data": {
    "key1": "value1",
    "key2": "value2"
  },

  "user_preferences": {
    "theme": "dark",
    "language": "en"
  }
}
载荷的内容也会被 Base64 编码,构成JWT的第二部分。这部分内容是可以反向反编码回原样的,所以不要在 JWT 中放敏感数据,以防信息泄露。
- Signature
签名是 JWT的第三部分,通过将编码后的头部、编码后的载荷与一个密钥结合在一起,然后通过所选的哈希算法生成的。
-- 伪代码:
base64URL(hmac_sha256(base64URL(header).base64URL(payload), secret))
这个 secret 是私密密钥,保存在服务端,客户端无法获取。并且签名的加密算法要和 JWT 头部定义的加密算法一致,否则无效。
Application Server 进行验证,利用 JWT 前两段,用同一套哈希加密算法,和同一个 secret 计算一个签名值,与第三段比较,相同即认证成功。
JWT 优点
- 轻量且自包含:JWT 是一种紧凑的数据格式,可以轻松地在 HTTP 头部、URL 参数或 Cookie 中传输。由于它自包含,无需在服务器端存储会话信息,减轻了服务器的负担。
- 无状态性:由于 JWT 包含了所有必要的信息,服务器不需要在后台存储会话状态。这使得应用程序更容易扩展,因为服务器不需要在多个实例之间共享会话信息。
- 跨平台和语言、便于传输、可扩展、安全等。
二、JWT 安装&使用
基于 openresty 实现简单的用户注册登录身份鉴权,安装 lua-resty-jwt 库,可以使用 opm 包管理工具快捷安装 JWT 库。
- 执行
opm search lua-resty-jwt

安装 github 上 star 较高的 jwt 库 SkyLothar/lua-resty-jwt:
opm get SkyLothar/lua-resty-jwt:
cd /usr/local/openresty/site/lualib/resty/ && ls:查看是否安装成功,jwt.lua文件是否存在。
添加 JWT 库路径
在 nginx 启动的配置文件 nginx.conf 中,添加上 JWT 库的路径。
lua_package_path "/usr/local/openresty/site/lualib/resty/?.lua;;";
导入 JWT 库使用:
local jwt = require "resty.jwt"
三、安装 http 客户端
lua-resty-http 库在本次实验中没有用到,但这是 openresty 中一个重要的 Lua 库,用于执行 HTTP 请求和处理响应。
安装过程很简单,直接执行下面三行即可,安装在 /usr/local/openresty/lualib/resty/。
sudo wget https://raw.githubusercontent.com/ledgetech/lua-resty-http/master/lib/resty/http.lua /usr/local/openresty/lualib/resty/
sudo wget https://raw.githubusercontent.com/ledgetech/lua-resty-http/master/lib/resty/http_headers.lua /usr/local/openresty/lualib/resty/
sudo wget https://raw.githubusercontent.com/ledgetech/lua-resty-http/master/lib/resty/http_connect.lua /usr/local/openresty/lualib/resty/
这个路径是 openresty 默认查询 lua 库的路径,无需手动添加进配置文件中。
四、项目代码
nginx.conf
user cauchy;

pid /home/cauchy/openresty/logs/nginx.pid;

worker_processes 1;

events {
    worker_connections 1024;
}

http {
    lua_package_path "/home/cauchy/openresty/modules/runnergo/?.lua;;/usr/local/openresty/site/lualib/resty/?.lua;;";

    lua_code_cache on;

    server {
        error_log /home/cauchy/openresty/logs/error.log;
        error_log /home/cauchy/openresty/logs/error.log info;
        access_log /home/cauchy/openresty/logs/access.log;

        listen 8002;

        location /api/register {
            content_by_lua_file /home/cauchy/openresty/modules/runnergo/register.lua;
        }

        location /api/login {
            content_by_lua_file /home/cauchy/openresty/modules/runnergo/login.lua;
        }

        location /api/protected {
            access_by_lua_file /home/cauchy/openresty/modules/runnergo/auth.lua;

        }
    }
}
register.lua
ngx.header.content_type = "application/json;charset=utf-8"

local cjson = require "cjson.safe"
local mysql = require "resty.mysql"

local db, err = mysql:new()
if not db then
    ngx.say("failed to instantiate mysql: ", err)
    return
end

local mysql_conf = {
    host = "127.0.0.1",
    port = 3306,
    database = "chat",
    user = "cauchy",
    password = "root",
    charset = "utf8",
    max_packet_size = 1024 * 1024,
}

local ok, err, errno, sqlstate = db:connect(mysql_conf)
if not ok then
    ngx.say("failed to connect: ", err, ": ", errcode, " ", sqlstate)
    return
end

-- post 需要先执行read_body
ngx.req.read_body()
-- get_post_args:
    -- 表单格式(x-www-form-urlencoded): password=12345&username=cauchy
        -- 用法:args.field
    -- json格式(raw json):
        -- 用法:cjson.decode(ngx.var.request_body), args.field
-- local args, err = ngx.req.get_post_args()
local args = cjson.decode(ngx.var.request_body)

-- TODO: 验证用户信息,例如检查用户名和密码的有效性


local password_hash = ngx.md5(args.password) -- 使用MD5哈希密码,生产环境中应使用更安全的方法

local fmt = [===[
insert into chat.users (`username`, `password`) values ('%s', '%s')
]===]
local sql = string.format(fmt, args.username, password_hash)

local res, err, errno, sqlstate = db:query(sql)
if not res then
    ngx.say("Bad result: ", err, ": ", errno, ": ", sqlstate, ".")
    return
end

local result = {
    code = "200",
    data = "Success Register User",
    userinfo = {
        username = args.username,
        password = args.password,
    }
}

ngx.status = 200
ngx.say(cjson.encode(result))

---------------------------------------------------------------

-- 需要放在数据库操作之后!

local ok, err = db:set_keepalive(3 * 1000, 50)
if not ok then
    ngx.say("failed to set keepalive: ", err)
    return
end

-- return ngx.exit(ngx.HTTP_OK)
login.lua
ngx.header.content_type = "application/json;charset=utf-8"

local jwt = require "resty.jwt"
local cjson = require "cjson.safe"
local mysql = require "resty.mysql"

local secret = "your-secret-key"

local db, err = mysql:new()
if not db then
    ngx.say("failed to instantiate mysql: ", err)
    return
end

local mysql_conf = {
    host = "127.0.0.1",
    port = 3306,
    database = "chat",
    user = "cauchy",
    password = "root",
    charset = "utf8",
    max_packet_size = 1024 * 1024,
}

local ok, err, errno, sqlstate = db:connect(mysql_conf)
if not ok then
    ngx.say("failed to connect: ", err, ": ", errcode, " ", sqlstate)
    return
end

---------------------------------------------------------------------

ngx.req.read_body()
local args = ngx.req.get_post_args()

local fmt = [===[
select `password` from chat.users where `username` = '%s' limit 1;
]===]
local sql = string.format(fmt, args.username)

local res, err = db:query(sql)
if not res then
    ngx.say("Bad result: ", err)
    return
end

local password_hash = ngx.md5(args.password)

if res[1] and res[1].password == password_hash then

    local table_of_jwt = {
        header = { typ = "JWT", alg = "HS512" },
        payload = {
            username = args.username,
        }
    }
    local jwt_token = "Bearer " .. jwt:sign(secret, table_of_jwt)

    ngx.status = 200

    local result = {
        code = ngx.HTTP_OK,
        token = jwt_token
    }

    ngx.say(cjson.encode(result))
else
    ngx.say("Invalid username or password")
end

---------------------------------------------------------------------


local ok, err = db:set_keepalive(10000, 50)
if not ok then
    ngx.say("failed to set keepalive: ", err)
    return
end
auth.lua
local jwt = require "resty.jwt"

local secret = "your-secret-key"
local auth_header = ngx.req.get_headers()["token"]
local token = auth_header:sub(8)

local jwt_obj = jwt:verify(secret, token)

if jwt_obj.verified then
    -- 令牌验证成功,继续处理请求
    ngx.say("Token verified successfully!")
else
    ngx.status = ngx.HTTP_UNAUTHORIZED
    ngx.say("Invalid token")
    ngx.exit(ngx.HTTP_UNAUTHORIZED)
end
五、RunnerGo 自动化测试接口
RunnerGo 可以方便的进行调试接口,模拟真实业务场景,实现自动化测试。这款产品的具体细节可以参考官网。
1. 创建接口
设置全局变量 url:
url 填写服务器 IP 和 端口:
下面在 接口管理 界面创建三个接口:
注册register:
Body 设置如下:(post 请求携带用户名和密码,表单格式:x-www-form-urlencoded)
登录login:
获取上一步提取的字段值({{}}形式),通过 post 请求,发送给登录验证
授权操作auth:
请求头携带上一步登录操作后返回的 token:
2. 创建场景
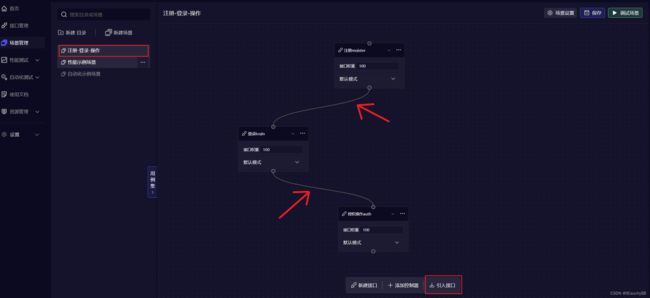
在场景管理界面,创建场景 注册-登录-操作,引入之前创建的三个接口,并将每步进行连接(即上一步关联提取的值,可用于下一步获取)。
3. 创建自动化测试
自动化测试界面,新建计划,然后导入场景:
点击调试场景,每个接口都是绿色则代表接口测试成功:
在场景设置中,需要导入 (txt、csv)文件,用于创建用户测试集:

用例集中创建多个用例,自动化测试时,每个用例都会被轮询附上文件中表头字段对应的值。
不过要想从文件中取值,需要在传递参数时用 {{}} 引用上:
运行自动化测试:
参考文章:
https://blog.csdn.net/weixin_45410366/article/details/125031959
https://zhuanlan.zhihu.com/p/530076389
https://blog.csdn.net/wzj_110/article/details/120271453


