最简单的android导航栏切换效果,使用jetpack navigation编写
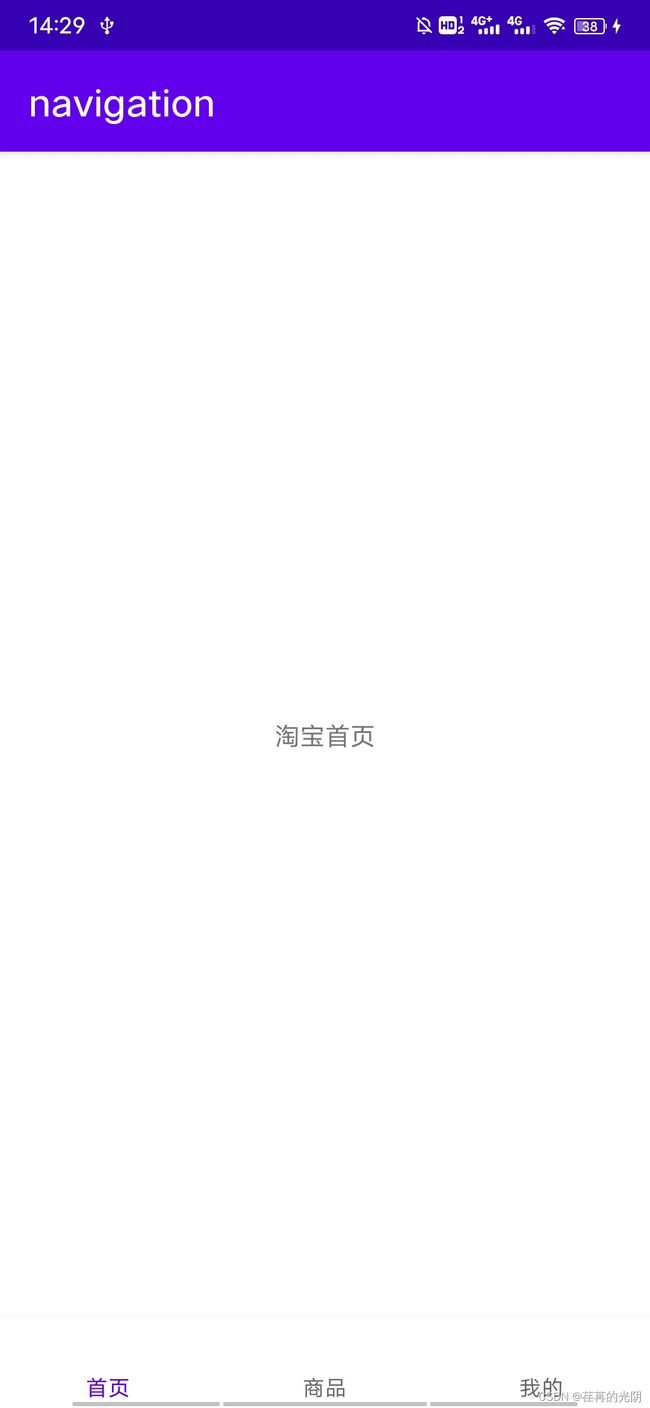
1.最终实现效果,如图所示
2.导入jetpack navigation的相关依赖
	def nav_version = "2.5.1"

    // Java language implementation
    implementation "androidx.navigation:navigation-fragment:$nav_version"
    implementation "androidx.navigation:navigation-ui:$nav_version"

    // Feature module Support
    implementation "androidx.navigation:navigation-dynamic-features-fragment:$nav_version"

    // Testing Navigation
    androidTestImplementation "androidx.navigation:navigation-testing:$nav_version"

    // Jetpack Compose Integration
    implementation "androidx.navigation:navigation-compose:$nav_version"
我这里使用的是java的依赖,本个demo也是使用java进行编写,如果需要kotlin可点击网址jetpack navigation导入kotlin的依赖。
3.使用设计模式中的模板方法抽取BaseFragment基类。
BaseFragment.java
public abstract class BaseFragment extends Fragment {
    private static final String TAG = "BaseFragment";
    @Nullable
    @org.jetbrains.annotations.Nullable
    @Override
    public View onCreateView(@NonNull @NotNull LayoutInflater inflater, @Nullable @org.jetbrains.annotations.Nullable ViewGroup container, @Nullable @org.jetbrains.annotations.Nullable Bundle savedInstanceState) {
        View rootView = LayoutInflater.from(container.getContext()).inflate(getResourcesId(), container, false);
        Log.d(TAG, rootView.toString());
        initView(rootView);
        initEvent();
        return rootView;
    }

    protected void initEvent() {

    }

    protected void initView(View rootView) {
    }

    public abstract int getResourcesId();
}
这是一个抽象类,子类继承它必须实现其中的抽象方法。这个getResourcesId()在模板方法设计模式中为普通方法,它的目的是为了返回对应的布局id。onCreateView()为模板方法,在其中调用普通方法。同时,这里面还定义了一些被protected修饰的方法,也被模板方法所调用,子类继承基类,可以在需要的时候,重写这些方法。
4.编写对应的子Fragment及其布局文件
TIndexFragment.java
public class TIndexFragment extends BaseFragment {
    @Override
    public int getResourcesId() {
        return R.layout.fragment_index;
    }
}
fragment_index.xml
<LinearLayout xmlns:android="http://schemas.android.com/apk/res/android"
    android:orientation="vertical"
    android:gravity="center"
    android:layout_width="match_parent"
    android:layout_height="match_parent">
    <TextView
        android:layout_width="wrap_content"
        android:layout_height="wrap_content"
        android:text="淘宝首页"/>
LinearLayout>
其他子Fragment以及对应xml布局文件类似,这里不再展示。
5.编写主Activity的布局文件以及对应的资源文件
activity_taobao.xml
<androidx.constraintlayout.widget.ConstraintLayout xmlns:android="http://schemas.android.com/apk/res/android"
    xmlns:app="http://schemas.android.com/apk/res-auto"
    xmlns:tools="http://schemas.android.com/tools"
    android:layout_width="match_parent"
    android:layout_height="match_parent"
    android:orientation="vertical"
    tools:context=".taobao.TaobaoActivity">

    <androidx.fragment.app.FragmentContainerView
        android:layout_width="match_parent"
        android:layout_height="wrap_content"
        android:id="@+id/fragment_container_view"
        android:name="androidx.navigation.fragment.NavHostFragment"
        app:navGraph="@navigation/nav_taobao"
        app:layout_constraintBottom_toTopOf="@+id/bottomNavigationView"
        app:layout_constraintEnd_toEndOf="parent"
        app:layout_constraintStart_toStartOf="parent"
        app:layout_constraintTop_toTopOf="parent" />

    <com.google.android.material.bottomnavigation.BottomNavigationView
        android:id="@+id/bottomNavigationView"
        android:layout_width="match_parent"
        android:layout_height="50dp"
        app:menu="@menu/taobao_menu"
        app:layout_constraintBottom_toBottomOf="parent"
        app:layout_constraintEnd_toEndOf="parent"
        app:layout_constraintStart_toStartOf="parent" />

androidx.constraintlayout.widget.ConstraintLayout>
这个FragmentContainerView中有几个属性,如name、navGraph、defaultNavHost,感兴趣的可查阅文档学习。
在res目录下创建menu和navigation两个包。先编写tab切换的菜单栏
taobao_menu.xml
<menu xmlns:android="http://schemas.android.com/apk/res/android">

    <item android:id="@+id/menu_index"
        android:title="首页"/>

    <item android:id="@+id/menu_goods"
        android:title="商品"/>

    <item android:id="@+id/menu_profile"
        android:title="我的"/>

menu>
之后在编写navigation对应的配置文件
nav_taobao.xml
<navigation xmlns:android="http://schemas.android.com/apk/res/android"
    xmlns:app="http://schemas.android.com/apk/res-auto"
    android:id="@+id/nav_taobao.xml"
    app:startDestination="@id/menu_index">

    <fragment
        android:id="@+id/menu_index"
        android:name="com.example.navigation.taobao.TIndexFragment"
        android:label="TIndexFragment" />
    <fragment
        android:id="@+id/menu_goods"
        android:name="com.example.navigation.taobao.GoodsFragment"
        android:label="GoodsFragment" />
    <fragment
        android:id="@+id/menu_profile"
        android:name="com.example.navigation.taobao.ProfileFragment"
        android:label="ProfileFragment" />
navigation>
在nav_taobao.xml中fragment属性的id要与taobao_menu.xml中item的id要保持一致。这样在切换的时候才能正确地切换到目标fragment,暂时不懂没关系,看完下面的的代码就明白了。
6.编写主Activity文件
TaobaoActivity.java
public class TaobaoActivity extends AppCompatActivity {
    private BottomNavigationView bottomNavigationView;
    private NavHostFragment navHostFragment;

    @Override
    protected void onCreate(Bundle savedInstanceState) {
        super.onCreate(savedInstanceState);
        setContentView(R.layout.activity_taobao);
        initView();
    }

    private void initView() {
        bottomNavigationView = findViewById(R.id.bottomNavigationView);
        //获取到FragmentContainerView并强转成NavHostFragment
        navHostFragment = (NavHostFragment) getSupportFragmentManager().findFragmentById(R.id.fragment_container_view);
        //获取导航切换的控制器NavController
        NavController navController = navHostFragment.getNavController();
        //设置menu菜单item切换的监听
        bottomNavigationView.setOnItemSelectedListener(new NavigationBarView.OnItemSelectedListener() {
            @Override
            public boolean onNavigationItemSelected(@NonNull @NotNull MenuItem item) {
                //根据切换的item的id,也就是menu中item的id,导航切换到对应的fragment,也是根据这个id来的
                navController.navigate(item.getItemId());
                //return true表示消费了此次事件,可学习事件分发进行了解
                return true;
            }
        });
    }
}
具体的注释已在代码中编写,这里不再赘述。
相信看到这里的小伙伴已经将效果实现了,动动发财的小手点个赞吧!