Elasticsearch:利用矢量搜索进行音乐信息检索
作者:Alex Salgado

欢迎来到音乐信息检索的未来,机器学习、矢量数据库和音频数据分析融合在一起,带来令人兴奋的新可能性! 如果你对音乐数据分析领域感兴趣,或者只是热衷于技术如何彻底改变音乐行业,那么本指南适合你。
在这里,我们将带你踏上使用矢量搜索方法搜索音乐数据的旅程。 由于世界上超过 80% 的数据都是非结构化的,因此了解如何处理文本以外的不同类型的数据是很有好处的。
如果你想在阅读时跟踪并执行代码,请访问本文末尾列出的 GitHub 上的文件。我们使用如下的命令来克隆代码:
git clone https://github.com/liu-xiao-guo/music-search架构
想象一下,如果你可以哼唱一首你试图回忆的歌曲的曲调,然后你哼唱的歌曲突然出现在屏幕上会怎样? 当然,考虑到必要的努力和数据模型调整,这就是我们今天要做的。
为了实现我们的结果,我们将创建一个如下所示的架构:

这里的主要角色是嵌入(embeddings)。 我们将使用模型生成的音频嵌入作为矢量搜索中的搜索关键字。
安装
如果你还没有安装好自己的 Elasticsearch 及 Kibana,那么请参考我之前的文章来分别进行安装:
-
如何在 Linux,MacOS 及 Windows 上进行安装 Elasticsearch
-
Kibana:如何在 Linux,MacOS 及 Windows 上安装 Elastic 栈中的 Kibana
在安装的时候,请参考 Elastic Stack 8.x 的安装指南来进行安装。在如下的练习中,我将使用最新的 Elastic Stack 8.9.0 来进行展示。
如何生成音频嵌入
生成嵌入的核心是模型,这些模型经过数百万个示例的训练,以提供更相关和更准确的结果。 对于音频,这些模型可以在大量音频数据上进行训练。 这些模型的输出是音频的密集数字表示(即音频嵌入)。 该高维向量捕获音频剪辑的关键特征,从而允许在嵌入空间中进行相似性计算和高效搜索。
对于这项工作,我们将使用 librosa(开源 python 包)来生成音频嵌入。 这通常涉及从音频文件中提取有意义的特征,例如梅尔频率倒谱系数 (MFCC)、色度和梅尔标度频谱图特征。 那么,我们如何使用 Elasticsearch® 实现音频搜索呢?
步骤1:创建索引来存储音频数据
首先,我们需要在 Elasticsearch 中创建一个索引,然后再用音乐数据填充矢量数据库。为简单起见,我们将使用在 Jupyter Notebook 来运行的 Python 代码。
1.1 创建我们的音频数据集索引
现在我们已经建立了连接,让我们创建一个用于存储音频信息的索引。我们使用 jupyter notebook 来打开 elastic_music_search.ipynb 文件。
!pip install elasticsearch
!pip install Config
在上面我们按照必要的 python 库。有关 Elasticsearch 的连接,请参考 “Elasticsearch:关于在 Python 中使用 Elasticsearch 你需要知道的一切 - 8.x”。我们在下载的代码里修改如下的文件 simple.cfg:
simple.cfg
ES_PASSWORD: "p1k6cT4a4bF+pFYf37Xx"
ES_FINGERPRINT: "633bf7f6e4bf264e6a05d488af3c686b858fa63592dc83999a0d77f7e9fe5940"
上面的 ES_PASSWORD 是我们在 Elasticsearch 第一次启动时显示的密码,而 ES_FINGERPRINT 的值是 http_ca.crt 的 fingerprint。我们也可以在 Elasticsearch 第一次启动的时候看到。如果你已经找不到这个显示,那么你可以参考文章 “Elasticsearch:关于在 Python 中使用 Elasticsearch 你需要知道的一切 - 8.x” 来了解如何获得这个。另外一种比较简单的方法就是打开 config/kibana.yml 这个文件:
#index data in elasticsearch
from elasticsearch import Elasticsearch
from config import Config

with open('simple.cfg') as f:
    cfg = Config(f)

print(cfg['ES_FINGERPRINT'])
print(cfg['ES_PASSWORD'])

es = Elasticsearch(
    'https://localhost:9200',
    ssl_assert_fingerprint = cfg['ES_FINGERPRINT'],
    basic_auth=('elastic', cfg['ES_PASSWORD'])
)

es.info()
上面的代码表明我们的 python 代码连接到 Elasticsearch 是成功的。
接下来,我们创建一个叫做 my-audio-index 的索引:
index_name = "my-audio-index"

if(es.indices.exists(index=index_name)):
    print("The index has already existed, going to remove it")
    es.options(ignore_status=404).indices.delete(index=index_name)

# Specify index configuration
mappings = {
    "_source": {
      "excludes": ["audio-embedding"]
    },
    "properties": {
      "audio-embedding": {
        "type": "dense_vector",
        "dims": 2048,
        "index": True,
        "similarity": "cosine"
      },
      "path": {
        "type": "text",
        "fields": {
          "keyword": {
            "type": "keyword",
            "ignore_above": 256
          }
        }
      },
      "timestamp": {
        "type": "date"
      },
      "title": {
        "type": "text"
      },
      "genre": {
        "type": "text"
      }
    }
}

# Create index
if not es.indices.exists(index=index_name):
    index_creation = es.options(ignore_status=400).indices.create(index=index_name, mappings = mappings)
    print("index created: ", index_creation)
else:
    print("Index  already exists.")
提供的 Python 代码使用 Elasticsearch Python 客户端创建具有特定配置的索引。 该索引的目的是提供一种允许在密集矢量字段上进行搜索操作的结构,该结构通常用于存储某些实体(例如本例中的音频文件)的矢量表示或嵌入。
mappings 对象定义了该索引的映射属性,包括 audio-embedding、path、timestamp 和 title 字段。 audio-embedding 字段被指定为 dense_vector 类型,适用于 2048 维,并以 cosine 相似度进行索引,这决定了在搜索操作期间用于计算矢量之间距离的方法。 path 字段将存储播放音频的路径。 请注意,为了适应 2048 的嵌入维度,你需要使用 Elasticsearch 8.8.0 或更高版本。
然后该脚本检查 Elasticsearch 实例中是否存在索引。 如果索引不存在,它将使用指定的配置创建一个新索引。 这种类型的索引配置可用于音频搜索等场景,其中音频文件被转换为矢量表示以进行索引和后续基于相似性的检索。
第 2 步:使用音频数据填充 Elasticsearch
在此步骤结束时,你将读取一个索引,并用音频数据填充以创建我们的数据存储。 为了继续进行音频搜索,我们首先需要填充数据库。
2.1 选择要摄取的音频数据
许多音频数据集都有特定的目标。 对于我们的示例,我将利用 Google Music LM 页面上生成的文件,特别是来自文本和旋律调节部分的文件。 将音频文件 *.wav 放在特定目录中 - 在本例中,我选择 /Users/liuxg/python/music-search/dataset。
$ pwd
/Users/liuxg/python/music-search/dataset
$ ls
a-cappella-chorus.wav                        bella_ciao_tribal-drums-and-flute.wav
bella_ciao_a-cappella-chorus.wav             mozart_symphony25_electronic-synth-lead.wav
bella_ciao_electronic-synth-lead.wav         mozart_symphony25_guitar-solo.wav
bella_ciao_guitar-solo.wav                   mozart_symphony25_jazz-with-saxophone.wav
bella_ciao_humming.wav                       mozart_symphony25_opera-singer.wav
bella_ciao_jazz-with-saxophone.wav           mozart_symphony25_piano-solo.wav
bella_ciao_opera-singer.wav                  mozart_symphony25_prompt.wav
bella_ciao_piano-solo.wav                    mozart_symphony25_string-quartet.wav
bella_ciao_string-quartet.wav                mozart_symphony25_tribal-drums-and-flute.wav
import os
def list_audio_files(directory):
# The list to store the names of .wav files
audio_files = []
# Check if the path exists
if os.path.exists(directory):
# Walk the directory
for root, dirs, files in os.walk(directory):
for file in files:
# Check if the file is a .wav file
if file.endswith('.wav'):
# Extract the filename from the path
filename = os.path.splitext(file)[0]
print(filename)
# Add the file to the list
audio_files.append(file)
else:
print(f"The directory '{directory}' does not exist.")
# Return the list of .mp3 files
return audio_files
# Use the function
audio_path = "/Users/liuxg/python/music-search/dataset"
audio_files = list_audio_files(audio_path)
该代码定义了一个名为 list_audio_files 的函数,该函数将目录作为参数。 该函数的目的是遍历提供的目录及其子目录,查找扩展名为“.wav”的音频文件。 如果需要支持 .mp3 文件,则需要修改该函数。
2.2 矢量搜索嵌入的威力
这一步就是神奇发生的地方。 矢量相似性搜索是一种根据给定查询的相似性来存储、检索和搜索矢量的机制,通常用于图像检索、自然语言处理、推荐系统等应用程序。 由于深度学习和使用嵌入表示数据的兴起,这个概念被广泛使用。 本质上,嵌入是高维数据的矢量表示。
基本思想是将数据项(例如图像、文档、用户配置文件)表示为高维空间中的矢量。 然后,使用距离度量(例如余弦相似度或欧几里得距离)来测量矢量之间的相似度,并返回最相似的矢量作为搜索结果。 虽然文本嵌入是使用语言特征提取的,但音频嵌入通常是使用频谱图或其他音频信号特征生成的。
 为文本和音频数据创建嵌入的过程涉及使用特征提取或嵌入技术将数据转换为矢量,然后在矢量搜索数据库中对这些矢量进行索引。
2.2.3 提取音频特征
下一步涉及分析我们的音频文件并提取有意义的特征。 此步骤至关重要,因为它有助于机器学习模型理解和学习我们的音频数据。
在机器学习的音频信号处理背景下,从声谱图中提取特征的过程是至关重要的一步。 频谱图是音频信号随时间变化的频率内容的直观表示。 在这种情况下确定的特征涵盖三种特定类型:
- 梅尔频率倒谱系数 (MFCC):MFCC 是以与人类听觉感知更密切相关的方式捕获音频信号频谱特征的系数。
- 色度特征:色度特征代表音乐八度的 12 个不同音级,在音乐相关任务中特别有用。
- 频谱对比度:频谱对比度重点关注音频信号中不同频段的感知亮度。
通过分析和比较这些功能集在现实世界文本文件中的有效性,研究人员和从业人员可以深入了解它们对各种基于音频的机器学习应用(例如音频分类和分析)的适用性。
- 首先,我们需要将音频文件转换为适合分析的格式。 Python 中的 librosa 等库可以帮助完成此转换,将音频文件转换为频谱图。
- 接下来,我们将从这些频谱图中提取特征。
- 然后,我们将保存这些特征并将它们作为机器学习模型的输入发送。
我们使用 panns_inference,这是一个专为音频标记和声音事件检测任务而设计的 Python 库。 该库中使用的模型是通过 PANN 进行训练的,PANN 代表大规模预训练音频神经网络,是一种音频模式识别方法。
!pip install -qU panns-inference librosa
from panns_inference import AudioTagging

# load the default model into the gpu.
model = AudioTagging(checkpoint_path=None, device='cuda') # change device to cpu if a gpu is not available
注意:下载 PANNS 推理模型可能需要几分钟的时间。
import numpy as np
import librosa

# Function to normalize a vector. Normalizing a vector means adjusting the values measured in different scales to a common scale.
def normalize(v):
   # np.linalg.norm computes the vector's norm (magnitude). The norm is the total length of all vectors in a space.
   norm = np.linalg.norm(v)
   if norm == 0:
        return v

   # Return the normalized vector.
   return v / norm

# Function to get an embedding of an audio file. An embedding is a reduced-dimensionality representation of the file.
def get_embedding (audio_file):

  # Load the audio file using librosa's load function, which returns an audio time series and its corresponding sample rate.
  a, _ = librosa.load(audio_file, sr=44100)

  # Reshape the audio time series to have an extra dimension, which is required by the model's inference function.
  query_audio = a[None, :]

  # Perform inference on the reshaped audio using the model. This returns an embedding of the audio.
  _, emb = model.inference(query_audio)

  # Normalize the embedding. This scales the embedding to have a length (magnitude) of 1, while maintaining its direction.
  normalized_v = normalize(emb[0])

  # Return the normalized embedding required for dot_product elastic similarity dense vector
  return normalized_v
2.3 将音频数据插入 Elasticsearch
现在我们已经拥有将音频数据插入 Elasticsearch 索引所需的一切。
from datetime import datetime

#Storing Songs in Elasticsearch with Vector Embeddings:
def store_in_elasticsearch(song, embedding, path, index_name, genre, vec_field):
  body = {
      'audio-embedding' : embedding,
      'title': song,
      'timestamp': datetime.now(),
      'path' : path,
      'genre' : genre

  }

  es.index(index=index_name, document=body)
  print ("stored...",song, embedding, path, genre, index_name)

# Initialize a list genre for test
genre_lst = ['jazz', 'opera', 'piano','prompt', 'humming', 'string', 'capella', 'eletronic', 'guitar']

for filename in audio_files:
  audio_file = audio_path + "/" + filename

  emb = get_embedding(audio_file)

  song = filename.lower()

  # Compare if genre list exists inside the song
  genre = next((g for g in genre_lst if g in song), "generic")

  store_in_elasticsearch(song, emb, audio_file, index_name, genre, 2 )
2.4 在 Kibana 中可视化结果
此时,我们可以使用嵌入音频嵌入稠密向量场中的音频数据来检查索引。 Kibana® Dev Tools,特别是控制台功能,是与 Elasticsearch 集群交互的强大界面。 它提供了一种直接向 Elasticsearch 发送 RESTful 命令并以用户友好的格式查看结果的方法。
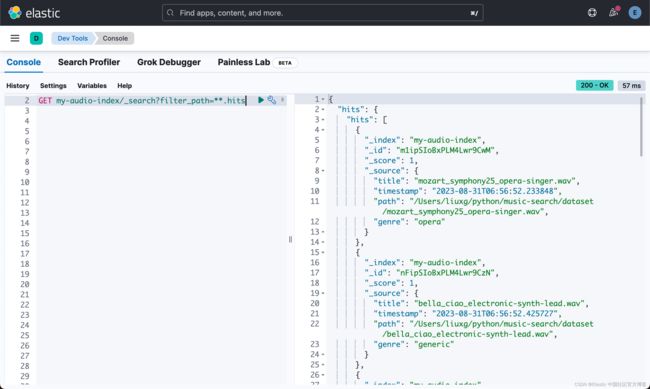
特性需要注意的一点是,我们在这里省去了 audio-embedding 字段。这个是在 mappings 里定义的。它的数据量比较大,这样可以节省空间。
第三步:按音乐搜索
现在,你可以使用生成的嵌入执行向量相似性搜索。 当你向系统提供输入歌曲时,它会将歌曲转换为嵌入,在数据库中搜索相似的嵌入,并返回具有相似特征的歌曲。
# Define a function to query audio vector in Elasticsearch
def query_audio_vector(es, emb, field_key, index_name):
    # Initialize the query structure
    # It's a bool filter query that checks if the field exists
    query = {
        "bool": {
            "filter": [{
                "exists": {
                    "field": field_key
                }
            }]
        }
    }

    # KNN search parameters
    # field is the name of the field to perform the search on
    # k is the number of nearest neighbors to find
    # num_candidates is the number of candidates to consider (more means slower but potentially more accurate results)
    # query_vector is the vector to find nearest neighbors for
    # boost is the multiplier for scores (higher means this match is considered more important)
    knn = {
        "field": field_key,
        "k": 2,
        "num_candidates": 100,
        "query_vector": emb,
        "boost": 100
    }

    # The fields to retrieve from the matching documents
    fields = ["title", "path", "genre", "body_content", "url"]

    # The name of the index to search
    index = index_name

    # Perform the search
    # index is the name of the index to search
    # query is the query to use to find matching documents
    # knn is the parameters for KNN search
    # fields is the fields to retrieve from the matching documents
    # size is the maximum number of matches to return
    # source is whether to include the source document in the results
    resp = es.search(index=index,
                     query=query,
                     knn=knn,
                     fields=fields,
                     size=5,
                     source=False)

    # Return the search results
    return resp
让我们从有趣的部分开始吧!
3.1 选择要搜索的音乐
在下面的代码中,我们直接从 dataset 音频目录中选择音乐,并使用音频音乐在 jupyter 中播放结果。
# Import necessary modules for audio display from IPython
from IPython.display import Audio, display

# Provide the URL of the audio file
my_audio = "/Users/liuxg/python/music-search/dataset/bella_ciao_humming.wav"

# Display the audio file in the notebook
Audio(my_audio)
你可以通过单击 “Play” 按钮来播放音乐。

3.2 搜索音乐
现在,让我们运行一段代码来在 Elasticsearch 中搜索音乐 my_audio。 我们将仅使用音频文件进行搜索。
audio_file = "/Users/liuxg/python/music-search/dataset/bella_ciao_humming.wav"
# Generate the embedding vector from the provided audio file
# 'get_embedding' is a function that presumably converts the audio file into a numerical vector
emb = get_embedding(audio_file)

# Query the Elasticsearch instance 'es' with the embedding vector 'emb', field key 'audio-embedding',
# and index name 'my-audio-index'
# 'query_audio_vector' is a function that performs a search in Elasticsearch using a vector embedding.
# 'tolist()' method is used to convert numpy array to python list if 'emb' is a numpy array.
resp = query_audio_vector (es, emb.tolist(), "audio-embedding","my-audio-index")
resp['hits']
Elasticsearch 会返回与你的主打歌曲相似的所有音乐:
NUM_MUSIC = 5  # example value

for i in range(NUM_MUSIC):
    path = resp['hits']['hits'][i]['fields']['path'][0]
    print(path)
一些帮助播放结果的代码:

Audio("/Users/liuxg/python/music-search/dataset/bella_ciao_opera-singer.wav")
现在,你可以通过单击 “Play” 按钮来检查结果。
3.3 分析结果
那么,我可以在生产环境中部署此代码并出售我的应用程序吗? 不,作为一种概率模型,概率听觉神经网络 (PANN) 和任何其他机器学习模型都需要增加数据量和额外的微调才能有效地应用于现实场景。
与我们的 18 首歌曲样本相关的嵌入可视化图表清楚地表明了这一点,这可能会导致 kNN 方法出现误报。 然而,未来的数据工程师仍然面临着一个显着的挑战:通过嗡嗡声识别查询的最佳模型的任务。 这代表了机器学习和听觉认知的迷人交叉,需要严格的研究和创新的问题解决。

3.4 使用 UI 改进 POC(可选)
经过一点修改,我将整个代码复制并粘贴到 Streamlit。 Streamlit 是一个 Python 库,可简化为数据科学和机器学习项目创建交互式 Web 应用程序的过程。 它允许新手轻松地将数据脚本转换为可共享的 Web 应用程序,而无需丰富的 Web 开发知识。
结果是这个应用程序:
 Elasticsearch 矢量搜索搜索音频文件_哔哩哔哩_bilibili
音频搜索未来的窗口
我们已经在 Python 中使用 Elasticsearch 向量成功实现了音乐搜索系统。 这是音频搜索领域的一个起点,并且可能通过利用这种架构方法激发更多创新概念。 通过改变模型,可以开发不同的应用程序。 此外,将推理移植到 Elasticsearch 可能会提高性能。 访问 Elastic 的机器学习页面以了解更多信息。
这表明该技术对于文本以外的各种搜索应用具有巨大的潜力和适应性。
所有代码都可以在 GitHub 上的单个文件 elastic-music_search.ipynb 中找到。
原文:Searching by music: Leveraging vector search for audio information retrieval | Elastic Blog