electron ffi-napi 调用dll 记录
用了一个星期,终于在electron  引用成功了。记录下
1.确定 dll 是32位 还是64位
2.将nodejs electron   都安装为32位,在ffi-napi中编译为32位
3.单独运行 写的调用的js文件,看看dll是否调入成功
4.将js文件加入 electron 看是否运行成功
**
1. 查看dll是多少位的
**
打开vs开发人员命令

输入dumpbin /headers +‘dll路径’
dumpbin /headers C:xx.dll
结果

2. 查看nodejs是多少位
打开cmd 输入命令 node 在输入process

如果是有多个nodejs 版本推荐使用nvm管理和切换当前环境

3.安装windows-build-tools
这里主要是注意看python版本 和位数
安装windows-build-tools(ffi-napi依赖ref-napi,这两者都需要依赖python2.7和c++编译工具,windows-build-tools为它们自动配置所需环境)
// 以管理员身份运行终端执行命令
npm install --global --production windows-build-tools
成功截图

在cmd中输入 python

查看python文件路径在哪里
where pyton

继续安装
npm install -g node-gyp
记住安装地址

然后去vue项目中设置node_gyp的地址
npm config set node_gyp "C:\Program Files\nodejs\node_modules\node-gyp\bin\node-gyp.js"
设置msvs_version
npm config set msvs_version 2017
设置python
npm config set python _version "C:\Users\TF\.windows-build-tools\python27\python.exe"
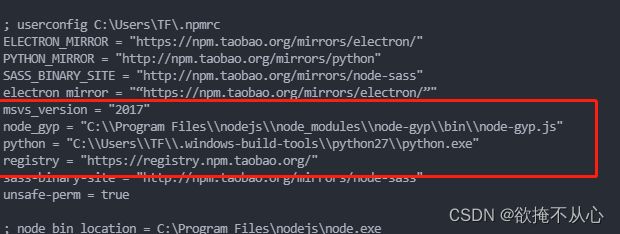
在vue项目中查看配置
npm config list
Electron9.x +vue+ffi-napi 调用Dll动态链接库
在运行
4.安装 ffi-napi
安装ffi-napi,先确定dll是32还是64,安装对应的版本
npm install --save ffi-napi
进入到项目的\node_modules\ref-napi文件中
输入node-gyp build  --arch=位数
如果已经编译了,不是对应的位数。重新编译下(这里是编译为32位)
node-gyp clean configure build --verbose --arch=ia32

安装ref-array-napi ref-struct-napi
npm i -S ref-array-napi ref-struct-napi
5.单个文件测试 调用的dll.js文件
将dll 与js放入同一目录
dll说明

const path = require('path')
console.log('path->引用成功')
const ffi = require('ffi-napi')
console.log('ffi-napi->引用成功')
const ref = require('ref-napi')
const ArrayType = require('ref-array-napi')
console.log('ref-array-napi->引用成功')
const iconv = require('iconv-lite')
console.log('iconv->引用成功')

// 编码格式(用utf8,会显示中文乱码)
const encoding = 'gbk'

// __dirname当前路径的绝对路径
// 默认加载 32位 DLL
const { arch } = process // x64
console.log('版本信息', arch)
// 这里的path.resolve 显示的当前文件根目录,
// 实际与electron用时,__dirname 指向根目录的dist_electron文件夹
// 如已安装electron 就会在项目的根目录找到该文件夹
var dllFilePath = path.resolve('NationECCode')
if (arch === 'x64') {
  dllFilePath = path.resolve('NationECCode')
}
console.log('dll地址:', dllFilePath)

// 加载 DLL文件,无需写扩展名,将DLL中的函数映射成JS方法
// 这个参数对应时输出参数,所以定义一个buffer,把内存地址传入dll
var refStr = ref.types.char
var refStrs = ArrayType(refStr)
console.log('加载dll')

const NationECCodeDll = new ffi.Library(dllFilePath, {
  // 方法名必须与C函数名一致
  NationEcTrans: [
    ref.types.CString, // 对应 C函数返回类型
    ['string', 'string', refStrs] // C函数参数列表
  ]
})
console.log('加载dll结束')

module.exports = {
  NationEcTrans () {
    console.log('解码asdas开始')
    var strUrl = 'xx'
    var JDataIn = {
      businessType: 'xx',
      officeId: '1234',
      officeName: 'xx',
      operatorId: 'xx',
      operatorName: 'xx',
      orgId: 'xxx'
    }
    var JECCodeInData = {
      data: JDataIn,
      orgId: 'xxx',
      transType: 'xxx'
    }
    var InData = JSON.stringify(JECCodeInData)
    // 定义接收长度
    var OutData = refStrs(10240)
    NationECCodeDll.NationEcTrans(strUrl, InData, OutData)

    // 如出入的参数没有中文,可不下载 iconv-lite
    // OutData.buffer.toString()
    // 因为传出有中文,使用iconv-lite转码,
    // iconv-lite 需要自己下载安装 npm install iconv-lite

    var refData = iconv.decode(OutData.buffer, encoding)
    return refData
  }
}
// 测试代码。正式引用时删除
// function testFun (encoding) {
//   var strUrl = 'xxxx'
//   var JDataIn = {
//     businessType: 'xx',
//     officeId: 'xx',
//     officeName: 'xx',
//     operatorId: 'xx',
//     operatorName: 'xx',
//     orgId: 'xx'
//   }
//   var JECCodeInData = {
//     data: JDataIn,
//     orgId: 'xxx',
//     transType: 'xxx'
//   }
//   var InData = JSON.stringify(JECCodeInData)
//   var OutData = refStrs(10240)
//   var refData = NationECCodeDll.NationEcTrans(strUrl, InData, OutData)
//   console.log(iconv.decode(OutData.buffer, encoding))
//   var refData = iconv.decode(OutData.buffer, encoding)
//   return refData
// }

// var aa = testFun('gbk')
// console.log(aa)
在当前文件目录下 输入 node xx.js
如果不报错,说明调用dll成功
6.安装electron
electron 也存在32 或 64,选择对应的dll安装
npm install --arch=ia32 electron
打开background.js文件。在src文件下
隐藏界面上的菜单
import { app, protocol, BrowserWindow, Menu } from 'electron'

async function createWindow () {
  // 隐藏菜单栏
  Menu.setApplicationMenu(null) //取消菜单栏
  }
相关配置参考electron 配置
7. 将xx.js加入electron
直接在background.js 文件的createWindow 引用调用dll的js方法
如果没有错误,会自动打开
使用ffi-napi 错误代码
Dynamic Linking Error: Win32 error 126

原因1.找不到对应dll
原因2:dll存在多个引用dll

解决办法: 1.单个js文件测试,将dll与js放入同一路径下测试
2. 使用 electron  时,如果dll存在多个dll引用,将dll文件放入项目根目录下
Error: \\?\F:xxx\node_modules\ref-napi\build\Release\binding.node is not a valid Win32 application.
\\?\F:xxxxnode_modules\ref-napi\build\Release\binding.node

原因:多半时因为node-gyp编译的文件不是对应dll的位数
解决办法。 查看dll 的位数。在看electron 的位数 ,
进入node_modules\ref-napi文件下 重新编译
node-gyp clean configure build --verbose --arch=ia32
node-gyp clean configure build --verbose --arch=ia32
小结
在我使用过程中。js文件调用成功,但在electron 中报错。
经过排查,发现我使用的dll是32位的。
但 nodejs 是64位 node-gyp编译的也是64
electron 也是64
把以上 重新安装 编译为32后,调用成功。
参考步骤electron +ffinapi
环境:node 14.18.1
node-gyp 8.4.1
ffi-napi 4.0.3