RecyclerView源码解析(二):结合LinearLayout分析绘制流程
RecyclerView源码解析(二):结合LinearLayout分析绘制流程
封面:

导言
上篇文章中主要已经介绍了RecyclerView的View的三大工作流程(onMeasure,onLayout,onDraw),实际上看了上篇文章还是很迷糊,因为RecylerView由于实现了高度的解耦,所以阅读整个RecyclerView的源码和理解整个RecyclerView需要结合多个相关的类别。本篇文章我们将以配合我们最常用的LinearLayoutManager类来继续分析RecyclerView。上一篇文章权当是介绍一些前置概念和对整个RecyclerView有一个大致的了解吧。
源码分析
从setAdapter方法开始
这里我们以setAdapter方法为切入点,来从这个方法开始继续分析RecyclerView的工作流程:
public void setAdapter(@Nullable Adapter adapter) {
    // bail out if layout is frozen
    setLayoutFrozen(false);
    setAdapterInternal(adapter, false, true);
    processDataSetCompletelyChanged(false);
    requestLayout();
}
这里主要做了以下几步:
-
解除Layout的Frozen状态,使之后的布局可以正常进行
-
调用
setAdapterInternal方法来设置新的适配器,这一步中将会卸载之前的适配器,清除其相关信息并且更新Recycler回收池,最后将新的适配器安装上去 -
由于数据集发生了变化,所以需要清除掉之前的缓存,并将之前的数据标记为无效
-
请求重新布局视图,这一步将重新触发View的三大工作流程,下面是ChatGpt的一些解释:
调用
requestLayout()方法后,会触发以下一系列的方法和事件,以重新布局视图:onMeasure(int, int): 这是布局传递的第一步。视图会测量自身的尺寸,确定它应该占用多少空间。onLayout(boolean, int, int, int, int): 这是布局传递的第二步。视图根据测量结果和布局参数来安排子视图的位置和大小。onDraw(Canvas): 如果视图包含绘制操作,它将在绘制阶段被调用。onSizeChanged(int, int, int, int): 如果视图的大小发生变化,这个方法会被调用。invalidate():requestLayout()方法通常伴随着invalidate()方法的调用,以便在下一个绘制帧时重新绘制视图。onLayoutChildren(RecyclerView.Recycler, RecyclerView.State): 如果是RecyclerView等特殊视图容器,这个方法将负责重新排列和布局子视图。
总之,
requestLayout()方法会触发测量、布局、绘制和刷新等一系列操作,以确保视图的正确显示和布局。具体的方法调用顺序和影响取决于视图的类型和视图层次结构。
所以可以说setAdapter方法主要就是为了重置状态,设置新的适配器,请求重新进行视图布局这三大步,而在这三大步中我们最关心的无非就是重新布局。而这个重新布局的流程的大致框架我们已经在上一篇文章中介绍过了,这篇文章将会着重介绍LayoutManager将会如何实现布局。
重新进行视图布局
这其中第一步的onMeasure就不细讲了,因为LinearLayoutManager和其他两个Google官方的LayoutManager都是启动自动测量的,也没有什么额外的逻辑。我们首先最需要关注的是LayoutManager的onLayoutChildren方法,因为这个方法将会真正进行子视图的布局并且在dispatchLayoutStep1和dispatchLayoutStep2方法中都会被调用到。如果我们查看LinearLayoutManager的这个方法的源码的话,在方法内容之前有巨长的一段注释:
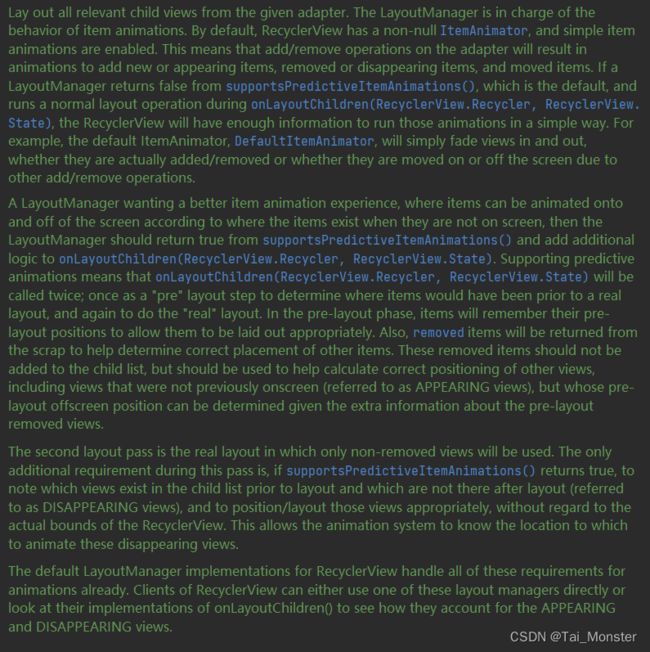
根据翻译,这段描述涉及到RecyclerView的布局过程和动画处理:
- 默认情况下,RecyclerView启用了简单的项动画(simple item animations),这意味着在适配器上执行添加/移除操作时,会有动画效果,包括新添加或出现的项、移除或消失的项以及移动的项。RecyclerView默认使用非空的ItemAnimator来处理这些动画。
- 如果一个LayoutManager返回
false,表示不支持预测性项动画(predictive item animations),这也是默认设置,那么它会在onLayoutChildren(RecyclerView.Recycler, RecyclerView.State)方法中执行普通的布局操作。在这种情况下,RecyclerView会有足够的信息来简单地运行这些动画。例如,默认的ItemAnimator(DefaultItemAnimator)只会淡入淡出视图,无论它们实际上是被添加/移除还是由于其他添加/移除操作而在屏幕上移动或移出屏幕。- 如果一个LayoutManager希望提供更好的项动画体验,其中项可以根据它们在不在屏幕上的位置进行动画,那么LayoutManager应该从
supportsPredictiveItemAnimations()方法中返回true,并在onLayoutChildren(RecyclerView.Recycler, RecyclerView.State)方法中添加额外的逻辑。支持预测性动画意味着onLayoutChildren(RecyclerView.Recycler, RecyclerView.State)方法将被调用两次:首先作为“预”布局步骤,用于确定在实际布局之前项的位置,然后再进行“实际”布局。在预布局阶段,项将记住它们在预布局时的位置,以便它们能够被正确地布局。此外,已移除的项将从废弃项(scrap)中返回,以帮助确定其他项的正确位置。这些已移除的项不应该添加到子项列表中,但应该用于计算其他视图的正确位置,包括之前不在屏幕上的视图(称为APPEARING视图),但可以根据有关预布局已移除视图的额外信息来确定它们的预布局位置。- 第二个布局过程是实际的布局,在这个过程中只使用未被移除的视图。在这个过程中,唯一的额外要求是,如果
supportsPredictiveItemAnimations()返回true,则需要注意哪些视图存在于布局之前的子项列表中,哪些在布局之后不在了(称为DISAPPEARING视图),并且需要正确地定位/布局这些视图,而不考虑RecyclerView的实际边界。这允许动画系统知道将这些消失的视图动画到的位置。总之,RecyclerView的默认LayoutManager实现已经处理了动画的所有要求。RecyclerView的客户端可以直接使用这些LayoutManager之一,或者查看它们的
onLayoutChildren()方法的实现,以了解它们如何处理APPEARING和DISAPPEARING视图。
根据这段描述,我们也可以了解到上篇文章提到的预布局和实际布局这两个布局过程的作用,预布局将会实现更好的动画效果,因为它记录了新动画开始之前的旧状态,这可以为更合理的动画迭代效果提供更多的信息。
接下来继续回到onLayoutChildren中,这个方法负责布局逻辑,大体逻辑分为四步:
- 首先,通过检查子项和其他变量,找到一个锚点坐标和一个锚点项的位置。
- 然后,从底部开始堆叠,向起始方向填充子项。
- 接下来,从顶部开始堆叠,向结束方向填充子项。
- 最后,根据需要滚动,以满足从底部堆叠等要求。
上面提到的锚点就是布局开始的位置,而锚点项正是与之对应的一个列表项。我们也可以根据这大体的四步逻辑来拆分这个方法,来看源码:
public void onLayoutChildren(RecyclerView.Recycler recycler, RecyclerView.State state) {
    ......
    if (!mAnchorInfo.mValid || mPendingScrollPosition != RecyclerView.NO_POSITION
            || mPendingSavedState != null) {
        mAnchorInfo.reset();
        mAnchorInfo.mLayoutFromEnd = mShouldReverseLayout ^ mStackFromEnd;
        // calculate anchor position and coordinate
        updateAnchorInfoForLayout(recycler, state, mAnchorInfo);
        mAnchorInfo.mValid = true;
    } else if (focused != null && (mOrientationHelper.getDecoratedStart(focused)
                    >= mOrientationHelper.getEndAfterPadding()
            || mOrientationHelper.getDecoratedEnd(focused)
            <= mOrientationHelper.getStartAfterPadding())) {
        // This case relates to when the anchor child is the focused view and due to layout
        // shrinking the focused view fell outside the viewport, e.g. when soft keyboard shows
        // up after tapping an EditText which shrinks RV causing the focused view (The tapped
        // EditText which is the anchor child) to get kicked out of the screen. Will update the
        // anchor coordinate in order to make sure that the focused view is laid out. Otherwise,
        // the available space in layoutState will be calculated as negative preventing the
        // focused view from being laid out in fill.
        // Note that we won't update the anchor position between layout passes (refer to
        // TestResizingRelayoutWithAutoMeasure), which happens if we were to call
        // updateAnchorInfoForLayout for an anchor that's not the focused view (e.g. a reference
        // child which can change between layout passes).
        mAnchorInfo.assignFromViewAndKeepVisibleRect(focused, getPosition(focused));
    }
   ......
}
这一部分的源码主要就是来寻找锚点,首先在第一行的if中会判断锚点信息是否有效(mAnchorInfo.mValid)或者是否有什么滚动状态需要更新,这个mAnchorInfo.mValid默认是false的,当完成测量后就会被置为true,当完成Layout之后又会被置为false。可以看到如果这个锚点信息无效的话就会进入这个分支中,在该分支中主要是对锚点的信息进行了计算和测量(通过updateAnchorInfoForLayout(recycler, state, mAnchorInfo)方法),然后设置该锚点信息为有效的。
对上面的一小段介绍进行总结的话,其实就是当锚点信息需要更新时,调用updateAnchorInfoForLayout(recycler, state, mAnchorInfo)来重新测量锚点信息。如果之前的锚点信息可用的话就会进入到else-if块中,可以对这个注释进行翻译和总结,其实就是对软键盘弹出等情况进行了处理,这段代码确保了当布局发生变化时,焦点视图(通常是用户正在与之交互的视图)不会因布局调整而被移出屏幕,而是会被正确地布局在可见区域内。
接下来继续往下看:
public void onLayoutChildren(RecyclerView.Recycler recycler, RecyclerView.State state) {
    ......
    int startOffset;
    int endOffset;
    final int firstLayoutDirection;
    if (mAnchorInfo.mLayoutFromEnd) {
        firstLayoutDirection = mShouldReverseLayout ? LayoutState.ITEM_DIRECTION_TAIL
                : LayoutState.ITEM_DIRECTION_HEAD;
    } else {
        firstLayoutDirection = mShouldReverseLayout ? LayoutState.ITEM_DIRECTION_HEAD
                : LayoutState.ITEM_DIRECTION_TAIL;
    }
    ......
}
这段代码将会根据锚点信息中的mLayoutFromEnd参数来确定布局的方向,具体来说就是到底是从上到下还是从下到上(或者是左右)。
public void onLayoutChildren(RecyclerView.Recycler recycler, RecyclerView.State state) {
......
onAnchorReady(recycler, state, mAnchorInfo, firstLayoutDirection);
    detachAndScrapAttachedViews(recycler);
  	......
    if (mAnchorInfo.mLayoutFromEnd) {
        // fill towards start
        updateLayoutStateToFillStart(mAnchorInfo);
        mLayoutState.mExtraFillSpace = extraForStart;
        fill(recycler, mLayoutState, state, false);
        startOffset = mLayoutState.mOffset;
        final int firstElement = mLayoutState.mCurrentPosition;
        if (mLayoutState.mAvailable > 0) {
            extraForEnd += mLayoutState.mAvailable;
        }
        // fill towards end
        updateLayoutStateToFillEnd(mAnchorInfo);
        mLayoutState.mExtraFillSpace = extraForEnd;
        mLayoutState.mCurrentPosition += mLayoutState.mItemDirection;
        fill(recycler, mLayoutState, state, false);
        endOffset = mLayoutState.mOffset;

        if (mLayoutState.mAvailable > 0) {
            // end could not consume all. add more items towards start
            extraForStart = mLayoutState.mAvailable;
            updateLayoutStateToFillStart(firstElement, startOffset);
            mLayoutState.mExtraFillSpace = extraForStart;
            fill(recycler, mLayoutState, state, false);
            startOffset = mLayoutState.mOffset;
        }
    } else {
        // fill towards end
        updateLayoutStateToFillEnd(mAnchorInfo);
        mLayoutState.mExtraFillSpace = extraForEnd;
        fill(recycler, mLayoutState, state, false);
        endOffset = mLayoutState.mOffset;
        final int lastElement = mLayoutState.mCurrentPosition;
        if (mLayoutState.mAvailable > 0) {
            extraForStart += mLayoutState.mAvailable;
        }
        // fill towards start
        updateLayoutStateToFillStart(mAnchorInfo);
        mLayoutState.mExtraFillSpace = extraForStart;
        mLayoutState.mCurrentPosition += mLayoutState.mItemDirection;
        fill(recycler, mLayoutState, state, false);
        startOffset = mLayoutState.mOffset;

        if (mLayoutState.mAvailable > 0) {
            extraForEnd = mLayoutState.mAvailable;
            // start could not consume all it should. add more items towards end
            updateLayoutStateToFillEnd(lastElement, endOffset);
            mLayoutState.mExtraFillSpace = extraForEnd;
            fill(recycler, mLayoutState, state, false);
            endOffset = mLayoutState.mOffset;
        }
    }
......
}
这段代码还是比较长的,不过结构也很清晰,主要就是两个大的分支。首先会调用onAnchorReady(recycler, state, mAnchorInfo, firstLayoutDirection),该方法主要是在锚点信息已经确定的情况下调用的,用于在锚点准备就绪时执行相关操作或更新锚点信息。
接下来会根据锚点信息中的布局方向来确定到底进入哪个分支块代码中,可以说这两段分支代码是一模一样,唯一的区别就是从如何执行fill方法。我们来以第一个分支块为例来介绍如何填充内容:
if (mAnchorInfo.mLayoutFromEnd) {
    // fill towards start
    updateLayoutStateToFillStart(mAnchorInfo);
    mLayoutState.mExtraFillSpace = extraForStart;
    fill(recycler, mLayoutState, state, false);
    startOffset = mLayoutState.mOffset;
    final int firstElement = mLayoutState.mCurrentPosition;
    if (mLayoutState.mAvailable > 0) {
        extraForEnd += mLayoutState.mAvailable;
    }
    // fill towards end
    updateLayoutStateToFillEnd(mAnchorInfo);
    mLayoutState.mExtraFillSpace = extraForEnd;
    mLayoutState.mCurrentPosition += mLayoutState.mItemDirection;
    fill(recycler, mLayoutState, state, false);
    endOffset = mLayoutState.mOffset;

    if (mLayoutState.mAvailable > 0) {
        // end could not consume all. add more items towards start
        extraForStart = mLayoutState.mAvailable;
        updateLayoutStateToFillStart(firstElement, startOffset);
        mLayoutState.mExtraFillSpace = extraForStart;
        fill(recycler, mLayoutState, state, false);
        startOffset = mLayoutState.mOffset;
    }
}
首先我们看到会调用updateLayoutStateToFillStart(mAnchorInfo)方法,主要是用于更新LayoutState对象,以便在开始填充(fill)布局时使用。之后会正式调用fill方法进行填充,我们将着重分析这个方法:
int fill(RecyclerView.Recycler recycler, LayoutState layoutState,
        RecyclerView.State state, boolean stopOnFocusable) {
    // max offset we should set is mFastScroll + available
	......
    while ((layoutState.mInfinite || remainingSpace > 0) && layoutState.hasMore(state)) {
        layoutChunkResult.resetInternal();
		...
        layoutChunk(recycler, state, layoutState, layoutChunkResult);
		...
        if (!layoutChunkResult.mIgnoreConsumed || layoutState.mScrapList != null
                || !state.isPreLayout()) {
            layoutState.mAvailable -= layoutChunkResult.mConsumed;
            // we keep a separate remaining space because mAvailable is important for recycling
            remainingSpace -= layoutChunkResult.mConsumed;
        }
		....
        if (stopOnFocusable && layoutChunkResult.mFocusable) {
            break;
        }
    }
	......
}
这个方法首先会获取RecyclerView中的剩余可用空间,如果有可用空间且有更多列表项需要加载的话就会进入到while循环中,在这个while循环中首先重置layoutChunkResult变量,这个变量将会存储通过layoutChunk方法填充完数据之后的RecyclerView的状态。而在这个layoutChunk方法中会对内容进行填充,填充完毕之后再次计算RecyclerView的剩余可用空间。
所以说,填充内容靠的还是layoutChunk方法,在layoutChunk方法中一开始会调用到layoutState的next方法,这个方法非常重要,是用来获取下一个加载项视图的:

具体方法如下,非常短,主要是会跳转到Recycler的getViewForPosition方法
View next(RecyclerView.Recycler recycler) {
    if (mScrapList != null) {
        return nextViewFromScrapList();
    }
    final View view = recycler.getViewForPosition(mCurrentPosition);
    mCurrentPosition += mItemDirection;
    return view;
}
这个方法中就会涉及到RecyclerView的缓存机制了,不过在这篇文章中我们先不分析缓存机制,下篇文章再介绍。接下来继续回到next方法中,获得到了这个View之后,next中就会将当前的位置进行更新,更新值即为布局方向,我们也可以看看这两个常量的值:

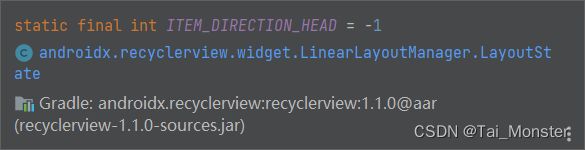
可以看到,如果是TAIL(尾部)的话,该常量为1,否则就为-1。回到之前的layoutChildren中回顾一下这个值是在什么时候被赋予的:
if (mAnchorInfo.mLayoutFromEnd) {
    firstLayoutDirection = mShouldReverseLayout ? LayoutState.ITEM_DIRECTION_TAIL
            : LayoutState.ITEM_DIRECTION_HEAD;
} else {
    firstLayoutDirection = mShouldReverseLayout ? LayoutState.ITEM_DIRECTION_HEAD
            : LayoutState.ITEM_DIRECTION_TAIL;
}
可以看到,如果是从底部开始填充且不需要反转布局方向的话,那么此时的方向就会被赋予为LayoutState.ITEM_DIRECTION_HEAD即为-1,这个数字有什么意义呢?大家可以结合这一张图理解(摘自【进阶】RecyclerView源码解析(一)——绘制流程 - 简书 (jianshu.com)):

可以看到这种情况即为第一张图的情况,此时的positon当然是每次-1来达到从底部开始向上布局的效果。
在layoutChunk方法中获取到了下一次需要填充的视图之后,我们再来看看接下来该方法的逻辑:
void layoutChunk(RecyclerView.Recycler recycler, RecyclerView.State state,
        LayoutState layoutState, LayoutChunkResult result) {
    View view = layoutState.next(recycler);
    ......
    RecyclerView.LayoutParams params = (RecyclerView.LayoutParams) view.getLayoutParams();
    if (layoutState.mScrapList == null) {
        if (mShouldReverseLayout == (layoutState.mLayoutDirection
                == LayoutState.LAYOUT_START)) {
            addView(view);
        } else {
            addView(view, 0);
        }
    } else {
        if (mShouldReverseLayout == (layoutState.mLayoutDirection
                == LayoutState.LAYOUT_START)) {
            addDisappearingView(view);
        } else {
            addDisappearingView(view, 0);
        }
    }
    ......
}
接下来会获取到RecyclerView的布局参数,并且根据布局方向来通过addView方法正式添加视图,这个插入的位置也和方向有关,如果要从底部开始布局的话就会直接调用addView(view)方法在底部插入,否则就会调用到addView(view, 0)方法从头部插入。继续向下走:
measureChildWithMargins(view, 0, 0);
result.mConsumed = mOrientationHelper.getDecoratedMeasurement(view);
int left, top, right, bottom;
if (mOrientation == VERTICAL) {
    if (isLayoutRTL()) {
        right = getWidth() - getPaddingRight();
        left = right - mOrientationHelper.getDecoratedMeasurementInOther(view);
    } else {
        left = getPaddingLeft();
        right = left + mOrientationHelper.getDecoratedMeasurementInOther(view);
    }
    if (layoutState.mLayoutDirection == LayoutState.LAYOUT_START) {
        bottom = layoutState.mOffset;
        top = layoutState.mOffset - result.mConsumed;
    } else {
        top = layoutState.mOffset;
        bottom = layoutState.mOffset + result.mConsumed;
    }
} else {
    top = getPaddingTop();
    bottom = top + mOrientationHelper.getDecoratedMeasurementInOther(view);

    if (layoutState.mLayoutDirection == LayoutState.LAYOUT_START) {
        right = layoutState.mOffset;
        left = layoutState.mOffset - result.mConsumed;
    } else {
        left = layoutState.mOffset;
        right = layoutState.mOffset + result.mConsumed;
    }
}
首先会触发measureChildWithMargins(view, 0, 0)方法,而在这个方法中又会调用到getItemDecorInsetsForChild并最终触发到mItemDecorations.get(i).getItemOffsets(mTempRect, child, this, mState)方法,而这个方法正是我们在设置分割线时需要重写的,它默认返回一个宽度和高度均为0dp的矩形,实际上就是没有。当我们重写了该方法后分割线就会显现出来了。
接下来又会根据LinearLayoutManager设置的排列方向以及isLayoutRTL的标志位来确定当前的view在相对坐标系中的left,right,top以及bottom坐标。在之后也会用到这四个坐标。
// We calculate everything with View's bounding box (which includes decor and margins)
// To calculate correct layout position, we subtract margins.
layoutDecoratedWithMargins(view, left, top, right, bottom);
if (DEBUG) {
    Log.d(TAG, "laid out child at position " + getPosition(view) + ", with l:"
            + (left + params.leftMargin) + ", t:" + (top + params.topMargin) + ", r:"
            + (right - params.rightMargin) + ", b:" + (bottom - params.bottomMargin));
}
// Consume the available space if the view is not removed OR changed
if (params.isItemRemoved() || params.isItemChanged()) {
    result.mIgnoreConsumed = true;
}
result.mFocusable = view.hasFocusable();
这是layoutChunk方法的最后一部分,可以看到首先是用layoutDecoratedWithMargins(view, left, top, right, bottom)方法将之前计算出来的坐标传入以此来在当前的RecyclerView中布局当前的列表项view,具体来说就是调用到了View的layout方法了。到这里为止这个子方法我们也已经介绍完毕了。
最后让我们回到layoutChildren方法,实际上在填充过程中会进行两次甚至是三次的fill填充:
if (mAnchorInfo.mLayoutFromEnd) {
    // fill towards start
    updateLayoutStateToFillStart(mAnchorInfo);
    mLayoutState.mExtraFillSpace = extraForStart;
    fill(recycler, mLayoutState, state, false);
    startOffset = mLayoutState.mOffset;
    final int firstElement = mLayoutState.mCurrentPosition;
    if (mLayoutState.mAvailable > 0) {
        extraForEnd += mLayoutState.mAvailable;
    }
    // fill towards end
    updateLayoutStateToFillEnd(mAnchorInfo);
    mLayoutState.mExtraFillSpace = extraForEnd;
    mLayoutState.mCurrentPosition += mLayoutState.mItemDirection;
    fill(recycler, mLayoutState, state, false);
    endOffset = mLayoutState.mOffset;

    if (mLayoutState.mAvailable > 0) {
        // end could not consume all. add more items towards start
        extraForStart = mLayoutState.mAvailable;
        updateLayoutStateToFillStart(firstElement, startOffset);
        mLayoutState.mExtraFillSpace = extraForStart;
        fill(recycler, mLayoutState, state, false);
        startOffset = mLayoutState.mOffset;
    }
}
通过注释我们也可以看出来,一开始是向头来填充,第二次是向底部来填充。如果还有剩余空间的话则会进行第三次填充。这一切都填充完毕后,如果有需要的话还有调用layoutForPredictiveAnimations(recycler, state, startOffset, endOffset)来执行一些预测性动画。