在Ubuntu 22.04上安装WRF-Chem模型4.4版本和KPP
注意:虚拟机分配的硬盘最好大一点,300GB-500GB左右较为保险,若下载连接失效,请自行更换
我的用户名为:ubuntu 安装过程中请自行修改用户名
一、安装一些需要用到的软件
直接使用命令安装
$ sudo apt install csh m4 build-essential nasm cmake unzip libxmu-dev libcairo-dev libbz2-dev libxaw7-dev libx11-dev xorg-dev flex bison subversion liburi-perl evince tcsh cpp m4 quota cvs libomp-dev python3-pip freeglut3-dev libjpeg-dev file
二、安装编译软件
$ sudo apt install gcc g++ gfortran
检查一下版本
$ gcc -v
$ g++ -v
$ cpp --version
$ gfortran -v
三、创建要用到的文件夹
后面会用代码进行创建,也可以自己图形界面自行创建
/ root
|--home
   |--ubuntu
      |--Build_WRF
         |--LIBRARIES
         |--geos
         |--DATA
         |--src
四、安装相关的库
只要是这几个:
• mpich
• zlib
• hdf5
• curl
• netcdf
• libpng
• Jasper
下面一个个进行安装
4.1安装mpich
创建目录并移动到相关文件夹
$ mkdir -p /home/ubuntu/Build_WRF/src
$ mkdir -p /home/ubuntu/Build_WRF/LIBRARIES
$ cd /home/ubuntu/Build_WRF/src
下载并安装
$ wget https://www.mpich.org/static/downloads/4.0.2/mpich-4.0.2.tar.gz
$ tar -xzvf mpich-4.0.2.tar.gz
$ cd mpich-4.0.2
$ FFLAGS=-fallow-argument-mismatch FCFLAGS=-fallow-argument-mismatch ./configure --prefix=/home/ubuntu/Build_WRF/LIBRARIES/mpich
$ make -j4
$ make install
添加路径
$ vi /home/ubuntu/.profile
在文件中加上
### mpich
export PATH=/home/ubuntu/Build_WRF/LIBRARIES/mpich/bin:$PATH
更新路径
$ source /home/ubuntu/.profile
4.2安装zlib
程序跟上面差不多
$ cd /home/ubuntu/Build_WRF/src
$ wget http://www.zlib.net/fossils/zlib-1.2.12.tar.gz
$ tar xzvf zlib-1.2.12.tar.gz
$ cd zlib-1.2.12
$ ./configure --prefix=/home/ubuntu/Build_WRF/LIBRARIES/zlib
$ make -j4
$ make install
4.3安装hdf5
$ cd /home/ubuntu/Build_WRF/src
$ wget https://hdf-wordpress-1.s3.amazonaws.com/wp-content/uploads/manual/HDF5/HDF5_1_12_2/source/hdf5-1.12.2.tar.gz
$ tar xzvf hdf5-1.12.2.tar.gz
$ cd hdf5-1.12.2
$ ./configure --prefix=/home/ubuntu/Build_WRF/LIBRARIES/hdf5 --with-zlib=/home/ubuntu/Build_WRF/LIBRARIES/zlib --enable-fortran --enable-fortran2003 --enable-cxx --with-default-api-version=v18
$ make -j4
$ make install
$ vi /home/ubuntu/.profile
### hdf5
export PATH=/home/ubuntu/Build_WRF/LIBRARIES/hdf5/bin:$PATH
export LD_LIBRARY_PATH=/home/ubuntu/Build_WRF/LIBRARIES/hdf5/lib:$LD_LIBRARY_PATH
$ source /home/ubuntu/.profile
4.4安装curl
$ cd /home/ubuntu/Build_WRF/src
$ wget https://curl.se/download/curl-7.83.1.tar.gz
$ tar xzvf curl-7.83.1.tar.gz
$ cd curl-7.83.1
$ ./configure --prefix=/home/ubuntu/Build_WRF/LIBRARIES/curl --with-zlib=/home/ubuntu/Build_WRF/LIBRARIES/zlib --without-ssl
$ make -j4
$ make install
4.5安装netcdf
$ cd /home/ubuntu/Build_WRF/src
应为netcdf分版本,这里分别安装netcdf-C和netcdf-Fortran
$ wget ftp://ftp.unidata.ucar.edu/pub/netcdf/netcdf-c-4.8.0.tar.gz
$ wget ftp://ftp.unidata.ucar.edu/pub/netcdf/netcdf-fortran-4.5.3.tar.gz
$ tar xzvf netcdf-c-4.8.0.tar.gz
$ cd netcdf-c-4.8.0
$ CFLAGS=-fPIC CPPFLAGS='-I/home/ubuntu/Build_WRF/LIBRARIES/hdf5/include -I/home/ubuntu/Build_WRF/LIBRARIES/curl/include' LDFLAGS='-L/home/ubuntu/Build_WRF/LIBRARIES/hdf5/lib -L/home/ubuntu/Build_WRF/LIBRARIES/curl/lib ' ./configure --prefix=/home/ubuntu/Build_WRF/LIBRARIES/netcdf --enable-netcdf-4 --enable-netcdf4 --enable-shared --enable-dap
$ make -j4
$ make install
$ cd ..
$ tar xzvf netcdf-fortran-4.5.3.tar.gz
$ cd netcdf-fortran-4.5.3
$ CPPFLAGS='-I/home/ubuntu/Build_WRF/LIBRARIES/netcdf/include' LDFLAGS='-L/home/ubuntu/Build_WRF/LIBRARIES/netcdf/lib' FCFLAGS='-m64' ./configure --prefix=/home/ubuntu/Build_WRF/LIBRARIES/netcdf
$ make -j4
$ make install
$ vi /home/ubuntu/.profile
### netcdf
export PATH=/home/ubuntu/Build_WRF/LIBRARIES/netcdf/bin:$PATH
export NETCDF=/home/ubuntu/Build_WRF/LIBRARIES/netcdf
export LD_LIBRARY_PATH=/home/ubuntu/Build_WRF/LIBRARIES/netcdf/lib:$LD_LIBRARY_PATH
$ source /home/ubuntu/.profile
4.6安装libpng
$ cd /home/ubuntu/Build_WRF/src
$ wget https://jaist.dl.sourceforge.net/project/libpng/libpng16/1.6.37/libpng-1.6.37.tar.gz
$ tar xzvf libpng-1.6.37.tar.gz
$ cd libpng-1.6.37
$ CPPFLAGS='-I/home/ubuntu/Build_WRF/LIBRARIES/netcdf/include' FCFLAGS='-m64' ./configure --prefix=/home/ubuntu/Build_WRF/LIBRARIES/libpng
$ make -j4
$ make install
4.7安装Jasper
$ cd /home/ubuntu/Build_WRF/src
$ wget https://www.ece.uvic.ca/~frodo/jasper/software/jasper-2.0.10.tar.gz
$ tar -xvzf jasper-2.0.10.tar.gz
$ cmake -G "Unix Makefiles" -H/home/ubuntu/Build_WRF/src/jasper-2.0.10 -B/home/ubuntu/Build_WRF/src/jasper-2.0.10-build -DCMAKE_INSTALL_PREFIX=/home/ubuntu/Build_WRF/LIBRARIES/jasper
$ cd /home/ubuntu/Build_WRF/src/jasper-2.0.10-build
$ make install
$ vi /home/ubuntu/.profile
#### jasper
export PATH=/home/ubuntu/Build_WRF/LIBRARIES/jasper/bin:$PATH
export LD_LIBRARY_PATH=/home/ubuntu/Build_WRF/LIBRARIES/jasper/lib:$LD_LIBRARY_PATH
$ source /home/ubuntu/.profile
4.8安装ncl
$ cd /home/ubuntu/Build_WRF/src
安装miniconda
$ wget https://repo.anaconda.com/miniconda/Miniconda3-latest-Linux-x86_64.sh
$ sh ./Miniconda3-latest-Linux-x86_64.sh
需要进行的操作如下:
Enter…, yes, ENTER, yesl
安装ncl
$ source /home/ubuntu/.bashrc
$ conda create -n ncl_stable -c conda-forge ncl
$ conda activate ncl_stable
$ ncl -V
6.6.2版本就可以
$ vi /home/ubuntu/.bashrc
#### ncl
conda activate ncl_stable
五、安装WRF-Chem
5.1安装WRF-Chem and KPP
$ ulimit -s unlimited
$ export MALLOC_CHECK_=0
$ export EM_CORE=1
$ export NMM_CORE=0
$ export WRF_CHEM=1
$ export WRF_KPP=1
$ export YACC='/usr/bin/yacc -d'
$ export FLEX=/usr/bin/flex
$ export FLEX_LIB_DIR=/usr/lib/x86_64-linux-gnu
$ export KPP_HOME=/home/ubuntu/Build_WRF/WRFV4.4/chem/KPP/kpp/kpp-2.1
$ export WRF_SRC_ROOT_DIR=/home/ubuntu/Build_WRF/WRFV4.4
$ export PATH=$KPP_HOME/bin:$PATH
$ export SED=/usr/bin/sed
$ export WRFIO_NCD_LARGE_FILE_SUPPORT=1
$ cd /home/ubuntu/Build_WRF/
虚拟机中下的比较慢,可以下好后,将文件共享到虚拟机中,在复制到上面的目录
$ wget -c https://github.com/wrf-model/WRF/releases/download/v4.4/v4.4.tar.gz -O wrf-4.4.tar.gz
$ tar -xvzf wrf-4.4.tar.gz
$ cd WRFV4.4/chem/KPP/kpp/kpp-2.1/src
$ /usr/bin/flex scan.l
$ cd /home/ubuntu/Build_WRF/WRFV4.4
修改 configure file 第919行
$ vi configure
将if [ "$USENETCDFPAR" == "1" ] ; then
修改为if [ "$USENETCDFPAR" = "1" ] ; then
(去掉一个等号)
$ ./configure
按照以下选项进行
select 34. (dmpar) GNU (gfortran/gcc)
Enter selection [1-75] : 34
and nesting is 1
Compile for nesting? (1=basic, 2=preset moves, 3=vortex following) [default 1]: 1
编译kpp
$ ./compile 2>&1 | tee compile_kpp.log
$ ./compile em_real 2>&1 | tee compile_wrf.log
编译em_real mode.(这里要等很长时间,可能会有一个多小时,耐心等待,如果编译失败 ,直接再次编译,这是4.4版本的一个bug)
BUG详情见论坛:
https://forum.mmm.ucar.edu/threads/wrf-chem-v4-4-bug-update-edit-bug-fixed-in-v4-4-1.11471/
$ ls -lah main/*.exe
如果有real.exe and wrf.exe这两个文件就是编译成功,否则去compile_wrf.log file找原因
5.2安装WPS
$ cd /home/ubuntu/Build_WRF/
$ ln -sf WRFV4.4 WRF
$ wget -c https://github.com/wrf-model/WPS/archive/refs/tags/v4.4.tar.gz -O wps-4.4.tar.gz
$ tar -xvzf wps-4.4.tar.gz
$ cd WPS-4.4
$ export JASPERLIB=/home/ubuntu/Build_WRF/LIBRARIES/jasper/lib
$ export JASPERINC=/home/ubuntu/Build_WRF/LIBRARIES/jasper/include
$ ./configure
选项如下:
select 3. Linux x86_64, gfortran (dmpar)
Enter selection [1-40] : 3
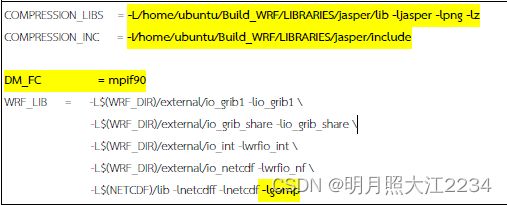
edit configure.wps file. Change DM_FC to mpif90 and Append -lgomp in WRF_LIB.
$ vi configure.wps
COMPRESSION_LIBS = -L/home/ubuntu/Build_WRF/LIBRARIES/jasper/lib -ljasper -lpng -lz COMPRESSION_INC = -I/home/ubuntu/Build_WRF/LIBRARIES/jasper/include
DM_FC = mpif90
WRF_LIB = -L$(WRF_DIR)/external/io_grib1 -lio_grib1 \
-L$(WRF_DIR)/external/io_grib_share -lio_grib_share \
-L$(WRF_DIR)/external/io_int -lwrfio_int \
-L$(WRF_DIR)/external/io_netcdf -lwrfio_nf \ -L$(NETCDF)/lib -lnetcdff -lnetcdf -lgomp
$ ./compile 2>&1 | tee compile_wps.log
$ ls -lah *.exe
如果有geogrid.exe metgrid.exe and ungrib.exe这三个文件就是对的,有问题去compile_wps.log file文件中看
六地理数据创建目录
$ cd /home/ubuntu/Build_WRF/
下载地理数据。
$ wget http://www2.mmm.ucar.edu/wrf/src/wps_files/albedo_modis.tar.bz2
$ wget http://www2.mmm.ucar.edu/wrf/src/wps_files/geog_complete.tar.gz
$ wget http://www2.mmm.ucar.edu/wrf/src/wps_files/maxsnowalb_modis.tar.bz2
$ wget http://www2.mmm.ucar.edu/wrf/src/wps_files/topo_2m.tar.bz2
$ tar -xvzf geog_complete.tar.gz
$ cd geog
$ tar -xvjf ../albedo_modis.tar.bz2
$ tar -xvjf ../maxsnowalb_modis.tar.bz2
$ tar -xvjf ../topo_2m.tar.bz2
创建输入数据文件夹
$ mkdir -p /home/ubuntu/Build_WRF/data/fnl
$ cd /home/ubuntu/Build_WRF/data/fnl
到此结束,需要的数据自行下载导入运行
