java注册界面发送邮箱验证码(无线程版)
邮箱验证注册
本篇文章使用第三方jar包实现邮箱发送验证码来注册用户,该文章未采用线程如果多人访问注册注册页面发送邮件可能会导致服务器崩溃,建议采用线程发送邮件!!!
一、前期准备工作
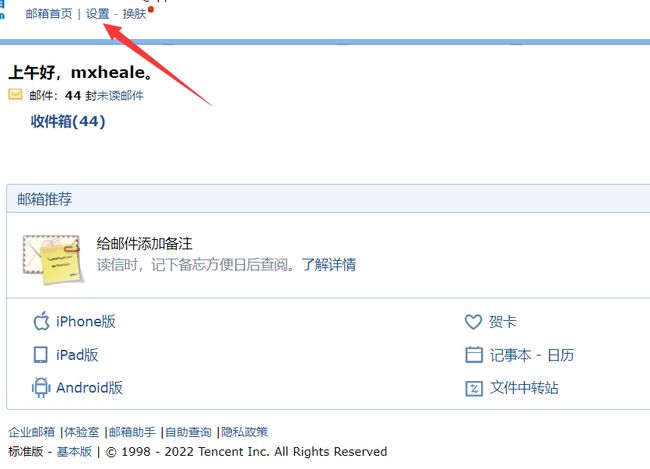
1.发送验证码所需要用到的邮箱设置(以qq邮箱为例)
1)点击设置

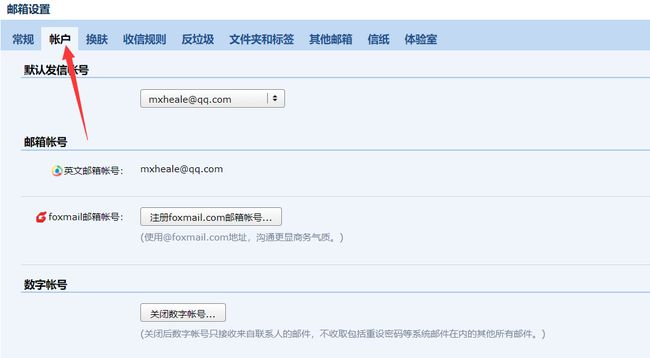
2)点击账户

3) 找到POP3/SMTP和IMAP/STMP服务并打开(可能需要手机验证),会生成授权码,你需要记住你自己的授权码。(本次需要用到IMAP/STMP服务) 
2.导入email的三方jar包
本次采用maven骨架的方式导包
<dependency>
  <groupId>org.apache.commonsgroupId>
  <artifactId>commons-emailartifactId>
  <version>1.2version>
dependency>
3.数据库设计
create table admin(
	id INT NOT NULL PRIMARY KEY auto_increment,
	admin_name varchar(20) null,
	password varchar(255) null
);
二、具体实现步骤
1.用户的pojo层
2.mysql数据库mybatis配置
3.mapper接口
4.返回前端结果集封装到ResultModel
5.发送邮件的工具类
6.发送邮件的servlet层
7.注册的servlet层
8.前端页面编写,采用layui框架
1.用户的pojo层
public class Admin {
  private long id;
  private String adminName;
  private String password;
  public long getId() {
    return id;
  }
  public void setId(long id) {
    this.id = id;
  }
  public String getAdminName() {
    return adminName;
  }
  public void setAdminName(String adminName) {
    this.adminName = adminName;
  }
  public String getPassword() {
    return password;
  }
  public void setPassword(String password) {
    this.password = password;
  }
}
2.mysql数据库mybatis配置,获取sqlsession工厂需要去自己配置(不会的话可私聊我)
DOCTYPE configuration
        PUBLIC "-//mybatis.org//DTD Config 3.0//EN"
        "http://mybatis.org/dtd/mybatis-3-config.dtd">
<configuration>


    <typeAliases>
        <package name="com.mxheale.pojo"/>
    typeAliases>

    <environments default="development">
        <environment id="development">
            <transactionManager type="JDBC"/>
            <dataSource type="POOLED">

                <property name="driver" value="com.mysql.jdbc.Driver"/>
                <property name="url" value="jdbc:mysql:///自己的数据库?useSSL=false&useUnicode=true&characterEncoding=utf8"/>
                <property name="#{username}" value="#{username}"/>
                <property name="#{password}" value="#{password}"/>
            dataSource>
        environment>
    environments>
configuration>
3.mapper接口(本次使用的sql语句比较简单所以我们采用注解来写sql)
public interface AdminMapper {
    //添加用户
    @Insert("insert into admin (admin_name,password) values (#{adminName},#{password});")
    int register(@Param("adminName") String adminName, @Param("password") String password);
    //查询用户名是否存在
    @Select("select admin_name as adminName,password from admin where admin_name = #{adminName};")
    Admin selectByName(String adminName);
}
4.返回前端结果集
public class ResultModel {
    //编码:0表示成功 1表示失败
    private Integer code;
    //返回的信息数据
    private String msg;
    //影响的条数
    private Integer count;
    //查询出的数据
    private Object data;
    public Integer getCode() {
        return code;
    }
    public void setCode(Integer code) {
        this.code = code;
    }
    public String getMsg() {
        return msg;
    }
    public void setMsg(String msg) {
        this.msg = msg;
    }
    public Integer getCount() {
        return count;
    }
    public void setCount(Integer count) {
        this.count = count;
    }
    public Object getData() {
        return data;
    }
    public void setData(Object data) {
        this.data = data;
    }
    /*
    根据sql影响条数得到结果
* */
    public static ResultModel getResultModel(int count) {
        return getCommonResultModel(count, count > 0 ? 0 : 1, count > 0 ? "success" : "error", null);
    }
    public static ResultModel getResultModel(String msg){
        return getCommonResultModel(0, 0, msg, null);
    }
    public static ResultModel getResultModel(String msg,int code){
        return getCommonResultModel(0, code, msg, null);
    }
    private static ResultModel getCommonResultModel(int count, int code, String msg, Object data) {
        ResultModel resultModel = new ResultModel();
        resultModel.setMsg(msg);
        resultModel.setCode(code);
        resultModel.setCount(count);
        resultModel.setData(data);
        return resultModel;
    }
}
5.发送邮件的工具类
public class SendEmail {
    private static Integer code;//生成验证码,并返回给前端控制层,用于判断验证码是否正确

    public static Integer getCode() {
        return code;
    }

    public void setCode(Integer code) {
        this.code = code;
    }

    public static int sendEmail(String emailAddress) {
        Random random = new Random();
        SendEmail sendEmail = new SendEmail();
        sendEmail.setCode(random.nextInt(9000)+1000);//生成四位验证码
        HtmlEmail email = new HtmlEmail();//创建email对象
        email.setHostName("smtp.qq.com");//发送邮箱的邮箱类型,126邮箱为smtp.126.com,163邮箱为163.smtp.com,qq邮箱为smtp.qq.com
        email.setCharset("UTF-8");//设置编码格式
        try {
            email.addTo(emailAddress);// 收件地址
            email.setFrom("发送邮箱的地址", "发送邮箱的用户名");// 设置邮箱地址和用户名,用户名可以任意填写
            //jbbb********baee(IMAP/SMTP服务)---这里需要改为你自己
            email.setAuthentication("发送邮箱的地址", "jbbb********baee");// 设置邮箱地址和授权码
            email.setSubject("邮件标题");// 设置邮件标题
            email.setMsg("【xxx注册验证】验证码为" + getCode());// 此处填写邮件内容
            email.send();
            return getCode();
        } catch (EmailException e) {
            return 0;
        }
    }
}
6.发送邮件的servlet层
@WebServlet("/register/sendEmail")
public class SendEmailServlet extends HttpServlet {

    @Override
    protected void doPost(HttpServletRequest req, HttpServletResponse resp)  throws ServletException, IOException {
    	//乱码处理
        req.setCharacterEncoding("UTF-8");
        resp.setCharacterEncoding("UTF-8");
        //获取前端的emil
        String email = req.getParameter("email");
        int flag = 0;
        ResultModel result = null;
        if (email != null&& !"".equals(email)) {//判断邮箱不为空和null
            int code = SendEmail.sendEmail(email);//邮箱不为空和null后发送验证码
            if (code != 0) {
                flag = 1;//标志位,用于判断发送是否成功
            }
        }else {
            result =  ResultModel.getResultModel("邮箱格式不正确!");
        }
        ResultModel resultModel = ResultModel.getResultModel(sendResult,flag);
        resp.getWriter().println(JSONObject.toJSONString(result));
    }
7.注册的servlet层(这里用到sqlsession工厂,调用自己的工厂类)
@WebServlet("/register/ad_register")
public class AdminRegisterServlet extends HttpServlet {

    @Override
    protected void doPost(HttpServletRequest req, HttpServletResponse resp) throws ServletException, IOException {
        //1.处理乱码
        req.setCharacterEncoding("UTF-8");
        resp.setCharacterEncoding("UTF-8");
        //2.获取前端的数据
        String username = req.getParameter("username");
        String password = req.getParameter("password");
        String rePassword = req.getParameter("rePassword");
        String inputCode = req.getParameter("code");

        Admin ad = new Admin();
        ad.setPassword(Tool.nullToString(password));//自己写的工具类,用于将前端的null转换为空字符串,可以不写(最多导致数据库存null)
        ad.setAdminName(Tool.nullToString(username));
        //获取sql连接
        SqlSessionFactory sqlSessionFactory = Tool.getSqlSessionFactory();//调用自己写的sqlsession工厂工具类,可以自己调用mybatis配置文件和新建工厂
        SqlSession sqlSession = sqlSessionFactory.openSession();
        //调用mappr代理
        AdminMapper adminMapper = sqlSession.getMapper(AdminMapper.class);
        Admin admin = adminMapper.selectByName(username);//查询是否重名
        ResultModel result = null;
        //创建发送邮箱的对象,获取验证码
        int code = SendEmail.getCode();
        //判断是否重名
        if (admin != null) {
            result = ResultModel.getResultModel("你输入的用户名已存在,请重新输入!");
        } else {
            if (Integer.parseInt(inputCode) == code) {
                if (password.equals(rePassword)) {
                    //得到查询结果
                    result = ResultModel.getResultModel(adminMapper.register(username, password));
                } else {
                    result = ResultModel.getResultModel("两次输入的密码要相同!");
                }
            } else {
                result = ResultModel.getResultModel("验证码输入错误");
            }
        }
        //将结果发送到页面
        resp.getWriter().println(JSONObject.toJSONString(result));
        sqlSession.commit();
        sqlSession.close();

    }
}
8.前端页面编写,采用layui框架
doctype html>
<html class="x-admin-sm">
<head>
    <meta charset="UTF-8">
    <title>注册title>

    <meta name="renderer" content="webkit|ie-comp|ie-stand">
    <meta http-equiv="X-UA-Compatible" content="IE=edge,chrome=1">
    <meta name="viewport"
          content="width=device-width,user-scalable=yes, minimum-scale=0.4, initial-scale=0.8,target-densitydpi=low-dpi"/>
    <meta http-equiv="Cache-Control" content="no-siteapp"/>
    <link rel="stylesheet" href="/X-admin/css/font.css">
    <link rel="stylesheet" href="/X-admin/css/login.css">
    <link rel="stylesheet" href="/X-admin/css/xadmin.css">

    <script src="/X-admin/lib/layui/layui.js" charset="utf-8">script>

    <script src = "../js/jquery.js">script>

    <script src = "/js/myAjax.js">script>

head>
<body class="login-bg">

<div class="login layui-anim layui-anim-up">
    <div class="message">用户注册div>
    <div id="darkbannerwrap">div>

    <form method="post" class="layui-form">
        <input name="username" placeholder="用户名" type="text" lay-verify="username" class="layui-input">
        <hr class="hr15">
        <input name="password" lay-verify="password" placeholder="密码" type="password" class="layui-input">
        <hr class="hr15">
        <input name="rePassword" lay-verify="rePassword" placeholder="确认密码" type="password" class="layui-input">
        <hr class="hr15">
        <input name="email" lay-verify="email" placeholder="邮箱" type="email" class="layui-input">
        <hr class="hr15">
        <input name="code" lay-verify="code" placeholder="邮箱验证码" type="number" class="layui-input">
        <hr class="hr15">
        <input value="发送" lay-submit lay-filter ="send" style="width:60%;" type="submit">
        <input value="注册" lay-submit lay-filter="register" style="width:100%;" type="submit">
        <hr class="hr20">
    form>
div>

body>
<script>
    layui.use('form', function () {
        let form = layui.form;
        form.on('submit(send)',function (data){
            data = data.field;
            //自己的配置的myAjax函数
            let res = myAjax("/register/sendEmail", data,'post');
            if(res.code > 0){
                alert("邮箱发送成功,请注意查收!");
            }else{
                alert("邮箱发送失败,请检查邮箱格式是否正确!");
            }
            return false;
        });
        form.on('submit(register)', function (data) {
            data = data.field;
            console.log(data);
            let res = myAjax("/register/ad_register",data,'post')
            if(res.count > 0){
                layer.alert("注册成功", {
                        icon: 6
                    },
                    function () {
                        //关闭当前frame
                        xadmin.close();
                        // 可以对父窗口进行刷新
                        xadmin.father_reload();
                    });
            }else{
                alert(res.msg);
            }
            return false;
        })
    })
script>
html>
总结
邮件发送,只用到一个三方邮箱jar包,相对来说较简单,实现的逻辑并不难;需要注意的是:核对自己的授权码和邮箱地址一定要对应。新人第一次写文,如有不足之处,还请多多指教。