ansible权威指南笔记(一)—— 安装配置、常用命令与模块
一、简介
ansible基于Python开发,主要用于批量系统配置、批量程序部署、批量运行命令等。
看看它能干什么 ansible DBA常用场景命令小集_Hehuyi_In的博客-CSDN博客
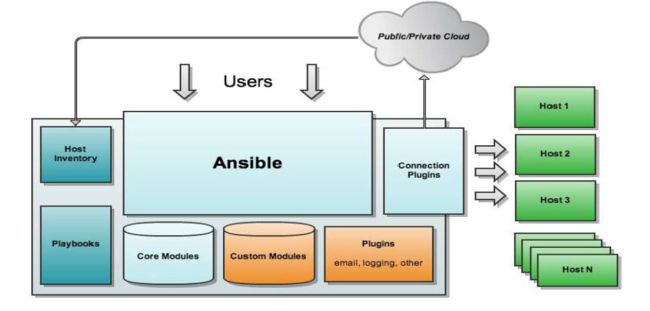
架构如下
工作原理
1. 主要管理方式
- Ad-Hoc:即ansible单条命令,主要用于临时命令使用场景
- Ansible-playbook:即ansible脚本,主要用于会反复使用的场景
- Ansible-Roles:简单来讲,roles就是通过分别将变量、文件、任务、模板等放置于单独的目录中,并可以快速include它们的机制。类似按项目管理的代码,用于层次性、结构化地组织playbook。
2. 注意事项
- ansible的安装主机一般称为主控端,中控,master或堡垒机
- ansible 2.4版本开始,主控端Python版本需要2.6或以上(CentOS 5 Python版本为 2.4.3)
- 被控端Python版本小于2.4的,需要安装python-simplejson
- 被控端如开启SELinux需要安装libselinux-python
- windows不能做为主控端
- ansible不是服务,只在需要的时候启动(本质是Python脚本)
二、 安装ansible
1. yum安装
yum install epel-release -y
yum install ansible -y
2. 编译安装
二进制包下载 Index of /ansible
yum -y install python-jinja2 PyYAML python-paramiko python-babel python-crypto
tar xf ansible-1.5.4.tar.gz
cd ansible-1.5.4
python setup.py build
python setup.py install
mkdir /etc/ansible
cp -r examples/* /etc/ansible
3. git方式
git clone git://github.com/ansible/ansible.git --recursive
cd ./ansible
source ./hacking/env-setup
4. pip安装
yum install python-pip python-devel
yum install gcc glibc-devel zibl-devel rpm-bulid openssl-devel
pip install --upgrade pip
pip install ansible --upgrade
5. 验证安装
ansible --version三、 主要文件
1. 配置文件ansible.cfg
vim /etc/ansible/ansible.cfg

[defaults]
#inventory     = /etc/ansible/hosts      # 主机列表配置文件
#library       = /usr/share/my_modules/  # 库文件存放目录
#remote_tmp    = $HOME/.ansible/tmp      # 临时py命令文件存放在远程主机目录
#local_tmp     = $HOME/.ansible/tmp      # 本机的临时命令执行目录
#forks         = 5                       # 默认并发数,同时可以执行5次
#sudo_user     = root                    # 默认sudo 用户
#ask_sudo_pass = True                    # 每次执行ansible命令是否询问ssh密码
#ask_pass      = True                    # 每次执行ansible命令是否询问ssh口令
#remote_port   = 22                      # 远程主机的端口号(默认22)

# 建议调整项
host_key_checking = False               # 检查对应服务器的host_key,建议取消注释
log_path=/var/log/ansible.log           # 日志文件,建议取消注释
module_name   = command                 # 默认模块,可以改为shell
2. 主机清单 /etc/ansible/hosts
- 文件位置可以任意修改,执行命令时指定 -i host文件位置 即可。
- 可以以多种方式指定host主机
可以分组指定,可以写ip、主机名
[testgroup]
192.168.56.40
192.168.56.41

[test41]
host001
host002
可以用正则表达式
[webservers]
www[1:100].example.com   # ip: 1-100

[dbservers]
db-[a:f].example.com     # dba - dbf
指定主机参数(用户、密码、端口、是否sudo等)
[testgroup]
10.192.168.101 ansible_ssh_user=dba ansible_become=true ansible_become_pass='xxxxx!'
10.192.168.137 ansible_ssh_user=dba ansible_become=true ansible_become_pass='xxxxx!' ansible_ssh_port=9527
ansible普通用户切换_N0thln9的博客-程序员秘密_ansible 指定用户 - 程序员秘密
ansible可根据正则表达式调用主机
ansible "*" -m ping  # (*表示所有主机)
ansible 192.168.1.* -m ping
ansible "*srvs" -m ping
还可以按逻辑关系确定调用主机
- webservers和dbservers组中机器都被调用(逻辑或)
ansible webservers:dbservers -m win_ping- 在webservers组中但不在dbsersers中的调用(逻辑非)
ansible webservers:!dbservers -m win_ping- 在webservers组中并且在dbservers组中的才会调用(逻辑与)
ansible webservers:&dbservers -m win_ping四、 主要命令简介
- /usr/bin/ansible 主程序,临时命令执行工具
- /usr/bin/ansible-doc 文档工具,查看模块功能及用法
- /usr/bin/ansible-playbook 执行playbook
- /usr/bin/ansible-galaxy 下载/上传优秀代码或Roles模块的官网平台
- /usr/bin/ansible-vault 文件加密工具
1. ansible命令
ansible  [-m module_name] [-a args]
ansible +被管理的主机(ALL) +模块  +参数

    --help                 显示帮助
    --version              显示版本
    -m module              指定模块,默认为command
    -v                     详细过程 –vv -vvv更详细
    --list-hosts           显示主机列表,可简写 --list
    -k, --ask-pass         提示输入ssh连接密码,默认Key验证
    -C, --check            检查,并不执行
    -T, --timeout=TIMEOUT  执行命令的超时时间,默认10s
    -u, --user=REMOTE_USER 执行远程执行的用户
    -b, --become           代替旧版的sudo切换
        --become-user=USERNAME 指定sudo的runas用户,默认为root
    -K, --ask-become-pass  提示输入sudo时的口令
2. ansible-doc
显示模块帮助
ansible-doc [options] [module...]
        -a            显示所有模块的文档
        -l, --list    列出可用模块
        -s, --snippet 显示指定模块的playbook片段(简化版,便于查找语法)
3. ansible-playbook
用于执行playbook文件,系列后面文章会详细介绍
ansible-playbook hello.yml

cat hello.yml
#hello world yml file
- hosts: websrvs
  remote_user: root
  tasks:
    - name: hello world
      command: /usr/bin/wall hello world
4. ansible-galaxy
连接 https://galaxy.ansible.com,下载相应的roles
# 列出所有已安装的galaxy
ansible-galaxy list
# 安装galaxy
ansible-galaxy install geerlingguy.redis
# 删除galaxy
ansible-galaxy remove geerlingguy.redis
5. ansible-vault
管理、加解密playbook文件(例如其中包含密码时)
ansible-vault [create|decrypt|edit|encrypt|rekey|view]

# 加密
ansible-vault encrypt hello.yml
# 解密
ansible-vault decrypt hello.yml
# 查看
ansible-vault view hello.yml
# 编辑加密文件
ansible-vault edit hello.yml
# 修改口令
ansible-vault rekey hello.yml
# 创建新文件
ansible-vault create new.yml
6. 命令执行过程
执行步骤
- 加载配置文件 默认/etc/ansible/ansible.cfg
- 加载对应的模块文件,如command
- 通过ansible将模块或命令生成对应的临时py文件,并将该文件传输至远程服务器目录:对应执行用户 $HOME/.ansible/tmp/ansible-tmp-数字/XXX.PY文件
- 给文件+x执行权限
- 执行并返回结果
- 删除临时py文件(命令中途执行失败也会删掉),sleep 0退出
执行状态
- 绿色:执行成功并且不需要做改变的操作
- 黄色:执行成功并且对目标主机做变更
- 红色:执行失败
五、 ansible常用模块
- 再次回顾ansible语法
ansible -i host文件 主机组或者主机 -m 模块 -a 命令
# 例如
ansible testgroup -m ping
ansible testgroup -m command -a "pwd"
1. command模块
默认模块,支持简单的linux命令,不支持管道、重定向等,不建议使用
ansible testgroup -m command -a "pwd"
ansible testgroup -m command -a "echo testa|grep a" #这个不能正常使用
ansible testgroup -m command -a "echo bb >>/tmp/testansible" #重定向也无法正常使用
2. shell模块
支持管道、重定向等,常用模块
ansible testgroup -m shell -a "echo testa|grep a" #支持管道
ansible testgroup -m shell -a "echo bb >>/tmp/testansible" #支持重定向
ansible testgroup -m shell -a "cat /etc/passwd|awk -F':' '{print \$1}'" #遇到特殊符号需要加入\转义,这样子ansible才能正常运行

# 更新rpm包
ansible -i /tmp/host testgroup -m shell -a "cd /tmp; rpm -Uvh polkit-0.112-26.0.1.el7_9.1.x86_64.rpm"
3. raw模块
ansible依赖python环境,例如需要有python-simplejson之类的包,如果没安装的话,就无法使用shell等模块。而raw模块不依赖Python,可以先用raw模块安装批量安装Python。
从 Ansible 2.4 版开始,不再支持 Python2 2.4 版。CentOS 5 附带 2.4.3。
您需要降级到 Ansible 2.3,或者使用更新版本的 CentOS,或者更新版本的 Python。
您也许可以改用该raw模块,该模块对 python 没有远程依赖。https://github.com/ansible/ansible/issues/34643
ansible testgroup -m raw -a "yum install python-simplejson -y"
ansible testgroup -m raw -a "yum install libselinux-python -y"
4. copy模块
从ansible服务器复制文件/目录到远程主机,常用参数:
src:源文件/目录
dest:指定目标路径
mode:设置权限
backup:备份源文件
content:代替src,将本机指定内容传至远程主机并生成目标文件
# src指定本地文件,dest指定远程主机目录或者文件
ansible testgroup -m copy -a "src=/tmp/testdir/test.txt dest=/usr/local/src/"
ansible -i /tmp/host testgroup -m copy -a "src=polkit-0.112-26.0.1.el7_9.1.x86_64.rpm dest=/tmp/"- 拷贝文件夹
ansible testgroup -m copy -a "src=/tmp/testdir/ dest=/usr/local/src/" #testdir文件夹没拷贝
ansible testgroup -m copy -a "src=/tmp/testdir dest=/usr/local/src/" #testdir文件夹拷贝了- 备份文件
ansible testgroup -m copy -a "src=/tmp/testdir/test.txt dest=/usr/local/src/ backup=yes"- 指定用户和权限
ansible testgroup -m copy -a "src=/tmp/testdir/test.txt dest=/usr/local/src/ backup=yes owner=oracle group=oinstall mode=0600"5. script模块
在远程主机上运行ansible服务器上的脚本,优点是不需手动传送脚本至每个服务器。
其实是ansible自动传到远程主机、执行然后再删除脚本,即copy+shell+delete
ansible websrvs -m script -a "/data/test.sh"6. Fetch模块
与copy相反,从远程主机获取文件至ansible服务器(每个被管理主机会生成不同编号的目录,不会发生文件名冲突)。目前不支持目录,可以先打包再提取文件。
- 从远程主机组获取文件
ansible websrvs -m fetch -a 'src=/root/test.sh dest=/data/scripts'- 打包目录并获取压缩文件
ansible all -m shell -a 'tar jxvf test.tar.gz /root/test.sh'
ansible all -m fetch -a 'src=/root/test.tar.gz dest=/data/'
7. yum模块
功能同yum命令
# 查看程序列表
ansible websrvs -m yum -a 'list=httpd'
# 安装软件
ansible websrvs -m yum -a 'name=httpd state=present'
# 删除删除
ansible websrvs -m yum -a 'name=httpd state=absent'
8. service模块
功能同service(systemctl)命令
# 停止服务
ansible srv -m service -a 'name=httpd state=stopped'
# 启动服务,并设为开机自启动
ansible srv -m service -a 'name=httpd state=started enabled=yes'
# 重新加载
ansible srv -m service -a 'name=httpd state=reloaded'
# 重启服务
ansible srv -m service -a 'name=httpd state=restarted'
参考:
ansible批量执行命令_小鱼的技术博客_51CTO博客
《ansible权威指南》
https://www.bilibili.com/video/BV1HZ4y1p7Bf?from=search&seid=13215158654353304589&spm_id_from=333.337.0.0
有道云笔记

