keras CNN lenet-5和LSTM实现MNIST手写数字识别(代码注释详解)
MNIST手写数字识别数据集(图像识别)
数据集包含10个数字的60,000个28x28灰度图像,以及10,000个图像的测试集。
如果MNIST数据集无法下载,详见本篇博客提供下载和使用:
https://blog.csdn.net/sinat_41144773/article/details/89843688
代码实现(CNN卷积、循环神经网络RNN 注释切换)
from __future__ import print_function
import numpy as np
np.random.seed(1337)
from keras.datasets import mnist
from keras.models import Sequential
from keras.layers import Dense, LSTM,GRU
from keras.utils import np_utils
from keras.callbacks import Callback
from keras.layers import Dense, Activation, Convolution2D, MaxPooling2D, Flatten
from keras.optimizers import Adam
import matplotlib.pyplot as plt
from sklearn.metrics import confusion_matrix, f1_score, precision_score, recall_score,accuracy_score
# 写一个LossHistory类,保存loss和acc
class LossHistory(Callback):
def on_train_begin(self, logs={}):
self.losses = {'batch':[], 'epoch':[]}
self.accuracy = {'batch':[], 'epoch':[]}
self.val_loss = {'batch':[], 'epoch':[]}
self.val_acc = {'batch':[], 'epoch':[]}
def on_batch_end(self, batch, logs={}):
self.losses['batch'].append(logs.get('loss'))
self.accuracy['batch'].append(logs.get('acc'))
self.val_loss['batch'].append(logs.get('val_loss'))
self.val_acc['batch'].append(logs.get('val_acc'))
def on_epoch_end(self, batch, logs={}):
self.losses['epoch'].append(logs.get('loss'))
self.accuracy['epoch'].append(logs.get('acc'))
self.val_loss['epoch'].append(logs.get('val_loss'))
self.val_acc['epoch'].append(logs.get('val_acc'))
def loss_plot(self, loss_type):
iters = range(len(self.losses[loss_type]))
plt.figure()
# acc
plt.plot(iters, self.accuracy[loss_type], 'r', label='train acc')
# loss
plt.plot(iters, self.losses[loss_type], 'g', label='train loss')
if loss_type == 'epoch':
# val_acc
plt.plot(iters, self.val_acc[loss_type], 'b', label='val acc')
# val_loss
plt.plot(iters, self.val_loss[loss_type], 'k', label='val loss')
plt.grid(True)
plt.xlabel(loss_type)
plt.ylabel('acc-loss')
plt.legend(loc="upper right")
plt.savefig("mnist_keras.png")
plt.show()
# 训练参数
learning_rate = 0.001
epochs = 3
batch_size = 128
n_classes = 10
# 定义图像维度reshape
img_rows, img_cols = 28, 28
# 加载keras中的mnist数据集 分为60,000个训练集,10,000个测试集
# 将100张RGB,3通道的16*32彩色图表示为(100,16,32,3),(样本数,高,宽,颜色通道数)
(x_train, y_train), (x_test, y_test) = mnist.load_data()
# RNN shape
# x_train = x_train.reshape(-1, img_rows, img_cols)
# x_test = x_test.reshape(-1, img_rows, img_cols)
# CNN shape
x_train = x_train.reshape(x_train.shape[0], img_rows, img_cols, 1)
x_test = x_test.reshape(x_test.shape[0], img_rows, img_cols, 1)
# 将X_train, X_test的数据格式转为float32
x_train = x_train.astype('float32')
x_test = x_test.astype('float32')
# 将X_train, X_test归一化0-1
x_train /= 255
x_test /= 255
# 输出0-9转换为ont-hot形式
y_train = np_utils.to_categorical(y_train, n_classes)
y_test = np_utils.to_categorical(y_test, n_classes)
# 建立模型
model = Sequential()
# RNN一层
# model.add(LSTM(units=32,batch_input_shape=(None, img_rows, img_cols)))
# RNN两层
# model.add(LSTM(units=32,batch_input_shape=(None, img_rows, img_cols),return_sequences=True))
# model.add(LSTM(units=32))
# FC全连接层
# model.add(Dense(16))
# cnn一层
# model.add(Convolution2D(filters=32, kernel_size=5,input_shape=(img_rows, img_cols, 1),strides=1,padding='same', activation='relu'))
# model.add(MaxPooling2D(pool_size=2,strides=2))
# cnn两层
# model.add(Convolution2D(filters=24, kernel_size=5,input_shape=(img_rows, img_cols, 1),strides=1,padding='same', activation='relu'))
# model.add(MaxPooling2D(pool_size=2,strides=2))
# model.add(Convolution2D(filters=16, kernel_size=5,input_shape=(img_rows, img_cols, 1),strides=1,activation='relu'))
# model.add(MaxPooling2D(pool_size=2,strides=2))
# 压平层 和 FC全连接层
# model.add(Flatten())
# model.add(Dense(16))
# lenet-5
model.add(Convolution2D(filters=6, kernel_size=(5, 5), padding='valid', input_shape=(img_rows, img_cols, 1), activation='tanh'))
model.add(MaxPooling2D(pool_size=(2, 2)))
model.add(Convolution2D(filters=16, kernel_size=(5, 5), padding='valid', activation='tanh'))
model.add(MaxPooling2D(pool_size=(2, 2)))
model.add(Flatten())
model.add(Dense(120, activation='tanh'))
model.add(Dense(84, activation='tanh'))
model.add(Dense(n_classes, activation='softmax'))
#打印模型# verbose=1显示进度条
model.summary()
model.compile(optimizer=Adam(lr=learning_rate), loss='categorical_crossentropy',metrics=['accuracy'])
history = LossHistory()
model.fit(x_train, y_train,batch_size=batch_size,epochs=epochs, verbose=1,validation_data=(x_test, y_test),callbacks=[history])
model.save('rnn_weight.h5')
# 测试
# model.load_weights('rnn_weight.h5')
y_predict = model.predict(x_test, batch_size=512, verbose=1)
# y_predict = (y_predict > 0.007).astype(int)
y_predict = (y_predict > 0.01).astype(int)
y_true = np.reshape(y_test, [-1])
y_pred = np.reshape(y_predict, [-1])
# 评价指标
accuracy = accuracy_score(y_true, y_pred)
precision = precision_score(y_true, y_pred)
recall = recall_score(y_true, y_pred, average='binary')
f1score = f1_score(y_true, y_pred, average='binary')
# Micro F1: 将n分类的评价拆成n个二分类的评价,将n个二分类评价的TP、FP、RN对应相加,计算评价准确率和召回率,由这2个准确率和召回率计算的F1 score即为Micro F1。
# Macro F1: 将n分类的评价拆成n个二分类的评价,计算每个二分类的F1 score,n个F1 score的平均值即为Macro F1。
# 一般来讲,Macro F1、Micro F1高的分类效果好。Macro F1受样本数量少的类别影响大。
micro_f1 = f1_score(y_true, y_pred,average='micro')
macro_f1 = f1_score(y_true, y_pred,average='macro')
print('accuracy:',accuracy)
print('precision:',precision)
print('recall:',recall)
print('f1score:',f1score)
print('Macro-F1: {}'.format(macro_f1))
print('Micro-F1: {}'.format(micro_f1))
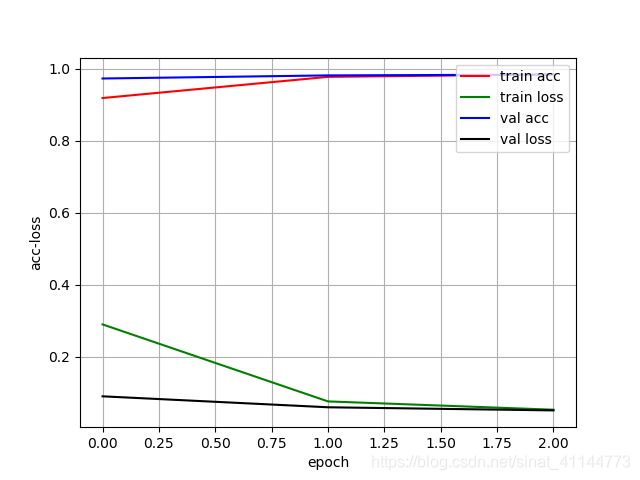
#绘制训练的acc-loss曲线
history.loss_plot('epoch')
1、CNN(lenet-5)
accuracy: 0.97898
precision: 0.8269581056466302
recall: 0.9988
f1score: 0.9047921007337622
Macro-F1: 0.9464889674878667
Micro-F1: 0.97898
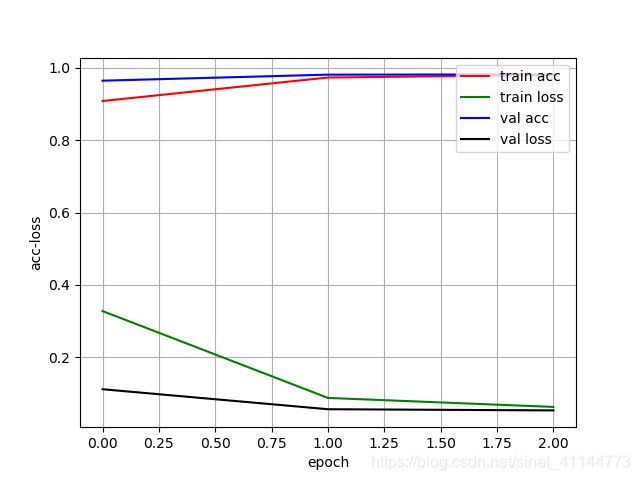
2、两层CNN
accuracy: 0.97764
precision: 0.8177799607072691
recall: 0.999
f1score: 0.8993518185091824
Macro-F1: 0.9433873793531378
Micro-F1: 0.97764
3、RNN(双层LSTM)
注意先切换到RNN shape程序才可以运行
# RNN shape
x_train = x_train.reshape(-1, img_rows, img_cols)
x_test = x_test.reshape(-1, img_rows, img_cols)

# CNN shape
# x_train = x_train.reshape(x_train.shape[0], img_rows, img_cols, 1)
# x_test = x_test.reshape(x_test.shape[0], img_rows, img_cols, 1)
accuracy: 0.94363
precision: 0.6401722033027052
recall: 0.9963
f1score: 0.7794859758244338
Macro-F1: 0.8735852920105447
Micro-F1: 0.94363
至此结束。