Android学习笔记-UI开发
P2 工程结构介绍
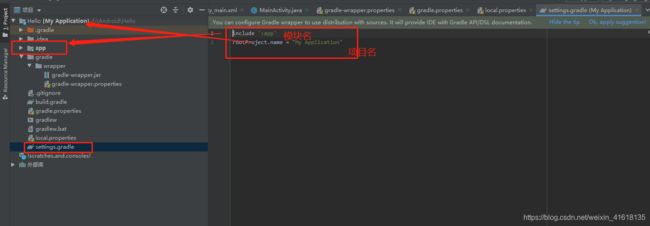
project和module的区别: project仅仅是项目,手机上看不到,而module是手机上的app

下载gradle

gradle全局配置文件

sdk位置local.properties

引入的模块setting.gradle
生成apk

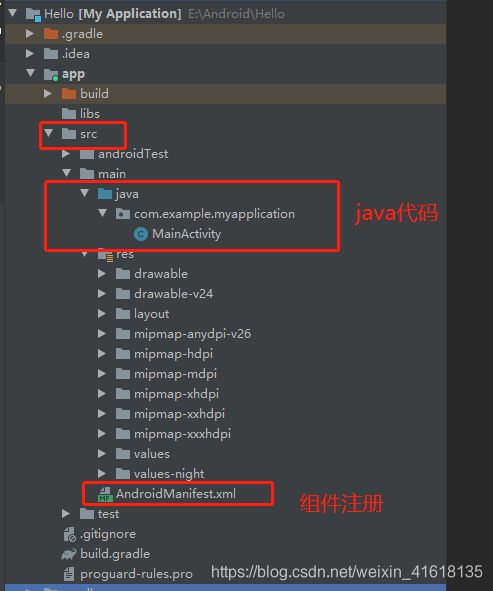
src
引入第三方库build.gradle
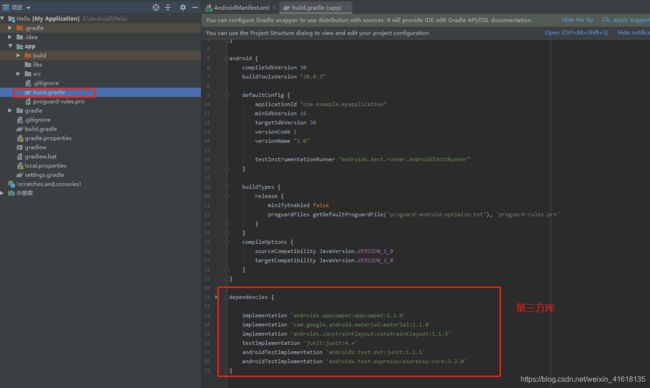
资源

虚拟机安装
P3 TextView1控件
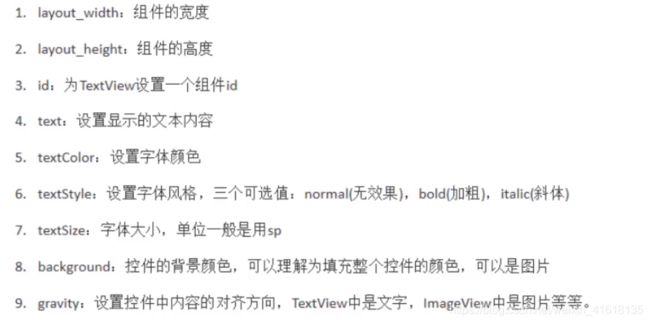
<LinearLayout xmlns:android="http://schemas.android.com/apk/res/android"
    android:layout_width="match_parent"
    android:layout_height="match_parent"
    android:background="#fff"
    android:orientation="vertical">
    <TextView
        android:id="@+id/tv_one"
        android:text="@string/tv_one"
        android:textColor="#FF0000FF"
        android:textStyle="italic"
        android:textSize="50sp"
        android:background="#FFFF0000"
        android:gravity="center_horizontal"
        android:layout_width="200dp"
        android:layout_height="200dp"/>
LinearLayout>
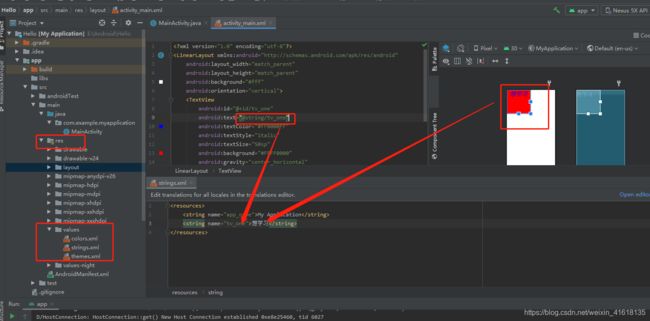
注意 配置值的时候不直接写数值,而是引用res中values目录下配置文件。
P4 TextView2
        android:shadowColor="#FF000000"
        android:shadowRadius="3.0"
        android:shadowDx="10.0"
        android:shadowDy="10.0"
P5 TextView3
    <TextView
        android:id="@+id/tv_one"
        android:text="@string/tv_one"
        android:textColor="#FF0000FF"
        android:textStyle="italic"
        android:textSize="50sp"

        android:shadowColor="#FF000000"
        android:shadowRadius="3.0"
        android:shadowDx="10.0"
        android:shadowDy="10.0"
        android:background="#FFFFFF"

        android:singleLine="true"
        android:ellipsize="marquee"
        android:marqueeRepeatLimit="marquee_forever"
        android:focusable="true"
        android:focusableInTouchMode="true"
        android:clickable="true"

        android:gravity="center_horizontal"
        android:layout_width="200dp"
        android:layout_height="200dp">
        <requestFocus/>
    TextView>
P6 Button1
令button的background属性生效
    <Button
        android:text="按钮"
        android:background="@drawable/ic_launcher_background"
        android:layout_width="200dp"
        android:layout_height="200dp"/>
background可用自定义selector
android:background="@drawable/button_selector"
button_selector.xml
<selector xmlns:android="http://schemas.android.com/apk/res/android">
    <item android:drawable="@drawable/btn_normal" android:state_pressed="false"/>

    <item android:drawable="@drawable/btn_pressed" android:state_pressed="true"/>

selector>
btn_pressed.xml
<shape xmlns:android="http://schemas.android.com/apk/res/android">
    <solid android:color="#020c41">solid>
    <stroke android:width="1dp" android:color="#FFFFFF">stroke>
shape>
btn_normal.xml
<shape xmlns:android="http://schemas.android.com/apk/res/android">
    <solid android:color="@color/white">solid>
    <stroke android:width="1dp" android:color="#FFFFFF">stroke>
shape>
颜色选择器
<selector xmlns:android="http://schemas.android.com/apk/res/android">
    <item android:color="#57565D" android:state_pressed="false"/>
    <item android:color="#FFFFFF" android:state_pressed="true"/>
selector>
P7 Button事件
//获得按钮
        Button btn = findViewById(R.id.btn_one);
点击事件
        //点击事件
        btn.setOnClickListener(new View.OnClickListener() {
            @Override
            public void onClick(View v) {
                Log.e(TAG,"S");  //打印东西
            }
        });
也可以设置button的onclick属性
android:onClick=""
长按事件
        //长按事件
        btn.setOnLongClickListener(new View.OnLongClickListener() {
            @Override
            public boolean onLongClick(View v) {
                return false;
            }
        });
触摸事件
        //触摸事件
        btn.setOnTouchListener(new View.OnTouchListener() {
            @Override
            public boolean onTouch(View v, MotionEvent event) {
                return false;  //当返回true,不会处理其他事件
            }
        });
P8 EditText
    <EditText
        android:layout_width="100dp"
        android:layout_height="100dp"
        android:hint="请输入日期"
        android:inputType="date"
        android:drawableBottom="@mipmap/ic_launcher"
        android:background="@drawable/ic_launcher_background"
        android:paddingLeft="10dp"
        />
P9 ImageView
    <ImageView
        android:src="@mipmap/ic_launcher"
        android:scaleType="fitStart"
        android:maxHeight="500dp"
        android:maxWidth="500dp"
        android:adjustViewBounds="true"
        android:layout_width="wrap_content"
        android:layout_height="wrap_content"/>
P10 ProgressBar
    <ProgressBar
        style="?android:attr/progressBarStyleHorizontal"
        android:layout_width="370dp"
        android:layout_height="wrap_content"
        android:max="200"
        android:progress="150" />
P11 notification
得先创建NotificationManager和Notification


   <Button
        android:layout_width="100dp"
        android:layout_height="50dp"
        android:onClick="sendN"
        android:text="@string/sendNotification"/>
新建通知具体消息的activity
public class NotificationActivity extends Activity {
    @Override
    protected void onCreate(@Nullable Bundle savedInstanceState) {
        super.onCreate(savedInstanceState);
        Log.e("TAG", "onCreate: 进入通知");
    }
}
通知所有内容
    private NotificationManager manager;
    private Notification notification;
    @Override
    protected void onCreate(Bundle savedInstanceState) {
        super.onCreate(savedInstanceState);
        setContentView(R.layout.activity_main);
        //创建通知管理
        manager = (NotificationManager) getSystemService(NOTIFICATION_SERVICE);

        //创建通道渠道
        if (Build.VERSION.SDK_INT >= Build.VERSION_CODES.O){
            NotificationChannel channel = new NotificationChannel(
                    "vashon","测试通知",NotificationManager.IMPORTANCE_HIGH);
            manager.createNotificationChannel(channel);
        }
        //我的消息具体内容
        Intent intent = new Intent(this,NotificationActivity.class);
        PendingIntent pendingIntent = PendingIntent.getActivity(
                this,0,intent,0);
        //创建通知
        notification = new NotificationCompat.Builder(this,"vashon")
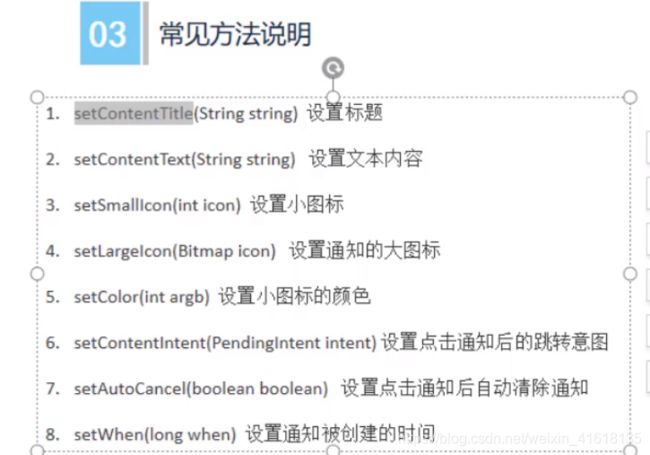
                .setContentTitle("我的通知")
                .setContentText("这是通知内容")
                .setSmallIcon(R.drawable.ic_launcher_background)//不能是RGB图
                .setLargeIcon(BitmapFactory.decodeResource(getResources(),R.drawable.timg))//大图标
                .setColor(Color.parseColor("#ff0000")) //小图标颜色
                .setAutoCancel(true) //点击后取消
                .setContentIntent(pendingIntent)   //通知具体信息
                .build();
    }

    public void sendN(View view) {
        manager.notify(1,notification);
        //manager.cancel(1);取消通知
    }
P12 ToolBar
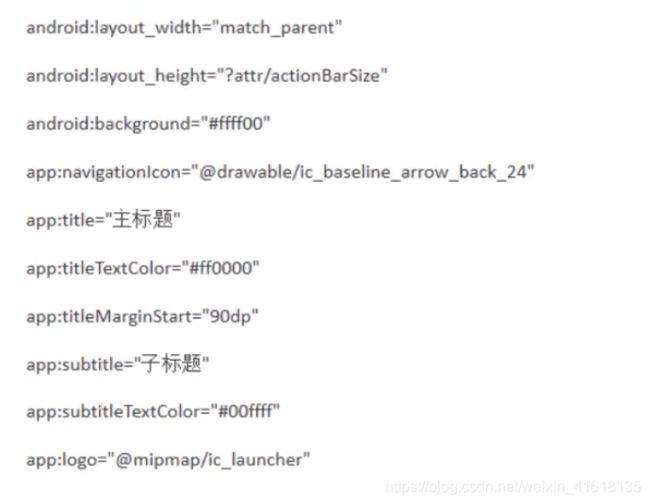
    <androidx.appcompat.widget.Toolbar
        android:id="@+id/tb"
        android:layout_width="match_parent"
        android:layout_height="?attr/actionBarSize"
        android:background="#ffff00"
        app:navigationIcon="@drawable/ic_baseline_arrow_back_24"
        app:title="标题"
        app:titleTextColor="#ff0000"
        app:subtitle="子标题"
        app:subtitleTextColor="#00ffff"
        app:logo="@drawable/ic_baseline_add_a_photo_24"
        app:titleMarginStart="120dp"
        />
P13 AlertDialog
    public void dialogClick(View view) {
        //新建View区域
        View dialogView = getLayoutInflater().inflate(R.layout.dialog_view,null);

        AlertDialog.Builder builder = new AlertDialog.Builder(this);
        builder.setIcon(R.mipmap.ic_launcher)
                .setTitle("这是一个对话框")
                .setMessage("这是消息")
                .setView(dialogView)
                .setPositiveButton("确定", new DialogInterface.OnClickListener() {
                    @Override
                    public void onClick(DialogInterface dialog, int which) {
                        Log.e(TAG, "onClick: 确定" );
                    }
                })
                .setNegativeButton("取消", new DialogInterface.OnClickListener() {
                    @Override
                    public void onClick(DialogInterface dialog, int which) {
                        Log.e(TAG, "onClick: 取消" );
                    }
                })
                .setNeutralButton("中间", new DialogInterface.OnClickListener() {
                    @Override
                    public void onClick(DialogInterface dialog, int which) {
                        Log.e(TAG, "onClick: 中间" );
                    }
                })
                .create()
                .show();
    }
P14 PopupWindow
    public void popupWindowClick(View view) {
        View popupView = getLayoutInflater().inflate(R.layout.popupwindow_view,null);

        PopupWindow popupWindow = new PopupWindow(popupView, ViewGroup.LayoutParams.WRAP_CONTENT,
                ViewGroup.LayoutParams.WRAP_CONTENT,true);
        //popupwindow放在view(button控件)下面
        popupWindow.setBackgroundDrawable( getResources().getDrawable(R.drawable.timg));
        popupWindow.showAsDropDown(view);
    }
P15 开发布局 LinearLayout(线性布局)
<LinearLayout xmlns:android="http://schemas.android.com/apk/res/android"
    android:layout_width="match_parent"
    android:layout_height="match_parent"
    xmlns:app="http://schemas.android.com/apk/res-auto"
    android:orientation="vertical"
    android:gravity="center_vertical"
    android:divider="@drawable/ic_baseline_add_a_photo_24"
    android:showDividers="middle"
    android:dividerPadding="100dp"
    >
    <LinearLayout
        android:layout_width="100dp"
        android:layout_height="100dp"
        android:background="#ff0000"
        android:layout_gravity="center_horizontal"
        android:layout_weight="1"
        />
    <LinearLayout
        android:layout_width="100dp"
        android:layout_height="100dp"
        android:background="#ffff00"
        android:layout_weight="1"
        />
    <LinearLayout
        android:layout_width="100dp"
        android:layout_height="100dp"
        android:background="#ff0000"/>

LinearLayout>
P16 RelativeLayout (相对布局)
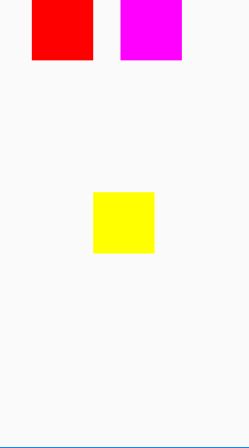
<RelativeLayout xmlns:android="http://schemas.android.com/apk/res/android"
    android:layout_width="match_parent"
    android:layout_height="match_parent"
    >
    <RelativeLayout
        android:id="@+id/rtl_yellow"
        android:background="#ffff00"
        android:layout_width="100dp"
        android:layout_centerInParent="true"
        android:layout_height="100dp"/>
    <RelativeLayout
        android:background="#ff0000"
        android:layout_toLeftOf="@+id/rtl_yellow"
        android:layout_width="100dp"
        android:layout_height="100dp"/>
    <RelativeLayout
        android:background="#ff00ff"
        android:layout_marginLeft="200dp"
        android:layout_width="100dp"
        android:layout_height="100dp"/>
RelativeLayout>
P17 FrameLayout(帧布局,框架布局)
<FrameLayout xmlns:android="http://schemas.android.com/apk/res/android"
    android:layout_width="match_parent"
    android:layout_height="match_parent"
    >


FrameLayout>
P17 TableLayout(表格布局)
<TableLayout xmlns:android="http://schemas.android.com/apk/res/android"

    android:layout_width="match_parent"
    android:layout_height="match_parent"
    >
    <Button
        android:layout_width="wrap_content"
        android:layout_height="wrap_content"
        android:text="这种布局,一个控件占用一行"
        />
    <TableRow>
        <Button
            android:layout_width="wrap_content"
            android:layout_height="wrap_content"
            android:layout_column="1"
            android:text="使用TableRow,元素内控件在一行"
            />
        <Button
            android:layout_width="wrap_content"
            android:layout_height="wrap_content"
            android:text="该行前面那个控件被隐藏了"
            />
    TableRow>
    <TableRow>
        <Button
            android:layout_width="wrap_content"
            android:layout_height="wrap_content"
            android:text="1"
            />
        <Button
            android:layout_width="wrap_content"
            android:layout_height="wrap_content"
            android:text="2"
            />
    TableRow>
TableLayout>
P19 GridLayout(网格布局)
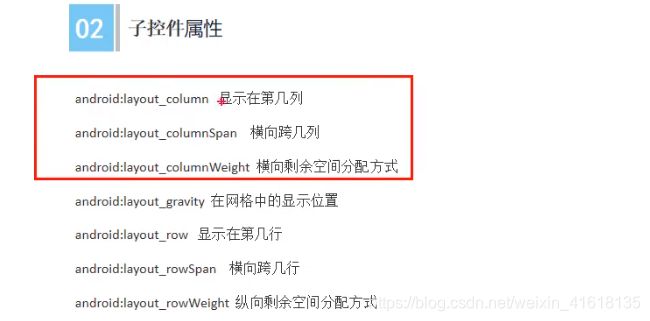
<GridLayout xmlns:android="http://schemas.android.com/apk/res/android"
    android:layout_width="match_parent"
    android:layout_height="match_parent"
    android:orientation="horizontal"
    android:columnCount="3"
    >
    <Button
        android:layout_width="wrap_content"
        android:layout_height="wrap_content"
        android:text="这是1个按钮"
        />
    <Button
        android:layout_width="wrap_content"
        android:layout_height="wrap_content"
        android:layout_row="1"
        android:layout_column="0"
        android:text="这是2个按钮"
        />
    <Button
    android:layout_width="wrap_content"
    android:layout_height="wrap_content"
    android:text="这是3个按钮"
    />
    <Button
        android:layout_width="wrap_content"
        android:layout_height="wrap_content"
        android:text="这是4个按钮"
        />
    <Button
        android:layout_width="wrap_content"
        android:layout_height="wrap_content"
        android:text="这是5个按钮"
        />
GridLayout>
P20 ConstraintLayout(约束布局)
P21 ListView
item项目
<LinearLayout
    xmlns:android="http://schemas.android.com/apk/res/android"
    android:layout_width="match_parent"
    android:layout_height="match_parent">

    <TextView
        android:id="@+id/tv"
        android:textSize="30sp"
        android:layout_width="wrap_content"
        android:layout_height="wrap_content"
        />
LinearLayout>
listView控件
<LinearLayout xmlns:android="http://schemas.android.com/apk/res/android"
    android:layout_width="match_parent"
    android:layout_height="match_parent"
    android:orientation="vertical">
    <ListView
        android:id="@+id/lv"
        android:layout_width="wrap_content"
        android:layout_height="wrap_content"

        />

LinearLayout>
为listView控件的item赋值的Bean类
public class Bean {
    private String name;

    public String getName() {
        return name;
    }

    public void setName(String name) {
        this.name = name;
    }
}
为listView控件进行赋值操作的adapter类
public class MyAdapter extends BaseAdapter {

    //为listView控件item赋值的数据
    private List<Bean> data;
    private Context context;

    public MyAdapter(List<Bean> data, Context context) {
        this.data = data;
        this.context = context;
    }

    @Override
    public int getCount() {
        //listView可显示的item数,显然时data的长度
        return data.size();
    }

    @Override
    public Object getItem(int position) {
        //一般固定不变
        return position;
    }

    @Override
    public long getItemId(int position) {
        return 0 ;
    }

    @Override
    public View getView(int position, View convertView, ViewGroup parent) {
        ViewHolder viewHolder;
        //listView没显示一个item通过该方法获得item
        //拿到item的样式
        if (convertView == null){
            viewHolder = new ViewHolder();
             //拿到item样式中的tv
            convertView = LayoutInflater.from(context).inflate(R.layout.list_item,parent,false);
            viewHolder.textView = convertView.findViewById(R.id.tv);
            //将item中的样式放入到tag中
            convertView.setTag(viewHolder);
        }else {
            //第二次访问item通过tag获得item,避免频繁使用findViewById
            viewHolder = (ViewHolder) convertView.getTag();
        }
        //为item中的tv赋值
        viewHolder.textView.setText(data.get(position).getName());
        return convertView;
    }
    private final class ViewHolder{
        TextView textView;
    }
}
    @Override
    protected void onCreate(Bundle savedInstanceState) {
        super.onCreate(savedInstanceState);
        setContentView(R.layout.activity_main);

        for (int i = 0; i < 20; i++) {
            Bean bean = new Bean();
            bean.setName("vashon" + i);
            data.add(bean);
        }
        //获得ListView
        ListView listView = findViewById(R.id.lv);
        //listView设置为item赋值的adapter
        listView.setAdapter(new MyAdapter(data, this));
        listView.setOnItemClickListener(new AdapterView.OnItemClickListener() {
            @Override
            public void onItemClick(AdapterView<?> parent, View view, int position, long id) {
                Log.e("vashon","click" + position);
            }
        });

    }
P22 RecyclerView
需要导包
在项目的build.gradle
//    导入RecyclerView的依赖包
    implementation 'androidx.recyclerview:recyclerview:1.0.0'
item布局样式
<LinearLayout
    xmlns:android="http://schemas.android.com/apk/res/android"
    android:layout_width="match_parent"
    android:layout_height="match_parent">

    <TextView
        android:id="@+id/tv"
        android:textSize="30sp"
        android:layout_width="wrap_content"
        android:layout_height="wrap_content" />
LinearLayout>
recyclerView控件
<LinearLayout xmlns:android="http://schemas.android.com/apk/res/android"
    android:layout_width="match_parent"
    android:layout_height="match_parent"
    android:orientation="vertical">


    <androidx.recyclerview.widget.RecyclerView
        android:id="@+id/rv"
        android:layout_width="wrap_content"
        android:layout_height="wrap_content"/>

LinearLayout>
为listView控件的item赋值的Bean类
public class Bean {
    private String name;

    public String getName() {
        return name;
    }

    public void setName(String name) {
        this.name = name;
    }
}
为RecyclerView控件进行赋值操作的adapter类
public class MyAdapter_RV extends RecyclerView.Adapter<MyAdapter_RV.MyViewHolder> {

    //item数据
    private List<Bean> data;
    private Context context;

    public MyAdapter_RV(List<Bean> data, Context context) {
        this.data = data;
        this.context = context;
    }

    @NonNull
    @Override
    public MyViewHolder onCreateViewHolder(@NonNull ViewGroup parent, int viewType) {
        //1.获得item布局样式
        View view = View.inflate(context,R.layout.recyclerview_item,null);
        //3.返回item布局中的textView
        return new MyViewHolder(view);
    }

    @Override
    public void onBindViewHolder(@NonNull MyViewHolder holder, int position) {
        //4.为item绑定textView中的数据
        holder.tv.setText(data.get(position).getName());
    }

    @Override
    public int getItemCount() {
        return data == null ? 0 : data.size();
    }

    public class MyViewHolder extends RecyclerView.ViewHolder{
        //2.获得布局item样式中的textView
        private TextView tv;
        public MyViewHolder(@NonNull View itemView) {
            super(itemView);
            //2.
            tv = itemView.findViewById(R.id.tv);
            //2_2创建点击事件
            itemView.setOnClickListener(new View.OnClickListener() {
                @Override
                public void onClick(View v) {
                    if (mOnItemClickListener !=null){
                        mOnItemClickListener.onRecyclerItemClick(getAdapterPosition());
                    }
                }
            });
        }
    }

    //设置点击事件
    //----------------------------------------------------------------------------
    private OnRecyclerItemClickListener mOnItemClickListener;

    //2_1生成listener
    public void setmOnItemClickListener(OnRecyclerItemClickListener mOnItemClickListener) {
        this.mOnItemClickListener = mOnItemClickListener;
    }
    //接口
    public interface OnRecyclerItemClickListener{
        void onRecyclerItemClick(int position);
    }
}
        //1.获得RecyclerView
        RecyclerView recyclerView = findViewById(R.id.rv);
        //2.设置布局
        LinearLayoutManager linearLayoutManager = new LinearLayoutManager(this);
        recyclerView.setLayoutManager(linearLayoutManager);
        //3.设置可设置item的adapter
        MyAdapter_RV myAdapter_rv = new MyAdapter_RV(data,this);
        recyclerView.setAdapter(myAdapter_rv);


        //设置点击事件
        myAdapter_rv.setmOnItemClickListener(new MyAdapter_RV.OnRecyclerItemClickListener() {
            @Override
            public void onRecyclerItemClick(int position) {
                Log.e(TAG, "onRecyclerItemClick: "+position );
            }
        });
P23 帧动画
放置图片作为动画的xml文件。
<animation-list xmlns:android="http://schemas.android.com/apk/res/android">
    <item android:drawable="@drawable/ic_baseline_add_a_photo_24" android:duration="1000"/>
    <item android:drawable="@drawable/ic_baseline_arrow_back_24" android:duration="1000"/>
animation-list>
使用xml文件
<LinearLayout xmlns:android="http://schemas.android.com/apk/res/android"
    android:layout_width="match_parent"
    android:layout_height="match_parent"
    android:orientation="vertical"
    android:id="@+id/ly"
    android:background="@drawable/frame"
    >
动画开启
LinearLayout linearLayout = findViewById(R.id.ly);
AnimationDrawable anim = (AnimationDrawable) linearLayout.getBackground();
linearLayout.setOnClickListener(new View.OnClickListener() {
    @Override
    public void onClick(View v) {
        if (flag){
            anim.start();
            flag = false;
        }else {
            anim.stop();
            flag = true;
        }
    }
});
效果:图片不断切换
P24 补间动画
    <ImageView
        android:id="@+id/iv"
        android:layout_width="wrap_content"
        android:layout_height="wrap_content"
        android:maxWidth="300dp"
        android:maxHeight="300dp"

        android:src="@drawable/ic_baseline_arrow_back_24"/>
新建anim文件,创建实现动画的xml文件
<set xmlns:android="http://schemas.android.com/apk/res/android">
    <alpha
        android:fromAlpha="0"
        android:toAlpha="1"
        android:duration="2000"
        />
set>
ImageView iv = findViewById(R.id.iv);
iv.setOnClickListener(new View.OnClickListener() {
    @Override
    public void onClick(View v) {
        //通过加载xml动画设置文件创建一个Animation对象
        Animation animation = AnimationUtils.loadAnimation(
                MainActivity.this,R.anim.alpha);
        //启动动画
        iv.startAnimation(animation);
    }
});
效果:图片由透明逐渐显示出来
P25 属性动画
ValueAnimator anim = ValueAnimator.ofFloat(0f,1f);
anim.setDuration(2000);
anim.addUpdateListener(new ValueAnimator.AnimatorUpdateListener() {
    @Override
    public void onAnimationUpdate(ValueAnimator animation) {
        float value = (float) animation.getAnimatedValue();
        Log.e(TAG, "onAnimationUpdate: " + value );
    }
});
//启动动画
anim.start();
继承ValueAnimator直接对控件进行操作

上列代码,对控件textView的透明度进行值得变化。
 TextView textView = findViewById(R.id.tv);
 ObjectAnimator objectAnimator = ObjectAnimator.ofFloat(textView,"alpha",0f,1f);
 objectAnimator.setDuration(4000);
 objectAnimator.start();
 //设置动画监听
 objectAnimator.addListener(new Animator.AnimatorListener() {
     @Override
     public void onAnimationStart(Animator animation) {

     }

     @Override
     public void onAnimationEnd(Animator animation) {

     }

     @Override
     public void onAnimationCancel(Animator animation) {

     }

     @Override
     public void onAnimationRepeat(Animator animation) {

     }
 });
 objectAnimator.addListener(new AnimatorListenerAdapter() {
     @Override
     public void onAnimationStart(Animator animation) {
         super.onAnimationStart(animation);
     }
 });
P26 单位和尺寸
LinearLayout linearLayout = new LinearLayout(this);
LinearLayout.LayoutParams layoutParams = new LinearLayout.LayoutParams
        (ViewGroup.LayoutParams.MATCH_PARENT, ViewGroup.LayoutParams.MATCH_PARENT);
linearLayout.setLayoutParams(layoutParams);

TextView textView1 = new TextView(this);
textView1.setText("我是文本");
LinearLayout.LayoutParams layoutParams2 = new LinearLayout.LayoutParams
        (300,300);
linearLayout.addView(textView1);
P27 ViewPager
    <androidx.viewpager.widget.ViewPager
        android:id="@+id/vp"
        android:layout_width="match_parent"
        android:layout_height="match_parent"/>
java中设置viewPager
        //View集合
LayoutInflater lf = getLayoutInflater().from(this);
View view1 = lf.inflate(R.layout.dialog_view, null);
View view2 = lf.inflate(R.layout.popupwindow_view,null);
List<View> viewList = new ArrayList<>();
viewList.add(view1);
viewList.add(view2);

//viewPager设置adapter
ViewPager viewPager = findViewById(R.id.vp);
MyAdapter_VP myAdapter_vp =  new MyAdapter_VP(viewList);
viewPager.setAdapter(myAdapter_vp);
viewPager的adapter
public class MyAdapter_VP extends PagerAdapter {
    private List<View> mListView;
    public MyAdapter_VP(List<View> mListView) {
        this.mListView = mListView;
    }

    @NonNull
    @Override
    public Object instantiateItem(@NonNull ViewGroup container, int position) {
        container.addView(mListView.get(position),0);
        return mListView.get(position);
    }

    @Override
    public int getCount() {
        //view的个数
        return mListView.size();
    }

    @Override
    public boolean isViewFromObject(@NonNull View view, @NonNull Object object) {
        return view == object;
    }

    @Override
    public void destroyItem(@NonNull ViewGroup container, int position, @NonNull Object object) {
        container.removeView(mListView.get(position));
    }
}
有页面滑动效果
P28 Fragment
P29 什么是Fragment

可以在同一activity中使用fragment
一个fragment可以复用
可以看作子activity
P30 使用Fragment
创建fragment java文件
跟Mainactivty差不多都有java文件和xml文件
xml文件
<LinearLayout xmlns:android="http://schemas.android.com/apk/res/android"
    xmlns:tools="http://schemas.android.com/tools"
    android:layout_width="match_parent"
    android:layout_height="match_parent"
    android:orientation="vertical"
    tools:context=".BlankFragment1">

    <TextView
        android:id="@+id/tv"
        android:layout_width="match_parent"
        android:layout_height="40dp"
        android:text="@string/hello_blank_fragment" />
    <Button
        android:id="@+id/btn"
        android:layout_width="match_parent"
        android:text="button"
        android:layout_height="40dp"/>
LinearLayout>
java文件
public class BlankFragment1 extends Fragment {

    private View root;
    private TextView textView;
    private Button button;
    @Override
    public void onCreate(Bundle savedInstanceState) {
        super.onCreate(savedInstanceState);

    }

    @Override
    public View onCreateView(LayoutInflater inflater, ViewGroup container,
                             Bundle savedInstanceState) {
        // Inflate the layout for this fragment
        if (root ==null)
            root = inflater.inflate(R.layout.fragment_blank1, container, false);
        textView = root.findViewById(R.id.tv);
        button = root.findViewById(R.id.btn);
        button.setOnClickListener(new View.OnClickListener() {
            @Override
            public void onClick(View v) {
                textView.setText("click");
            }
        });
        return root;
    }
}
activity_main中使用fragment
<fragment android:name="com.example.myapplication.BlankFragment1"
    android:id="@+id/fragment1"
    android:layout_width="match_parent"
    android:layout_height="match_parent"/>
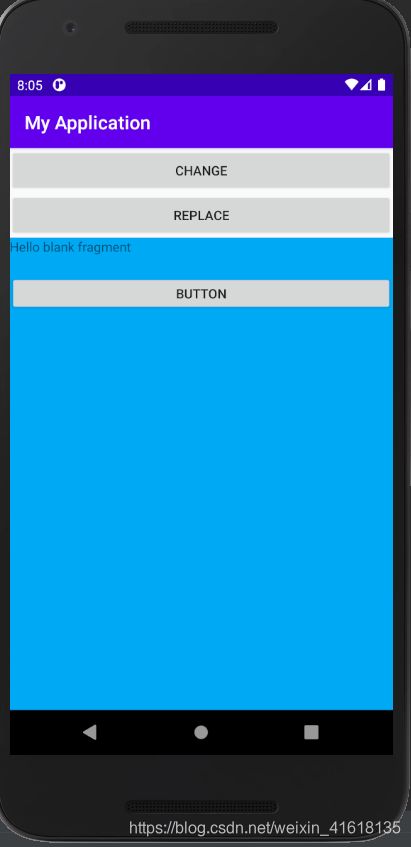
P32 动态添加fragment
新建两个fragment

mainactivity继承点击接口,并编写切换fragment事件
public class MainActivity extends AppCompatActivity implements View.OnClickListener{

    @Override
    protected void onCreate(Bundle savedInstanceState) {
        super.onCreate(savedInstanceState);
        setContentView(R.layout.activity_main);
        Button btn1 = findViewById(R.id.btn);
        btn1.setOnClickListener(this);
        Button btn2 = findViewById(R.id.btn_2);
        btn2.setOnClickListener(this);
    }

    @Override
    public void onClick(View v) {
        switch (v.getId()){
            case R.id.btn:
                replaceFragment(new BlankFragment1());
                break;
            case R.id.btn_2:
                replaceFragment(new ItemFragment());
                break;
        }
    }

    //切换fragment
    private void replaceFragment(Fragment fragment) {
        //开启事务
        FragmentManager fragmentManager = getSupportFragmentManager();
        FragmentTransaction transaction = fragmentManager.beginTransaction();
        transaction.replace(R.id.framelayout,fragment);
        transaction.addToBackStack(null);//将fragment加入栈中
        transaction.commit();
    }
}
P33 Activity与fragment通信
通过bundle。
fragment类中有bundle变量,在activity中创建fragment时可以将值放到该变量(bundle)中

代码如下:
public void onClick(View v) {
    switch (v.getId()){
        case R.id.btn:
            Bundle bundle =new Bundle();
            bundle.putString("message","我喜欢享课堂");
            BlankFragment1 bf = new BlankFragment1();
            //通过bundle通信。
            bf.setArguments(bundle);
            replaceFragment(bf);
            break;
        case R.id.btn_2:
            replaceFragment(new ItemFragment());
            break;
    }
}
P35 Fragment和activity的接口通信方案
首先定义一个接口
public interface IFragmentCallback {
	//发送信息给activity
    void sendMsgToActivity(String msg);
    //从activity得到信息
    String getMsgFromActivity();
}
在fragment中定义接口变量并定义get和set方法
在activity中为fragment赋值
 case R.id.btn:
     Bundle bundle =new Bundle();
     bundle.putString("message","我喜欢享课堂");
     BlankFragment1 bf = new BlankFragment1();
     bf.setArguments(bundle);
     //利用接口传递数据
     bf.setiFragmentCallback(new IFragmentCallback() {
         @Override
         public void sendMsgToActivity(String msg) {
             Toast.makeText(MainActivity.this,msg,Toast.LENGTH_SHORT).show();
         }

         @Override
         public String getMsgFromActivity() {
             return "hello, I'm from activity";
         }
     });

     replaceFragment(bf);
     break;
fragment中设置点击事件实现数据传递
@Override
public View onCreateView(LayoutInflater inflater, ViewGroup container,
                         Bundle savedInstanceState) {
    // Inflate the layout for this fragment
    if (root ==null)
        root = inflater.inflate(R.layout.fragment_blank1, container, false);
    textView = root.findViewById(R.id.tv);

    //向activity发送信息
    button = root.findViewById(R.id.btn_3);
    button.setOnClickListener(new View.OnClickListener() {
        @Override
        public void onClick(View v) {
            iFragmentCallback.sendMsgToActivity("hello,I'm from fragment");
        }
    });
    ///从activity中获得信息
    button2 = root.findViewById(R.id.btn_4);
    button2.setOnClickListener(new View.OnClickListener() {
        @Override
        public void onClick(View v) {
            String msg = iFragmentCallback.getMsgFromActivity();
            Toast.makeText(BlankFragment1.this.getContext(),msg,Toast.LENGTH_SHORT).show();
        }
    });
    return root;
}
封装好的接口有:eventBus、LiveData
P36 Fragment生命周期
fragment的执行依托于activity
这些回调方法在fragment类中可以看到。


P39 ViewPager2的基本使用
引入依赖:(可以在maven仓库中查找)
implementation group: 'androidx.viewpager2', name: 'viewpager2', version: '1.0.0'
viewPager2控件绑定adapter
public class MainActivity extends AppCompatActivity {
    @Override
    protected void onCreate(Bundle savedInstanceState) {
        super.onCreate(savedInstanceState);
        setContentView(R.layout.activity_main);
        ViewPager2 viewPager2 = findViewById(R.id.viewPager2);
        ViewPagerAdapter viewPagerAdapter = new ViewPagerAdapter();
        viewPager2.setAdapter(viewPagerAdapter);
    }
}
自定义adapter(ViewPagerAdapter)
public class ViewPagerAdapter extends RecyclerView.Adapter<ViewPagerAdapter.ViewPagerViewHolder> {
    private List<String> titles = new ArrayList<>();

    public ViewPagerAdapter() {
        titles.add("hello");
        titles.add("world");
    }

    @NonNull
    @Override
    //绑定viewPager的view
    public ViewPagerViewHolder onCreateViewHolder(@NonNull ViewGroup parent, int viewType) {
        return new ViewPagerViewHolder(LayoutInflater.from(parent.getContext()).inflate(R.layout.item_pager,parent,false));
    }

    @Override
    public void onBindViewHolder(@NonNull ViewPagerViewHolder holder, int position) {
        //滑动效果
        holder.mTv.setText(titles.get(position));
    }

    @Override
    public int getItemCount() {
        //滑动页面的数量
        return 2;
    }
    //自定义viewHolder
    class ViewPagerViewHolder extends RecyclerView.ViewHolder{

        TextView mTv;
        RelativeLayout mContainer;
        public ViewPagerViewHolder(@NonNull View itemView) {
            super(itemView);
            mContainer = itemView.findViewById(R.id.container);
            mTv = mContainer.findViewById(R.id.tvTitle);
        }
    }
}
item_pager.xml
<RelativeLayout
    xmlns:android="http://schemas.android.com/apk/res/android" android:layout_width="match_parent"
    android:layout_height="match_parent"
    android:id="@+id/container">

    <TextView
        android:layout_width="wrap_content"
        android:layout_height="wrap_content"
        android:id="@+id/tvTitle"
        android:layout_centerInParent="true"
        android:textSize="32dp"
        android:text="hello"/>
RelativeLayout>
P41 ViewPager和Fragment合集
viewPager专门的adapter
FragmentPagerAdapter或者FragmentStateAdapter
MyFragmentPagerAdapter.java
public class MyFragmentPagerAdapter extends FragmentStateAdapter {
    List<Fragment> fragmentList =new ArrayList<>();

    public MyFragmentPagerAdapter(@NonNull FragmentManager fragmentManager, @NonNull Lifecycle lifecycle,
    List<Fragment> fragments) {
        super(fragmentManager, lifecycle);
        this.fragmentList = fragments;
    }

    @NonNull
    @Override
    public Fragment createFragment(int position) {
        return fragmentList.get(position);
    }

    @Override
    public int getItemCount() {
        return fragmentList.size();
    }
}
待使用的fragment
public class BlankFragment extends Fragment {

    // TODO: Rename parameter arguments, choose names that match
    // the fragment initialization parameters, e.g. ARG_ITEM_NUMBER
    private static final String ARG_Text = "param1";

    // TODO: Rename and change types of parameters
    private String mTextString;
    View rootView;
    public BlankFragment() {
        // Required empty public constructor
    }

    /**
     * Use this factory method to create a new instance of
     * this fragment using the provided parameters.
     *
     * @param param1 Parameter 1.

     * @return A new instance of fragment BlankFragment.
     */
    // TODO: Rename and change types and number of parameters
    public static BlankFragment newInstance(String param1) {
        //生成fragment时同时设置mTextString的值
        BlankFragment fragment = new BlankFragment();
        Bundle args = new Bundle();
        args.putString(ARG_Text, param1);
        fragment.setArguments(args);
        return fragment;
    }

    @Override
    public void onCreate(Bundle savedInstanceState) {
        super.onCreate(savedInstanceState);
        if (getArguments() != null) {
            mTextString = getArguments().getString(ARG_Text);
        }
    }

    @Override
    public View onCreateView(LayoutInflater inflater, ViewGroup container,
                             Bundle savedInstanceState) {
        if (rootView ==null)
            rootView = inflater.inflate(R.layout.fragment_blank, container, false);
        initView();
        return rootView;
    }
    private void initView() {
        //将textView的文本设置为mTextString,在新建fragment时会设置该值
        TextView textView = rootView.findViewById(R.id.text);
        textView.setText(mTextString);
    }
}
activity中设置viewPager2
private void initPager() {
    viewPager = findViewById(R.id.viewPager2);
    ArrayList<Fragment> fragments = new ArrayList<>();
    fragments.add(BlankFragment.newInstance("微信聊天"));
    fragments.add(BlankFragment.newInstance("通讯录"));
    fragments.add(BlankFragment.newInstance("发现"));
    fragments.add(BlankFragment.newInstance("我"));
    MyFragmentPagerAdapter pagerAdapter = new MyFragmentPagerAdapter(getSupportFragmentManager(),getLifecycle(),fragments);
    viewPager.setAdapter(pagerAdapter);
}
42 ViewPager + Fragment模拟微信首页
承接上节
编写viewpage滑动代码
viewPager.registerOnPageChangeCallback(new ViewPager2.OnPageChangeCallback() {
    @Override
    public void onPageScrolled(int position, float positionOffset, int positionOffsetPixels) {
        super.onPageScrolled(position, positionOffset, positionOffsetPixels);
    }

    @Override
    public void onPageSelected(int position) {
        super.onPageSelected(position);
        changeTable(position);
    }

    @Override
    public void onPageScrollStateChanged(int state) {
        super.onPageScrollStateChanged(state);
    }
});
编写点击事件图标点击事件
private void changeTable(int position) {
    ivCurrent.setSelected(false);
    switch (position){
        //点击微信图标,切换fragment的内容
        case R.id.id_tab_weixin:
            viewPager.setCurrentItem(0);
        case 0:
            //滑动fragment,改变图标
            ivChat.setSelected(true);
            ivCurrent = ivChat;
            break;
        case R.id.id_tab_call:
            viewPager.setCurrentItem(1);
        case 1:
            ivCall.setSelected(true);
            ivCurrent = ivCall;
            break;
        case R.id.id_tab_find:
            viewPager.setCurrentItem(2);
        case 2:
            ivFind.setSelected(true);
            ivCurrent = ivFind;
            break;
        case R.id.id_tab_me:
            viewPager.setCurrentItem(3);
        case 3:
            ivProfile.setSelected(true);
            ivCurrent = ivProfile;
            break;
    }
}


