MyBatis-Plus
目录
Spring+Mybatis+MP
1、创建子Module
通用CRUD
insert(user) 插入一条记录
id策略
@TableField 指定字段属性信息
updateById(user) 根据id更新
update(user, wrapper) 根据条件更新
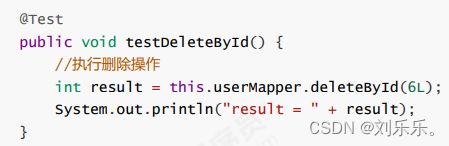
deleteById() 删除操作
deleteByMap(map) 根据指定条件删除,多条件and关系
delete(wrapper) 根据包装条件删除
deleteBatchIds() 根据ID批量删除数据
selectById() 根据ID查询
selectBatchIds() 根据ID批量查询
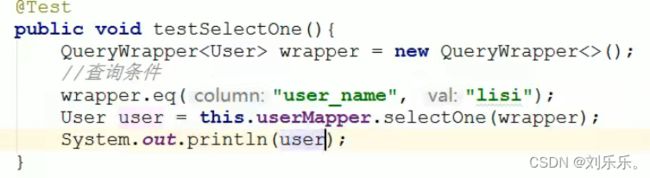
selectOne(wrapper) 根据条件只能查询一条数据
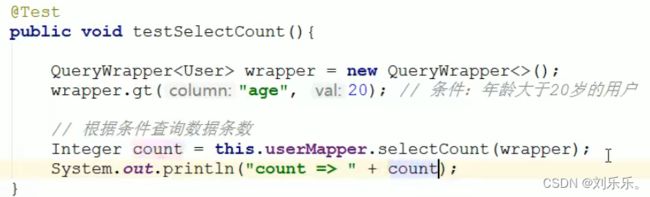
selectCount 根据条件查询总记录数
selectList 根据条件查询所有
selectPage 分页查询
SQL注入的原理
基本配置
1.configLocation 指定全局配置文件
2.mapperLocations 指定mapper.xml文件的路径
3.typeAliasesPackage 实体对象别名扫描包
进阶配置
1.mapUnderscoreToCamelCase 驼峰命名自动映射开关
2.cacheEnabled 禁用缓存
DB 策略配置
1.idType 全局的id生成策略
2.tablePrefix 表名前缀,全局配置后可省略@TableName()配置
条件构造器
1.allEq 该方法用来查找所有符合条件的数据。
wrapper.allEq(params):包含null
wrapper.allEq(params, false):不包含null
wrapper.allEq((k, v) -> (k.equals(“age”) || k.equals(“id”)), params):过滤器过滤出指定的条件
基本比较操作
模糊查询 like
排序
逻辑查询 or
编辑
select 返回指定字段
ActiveRecord
开启AR之旅
根据主键查询
新增数据
更新操作
删除操作
根据条件查询
Oracle 主键Sequence
1.部署Oracle环境
插件
执行分析插件 阻断全表更新、删除的操作
性能分析插件 输出每条 SQL 语句及其执行时间
乐观锁插件
注解实体字段
特别说明
SQL注入
1.编写MyBaseMapper
2.编写MySqlInjector
3.编写FindAll
4.注册到Spring容器
自动填充功能
1.添加@TableField注解
2.编写MyMetaObjectHandler
逻辑删除
通用枚举
代码生成器
MybatisX
MyBatis-Plus ( 简称 MP)是一个MyBatis的增强工具,在MyBatis 的基础只做增强不做改变,为简化开发,提高效率而生
Spring+Mybatis+MP
引入了Spring框架,数据源、构建等工作就交给了Spring管理。
1、创建子Module
第一步,将UserMapper继承BaseMapper,将拥有了BaseMapper中的所有方法:
public interface UserMapper extends BaseMapper
第二步:在User对象中添加@TableName,指定数据库表名

第三步:编写启动类

通用CRUD

insert(user) 插入一条记录

id策略
在User中添加
@TableId(type = IdType.AUTO) //指定id类型为自增长
@TableField 指定字段属性信息
1、对象中的属性名和字段名不一致的问题(非驼峰)
2、对象中的属性字段在表中不存在的问题

updateById(user) 根据id更新

update(user, wrapper) 根据条件更新
使用QueryWrapper

使用UpdateWrapper

deleteById() 删除操作
deleteByMap(map) 根据指定条件删除,多条件and关系

delete(wrapper) 根据包装条件删除

deleteBatchIds() 根据ID批量删除数据

selectById() 根据ID查询

selectBatchIds() 根据ID批量查询

selectOne(wrapper) 根据条件只能查询一条数据
查询数据超过一条时,会抛出异常
selectCount 根据条件查询总记录数
selectList 根据条件查询所有

selectPage 分页查询
1.

2.
SQL注入的原理
基本配置
1.configLocation 指定全局配置文件

logback.xml中:

2.mapperLocations 指定mapper.xml文件的路径

Maven 多模块项目的扫描路径需以 classpath*: 开头 (即加载多个 jar 包下的 XML 文件)

3.typeAliasesPackage 实体对象别名扫描包


进阶配置
1.mapUnderscoreToCamelCase 驼峰命名自动映射开关
#关闭自动驼峰映射,该参数不能和mybatis-plus.config-location同时存在
mybatis-plus.configuration.map-underscore-to-camel-case=true
2.cacheEnabled 禁用缓存
默认为true
mybatis-plus.configuration.cache-enabled=false
DB 策略配置
1.idType 全局的id生成策略
mybatis-plus.global-config.db-config.id-type=auto

2.tablePrefix 表名前缀,全局配置后可省略@TableName()配置
mybatis-plus.global-config.db-config.table-prefix=tb_
条件构造器
在MP中,Wrapper接口的实现类关系如下:
可以看到,AbstractWrapper和AbstractChainWrapper是重点实现,接下来我们重点学习AbstractWrapper以及其 子类。
说明: QueryWrapper(LambdaQueryWrapper) 和 UpdateWrapper(LambdaUpdateWrapper) 的父类 用于生成 sql 的 where 条件, entity 属性也用于生成 sql 的 where 条件
注意: entity 生成的 where 条件与 使用各个 api 生成 的 where 条件没有任何关联行为
1.allEq 该方法用来查找所有符合条件的数据。
全部eq(或个别isNull)
个别参数说明: params : key 为数据库字段名, value 为字段值 null2IsNull : 为 true 则在 map 的 value 为 null 时调用 isNull 方法,为 false 时则忽略 value 为 null 的
个别参数说明: filter : 过滤函数,是否允许字段传入比对条件中 params 与 null2IsNull : 同上
wrapper.allEq(params):包含null
wrapper.allEq(params, false):不包含null
wrapper.allEq((k, v) -> (k.equals(“age”) || k.equals(“id”)), params):过滤器过滤出指定的条件

基本比较操作
eq 等于 =
ne 不等于 <>
gt 大于 >
ge 大于等于 >=
lt 小于 <
le 小于等于<=
between BETWEEN 值1 AND 值2
notBetween NOT BETWEEN 值1 AND 值2
in 字段IN(value.get(0),value.get(1),...)
notln 字段 NOT IN(v0,v1,...)

模糊查询 like
like LIKE '%值%'
例: like("name", "王") ---> name like '%王%'
notLike NOT LIKE '%值%'
例: notLike("name", "王") ---> name not like '%王%'
likeLeft LIKE '%值'
例: likeLeft("name", "王") ---> name like '%王'
likeRight LIKE '值%'
例: likeRight("name", "王") ---> name like '王%'

排序
orderBy
排序:ORDER BY 字段, ...
例: orderBy(true, true, "id", "name") ---> order by id ASC,name ASC
orderByAsc 正序
排序:ORDER BY 字段, ... ASC
例: orderByAsc("id", "name") ---> order by id ASC,name ASC
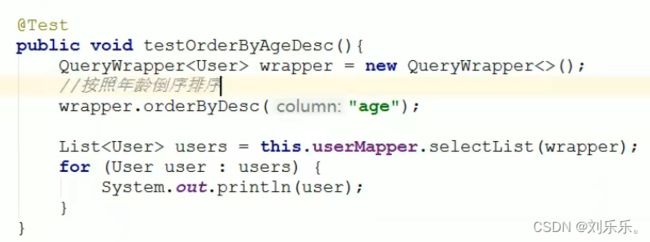
orderByDesc 倒叙
排序:ORDER BY 字段, ... DESC
例: orderByDesc("id", "name") ---> order by id DESC,name DESC
逻辑查询 or
or
拼接 OR
主动调用 or 表示紧接着下一个方法不是用 and 连接!(不调用 or 则默认为使用 and 连接)
and AND
嵌套
例: and(i -> i.eq("name", "李白").ne("status", "活着")) ---> and (name = '李白' and status <> '活着')

select 返回指定字段
在MP查询中,默认查询所有的字段,如果有需要也可以通过select方法进行指定字段。

ActiveRecord
ActiveRecord(简称AR)一直广受动态语言( PHP 、 Ruby 等)的喜爱,而 Java 作为准静态语言,对于 ActiveRecord 往往只能感叹其优雅,所以我们也在 AR 道路上进行了一定的探索,喜欢大家能够喜欢。
ActiveRecord也属于ORM(对象关系映射)层,由Rails最早提出,遵循标准的ORM模型:表映射到记录,记录映射到对象,字段映射到对象属性。配合遵循的命名和配置惯例,能够很大程度的快速实现模型的操作,而且简洁易懂。
ActiveRecord的主要思想是:
每一个数据库表对应创建一个类,类的每一个对象实例对应于数据库中表的一行记录;通常表的每个字段 在类中都有相应的Field;
ActiveRecord同时负责把自己持久化,在ActiveRecord中封装了对数据库的访问,即CURD;; ActiveRecord是一种领域模型(Domain Model),封装了部分业务逻辑;
开启AR之旅
在MP中,开启AR非常简单,只需要将实体对象继承Model
public class User extends Model
{
根据主键查询

新增数据

更新操作

删除操作

根据条件查询

Oracle 主键Sequence
在mysql中,主键往往是自增长的,这样使用起来是比较方便的,如果使用的是Oracle数据库,那么就不能使用自增 长了,就得使用Sequence 序列生成id值了。
1.部署Oracle环境
为了简化环境部署,这里使用Docker环境进行部署安装Oracle。
插件
mybatis插件机制
mybatis的插件机制
MyBatis 允许你在已映射语句执行过程中的某一点进行拦截调用。
1. 拦截执行器的方法 2. 拦截参数的处理 3. 拦截结果集的处理 4. 拦截Sql语法构建的处理
@Intercepts({@Signature(
type= Executor.class, //拦截类型
method = "update", //拦截的方法
args = {MappedStatement.class,Object.class})})
public class MyInterceptor implements Interceptor {
@Override
public Object intercept(Invocation invocation) throws Throwable {
//拦截方法,具体业务逻辑编写的位置
return invocation.proceed();
}
@Override
public Object plugin(Object target) {
//创建target对象的代理对象,目的是将当前拦截器加入到该对象中
return Plugin.wrap(target, this);
}
@Override
public void setProperties(Properties properties) {
//属性设置
}
}
注入到Spring容器://自定义拦截器
@Bean //注入自定义拦截器(插件)
public MyInterceptor myInterceptor(){
return new MyInterceptor();
}
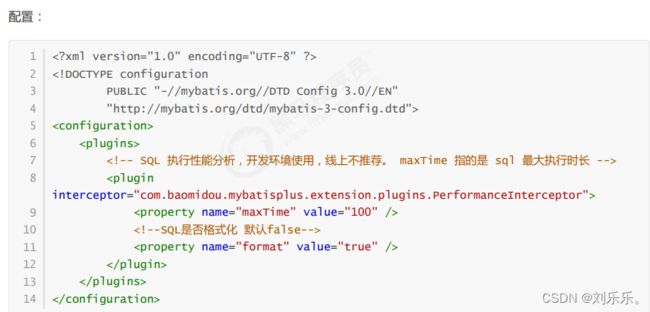
或者通过xml配置,mybatis-config.xml:
PUBLIC "-//mybatis.org//DTD Config 3.0//EN"
"http://mybatis.org/dtd/mybatis-3-config.dtd">
执行分析插件 阻断全表更新、删除的操作
在MP中提供了对SQL执行的分析的插件,可用作阻断全表更新、删除的操作,注意:该插件仅适用于开发环境,不适用于生产环境。


性能分析插件 输出每条 SQL 语句及其执行时间
性能分析拦截器,用于输出每条 SQL 语句及其执行时间,可以设置最大执行时间,超过时间会抛出异常。

乐观锁插件
当要更新一条记录的时候,希望这条记录没有被别人更新
乐观锁实现方式:
取出记录时,获取当前version
更新时,带上这个version
执行更新时, set version = newVersion where version = oldVersion
如果version不对,就更新失败
插件配置
spring xml:
spring boot:
@Bean
public OptimisticLockerInterceptor optimisticLockerInterceptor() {
return new OptimisticLockerInterceptor();
}
注解实体字段
需要为实体字段添加@Version注解。
第一步,为表添加version字段,并且设置初始值为1:
ALTER TABLE `tb_user`
ADD COLUMN `version` int(10) NULL AFTER `email`;
UPDATE `tb_user` SET `version`='1';
第二步,为User实体对象添加version字段,并且添加@Version注解:
@Version //乐观锁的版本字段
private Integer version;


特别说明
支持的数据类型只有:int,Integer,long,Long,Date,Timestamp,LocalDateTime
整数类型下 newVersion = oldVersion + 1
newVersion 会回写到 entity 中
仅支持 updateById(id) 与 update(entity, wrapper) 方法
在 update(entity, wrapper) 方法下, wrapper 不能复用!!!
SQL注入
我们已经知道,在MP中,通过AbstractSqlInjector将BaseMapper中的方法注入到了Mybatis容器,这样这些方法才 可以正常执行。
那么,如果我们需要扩充BaseMapper中的方法,又该如何实现呢? 下面我们以扩展findAll方法为例进行学习。
1.编写MyBaseMapper
public interface MyBaseMapper
extends BaseMapper { List
findAll(); //扩展其他方法
}
2.其他的Mapper都可以继承该Mapper,这样实现了统一的扩展。
public interface UserMapper extends MyBaseMapper {
User findById(Long id);
}
2.编写MySqlInjector
如果直接继承AbstractSqlInjector的话,原有的BaseMapper中的方法将失效,所以我们选择继承DefaultSqlInjector 进行扩展。
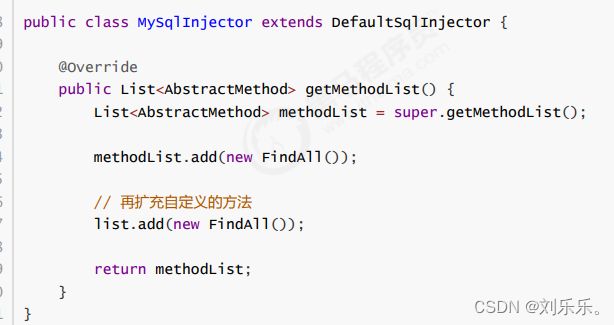
3.编写FindAll
public class FindAll extends AbstractMethod {
@Override
public MappedStatement injectMappedStatement(Class mapperClass, Class modelClass, TableInfo tableInfo) {
String sqlMethod = "findAll";
String sql = "select * from " + tableInfo.getTableName();
SqlSource sqlSource = languageDriver.createSqlSource(configuration, sql, modelClass);
return this.addSelectMappedStatement(mapperClass, sqlMethod, sqlSource, modelClass, tableInfo);
}
4.注册到Spring容器

自动填充功能
1.添加@TableField注解
@TableField(fill = FieldFill.INSERT) //插入数据时进行填充
private String password;
FieldFill提供了多种模式选择:
public enum FieldFill {
/** * 默认不处理 */ DEFAULT,
/** * 插入时填充字段 */ INSERT,
/** * 更新时填充字段 */ UPDATE,
/** * 插入和更新时填充字段 */ INSERT_UPDATE
2.编写MyMetaObjectHandler
@Component
public class MyMetaObjectHandler implements MetaObjectHandler {
@Override
public void insertFill(MetaObject metaObject) {
Object password = getFieldValByName("password", metaObject);
if(null == password){
//字段为空,可以进行填充
setFieldValByName("password", "123456", metaObject);
}
}
@Override
public void updateFill(MetaObject metaObject) {
}}
测试:
逻辑删除
开发系统时,有时候在实现功能时,删除操作需要实现逻辑删除,所谓逻辑删除就是将数据标记为删除,而并非真正 的物理删除(非DELETE操作),查询时需要携带状态条件,确保被标记的数据不被查询到。这样做的目的就是避免 数据被真正的删除。
修改表结构
为tb_user表增加deleted字段,用于表示数据是否被删除,1代表删除,0代表未删除。
LTER TABLE `tb_user`
ADD COLUMN `deleted` int(1) NULL DEFAULT 0 COMMENT '1代表删除,0代表未删除' AFTER
`version`;
同时,也修改User实体,增加deleted属性并且添加@TableLogic注解:
@TableLogic
private Integer deleted;
2.配置
application.properties:
#逻辑已删除值(默认为 1)
mybatis-plus.global-config.db-config.logic-delete-value=1
# 逻辑未删除值(默认为 0)
mybatis-plus.global-config.db-config.logic-not-delete-value=0
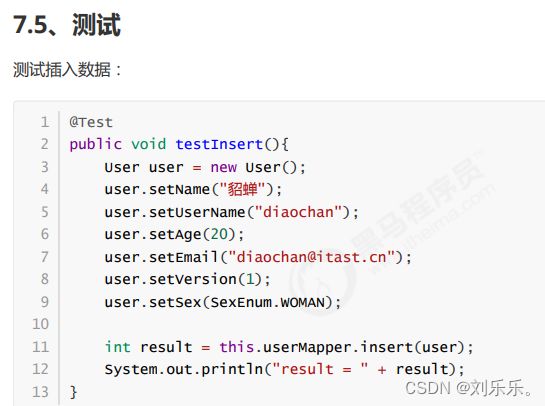
测试

通用枚举
解决了繁琐的配置,让 mybatis 优雅的使用枚举属性!
1.修改表结构
ALTER TABLE `tb_user`
ADD COLUMN `sex` int(1) NULL DEFAULT 1 COMMENT '1-男,2-女' AFTER `deleted`;
2.定义枚举
public enum SexEnum implements IEnum {
MAN(1,"男"),
WOMAN(2,"女");
private int value;
private String desc;
SexEnum(int value, String desc) {
this.value = value;
this.desc = desc;
}
@Override
public Integer getValue() {
return this.value;
}
@Override
public String toString() {
return this.desc;
}
}
3. 配置:
# 枚举包扫描
mybatis-plus.type-enums-package=cn.itcast.mp.enums
4.修改实体
private SexEnum sex;
代码生成器
package cn.itcast.mp.generator;
import java.util.ArrayList;
import java.util.List;
import java.util.Scanner;
import com.baomidou.mybatisplus.core.exceptions.MybatisPlusException;
import com.baomidou.mybatisplus.core.toolkit.StringPool;
import com.baomidou.mybatisplus.core.toolkit.StringUtils;
import com.baomidou.mybatisplus.generator.AutoGenerator;
import com.baomidou.mybatisplus.generator.InjectionConfig;
import com.baomidou.mybatisplus.generator.config.DataSourceConfig;
import com.baomidou.mybatisplus.generator.config.FileOutConfig;
import com.baomidou.mybatisplus.generator.config.GlobalConfig;
import com.baomidou.mybatisplus.generator.config.PackageConfig;
import com.baomidou.mybatisplus.generator.config.StrategyConfig;
import com.baomidou.mybatisplus.generator.config.TemplateConfig;
import com.baomidou.mybatisplus.generator.config.po.TableInfo;
import com.baomidou.mybatisplus.generator.config.rules.NamingStrategy;
import com.baomidou.mybatisplus.generator.engine.FreemarkerTemplateEngine;
/**
*
* mysql 代码生成器演示例子
*
*/
public class MysqlGenerator {
/**
*
* 读取控制台内容
*
*/
public static String scanner(String tip) {
Scanner scanner = new Scanner(System.in);
StringBuilder help = new StringBuilder();
help.append("请输入" + tip + ":");
System.out.println(help.toString());
if (scanner.hasNext()) {
String ipt = scanner.next();
if (StringUtils.isNotEmpty(ipt)) {
return ipt;
}
}
throw new MybatisPlusException("请输入正确的" + tip + "!");
}
/**
* RUN THIS
*/
public static void main(String[] args) {
// 代码生成器
AutoGenerator mpg = new AutoGenerator();
// 全局配置
GlobalConfig gc = new GlobalConfig();
String projectPath = System.getProperty("user.dir");
gc.setOutputDir(projectPath + "/src/main/java");
gc.setAuthor("itcast");
gc.setOpen(false);
mpg.setGlobalConfig(gc);
// 数据源配置
DataSourceConfig dsc = new DataSourceConfig();
dsc.setUrl("jdbc:mysql://127.0.0.1:3306/mp?
useUnicode=true&useSSL=false&characterEncoding=utf8");
// dsc.setSchemaName("public");
dsc.setDriverName("com.mysql.jdbc.Driver");
dsc.setUsername("root");
dsc.setPassword("root");
mpg.setDataSource(dsc);
// 包配置
PackageConfig pc = new PackageConfig();
pc.setModuleName(scanner("模块名"));
pc.setParent("cn.itcast.mp.generator");
mpg.setPackageInfo(pc);
// 自定义配置
InjectionConfig cfg = new InjectionConfig() {
@Override
public void initMap() {
// to do nothing
}
};
List focList = new ArrayList<>();
focList.add(new FileOutConfig("/templates/mapper.xml.ftl") {
@Override
public String outputFile(TableInfo tableInfo) {
// 自定义输入文件名称
return projectPath + "/itcast-mpgenerator/src/main/resources/mapper/" + pc.getModuleName()
+ "/" + tableInfo.getEntityName() + "Mapper" +
StringPool.DOT_XML;
}
});
cfg.setFileOutConfigList(focList);
mpg.setCfg(cfg);
mpg.setTemplate(new TemplateConfig().setXml(null));
// 策略配置
StrategyConfig strategy = new StrategyConfig();
strategy.setNaming(NamingStrategy.underline_to_camel);
strategy.setColumnNaming(NamingStrategy.underline_to_camel);
//
strategy.setSuperEntityClass("com.baomidou.mybatisplus.samples.generator.common.BaseE
ntity");
strategy.setEntityLombokModel(true);
//
strategy.setSuperControllerClass("com.baomidou.mybatisplus.samples.generator.common.B
aseController");
strategy.setInclude(scanner("表名"));
strategy.setSuperEntityColumns("id");
strategy.setControllerMappingHyphenStyle(true);
strategy.setTablePrefix(pc.getModuleName() + "_");
mpg.setStrategy(strategy);
// 选择 freemarker 引擎需要指定如下加,注意 pom 依赖必须有!
mpg.setTemplateEngine(new FreemarkerTemplateEngine());
mpg.execute();
}
}
MybatisX
Java 与 XML 调回跳转
Mapper 方法自动生成 XML