微信小程序Day4学习笔记
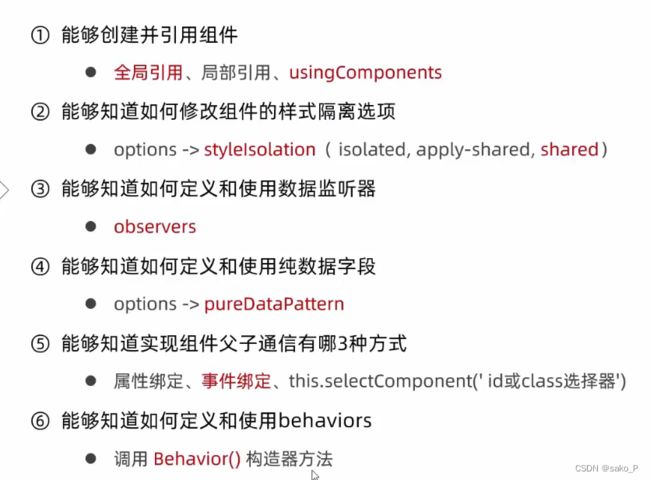
学习目标
基础强化
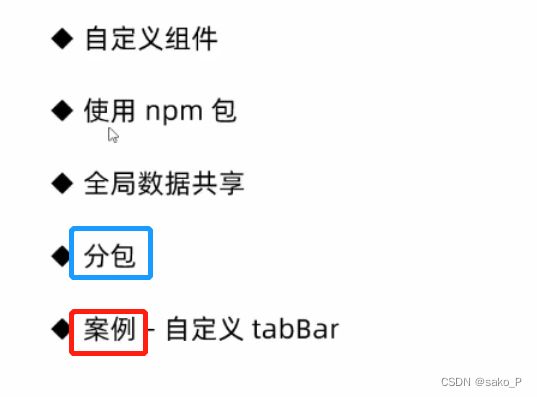
目录
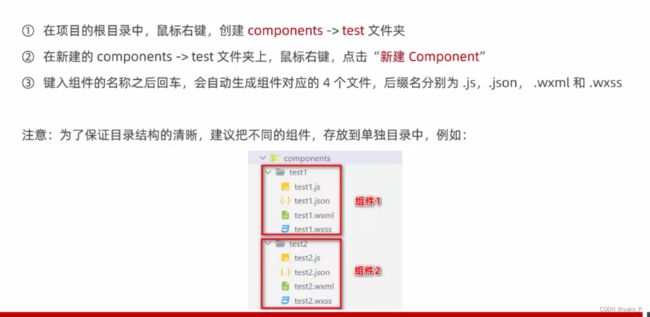
1. 自定义组件 - 创建
1. 引用组件
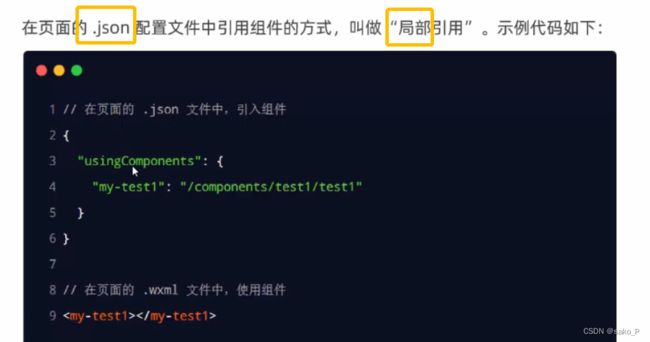
2. 局部引用组件
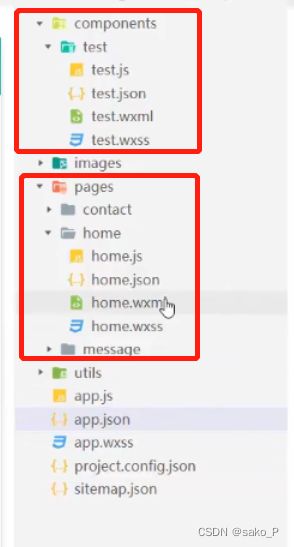
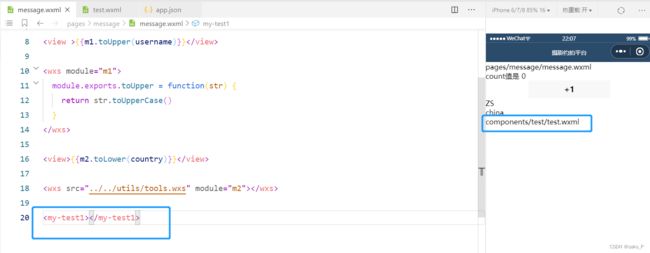
在 json 中 引用, 在页面 wxml 中 可以用标签 - 添加使用
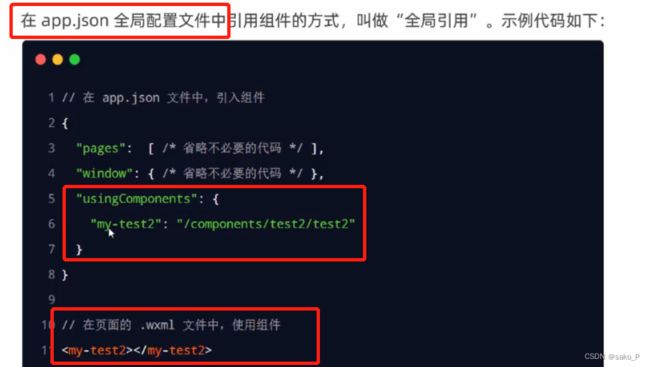
3. 全局引用组件
全局配置文件 app.json 里引用,所有页面的 wxml 都可以使用
4. 根据需求,选择合适的引用方式
5. 组件 和 页面的区别
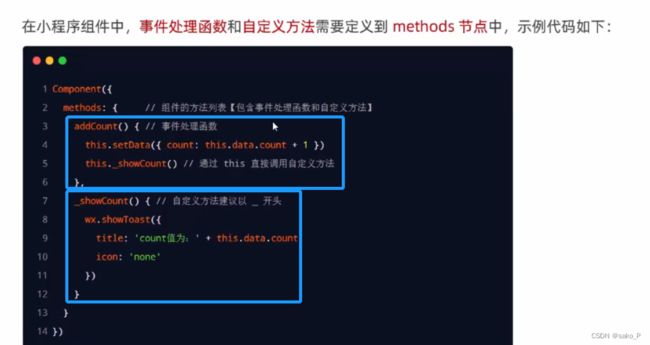
事件处理函数 - 定义到 js文件中 的 methods 节点中
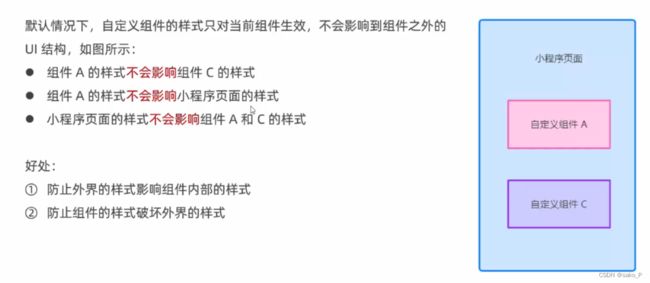
2. 组件样式隔离
1. 样式隔离的 - 注意点
- app.wxss 里的样式 对 组件不管用
- 只有 class 选择器有样式隔离效果。(id选择器,属性选择器,标签选择器不受样式隔离的影响)
尽量不使用标签选择器
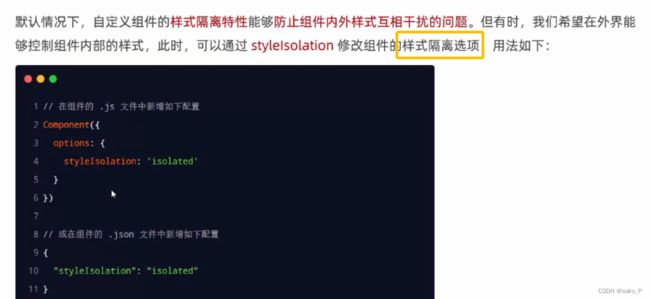
2. 修改组件样式隔离的 - 选项
isolated 页面 和 组件 不会互相影响
apply-shared 页面 影响组件
shared 组件 影响页面
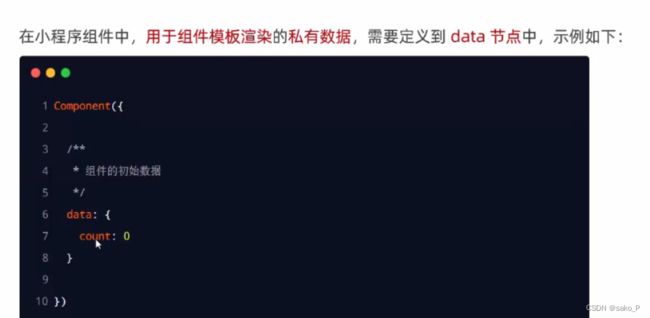
3. 组件中的 data数据
4. 组件中的 methods
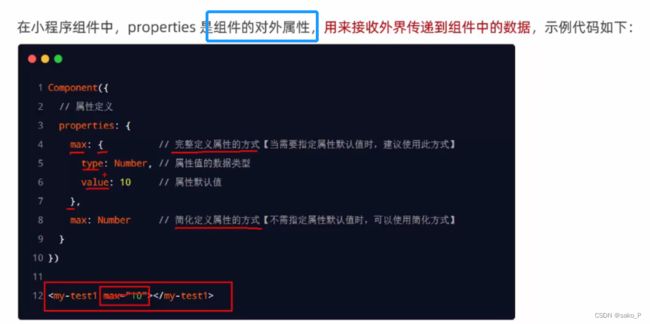
5. 组件中的 properties
定义组件的 properties
简化的方式 不能指定默认值
完整的定义方式 可以指定默认值
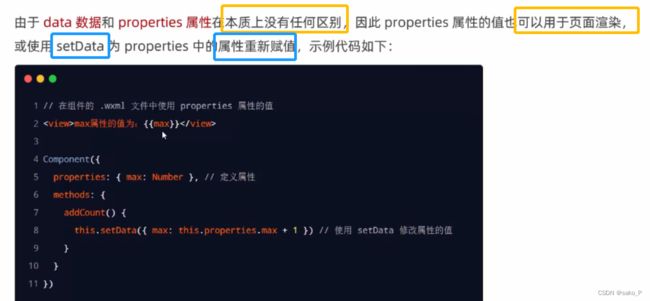
6. data 和 properties 的区别
data - 私有数据
properties - 外界传递过来的数据
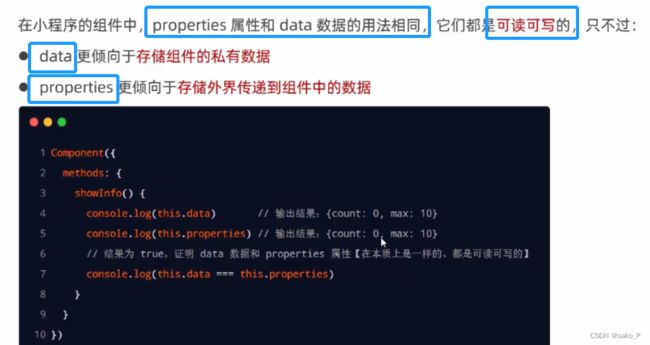
7. 使用 setData 修改 properties 的值
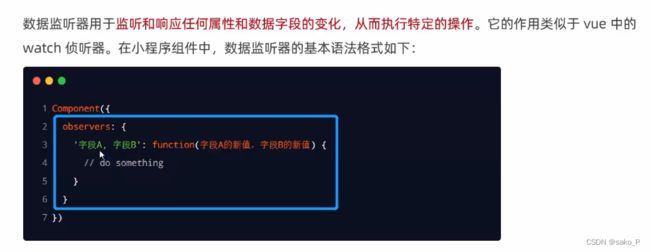
8. 自定义组件 - 数据监听器
 "usingComponents": {
    "my-test1":"/components/test/test"
  }
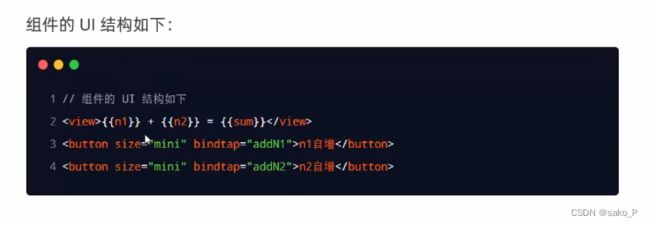
1. UI结构:wxml
<view>{{n1}} + {{n2}} = {{sum}}</view>

<button bindtap="addN1">n1 + 1</button>
<button bindtap="addN2">n2 + 1</button>
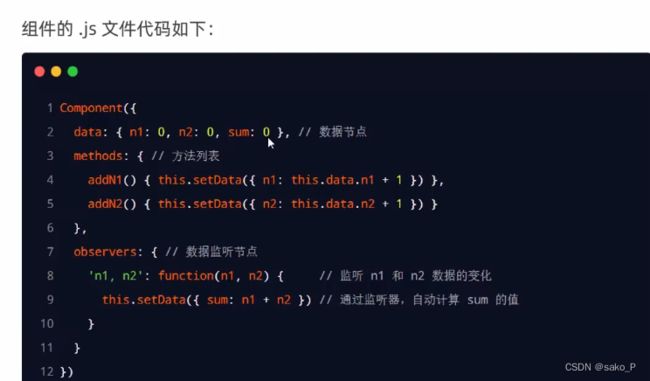
2. 组件的 js 文件
实例:
component - test.js (observers 和 methods 是同级的)
/**
   * 组件的初始数据
   */
  data: {
    n1: 0,
    n2: 0,
    sum: 0
  },

  /**
   * 组件的方法列表
   */
  methods: {
    addN1() {
      this.setData({
        n1: this.data.n1 + 1
      })
    },
    addN2() {
      this.setData({
        n2: this.data.n2 + 1
      })
    },
  },

  observers:{
    'n1, n2': function(newN1, newN2){
      this.setData({
        sum: newN1 + newN2
      })
    }
  }

})
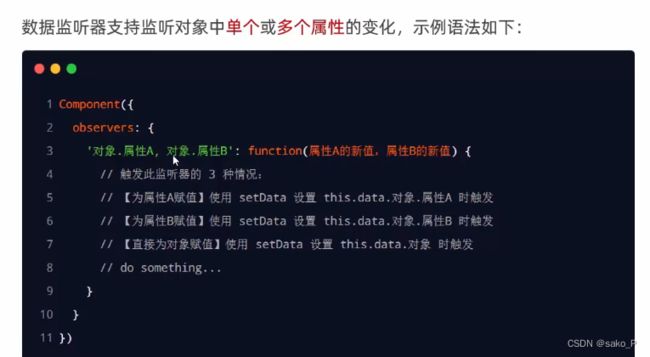
3. 监听对象属性的变化
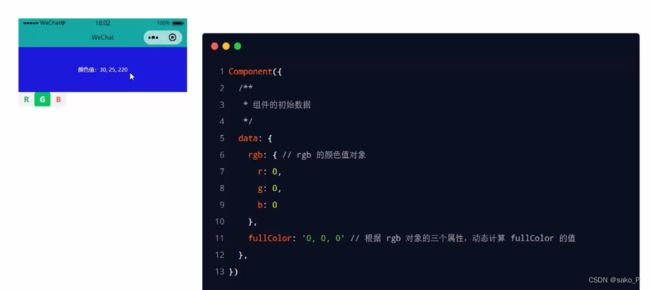
4. 案例
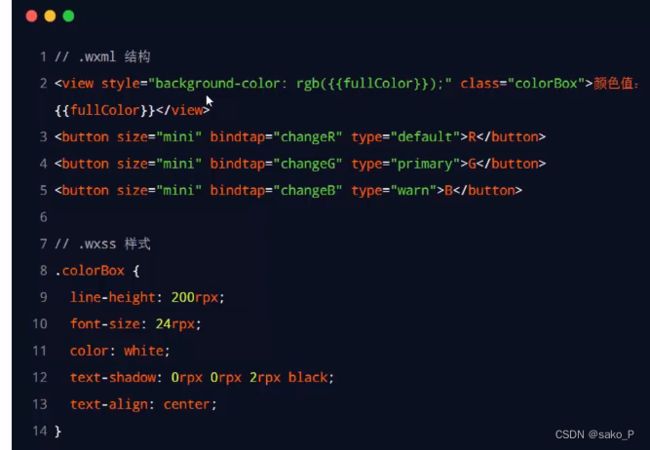
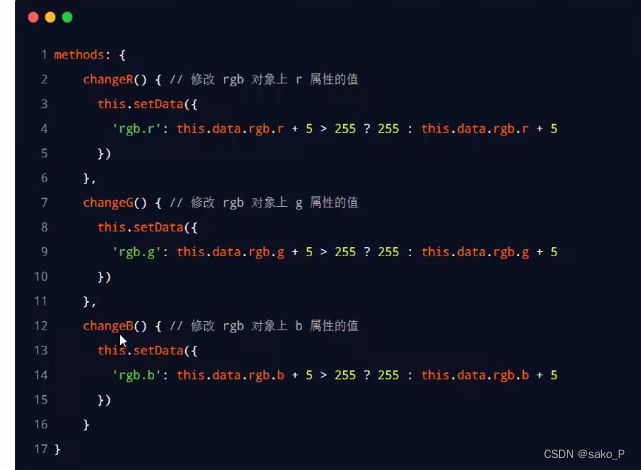
1. 渲染 UI 结构
2. 定义 button 的事件处理函数
test.js
    changeR() {
      this.setData({
        'rgb.r': this.data.rgb.r + 5 > 255 ? 255 : this.data.rgb.r + 5
      })
    },

    changeG() {
      this.setData({
        'rgb.g': this.data.rgb.g + 5 > 255 ? 255 : this.data.rgb.g + 5
      })
    },

    changeB() {
      this.setData({
        'rgb.b': this.data.rgb.b + 5 > 255 ? 255 : this.data.rgb.b + 5
      })
    }
3. observers 数据监听器
observers:{
    'n1, n2': function(newN1, newN2){
      this.setData({
        sum: newN1 + newN2
      })
    },

    'rgb.r, rgb.g, rgb.b': function(r, g, b){
      this.setData({
        fullColor: `${r},${g},${b}`
      })
    }
  }
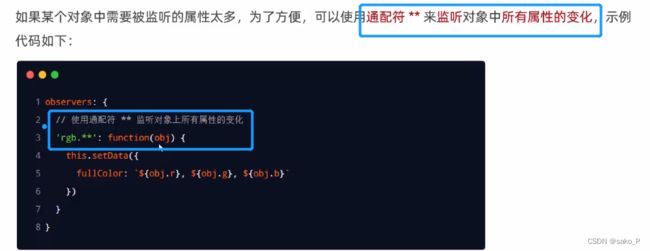
4. observers 监听对象中 所有属性的变化
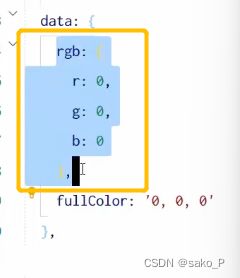
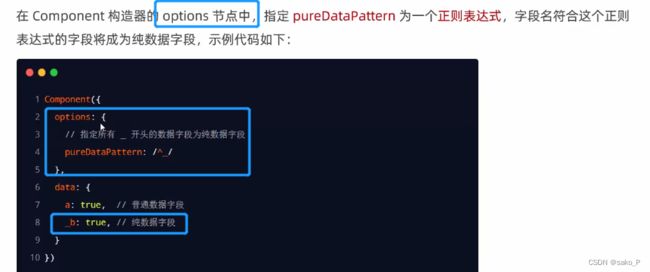
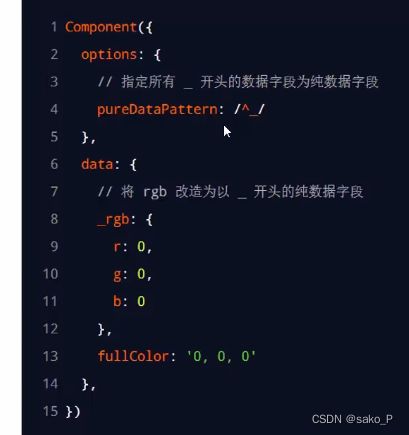
5. 纯数据字段
不用于 界面渲染的 data 字段
相同的内容全选 (Ctrl + D)
(Ctrl + S)保存!
6. 改造数据监听器案例
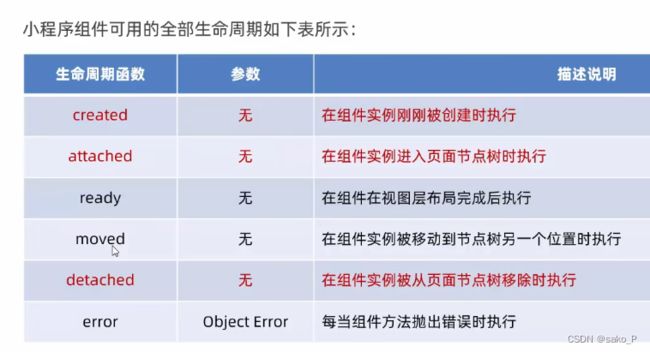
9. 组件的生命周期
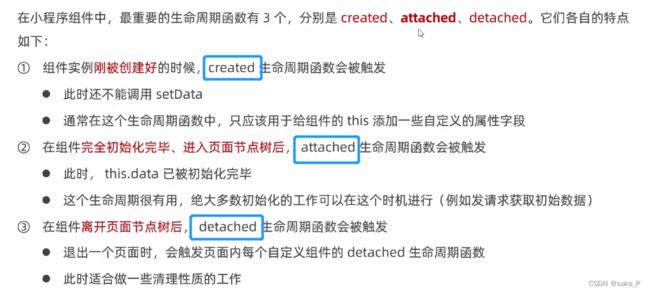
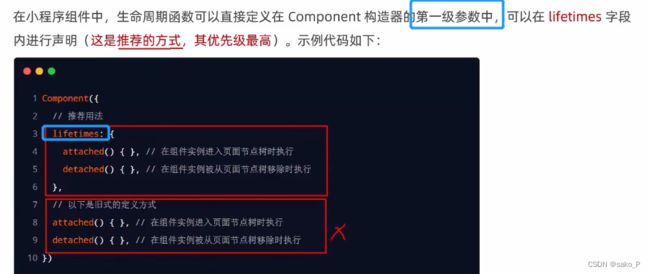
1. 主要的 声明周期函数
2. 如何定义 生命周期函数
在 lifetimes 节点中 使用。
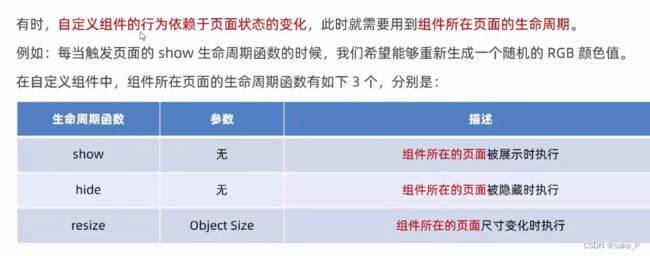
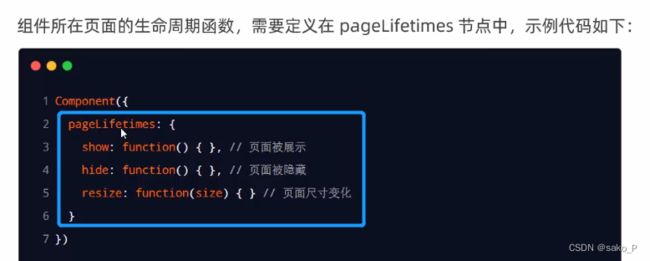
3. 组件 所在页面的 生命周期
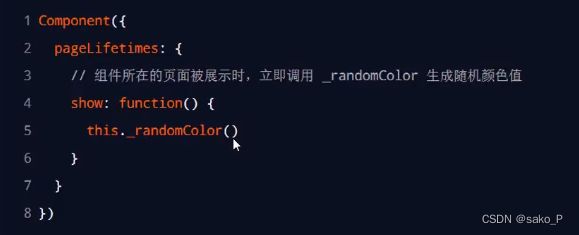
组件所在页面 的生命周期函数,需要定义子啊 pageLifetimes 节点中
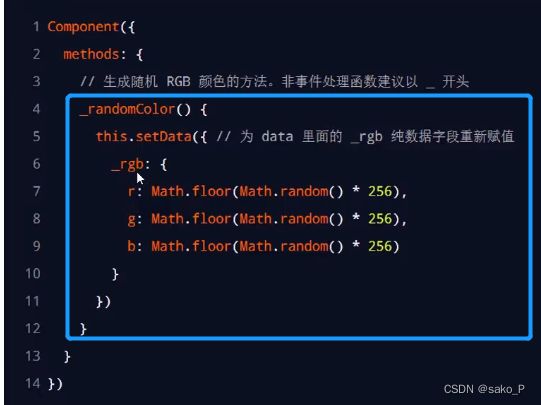
案例
组件的 js 文件
Component({
  options:{
    pureDataPattern: /^_/
  },

  /**
   * 组件的属性列表
   */
  properties: {

  },

  /**
   * 组件的初始数据
   */
  data: {
    n1: 0,
    n2: 0,
    sum: 0,
    _rgb:{  // rgb 的颜色值对象
      r: 0,
      g: 0,
      b: 0,
    },

    fullColor:'0, 0, 0' // 根据 rgb 对象的三个属性,动态计算 fullColor 的值
  },

  /**
   * 组件的方法列表
   */
  methods: {
    addN1() {
      this.setData({
        n1: this.data.n1 + 1
      })
    },
    addN2() {
      this.setData({
        n2: this.data.n2 + 1
      })
    },

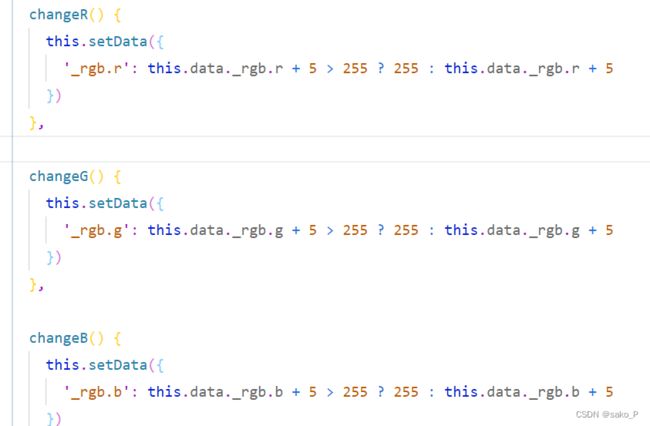
    changeR() {
      this.setData({
        '_rgb.r': this.data._rgb.r + 5 > 255 ? 255 : this.data._rgb.r + 5
      })
    },

    changeG() {
      this.setData({
        '_rgb.g': this.data._rgb.g + 5 > 255 ? 255 : this.data._rgb.g + 5
      })
    },

    changeB() {
      this.setData({
        '_rgb.b': this.data._rgb.b + 5 > 255 ? 255 : this.data._rgb.b + 5
      })
    },

    _randomColor() {
      this.setData({
        _rgb: {
          r: Math.floor(Math.random() * 256),
          g: Math.floor(Math.random() * 256),
          b: Math.floor(Math.random() * 256)
        }
      })
    }
  },

  observers:{
    'n1, n2': function(newN1, newN2){
      this.setData({
        sum: newN1 + newN2
      })
    },

    '_rgb.r, _rgb.g, _rgb.b': function(r, g, b){
      this.setData({
        fullColor: `${r},${g},${b}`
      })
    }
  },

  lifetimes: {   // 组件可用的生命周期
    created() {
      console.log('created~~~')
    },
    attached() {
      console.log('attached~~~')
    }
  },

  pageLifetimes: {
    show() {
      console.log('show~~')
      this._randomColor()
    },
    hide() {
      console.log('hide')
    },
    resize() {
      console.log('resize')
    }
  }

})
10. 插槽
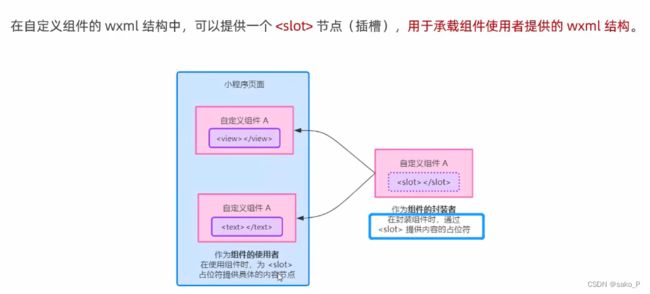
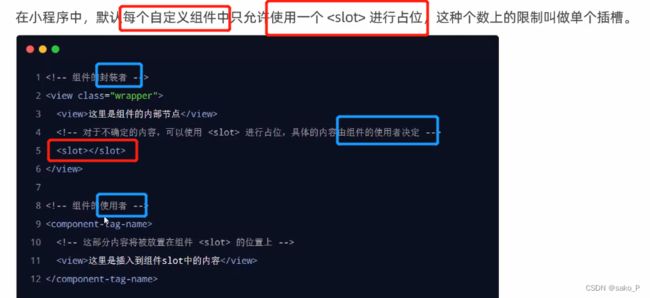
1. 单个插槽
使用组件的 wxml
<my-test1>
  <view>这里是通过插槽填充的内容</view>
</my-test1>
组件的 wxml
<view>
  <view>这里是组件的内部结构</view>
  <slot></slot>
</view>
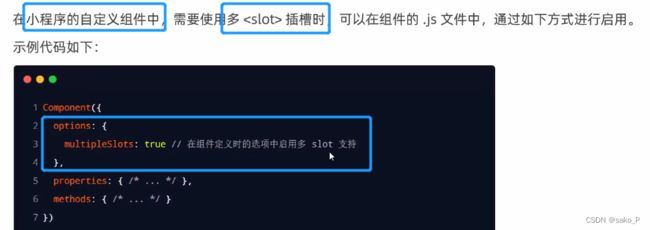
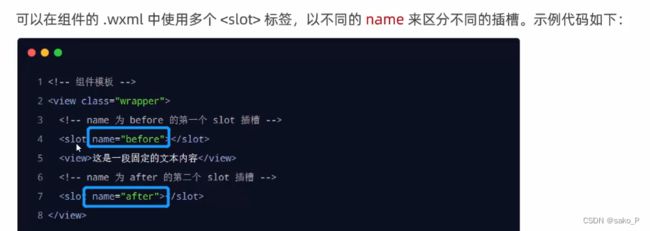
2. 启用多个插槽
在组件的 js 文件中的 options 中启用 multipleSlots
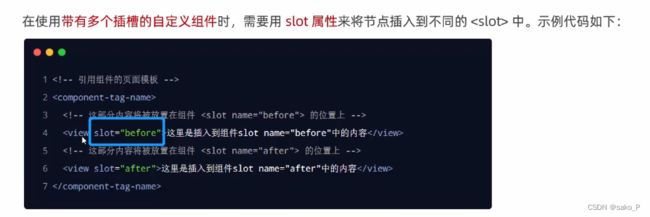
3. 定义、使用 多个插槽
使用组件的 wxml (slot 属性名)
<my-test1>
  <view slot="before">这里是通过插槽填充的内容</view>
</my-test1>
组件的 wxml
<view>
  <slot name="before"></slot>
  <view>这里是组件的内部结构</view>
  <slot name="after"></slot>
</view>
11. 父子组件之间的 通信
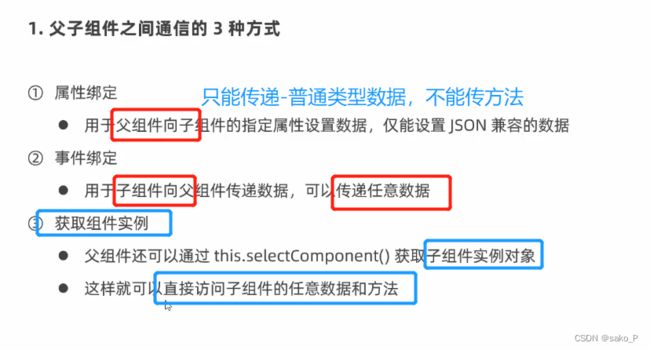
1. 三种方式
2. 属性绑定(父传子,Json兼容的数据)
注释的快捷键 Ctrl + /
父组件中的 count 属性,可以通过 count=“{{count}}” 来绑定到子组件中
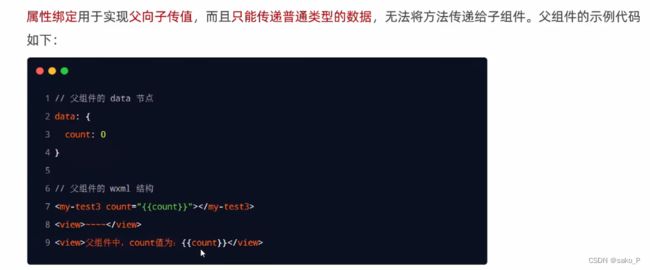
父组件中
<my-test1 count="{{count}}">
  <view slot="before">这里是通过插槽填充的内容</view>
  <view slot="after">!~</view>
</my-test1>

<view>父组件中,count的值是:{{count}}</view>
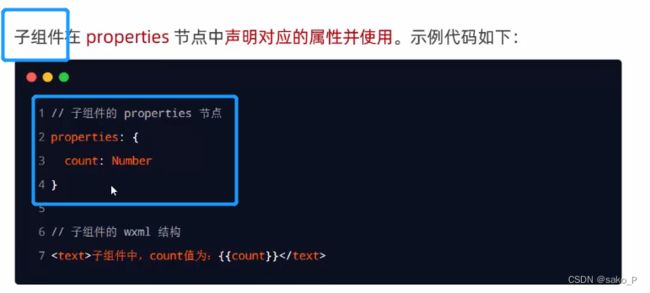
子组件中,properties 中声明,外来属性的名称就可以用了
子组件中使用
<view>
  <slot name="before"></slot>
  <view>这里是组件的内部结构,子组件中 count 的值{{count}}</view>
  <slot name="after"></slot>
</view>
3. 事件绑定(子传父,任何类型的数据)
1. 步骤一
2. 步骤二
父组件的 wxml
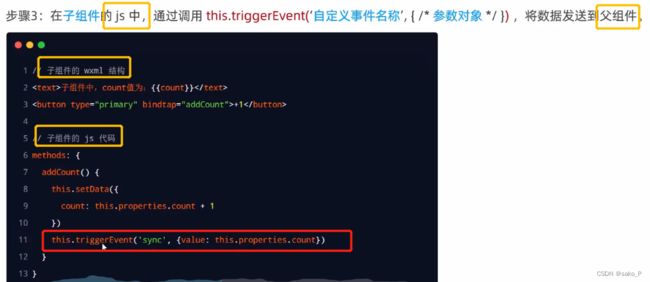
3. 步骤三
子组件的 js 中,调用 this.triggerEvent(‘自定义的事件名称’,{/*参数对象*/})
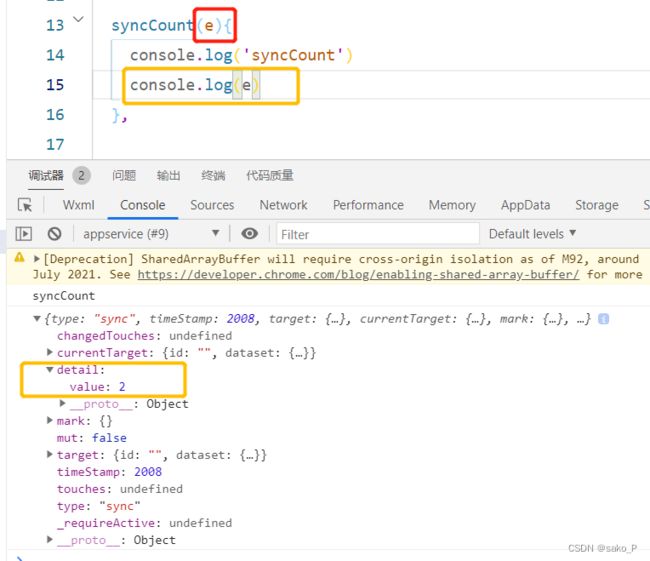
4. 步骤四
父组件的 js 中,e.detail 获取传递过来的数据,value
再绑定到 count 上
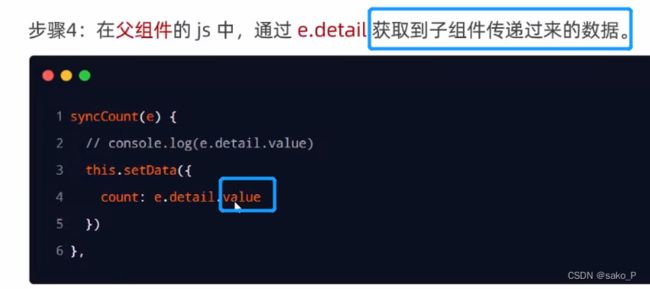
5. 传参,拿value
<view>
  <slot name="before"></slot>
  <view>这里是组件的内部结构</view>
  <button bindtap="addCount">+1</button>
  <text>子组件中 count 的值{{count}}</text>
  <slot name="after"></slot>
</view>
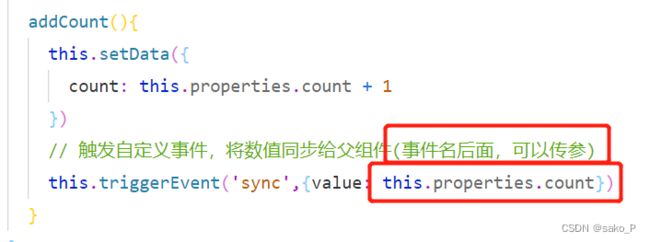
子组件 js
    addCount(){
      this.setData({
        count: this.properties.count + 1
      })
      // 触发自定义事件,将数值同步给父组件(事件名后面,可以传参)
      this.triggerEvent('sync',{value: this.properties.count})
    }
  },
父组件 wxml 中的代码 (子组件中有几个 slot,父组件使用子组件的时候,才能使用插槽,并显示几个自定义的view、text等)
<my-test1 count="{{count}}" bind:sync="syncCount">
  <view slot="before">before 这里是通过插槽填充的内容 </view>
  <view slot="after">after 插槽填充的内容 </view>
</my-test1>
<view>父组件中,count的值是:{{count}}</view>
父组件 js
  syncCount(e){
    console.log('syncCount' + e.detail.value)
    this.setData({
      count: e.detail.value
    })
  },
4. 获取组件实例
在父组件中调用 this.selectComponent(“id、class选择器”),
获取子组件的实例对象。
然后可以直接访问子组件的任意数据和方法。
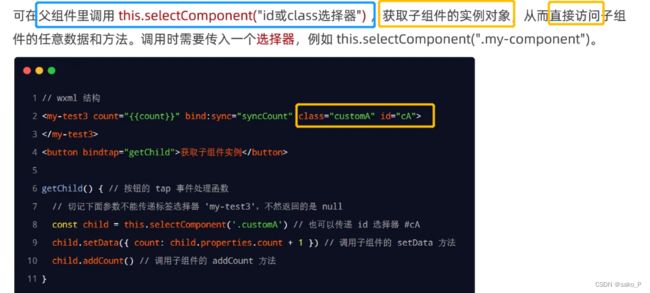
父组件的 wxml 文件
// 设置 class,id,方便 js 文件调用
<my-test1 count="{{count}}" bind:sync="syncCount" class="customA" id="cA">
  <view slot="before">before 这里是通过插槽填充的内容 </view>
  <view slot="after">after 插槽填充的内容 </view>
</my-test1>
<view>父组件中,count的值是:{{count}}</view>
// 在页面上点击按钮,触发 js中的 事件
<button bindtap="getChild">获取 子组件的 实例对象</button>
父组件的 js 文件
  getChild(){
  	// 拿到 子组件的 实例
    const child = this.selectComponent('#cA')
    console.log(child)
    child.setData({
    	  // 只能用 child,不能用 this(这时的this是父组件,不是子组件child)
      count: child.properties.count + 1
      // 触发子组件的 count 加 1
    })
  },
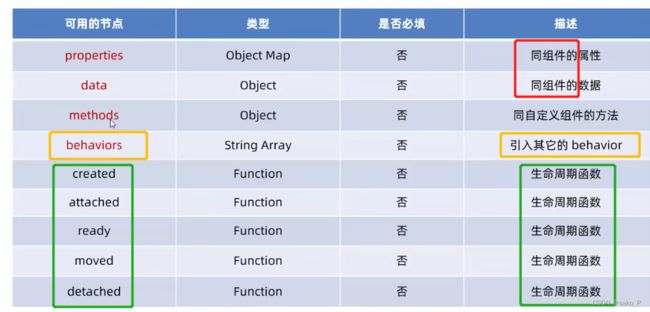
12. 自定义组件 - behaviors
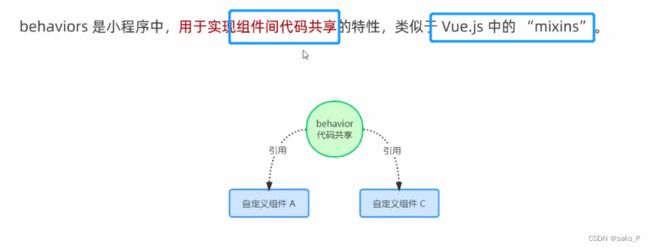
1. 什么是 behaviors
2. behaviors 的 工作方式
3. 创建 behaviors
创建
module.exports = Behavior({
  data: {
    username: 'zs'
  },
  properties:{},
  methods:{}
})
4. 导入并使用 behaviors
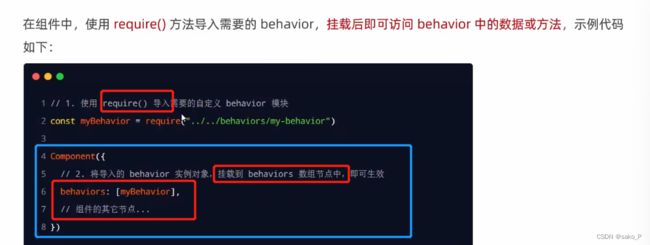
在子组件的 js 文件中:
requir() 导入, 挂载在 behaviors节点下: [behaviors名字]
在子组件的 wxml 中使用
<view>在behavior中定义的用户名是:{{username}}</view>
在子组件的 js 文件中:
const myBehavior = require('../../behaviors/my-behaviors')

Component({
  behaviors: [myBehavior],
引入,挂载,即可使用 数据或方法
5. behaviors 中 所有可用的节点
6. 同名字段的 覆盖 和 组合规则
13. 总结1 - 组件
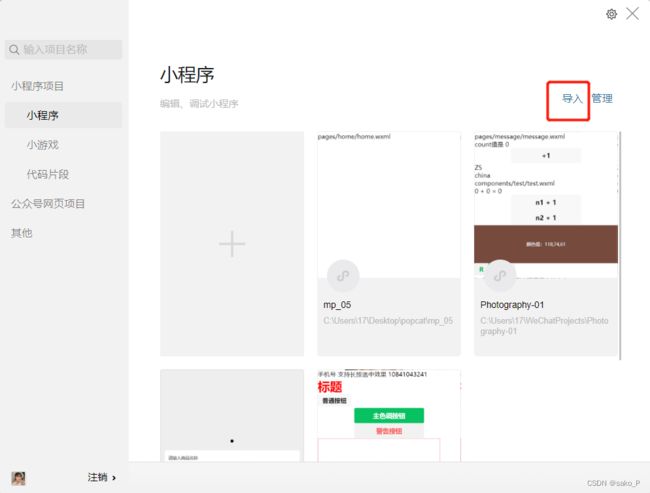
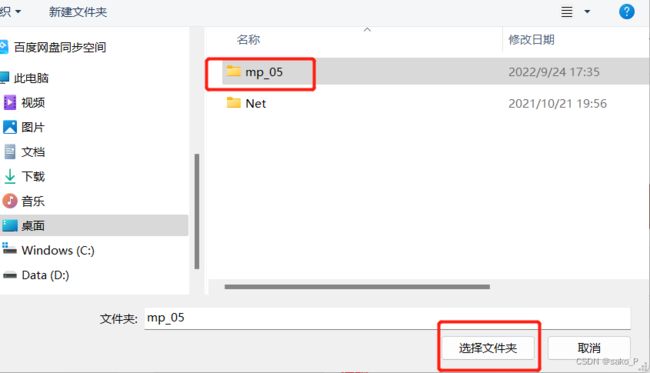
14. 如何导入别人的项目
15. 使用 npm 包
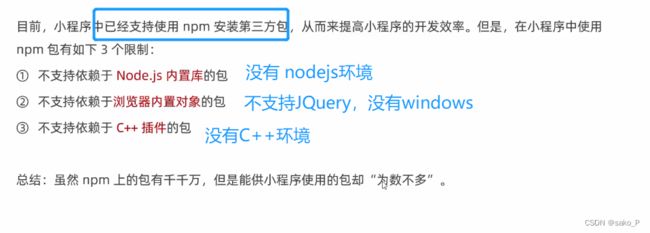
小程序对 npm 的支持与限制
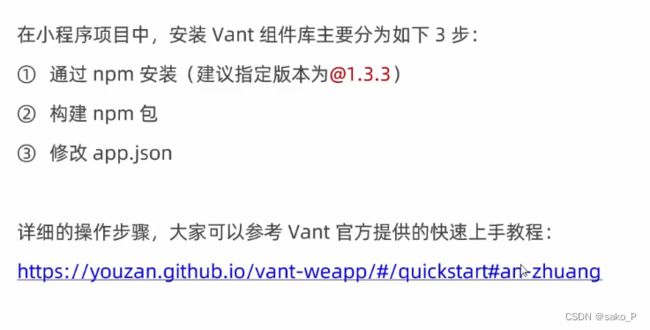
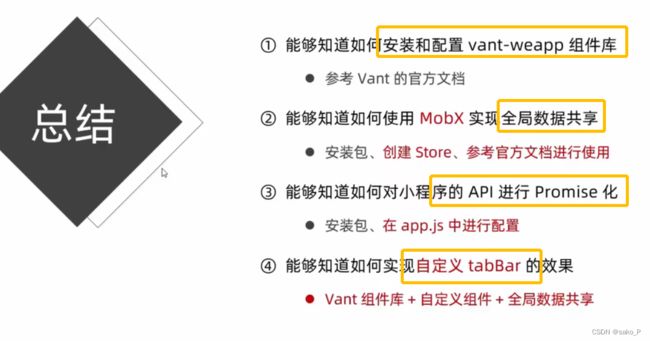
1. 使用 Vant Weapp
2. 安装 Vant 组件库
vant官网打不开怎么办 解决方法
(还是没法进去,但是可能有用)
w3cschool 的 vant 教程
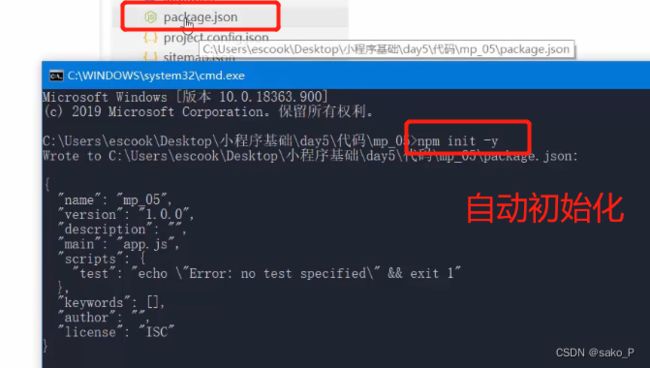
1. 初始化,安装 vant
右键,在外部终端窗口打开 - 已定位到 当前小程序项目所在的目录。
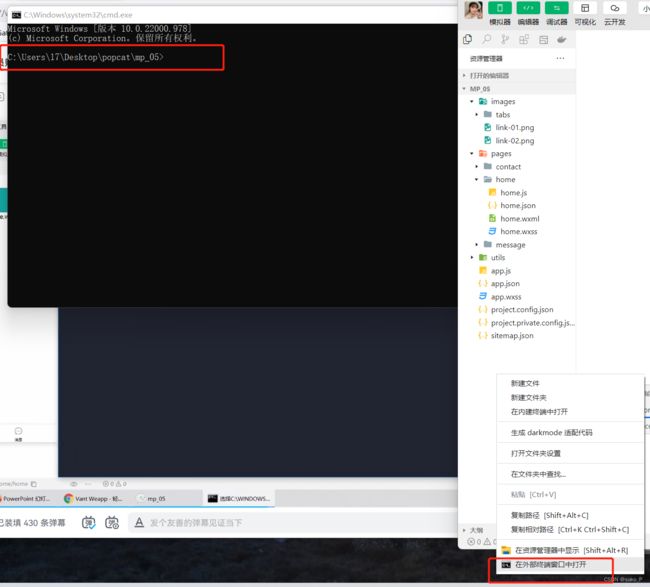
安装 vant/[email protected] 指定了版本号
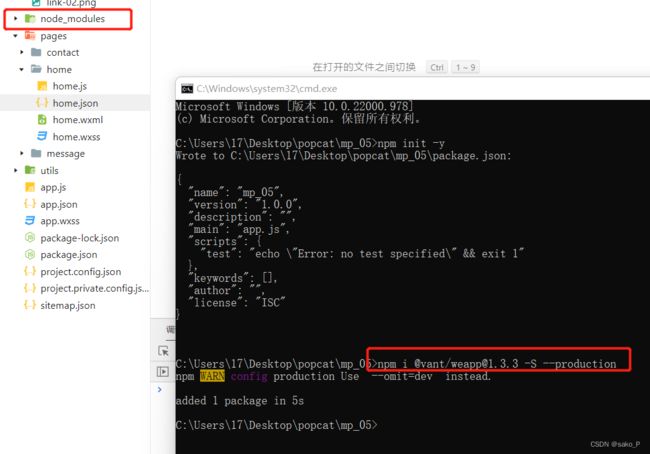
安装完毕
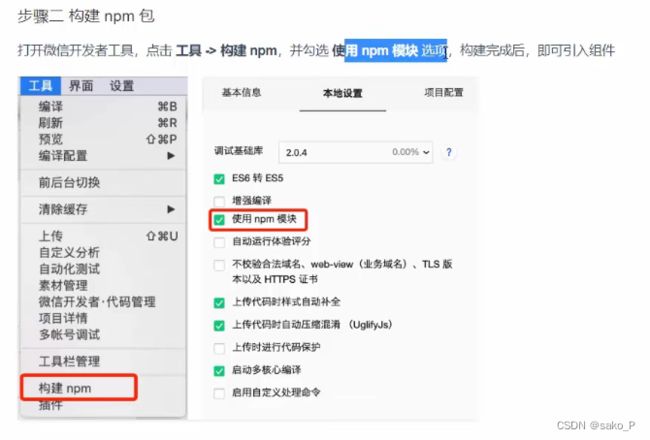
2. 构建 npm 包
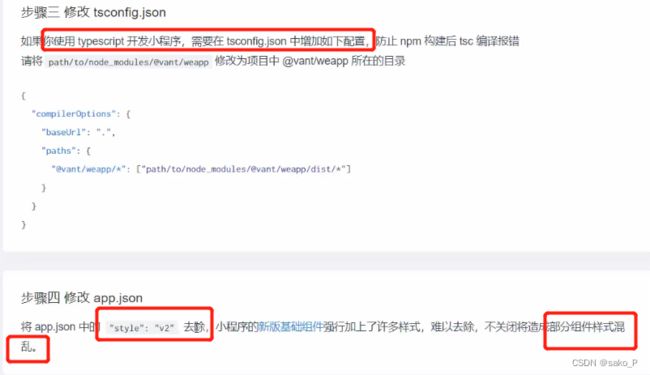
3. 用 typescript 做步骤三,不用就直接步骤四
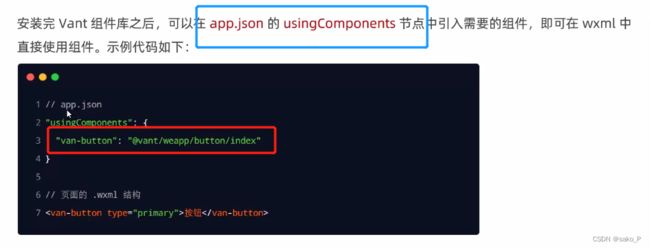
3. 使用 vant 组件
"usingComponents": {
    "vant-button": "@vant/weapp/button/index"
  }
home.wxml
<text>pages/home/home.wxml \n</text>

<vant-button type="primary">按钮</vant-button>
参考文档,使用对应的 组件
4. css变量 - 定制全局主题样式
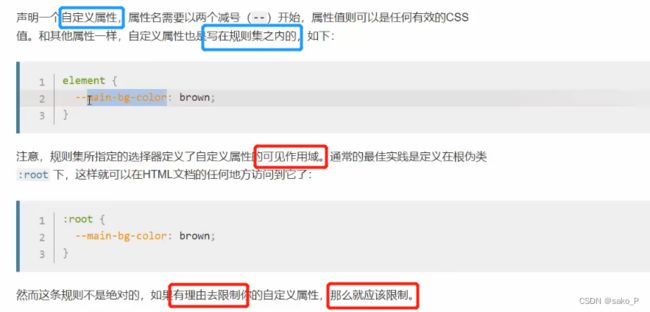
MDN 手册
为了提高 css 的可维护性。
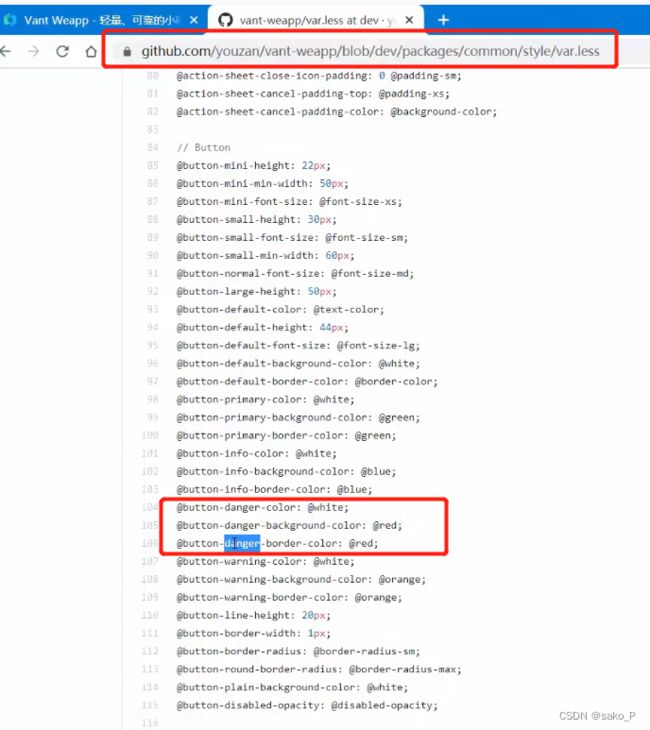
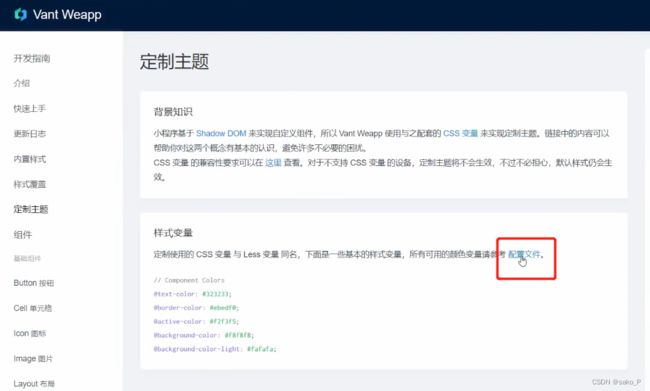
使用 css 变量,定制 vant 主题样式
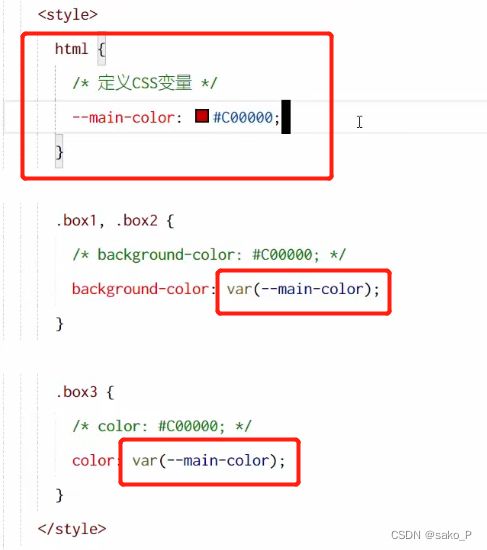
变量 在 html 里,说明这个变量的作用域是 html
5. CSS变量 实例
page 节点 - (类似 html 作用域 - 全局生效)
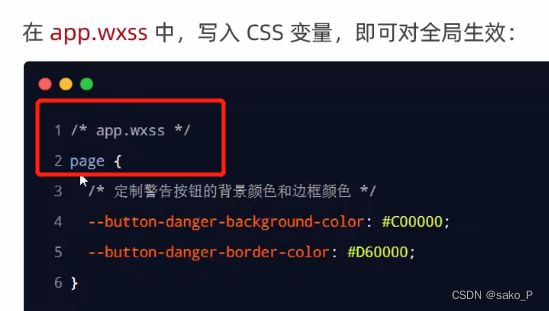
定制主题: 这个名字该叫什么?
6. 小程序 API 的 Promise化
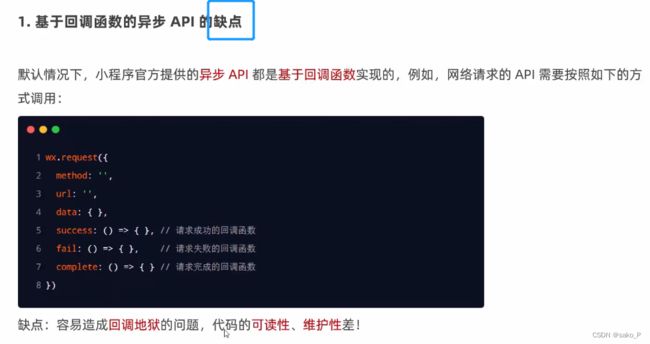
1. promise回调函数的 缺点
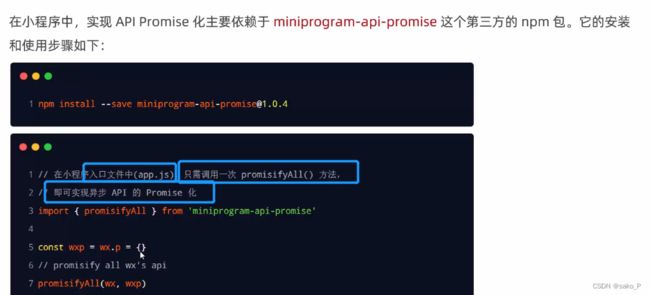
2. API 的 promise 化
3. 实现 API 的 promise 化
右键,外部终端窗口。 使用 npm 命令
每安装一个包,需要重新构建一下才能使用
wx.p 属性,方便每个页面都可以访问
//app.js
import { promisifyAll } from 'miniprogram-api-promise'

const wxp = wx.p = {}
promisifyAll(wx, wxp)
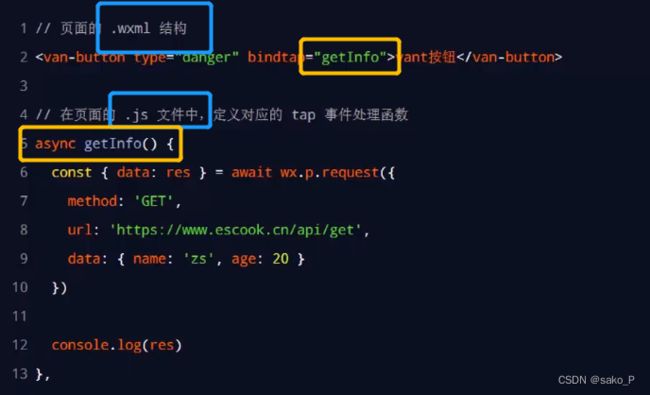
4. 调用 promise 化之后的 异步 API
<vant-button type="primary" bindtap="getInfo">按钮</vant-button>
页面 js 文件, 用 async 和 await 优化异步操作,使
// 和 data 同级

  async getInfo(){
    const {data: res} = await wx.p.request({
      method: 'GET',
      url: 'https://applet-base-api-t.itheima.net/api/get',
      data:{
        name: 'zs',
        age: 20
      }
    })
    console.log(res)
  },
16. 全局数据共享
1. 什么是 全局数据共享
Behaviors 只是组件间的 代码复用,不是全局的 数据共享
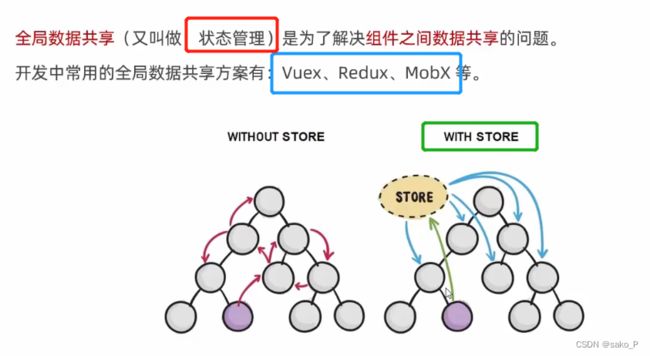
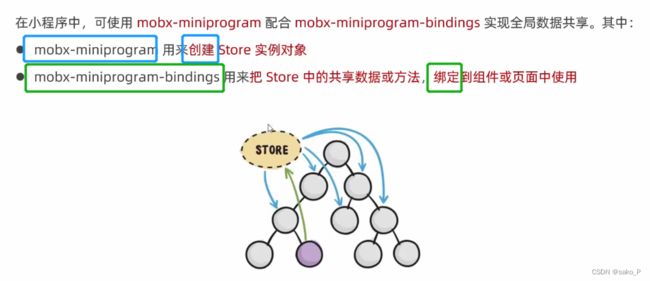
2. 小程序中的 全局数据共享 - 方案
先创建实例,再挂载
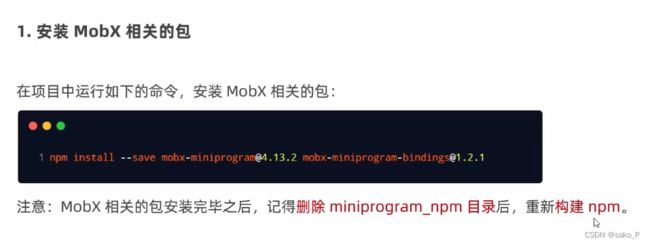
1. 安装 mobx 包
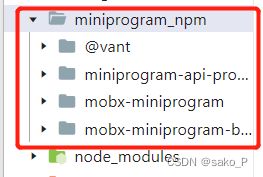
删掉 miniprogra_npm包之后,再构建npm,成功。
2. 创建 MobX 的 Store 实例
在根目录中,创建一个 store 文件夹, 在里面创建一个 store.js 文件
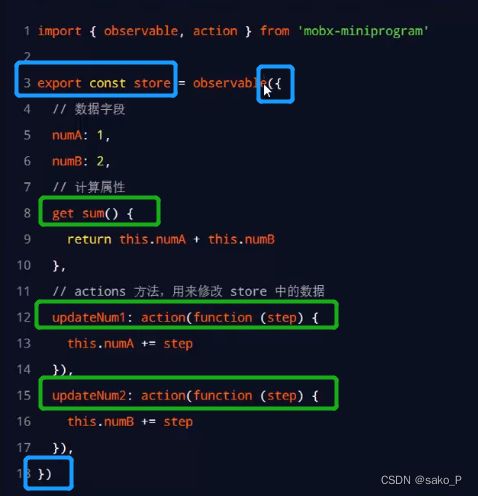
在外面 调用 action 方法,内部调用。
// 在这个 js 文件中,专门来创建 store 的实例对象
import { action, observable } from 'mobx-miniprogram'

export const store = observable({
  numA: 1,
  numB: 2,
  // 计算属性 get - sum只读, 无法重新赋值
  get sum(){
    return this.numA + this.numB
  },

  // actions 方法包裹 function() , 用来修改 store 中的数据
  updateNum1: action(function (step){
    this.numA += step
  }),
  updateNum2: action(function (step){
    this.numB += step
  }),
})
step 步长值
3. 将 Store 中的成员,绑定到页面中
实现思路
三步,导入需要的成员;onLoad绑定 字段、方法;清理工作。
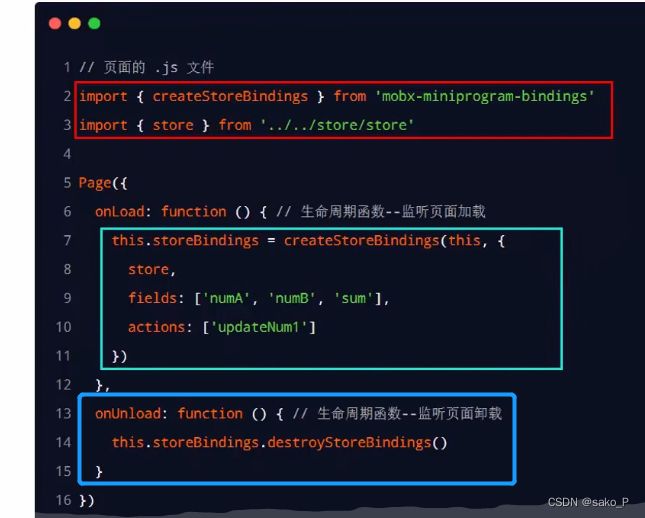
import { createStoreBindings } from 'mobx-miniprogram-bindings'
import {store } from '../../store/store'

Pages({
 /**
   * 生命周期函数--监听页面加载
   */
  onLoad: function (options) {
    this.storeBindings = createStoreBindings(this,{
      store,
      fields: ['numA','numB','sum'],
      actions: ['updateNum1']
    })
  },

 /**
   * 生命周期函数--监听页面卸载
   */
  onUnload: function () {
    this.storeBindings.destoryStoreBindings()
  },
4. 在页面上使用 Store 中的成员
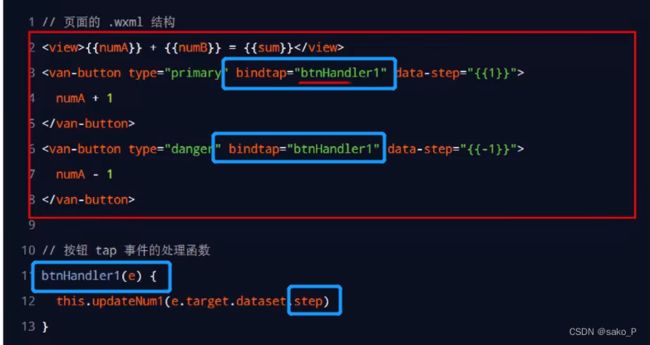
wxml 文件
<vant-button type="primary" bindtap="btnHandler1" data-step="{{1}}">numA + 1</vant-button>
<vant-button type="danger" bindtap="btnHandler1" data-step="{{-1}}">numA - 1</vant-button>
页面 js 文件
  btnHandler1(e){
    this.updateNum1(e.target.dataset.step)
  },
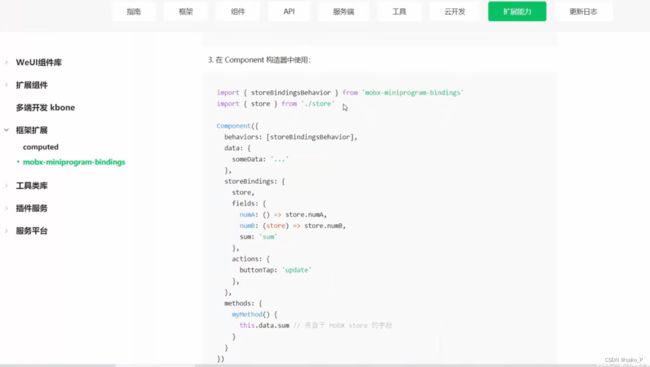
5. 将 Store 中的成员, 绑定到组件中
组件
Component({
 behaviors: [ ],
 storeBindings:{ }
})
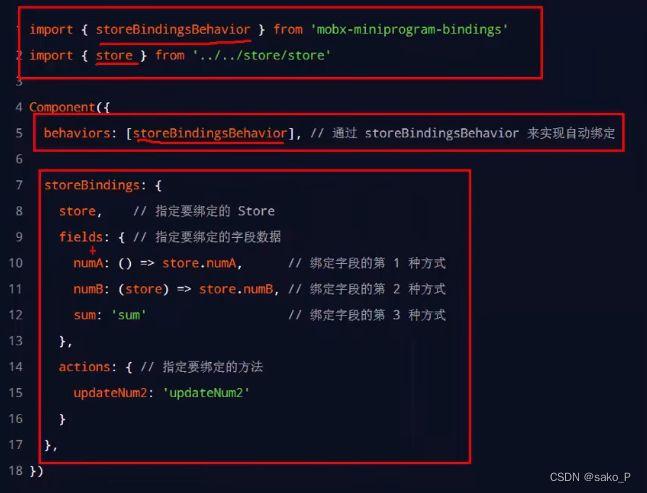
组件的 js 文件中
import {storeBindingsBehavior } from "mobx-miniprogram-bindings"
import {store } from "../../store/store"

Component({
  behaviors: [storeBindingsBehavior],
  storeBindings: {
    store,
    fields: {
      numA: () => store.numA,  // 绑定字段的第 1 种方式
      numB: () => store.numB,  // 绑定字段的第 2 种方式
      sum: 'sum'               // 绑定字段的第 3 种方式
    },
    actions: {
      updateNum2: 'updateNum2'
    }
  },
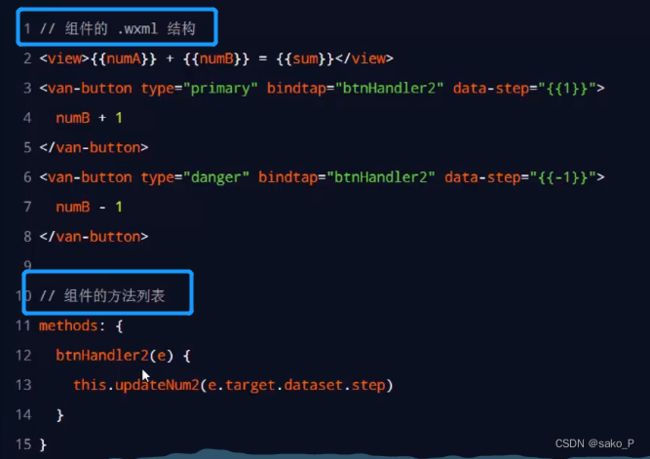
6. 在组件中使用 Store 中的成员
组件的 wxml 文件
<view>{{numA}} + {{numB}} = {{sum}} </view>
<vant-button type="primary" bindtap="btnHandler2" data-step="{{1}}">numB + 1</vant-button>
<vant-button type="danger" bindtap="btnHandler2" data-step="{{-1}}">numB - 1</vant-button>
组件中的 js 文件
import {storeBindingsBehavior } from "mobx-miniprogram-bindings"
import {store } from "../../store/store"

Component({
  behaviors: [storeBindingsBehavior],
  storeBindings: {
    store,
    fields: {
      numA: () => store.numA,  // 绑定字段的第 1 种方式
      numB: () => store.numB,  // 绑定字段的第 2 种方式
      sum: 'sum'               // 绑定字段的第 3 种方式
    },
    actions: {
      updateNum2: 'updateNum2'
    }
  },

  /**
   * 组件的方法列表
   */
  methods: {
    btnHandler2(e){
      this.updateNum2(e.target.dataset.step)
    }
  }
17. 分包
1. 什么是分包
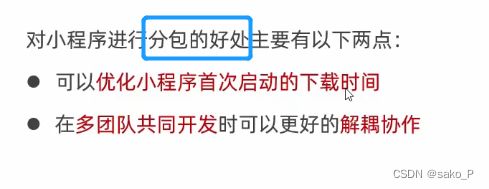
2. 分包的好处
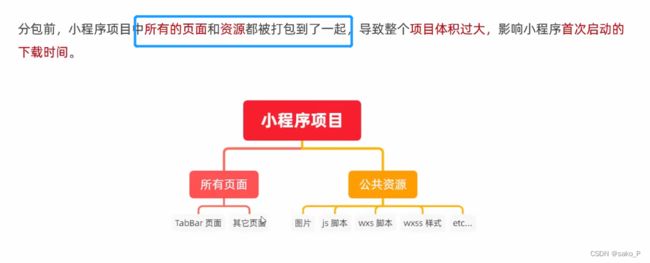
3. 分包前 - 项目的构成
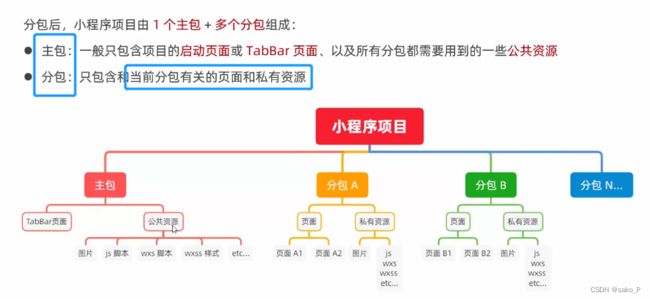
4. 分包后 - 项目的构成
5. 分包的 加载机制
tabBar - 主包
其他 非tabBar页面 - 分包(按照功能的不同)
6. 分包的 体积限制
2. 使用分包
1. 配置方法
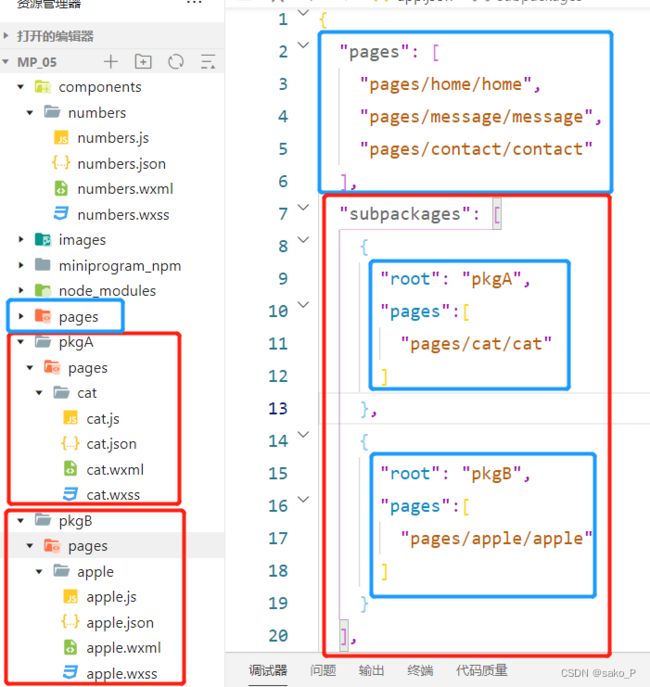
在 app.json 的 subpackages 节点中,声明了分包的结构
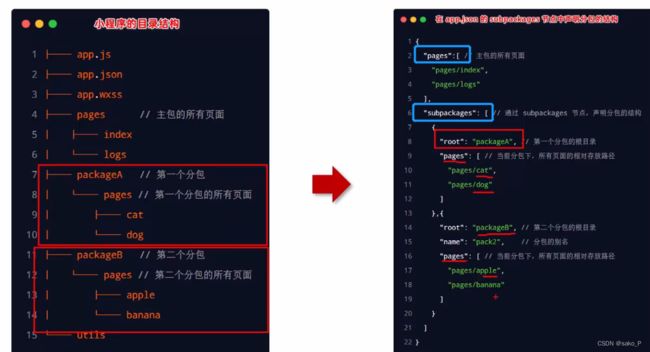
2. 配置 - 实例(添加别名+查看分包体积)
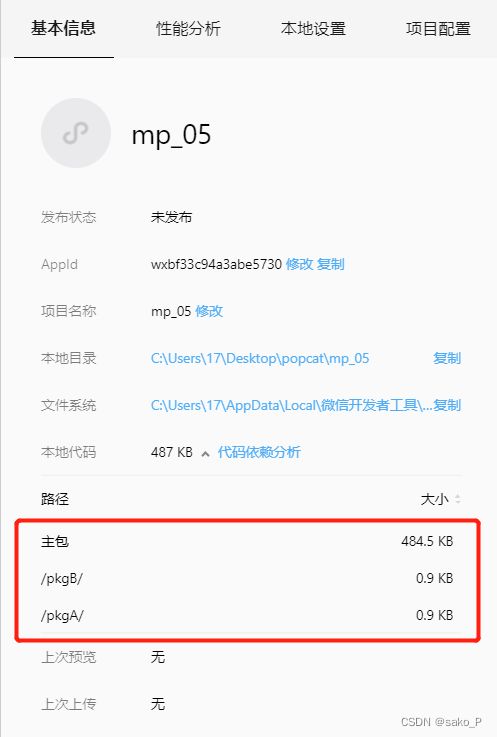
用 app.json 的 subpackages 节点,声明分包的结构
“name” 分包的自定义名字(别名)
"pages": [
    "pages/home/home",
    "pages/message/message",
    "pages/contact/contact"
  ],
  "subpackages": [
    {
      "root": "pkgA",
      "name":"p1",
      "pages":[
        "pages/cat/cat"
      ]
    },
    {
      "root": "pkgB",
      "name":"p2",
      "pages":[
        "pages/apple/apple"
      ]
    }
  ],
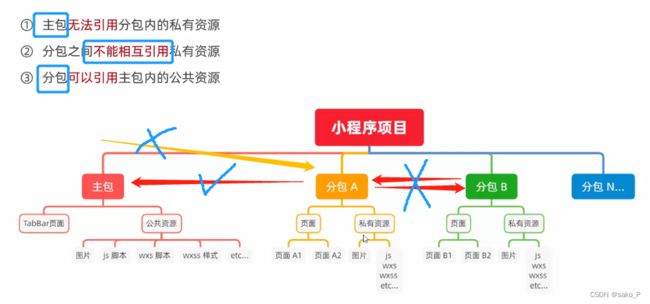
3. 打包原则
4. 引用原则
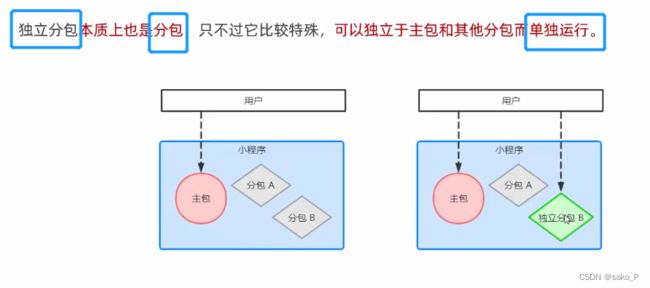
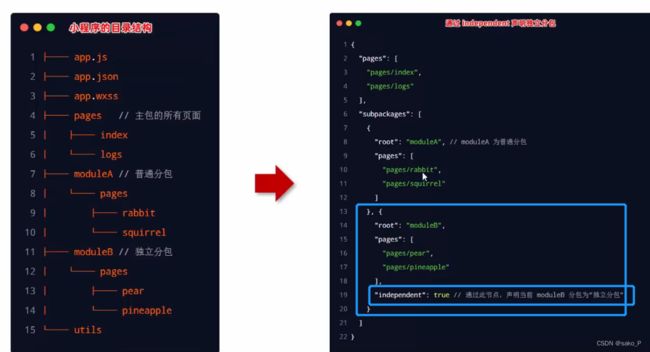
3. 什么是独立分包
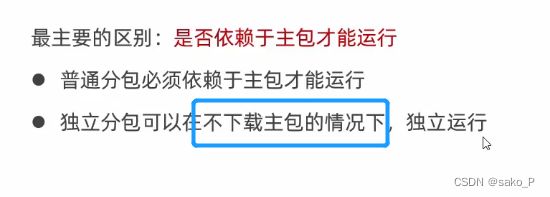
区别
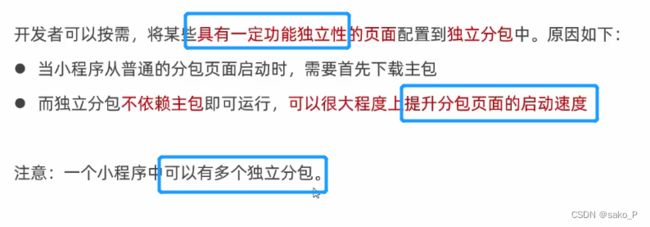
1. 独立分包的 应用场景
2. 独立分包的 配置方法
 "subpackages": [
    {
      "root": "pkgA",
      "name":"p1",
      "pages":[
        "pages/cat/cat"
      ]
    },
    {
      "root": "pkgB",
      "name":"p2",
      "pages":[
        "pages/apple/apple"
      ],
      "independent": true
    }
  ],
3. 引用原则
独立分包 - 普通分包 - 主包,相互隔绝。不能相互引用彼此的资源。

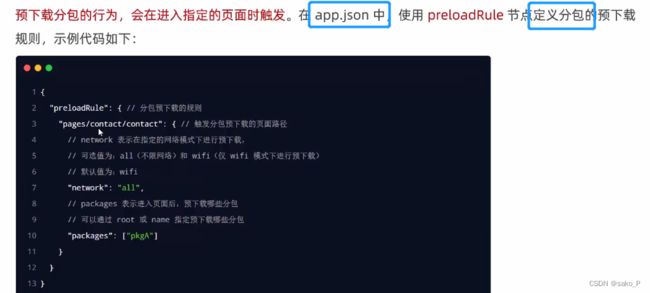
4. 什么是分包预下载
5. 配置 - 分包预下载
 "pages": [
    "pages/home/home",
    "pages/message/message",
    "pages/contact/contact"
  ],
  "preloadRule": {
    "pages/contact/contact":{
      "packages": ["p1"],
      "network": "all"
    }
  },
网络只有两个选项,all 是所有网络,wifi 只能连 wifi中才显示

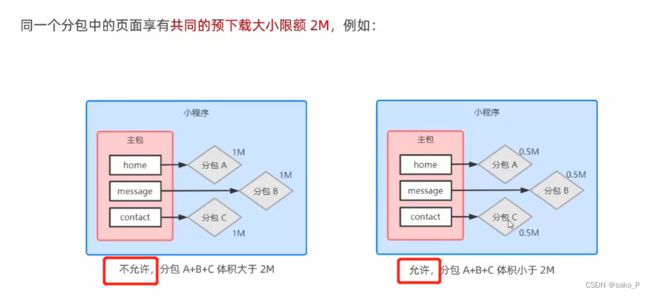
6. 分包预下载的 限制
体积加起来
18. 案例 - 自定义 tabBar
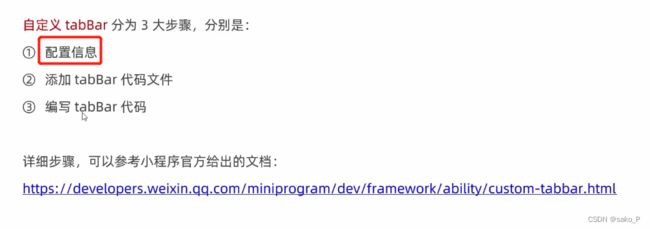
1. 实现步骤
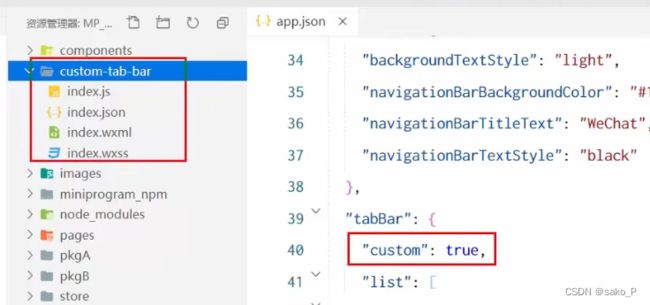
声明一个 custom true就行,list 别删
"tabBar": {
    "custom": true,
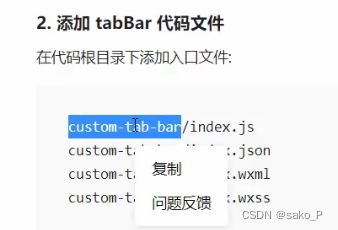
2. 添加 tabBar 代码文件
在根目录下,custom-tab-bar 一定要叫这个名字。
这样设置,就会自动识别 tabBar
![]()
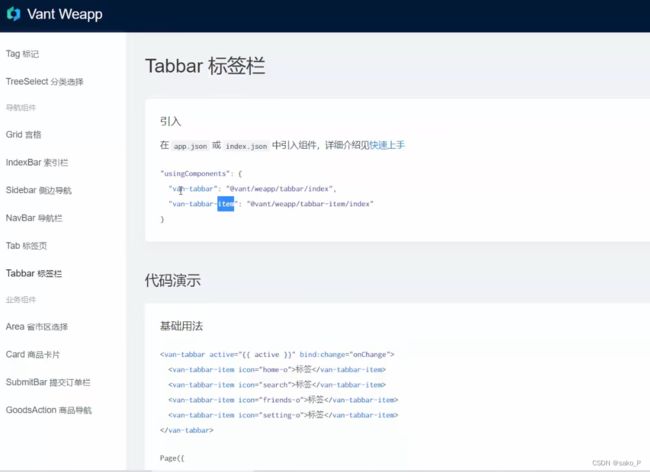
1. 调用 vant weapp的组件
组件
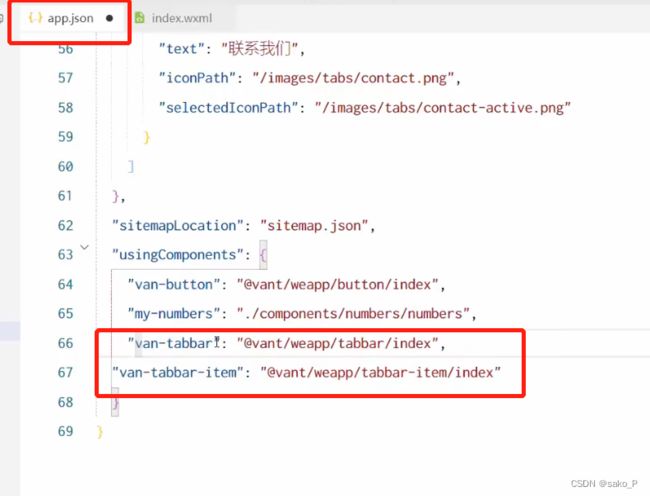
app.json 里声明
 "van-tabbar": "@vant/weapp/tabbar/index",
    "van-tabbar-item": "@vant/weapp/tabbar-item/index"
wxml 中
<van-tabbar active="{{active}}" bind:change="onChange">
  <van-tabbar-item icon="home-o">标签</van-tabbar-item>
  <van-tabbar-item icon="search">标签</van-tabbar-item>
  <van-tabbar-item icon="friends-o">标签</van-tabbar-item>
  <van-tabbar-item icon="setting-o">标签</van-tabbar-item>
</van-tabbar>
js 中
// custom-tab-bar/index.js
Component({
  /**
   * 组件的属性列表
   */
  properties: {

  },

  /**
   * 组件的初始数据
   */
  data: {
    active:0,
  },

  /**
   * 组件的方法列表
   */
  methods: {
    onChange(event){
      // event.detail 的值为当前选中项的索引
      this.setData({active: event.detail});
    },
  }
})
3. 自定义图标
循环声明 tabbar
wxml
<van-tabbar active="{{active}}" bind:change="onChange">
  <van-tabbar-item wx:for="{{list}}" wx:key="index">
    <image slot="icon" src="{{item.iconPath}}" mode="aspectFit" style="width: 25px; height: 25px;" />
    <image slot="icon-active" src="{{item.selectedIconPath}}" mode="aspectFit" style="width: 25px; height: 25px;" />
    {{item.text}}
  </van-tabbar-item>
</van-tabbar>
js 中,将app.json里 list的数据拿到 index.js 中。
 data: {
    active:0,
    "list": [
      {
        "pagePath": "pages/home/home",
        "text": "首页",
        "iconPath": "/images/tabs/home.png",
        "selectedIconPath": "/images/tabs/home-active.png"
      },
      {
        "pagePath": "pages/message/message",
        "text": "消息",
        "iconPath": "/images/tabs/message.png",
        "selectedIconPath": "/images/tabs/message-active.png"
      },
      {
        "pagePath": "pages/contact/contact",
        "text": "联系我们",
        "iconPath": "/images/tabs/contact.png",
        "selectedIconPath": "/images/tabs/contact-active.png"
      }
    ]
  },
效果如上
组件 - 样式覆盖(美化右上角提示)
js
Component({
  options: {
    "styleIsolation": "shared"
  },
wxss
.van-tabbar-item {
  --tabbar-item-margin-bottom: 0,

}
按照 js 中的 info 数字渲染(数字徽标)
info="{{item.info ? item.info : ''}}"
这是把数据 写死了的
{
        "pagePath": "pages/home/home",
        "text": "首页",
        "iconPath": "/images/tabs/home.png",
        "selectedIconPath": "/images/tabs/home-active.png",
        info: 2
      },
import {storeBindingsBehavior } from 'mobx-miniprogram-bindings'
import {store} from '../store/store'

Component({
  options: {
    "styleIsolation": "shared"
  },
  behaviors:[storeBindingsBehavior],
  storeBindings:{
    store,
    fields:{
      sum: 'sum'
    },
    action: {
    },
  },
  observers:{
    'sum': function(val) {
      this.setData({
        'list[1].info':val
      })
    }
  },
- 导入成员
- 监听sum值变化
- 再重新赋值
4. 实现 TabBar页面的 - 切换效果
event.detail 的值为当前选中项的索引
 methods: {
    onChange(event){
      // event.detail 的值为当前选中项的索引
      this.setData({active: event.detail})
      wx.switchTab({
        url: this.data.list[event.detail].pagePath,
      })
    },
  }
5. 使用 store 存储,实现 tabBar 转换
组件的 js 文件
import {storeBindingsBehavior } from 'mobx-miniprogram-bindings'
import {store} from '../store/store'

Component({
  options: {
    "styleIsolation": "shared"
  },
  behaviors:[storeBindingsBehavior],
  storeBindings:{
    store,
    fields:{
      sum: 'sum',
      active: 'activeTabBarIndex'
    },
    action: {
      updateActive: 'updateActiveTabBarIndex',
    },
  },
  observers:{
    'sum': function(val) {
      this.setData({
        'list[1].info':val
      })
    }
  },
  /**
   * 组件的属性列表
   */
  properties: {

  },

  /**
   * 组件的初始数据
   */
  data: {
    "list": [
      {
        "pagePath": "/pages/home/home",
        "text": "首页",
        "iconPath": "/images/tabs/home.png",
        "selectedIconPath": "/images/tabs/home-active.png",
        info: 0
      },
      {
        "pagePath": "/pages/message/message",
        "text": "消息",
        "iconPath": "/images/tabs/message.png",
        "selectedIconPath": "/images/tabs/message-active.png"
      },
      {
        "pagePath": "/pages/contact/contact",
        "text": "联系我们",
        "iconPath": "/images/tabs/contact.png",
        "selectedIconPath": "/images/tabs/contact-active.png"
      }
    ]
  },

  /**
   * 组件的方法列表
   */
  methods: {
    onChange(event){
      // event.detail 的值为当前选中项的索引
      // this.setData({active: event.detail}) 因为active是从store里映射过来的
      this.updateActive(event.detail);
      wx.switchTab({
        url: this.data.list[event.detail].pagePath,
      })
    },
  }
})
wxml
<van-tabbar active="{{active}}" bind:change="onChange">
6. 修改 tabBar 选中的颜色
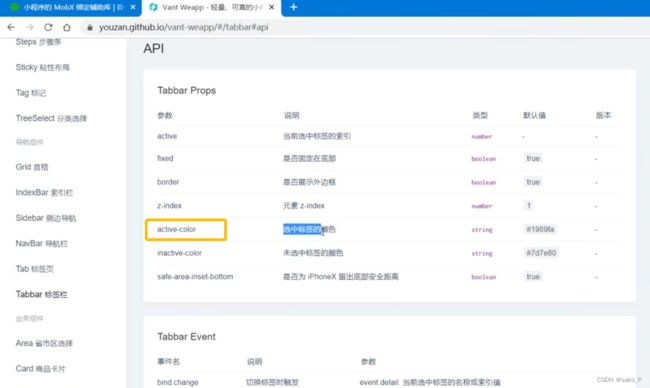
API
active-color 标签
<van-tabbar active="{{active}}" bind:change="onChange" active-color="#13A7A0"><van-tabbar active="{{active}}" bind:change="onChange" active-color="#13A7A0">

