第一个Spring-boot项目创建与测试
一、项目搭建
Spring-boot的主要搭建方式有两种,步骤基本一致:
方式一:使用官网在线生成
https://start.spring.io/
方式二:使用idea创建
这里主要介绍第二种方式:
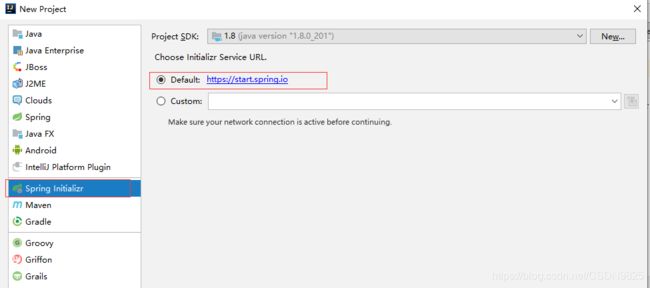
1.在idea中:File–>New–>Project,创建新项目

2.选择Spring Initializr 路径设置默认,如果长时间未创建成功,可尝试第二种,填入:http://start.spring.io。
3.点击Next 等待几秒,编辑分组,名称,项目类型,语言,包类型,jdk版本,其他默认即可
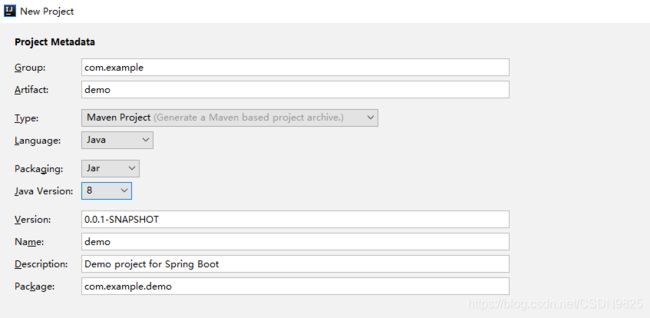
注:这一步其实和官网创建项目一致,不过官网在右侧可以直接导入jar包依赖。
4.点击Next 选择Web,勾选Spring Web,这一步主要是导入jar包依赖,新项目只需要这一个就可以,后续有需要可在pom.xml文件中导入依赖。

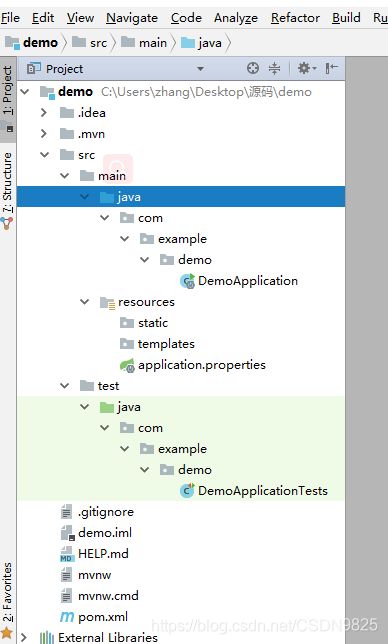
5.点击Next 设置项目名称和源码存储位置,点击Finish创建成功。等待基础配件下载成功后,即可书写测试类。
二、Spring-boot 常用的几个注解:
1、@Controller
作用:标记当前类是一个控制器,返回页面时,如果是json数据,需在接口上使用@ResponseBody才可以。
2、@RestController
作用:标记当前类是一个控制器,返回Json数据
@RestController = @Controller+@ResponseBody
3、RequestMapping
作用:路由映射,用于类上做1级路径;用于方法上做子路径
4、SpringBootApplication
作用:标记当前应用是SpringBoot应用,内部包含多个注解
@SpringBootApplication =
@Configuration+@EnableAutoConfiguration+@ComponentScan
三、静态文件的加载顺序和配置
静态文件包含:js、HTML、css、image、tpl 等等
1、springboot中静态默认加载顺序
resources>
static>
pubilc>
springboot默认从上到下的顺序查找资源,若找到,则直接返回,否则顺序找下去。
2、官方提供的静态文件默认值配置(默认生效,无需配置)
spring.web.resources.static-locations =
classpath:/META-INF/resources/,classpath:/resources/,classpath:/static/,classpath:/public/
3、自定义静态路径的访问
需明确配置spring.web.resources.static-locations 并且需增加自定义路径,比如添加一个名为user的文件包,需要在application.properties文件中添加:
spring.web.resources.static-locations = classpath:/META-INF/resources/,classpath:/resources/,classpath:/static/,classpath:/public/,classpath:/user/
使该文件包下的文件生效。
四、访问templates中的资源
访问templates中的HTML
1、需要引入thymeleaf依赖(在pom.xml配置文件中可以手动或者借助idea引入)
		<dependency>
			<groupId>org.springframework.boot</groupId>
			<artifactId>spring-boot-starter-thymeleaf</artifactId>
		</dependency>
2、通过Controller路径跳转访问
注:如果没有应用thymeleaf模板引擎,最好将依赖注释掉,否则可能会出现报错。
五、idea热部署
1、引入依赖 (可以手动或者借助idea引入)
 <!--idea热部署-->
        <dependency>
            <groupId>org.springframework.boot</groupId>
            <artifactId>spring-boot-devtools</artifactId>
            <optional>true</optional>
        </dependency>
2、修改spring-boot-maven-plugin插件,加入如下内容
<build>
		<plugins>
			<plugin>
				<groupId>org.springframework.boot</groupId>
				<artifactId>spring-boot-maven-plugin</artifactId>
                <configuration>
                    <fork>true</fork><!--避免热部署失败-->
                </configuration>
			</plugin>
		</plugins>
	</build>
3、idea配置
3.1 settings–Compiler–勾选“Build Project automatically”。
3.2 shift+ctrl+alt+/ – 选择“Registry”–勾选“compiler.automake.allow.when.app.running”
3.3 重启idea
六、测试类
1.在java文件夹下的DemoApplication同级创建一个Controller文件夹,新建一个HelloController类,
package com.springboot.demo.Controller;

import org.springframework.web.bind.annotation.RequestMapping;
import org.springframework.web.bind.annotation.RestController;

@RestController
public class HelloController {

    @RequestMapping("test")
    public String test1(){
        return "Hello spring-boot";
    }
}
2.运行项目
3.在浏览器中输入:localhost:8080/test,即可获取结果。
