使用 vuepress 快速搭建一个个人博客
又有一个可以装逼的技术点了
初始化项目
npm init -y
安装依赖
- vuepress:用来开发博客项目的依赖
- site-ftp:用来上传文件到服务器的依赖
npm i -D vuepress site-ftp
初始化目录
|-- wordpress -------------------- 项目名称
    |-- .gitignore --------------- git忽略文件
    |-- ftp.js ------------------- 上传配置文件
    |-- package-lock.json -------- 依赖地址信息
    |-- package.json ------------- npm 包信息
    |-- README.md ---------------- 项目文档
    |-- build -------------------- 配置目录
    |-- dist --------------------- 打包目录
    |-- docs --------------------- 项目主目录
        |-- README.md ------------ 入口文件
        |-- .vuepress ------------ vuepress 配置目录
        |   |-- config.js -------- 配置文件
        |-- |-- public ----------- 资源目录
        |   |-- styles ----------- 样式文件
        |-- blog ----------------- 博客文章目录
        |-- |-- README.md -------- blog的根目录
配置运行命令
- package.json
"scripts": {
  "start": "npm run dev",
  "dev": "vuepress dev docs",
  "build": "vuepress build docs",
  "upload": "node ftp.js",
}
配置 config.js
✅ 查看详情const articleNum = 15; // 文章数量
// 目录配置
const children = Array.from(new Array(articleNum), (_, i) => (i < 10 ? "0" + i : String(i))); // 初始化
// 配置文件
const themeConfig = {
logo: "/logo.svg",
search: false,
smoothScroll: true,
nav: [
{
text: "首页",
link: "/"
},
{
text: "博客",
ariaLabel: "博客菜单",
items: [
{
text: "我的博客",
link: "/blog/"
},
{
text: "CSDN",
link: "https://blog.csdn.net/biao_feng",
target: "_blank"
}
]
},
{
text: "Github",
link: "https://github.com/biaov/wordpress",
target: "_blank"
}
],
sidebar: {
"/blog/": [
{
title: "首页",
path: "/"
},
{
title: "博文",
path: "/blog/",
collapsable: false,
sidebarDepth: 3,
children
}
]
}
};
// 配置
const config = {
base: "/",
title: "个人博客",
description: "这是我用 VuePress 搭建的个人博客!",
dest: "dist",
head: [["link", { rel: "icon", href: "/logo.png" }]],
host: "127.0.0.1",
port: "8888",
themeConfig:themeConfig,
};
module.exports = config;
运行项目
npm start
开发中…
开发完成
打包项目
npm run build
上传项目文件到服务器
::: warning 注意
这是使用 ftp 上传文件到服务器,请确保你配置了ftp服务器,并开放了 21 端口。
:::
使用 FlashFXP 上传文件
连接服务器
上传 dist 目录文件
::: tip 提示
上传成功
:::
使用命令上传文件
配置 ftp.js
const { SiteFtp } = require("site-ftp"); // 引入ftp模块
SiteFtp.connect({
  host: "", // 需要上传的IP地址
  port: 21, // 开放的端口号,ftp 默认端口号为 21
  username: "", // ftp 账号
  password: "", // ftp 密码
  type: "ftp",
  from: ["dist/**"], // 你要上传的文件路径
  to: "/wordpress/", // 需要上传到服务器的文件路径
  rm: true // 允许 rm 操作
});
上传文件
npm run upload
::: tip 提示
上传成功
:::
使用自动化构建
::: warning 注意
由于某些原因,没有具体的开源案例,只提供思路。
:::
效果
- 当代码提交到远程 Git 仓库之后,服务器代码自动更新。
思路
- 监听我的代码提交,当我提交完之后,Git 仓库向服务器发送一个请求
- 服务器接收请求之后,执行我的预设操作,即:拉取代码 -> 安装依赖 -> 打包项目 -> 项目更新完成
具体操作
- 这里以 Github 为例,如果是其它类型的 Git 仓库,大体流程不变,只有监听 Git 提交的方式不同。
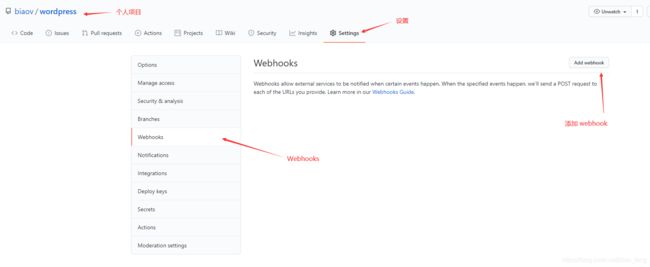
- 配置 Webhooks
总结
项目开源地址
- wordpress
项目演示地址
- wordpress


