【深入理解Kotlin协程】协程的上下文 CoroutineContext
-
Job:控制协程的生命周期。
-
CoroutineDispatcher:将工作分派到适当的线程。
-
CoroutineName:协程的名称,可用于调试。
-
CoroutineExceptionHandler:处理未捕获的异常。
public interface CoroutineContext {

    public operator fun  get(key: Key): E?

    public fun  fold(initial: R, operation: (R, Element) -> R): R

    public operator fun plus(context: CoroutineContext): CoroutineContext{...}

    public fun minusKey(key: Key<*>): CoroutineContext

    public interface Key

    public interface Element : CoroutineContext {...}
} -
操作符get 可以通过 key 来获取这个 Element。由于这是一个 get 操作符,所以可以像访问 map 中的元素一样使用 context[key] 这种中括号的形式来访问。
-
操作符 plus 和 Set.plus 扩展函数类似,返回一个新的 context 对象,新的对象里面包含了两个里面的所有 Element,如果遇到重复Key的元素,那么用+号右边的 Element 替代左边的。+ 运算符可以很容易的用于结合上下文,但是有一个很重要的事情需要小心 —— 要注意它们结合的次序,因为这个 + 运算符是不对称的。
-
fun fold(initial: R, operation: (R, Element) -> R): R 和 Collection.fold 扩展函数类似,提供遍历当前 context 中所有 Element 的能力。
-
fun minusKey(key: Key<*>): CoroutineContext 返回一个上下文,其中包含该上下文中的元素,但不包含具有指定key的元素。
public interface Element : CoroutineContext {

    public val key: Key<*>

    public override operator fun  get(key: Key): E? = if (this.key == key) this as E else null

    public override fun  fold(initial: R, operation: (R, Element) -> R): R = operation(initial, this)

    public override fun minusKey(key: Key<*>): CoroutineContext = if (this.key == key) EmptyCoroutineContext else this
}
Element 定义在 CoroutineContext 中, 是它的内部接口,不过这并不是重点,重点有两个,我们依次来分析。
-
Element 本身也实现了 CoroutineContext 接口,这看上去很奇怪,为什么元素本身也是集合了呢?其实这主要是为了 API 设计方便,Element 中是不会存放除了它自己以外的其他数据的。
-
Element 接口中有一个属性 key, 这个属性很关键。虽然我们在往 list 中添加元素的时候没有明确指出,但我们心知肚明 list 中的元素都有一个 index, 表示元素的索引,而这里协程上下文元素的 key 就是协程上下文这个集合中元素的索引,不同之处是这个索引“长”在了数据里面,这意味着协程上下文的数据在“出生”时就找到了自己的位置。
public abstract class AbstractCoroutineContextElement(public override val key: Key<*>) : Element创建元素不难,提供对应的 Key 即可。
public data class CoroutineName(
    val name: String
) : AbstractCoroutineContextElement(CoroutineName) {
    public companion object Key : CoroutineContext.Key
    override fun toString(): String = "CoroutineName($name)"
}
协程异常处理器的实现:
public inline fun CoroutineExceptionHandler(crossinline handler: (CoroutineContext, Throwable) -> Unit): CoroutineExceptionHandler =
    object : AbstractCoroutineContextElement(CoroutineExceptionHandler), CoroutineExceptionHandler {
        override fun handleException(context: CoroutineContext, exception: Throwable) =
            handler.invoke(context, exception)
    }
public interface CoroutineExceptionHandler : CoroutineContext.Element {
    public companion object Key : CoroutineContext.Key
    public fun handleException(context: CoroutineContext, exception: Throwable)
} 协程上下文的继承
-
默认值是指默认的调度器或者Name: Dispatchers.Default 是默认的 调度器 ,以及 "coroutine" 是默认的 CoroutineName;
-
继承的 CoroutineContext 是 CoroutineScope 从父协程作用域继承的上下文;
-
传入协程构造器的上下文参数的优先级高于继承的上下文参数,因此会覆盖对应的参数值。
协程上下文的使用
之所以可以这样写是因为协程上下文进行了+号运算符重载。当然也可以这样做:
为协程上下文设定协程名:
GlobalScope.launch(CoroutineName("parent")) {
        async(CoroutineName("child1")) {
            Thread.sleep(2000)
            return@async "response data"
        }.await()

        async(CoroutineName("child2")) {
            Thread.sleep(2000)
            return@async "response data"
        }.await()
}suspend fun main() {
var context: CoroutineContext = CoroutineName("CoroutineName01")
context += CoroutineExceptionHandler { coroutineContext, throwable ->
println("捕获到异常: $throwable 协程名字是:${coroutineContext[CoroutineName]}")
}
val job = GlobalScope.launch(context) {
println("协程名字是:${coroutineContext[CoroutineName]}")
withContext(Dispatchers.IO) {
println("协程名字是:${coroutineContext[CoroutineName]}")
Thread.sleep(5000)
throw Exception("发生了异常:Error!!!!!!!!!!!") // 抛出异常
}
}
job.join()
} 不管结果如何, Continuation
注意, context[CoroutineExceptionHandler] 中的 CoroutineExceptionHandler 实际上是异常处理类的伴生对象,也就是它在协程上下文中的 Key。
提示:要捕获协程的异常,除了使用 CoroutineExceptionHandler,依然可以使用try-catch在协程体内进行捕获,但使用CoroutineExceptionHandler可以统一捕获,不用到处 try-catch了。
fun CoroutineScope.safeLaunch(
    onError: ((Throwable) -> Unit)? = null,
    onLaunchBlock: () -> Unit
) {
    val exceptionHandler = CoroutineExceptionHandler { _, throwable ->
        onError?.invoke(throwable)
    }
    this.launch(exceptionHandler) {
        onLaunchBlock.invoke()
    }
}GlobalScope.safeLaunch(onError = { throwable ->
println(throwable.message ?: "UnKnow Error")
}) {
println("执行在协程中...")
delay(1000L)
val num = 999/0
println("执行完毕...")
}协程的拦截器
拦截器的使用
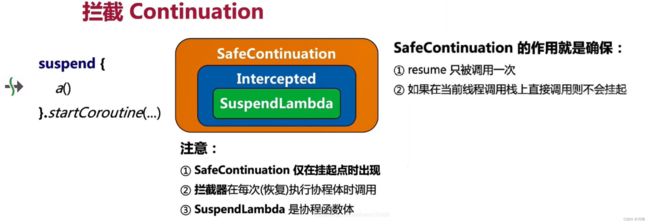
拦截器的 Key 是一个固定的值 Continuationlnterceptor, 程执行时会通过这个 Key 拿到拦截器并实现对 Continuation 的拦截。
从图 3-3 中可以清楚地 到,协程体在挂起点处先被拦截器,再被 SafeContinuation 保护了起来。想要让协程体真正恢复执行,先要过这两个过程,这也为协程支持更加复杂的调度逻辑提供了基础。除了打印日志,拦截器的作用还有很多,最常见的就是控制线程的切换,相关内容请考后续调度器实现的内容。
补充细节:
-
CoroutineContext重载了+号运算符,所以才能用+号进行运算。
-
CoroutineContext进行+运算后会生成一个 CombinedContext(也是CoroutineContext的子类), CombinedContext持有2个成员一个 left表示+号左边的对象,一个 element表示+号右边的对象,也就是按照从左往右的顺序进行结合
-
CombinedContext有点像一个单向链表的结构,头结点在最右边,尾结点在最左边。当根据key从context中进行get操作时,是从最右边开始向左查询的,如果查询到符合key的类型时就直接返回,否则就顺着链表一直往左边查询。因此如果进行+运算的是多个CoroutineName(或多个相同ContinuationInterceptor类对象)时,后面+的会覆盖前面+的对象(key相同),因为在get查询时是从最右边找第一个符合的就不找了。
-
CoroutineContext在重载+号运算符时,对拦截器进行了“特殊照顾”,即总是将最左边的拦截器先取出来,然后等处理完之后最后再拼到最右边,这样是为了提高get时的查询效率,因为get是从最右边开始查询的。所以 如果自定义了拦截器的key,起作用的永远是第一个。

参考:
《深入理解Kotlin协程》- 2020年-机械工业出版社-霍丙乾


