基于Dlib+PyQt5+TensorFlow智能口红色号检测推荐系统——深度学习算法应用(含Python全部工程源码及模型)+数据集
目录
- 前言
- 总体设计
-
- 系统整体结构图
- 系统流程图
- 运行环境
-
- Python环境
- TensorFlow环境
- 安装face_ recognition
- 安装colorsys模块
- 安装PyQt 5
- 安装QCandyUi
- 库依赖关系
- 模块实现
-
- 1. 数据预处理
-
- 1)源数据的存储
- 2)处理数据
- 3)合并得到json文件
- 2. 系统搭建
-
- 1)人脸识别
- 2)提取唇部轮廓并创建蒙版
- 3)划分嘴唇区域
- 4)提取图片颜色
- 5)获取色号库
- 6)比较并得出结果
- 7)创建图形化界面
- 8)将流程封装为类和函数
- 9)对GUI的显示效果进行美化
- 系统测试
- 工程源代码下载
- 其它资料下载
前言
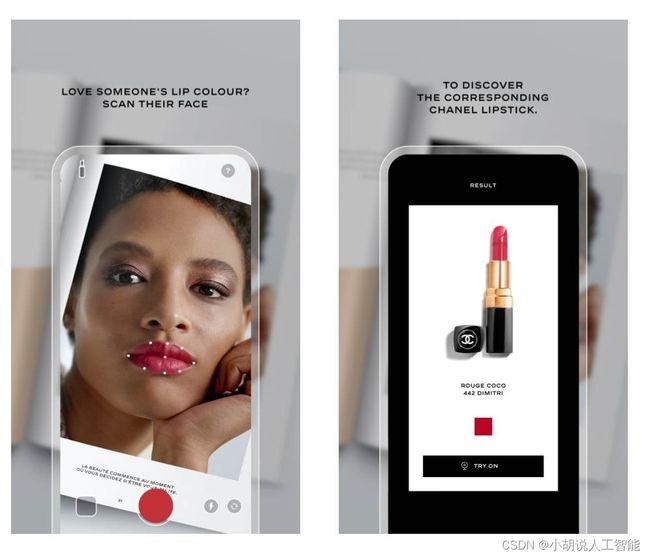
本项目利用了Dlib中已经成熟的68点人脸特征点检测功能,并结合了Python库"face_recognition",以便进行口红颜色的匹配和推荐。
首先,使用Dlib的人脸特征点检测功能,我们可以精确地定位人脸上的68个关键点,包括眼睛、嘴巴、鼻子等部位。这些关键点的检测能力使我们能够准确地识别嘴唇的位置和形状。
接下来,我们使用"face_recognition"库来处理这些检测到的区域。具体而言,我们关注嘴唇区域并提取其颜色信息。这可能涉及到将嘴唇区域的像素值转化为颜色的特征,比如RGB值或者HSV值。
一旦我们获得了嘴唇的颜色信息,接下来的步骤就是寻找与这种颜色最相近的口红颜色。这可以涉及到一个颜色匹配算法,例如计算颜色之间的欧几里德距离或色彩空间的相似度。
最后,根据颜色匹配的结果,我们可以输出口红推荐信息,包括口红的品牌、色号和购买链接等。这样,用户可以根据他们的嘴唇颜色找到最适合的口红。
本项目结合计算机视觉和颜色匹配技术,为用户提供了一种便捷的方式来选择合适的口红颜色,以匹配他们的嘴唇颜色和个人喜好。这对于化妆爱好者和购物者来说都具有实际的应用价值。
总体设计
本部分包括系统整体结构图和系统流程图。
系统整体结构图
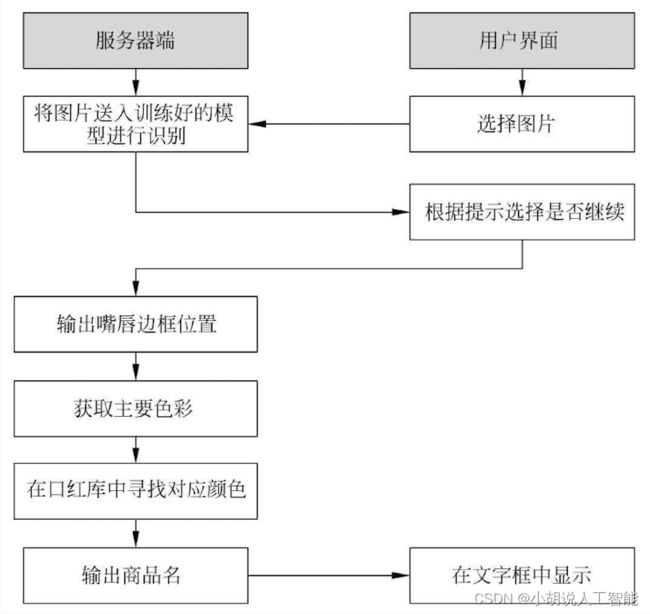
系统整体结构如图所示。
系统流程图
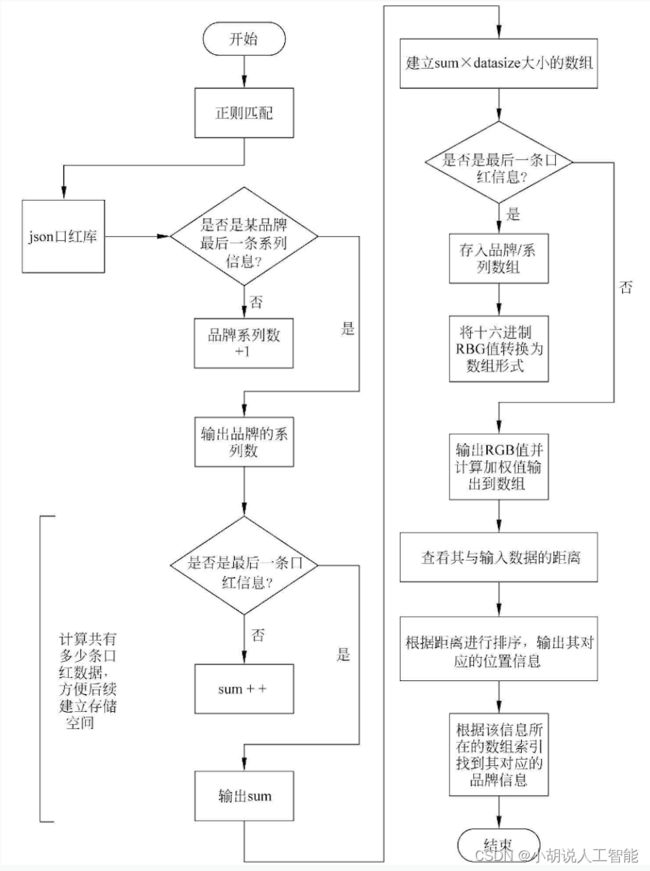
正则匹配系统流程如图所示。
保存信息系统流程如图所示。
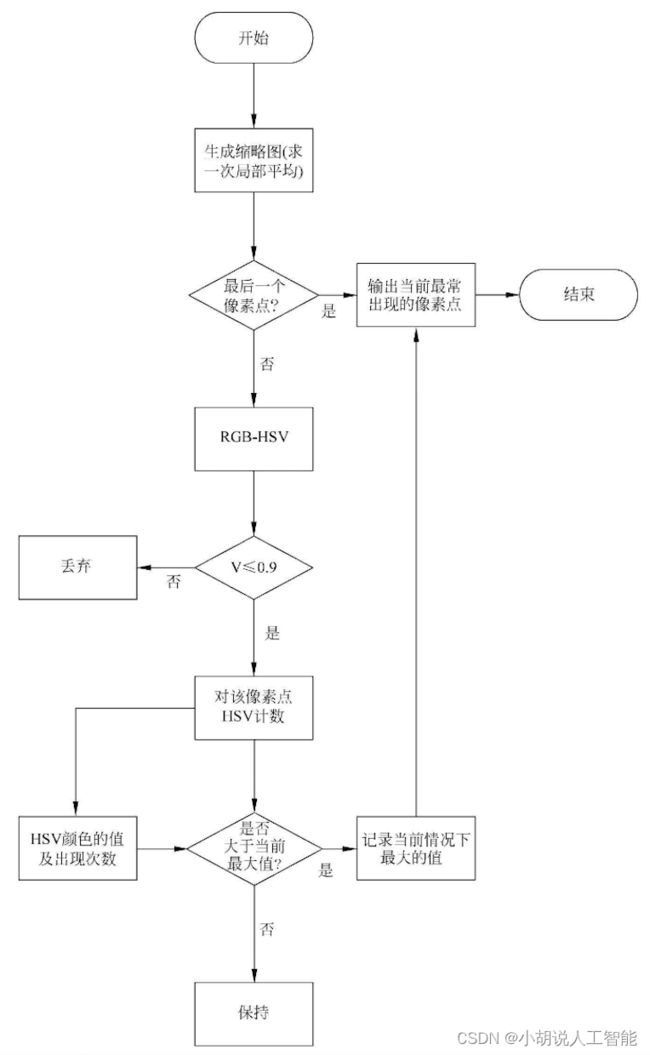
色彩空间转换流程如图所示。
寻找相应颜色模块如图所示。
运行环境
本部分包括Python环境、TensorFlow环境、安装face_recognitio、colorsys模块、PyQt5、QCandyUi、库依赖关系。
Python环境
需要Python 3.6及以上配置,在Windows环境下推荐下载Anaconda完成Python所需环境的配置,下载地址为https://www.anaconda.com/,也可下载虚拟机在Linux环境下运行代码。
TensorFlow环境
打开Anaconda Prompt,输入清华仓库镜像:
conda config --add channels https://mirrors.tuna.tsinghua.edu.cn/anaconda/pkgs/free/conda config --set show_channel_urls yes
创建Python 3.6的环境,名称为TensorFlow,此时Python版本和后面TensorFlow的版本有匹配问题,此步选择Python 3.6。
conda create -n tensorflow Python=3.6
有需要确认的地方,都输入y。
在Anaconda Prompt中激活TensorFlow环境:
activate tensorflow
安装CPU版本的TensorFlow:
pip install tensorflow
安装完毕。
安装face_ recognition
在Windows 10下安装face_recognition第三方库:
①在Anaconda的Python 3.6版本命令提示符下输入pip install CMake命令安裝CMake;
②安装Dlib。经查询发现face_recognition第三方库与Dlib的19.7.0版本相匹配,所以安装Dlib时要使用以下命令: pip install dlib==19.7.0,在DOS命令行输入pip install face_recognition命令安装face_recognition第三方库。
安装colorsys模块
colorsys模块用于RGB和YIQ/HLS/HSV颜色模式双向转换接口。提供6个函数,其中3个用于RGB转YIQ/HLS/HSV,另外3个将YIQ/HLS/HSV转RGB。
PIL库可以完成图像归档和图像处理两方面的需求。图像归档:对图像进行批处理、生成图像预览、图像格式转换等;图像处理:基本处理、像素处理、颜色处理等。Image是PIL中最重要的模块,有一个类叫作Image,与模块名称相同。Image类有很多函数、方法及属性。
安装PyQt 5
安装步骤:打开CMD,输入conda activate tensorflow命令;
pip install pyqt5 需要注意,conda库中没有PyQt5。
在网络质量不佳时有可能安装失败,可以使用下载*.whl文件并用pip install wheel的方式进行PyQt 5的安装部署;
pip install pyqt5-tools安装后关闭CMD,到达文件安装位置寻找designer.exe;
打开designer.exe即可使用该工具迅速画出样式并得到*ui文件;
打开CMD,跳转到对应位置。使用pyuic工具将*ui文件转换为ui_*.py文件;
打开ui_*py文件写入signal and slot相关内容,确定继承关系。
安装QCandyUi
使用conda activate tensorflow命令激活环境后,使用pip install QCandyUi命令安装即可。
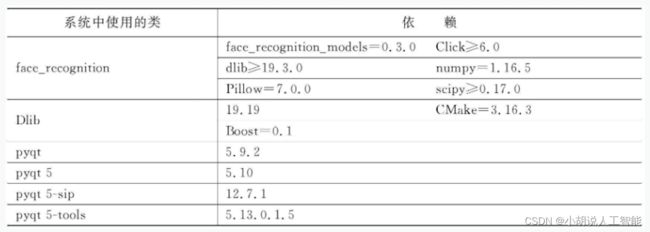
库依赖关系
库依赖如表所示。
模块实现
本项目包括数据预处理和系统搭建2个模块。下面分别给出各模块的功能介绍及相关代码。
1. 数据预处理
本部分包括源数据的存储、数据处理和数据合并。
1)源数据的存储
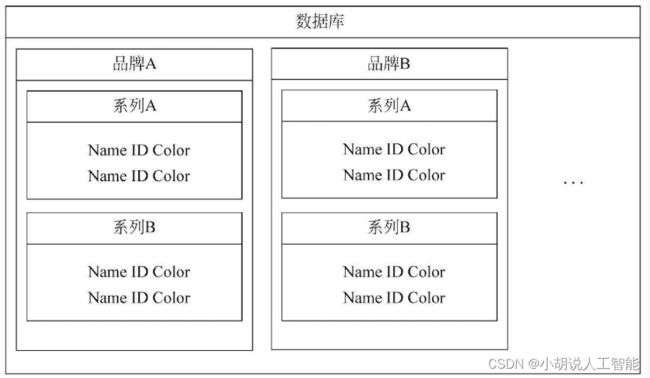
数据下载地址为https://www.kaggle.com/c/facial-keypoints-detection/data,存储形式如图所示。
2)处理数据
本部分代码因需要处理多个品牌,代码结构相似,存在重复现象,本处以口红品牌M.A.C为例展示处理方法,相关代码如下:
#-*- coding: utf-8 -*-
import json
import re
import os
path="D:/homework/大三下信息系统设计/lipsticks/"
brand="mac/"
brandpathli=[]
dict_Brand={"name":brand[:-1],"series":None}
dict_series={"name":None,"lipsticks":None}
dict_name={"color":"#ffffff", "id":"-1", "name":"none"}
#预设参数,在处理不同品牌时,只需要改变brand和path中的内容即可
def par_mac(str):
#对该口红的品牌、颜色、色号进行匹配
dict_name={"color":"#ffffff", "id":"-1", "name":"none"}
#设定默认值,当发现颜色是黑色或ID=-1可及时丢弃不合法的列表
    matchObj_color = re.search( r'#\w{6}', str, re.M|re.I)
    if (matchObj_color!=None):
        dict_name["color"]=matchObj_color.group().upper()
        #print (matchObj_color.group())调试代码
    matchObj_id = re.search( r"\">\d{3}" , str, re.M|re.I)
    if (matchObj_id!=None):
        dict_name["id"]=matchObj_id.group()[2:]
        #print (matchObj_id.group()[2:])调试代码
    matchObj_name = re.search( r">\d{0,}[ ]?([A-Z][a-z]*[,]?[ ]?[!?]?){1,}" , str, re.M|re.I)
    if (matchObj_name!=None):
        dict_name["name"]=matchObj_name.group()[1:]
    return  dict_name
#查找文件夹内所有文件的名称
def eachFile(filepath):
    pathDir =  os.listdir(filepath)
    for allDir in pathDir:
        child = os.path.join('%s%s' % (filepath, allDir))
        print("children",child)#即该目录下所有文件的名字
        brandpathli.append(child)
#读取文件路径名对应的内容
def readFile(filename):
    fopen = open(filename, 'r') #r 代表read
    list_series=[]#文件中每一行的内容
    for eachLine in fopen:
        #print( "读取到得内容如下:",eachLine)调试代码
        dict_name=par_mac(eachLine)
        if(dict_name["color"]=="#ffffff"):
           continue
        list_series.append(dict_name)
    fopen.close()
    return list_series#返回每个系列的所有口红
    if __name__ == '__main__':
    #filePath = path+brand+subpath调试代码,可以通过不同方式访问数据
    filePathC = path+brand
    eachFile(filePathC)
    list_brand=[]
    for i in brandpathli:
        dict_series={"name":None,"lipsticks":None}
        list_series=readFile(i) #每个系列的所有口红
        #print(dict_name)调试代码
        brandname=i.split('/')[-1].split('.')[0]
        #print("mainpring",brandname)调试代码
        dict_series["name"]=brandname
        dict_series["lipsticks"]=list_series
        #获得{系列名,口红色号}字典
        list_brand.append(dict_series)
  	print("dict_series",list_brand)
    dict_Brand["series"]=list_brand
        #dict_Brand["brands"][1]["series"]调试代码
file = open('D:/homework/大三下信息系统设计/json/'+brand.split('/')[0]+'.json','w',encoding='utf-8')
#在遇到长文本时需要处理编码格式以保证存入的数据不是乱码
    json = json.dump(dict_Brand,file)
    print(json)
file.close()
3)合并得到json文件
合并得到json文件即可组成口红色号数据库,如图所示。
2. 系统搭建
本部分包括人脸识别,提取唇部轮廓并创建蒙版,划分嘴唇区域,提取图片颜色,获取色号库,比较并得出结果,创建图形化界面等。
1)人脸识别
在识别唇部之前,定位到人脸,用face_recognition对图片中的人脸进行识别。
import face_recognition
path="*.jpg"
#放入一张照片
image = face_recognition.load_image_file(path)
#找到图片中所有人脸
print(type(image))
face_locations = face_recognition.face_locations(image)
print(face_locations)
#或者在图像中找到面部特征(还可以通过len(face_locations)得到图片中的人脸数
face_landmarks_list = face_recognition.face_landmarks(image)
print(face_landmarks_list)
#为图像中的每个人脸获取face_encodings
list_of_face_encodings = face_recognition.face_encodings(image)
2)提取唇部轮廓并创建蒙版
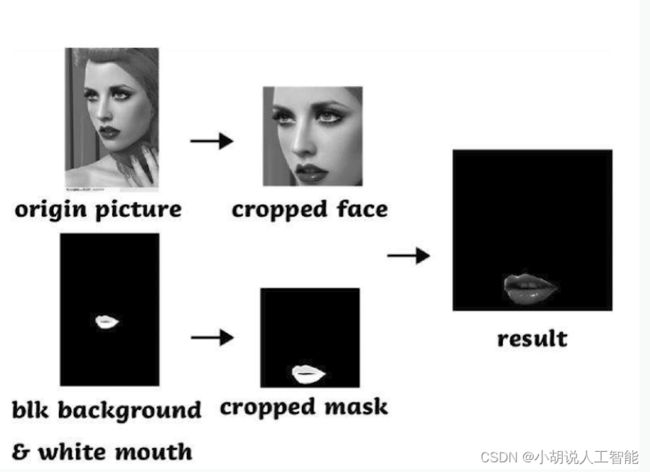
为方便提取唇部颜色,将识别到的上下嘴唇及轮廓用白色填充,得到一张黑底唇部留白的蒙版。
pil_image = Image.fromarray(image)
a=pil_image.size
#改变类型
print(a,type(a))
blank_mouse = Image.new('RGB', (a[0],a[1]), (0, 0, 0))
#新建一张黑色图片
for face_landmarks in face_landmarks_list:
    d = ImageDraw.Draw(blank_mouse, 'RGBA')
    #把嘴唇涂白
    d.polygon(face_landmarks['top_lip'], fill=(255,255,255,255))
    d.polygon(face_landmarks['bottom_lip'], fill=(255, 255,255, 255))
    d.line(face_landmarks['top_lip'], fill=(255, 255,255, 255), width=8)
blank_mouse.show()
#展示
blank_mouse=blank_mouse.crop((pos[3], pos[0], pos[1], pos[2]))
#(left, upper, right, lower) 修剪面部区域
Image._show(blank_mouse)
3)划分嘴唇区域
进一步对图像进行处理,在原图像中保留唇部区域,即上步中留白区域,非唇部区域用黑色覆盖,便于后续提取颜色。
def masklayer(origin,mask):
	#创建函数,origin和mask均为Image函数对应的图片格式,将其转换为数组,再操作
    mask1=np.array(mask)
    print(mask1.shape)
    origin1=np.array(origin)
    print(origin1.shape)
    for i in range(len(mask1)):
        for j in range(len(mask1[i])):
        #如果mask在这个区域是黑色的,则程序不需要这部分图片内容设定原图中该区域rgb=000
if (mask1[i][j][1]>=128):#保留嘴唇区域
                pass
                      else:#其他区域变为黑色
                origin1[i][j]=[0,0,0]
    new_png = Image.fromarray(origin1)
    new_png.show()
    #new_png.save('testpic.JPG')
return new_png
#调用编写的函数,将嘴唇区域框选出来
cropped=masklayer(cropped_face,blank_mouse)
经过以上步骤,可以获取唇部区域并打印,如图所示。
4)提取图片颜色
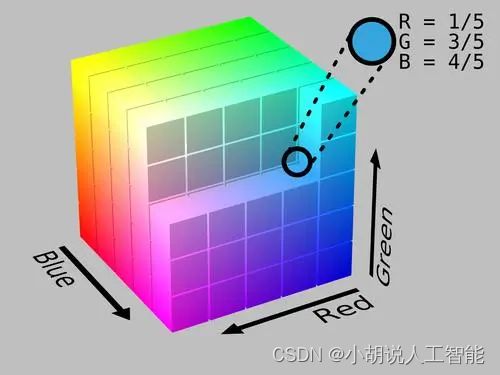
颜色空间可以分为基色颜色空间和色、亮分离颜色空间两类。前者是RGB,后者包括YUV和HSV等。在RGB颜色空间中,任意色光F都可以用R、G、B三基色不同分量的相加混合而成:F=r[R]+r[G]+r[B]。 RGB色彩空间还可以用一个三维的立方体来描述,当三基色分量都为0 (最弱)时混合为黑色光;当三基色都为定值( 最大值由存储空间决定)时混合为白色光。
HSV颜色空间用下图描述。正对着的面为S=100%,Z轴为V值正方向,从左至右为H间隔60°展开。程序采用了《广告图片生成方法、装置以及存储介质》中的部分思想。
import colorsys
import PIL.Image as Image
def get_dominant_color(image):
    #颜色模式转换,以便输出RGB颜色值
    image = image.convert('RGB')
    #生成缩略图,减少计算量,减小cpu压力,缩短运算时间
    image.thumbnail((200, 200))
    max_score =0
    dominant_color = 0
    for count,(r,g,b) in image.getcolors(image.size[0]*image.size[1]):
        #忽略黑色背景
        if (r<100) :
            continue
        #转换为HSV获取颜色饱和度,范围(0,1)
        saturation = colorsys.rgb_to_hsv(r/255.0, g/255.0, b/255.0)[1]
        #转换为YUV计算亮度
        y = min(abs(r*2104+g*4130+b*802+4096+131072)>>13,235)
        #将亮度从(16,235)缩放到(0,1)
        y = (y-16.0)/(235-16)
        #忽略高亮色
        if y > 0.9:
            continue
        #选择饱和度高的颜色
        #将饱和度加0.1,这样就不会通过将计数乘以0来完全忽略灰度颜色,但给它们较低的权重
        score = (saturation+0.1)*count
        if score > max_score:
            max_score = score
            dominant_color = (r,g,b)
    return dominant_color
5)获取色号库
对色号库进行操作,计算共有多少种颜色,并根据计算结果将json文件中的数据存为数组,转换为list方便操作。
def RGBhex_2RGB(rgb_hex):
     #print(rgb_hex) 调试代码
    RGB=[0,0,0]
    temp_num=0
    for i in range(len(rgb_hex)):
        temp_num=0
        temp=rgb_hex[i]
        if(i!=0):
            #将字母转换为ASCII表中位置
            if(temp>='A'and temp<='F'):
                temp_num=ord(temp)-55
                #将ABCDEF转换为10~15间的数字
            else:
                #将字符数字转换为0~9间的数字
                temp_num=ord(temp)-48
            if(i%2==1):
                #根据位置乘进制
                RGB[int((i/2)-0.5)]=RGB[int((i/2)-0.5)]+16*temp_num
            else:
                RGB[int((i/2)-0.5)]=RGB[int((i/2)-0.5)]+temp_num
     #print(RGB)调试代码
return RGB

import numpy as np
import json
#对色号库进行操作
#将品牌、系列颜色ID和颜色名称保存到汇总列表中
def operate(target_color):
    sum_all=0
    with open('lipstick.json', 'r', encoding='utf-8') as f:
        js2dic = json.load(f)
        #读取json
        brands_n=len(js2dic['brands'])
        print(brands_n)
        series_n=0
        for brands_i in range(brands_n):
            series_n=len(js2dic['brands'][brands_i]['series'])
            print("{0} has {1} series".format((js2dic['brands'][brands_i]['name']),series_n))
            for series_i in range(series_n):
                brand_name=js2dic['brands'][brands_i]['name']
                lip_name=js2dic['brands'][brands_i]['series'][series_i]['name']
   color_num=len(js2dic['brands'][brands_i]['series'][series_i]['lipsticks'])
                sum_all=color_num+sum_all
            #计算颜色总数
            print(sum_all)
        catalog=np.zeros((sum_all,4), dtype=(str,20))
        catalog_color=np.zeros((sum_all,3), dtype=int)
         #根据颜色数分配空间
        rank_color=np.zeros((sum_all,1),dtype=int)
6)比较并得出结果
提取出的颜色与库中颜色比较,得到误差最小的三组数据。将每个色号在R、G、B三个分量的数值与提取出的颜色RGB值分别做差并求和(权重自定),作为两个颜色的相似度。
        #catalog分为四部分:品牌名称、唇膏名称、色号ID、色号值
        #将信息存入表格,这个循环可以将信息存入Python程序建立数组中
        sum_i=0
        for brands_i in range(brands_n):
            series_n=len(js2dic['brands'][brands_i]['series'])
            #print("brand_name",js2dic['brands'][brands_i]['name'])
            catalog[sum_i][0]=js2dic['brands'][brands_i]['name']
            for series_i in range(series_n):                color_num=len(js2dic['brands'][brands_i]['series'][series_i]['lipsticks'])
                for color_i in range(color_num):
                    catalog[sum_i][0]=js2dic['brands'][brands_i]['name']                 catalog[sum_i][1]=js2dic['brands'][brands_i]['series'][series_i]['name']                    catalog[sum_i][2]=js2dic['brands'][brands_i]['series'][series_i]['lipsticks'][color_i]['name']                    catalog[sum_i][3]=js2dic['brands'][brands_i]['series'][series_i]['lipsticks'][color_i]['id']                    catalog_color[sum_i]=RGBhex_2RGB(js2dic['brands'][brands_i]['series'][series_i]['lipsticks'][color_i]['color'])
                    sum_i+=1
                     #print(sum_i)调试代码
        print(catalog.shape)
        RGB_distance=np.zeros((sum_all,1), dtype=float)
        for i in range(sum_all):
            #计算相似度,target是此前通过domain得到的值
            RGB_distance[i]=abs(target_color[0]-catalog_color[i][0])+abs((target_color[1]-catalog_color[i][1])*(1/5))+abs(target_color[2]-catalog_color[i][2])
        RGB_distance.tolist()
        result=sorted(range(len(RGB_distance)), key=lambda k: RGB_distance[k])
         #获得颜色最像的三只口红(以颜色的相近度为规则排序,返回位置数据)
        print("颜色最像的三只口红及其颜色")
        result_show=[]
        for i in range(3):
            loc=result[i]
            color_show=tuple(catalog_color[loc])
            print("catalog index",catalog[loc],color_show)
#operate([155, 44, 69]) 调试代码
if __name__ == '__main__':
    get=get_dominant_color(cropped)
    print("获得的口红颜色{0}".format(get))
    #计算相似度,get是此前通过domain得到的值
    operate(get)
7)创建图形化界面
使用designer工具创建GUI文件,并使用pyuic工具进行ui到.py文件的转换。对该*.py文件不建议直接修改,一般使用import其他文件定义操作类的方法进行信号和槽的链接。
#-*- coding: utf-8 -*-
#从读取ui文件“myuidesign.ui”生成的窗体实现
#创建人:PyQt5 UI代码生成器5.10
#警告!此文件中做的所有更改都将丢失
from PyQt5 import QtCore, QtGUI, QtWidgets
from PyQt5.QtWidgets import QFileDialog, QWidget,QGraphicsScene
from PyQt5.QtCore import QFileInfo
from detectface import my_face_recognition
try:
    _fromUtf8 = QtCore.QString.fromUtf8
except AttributeError:
    def _fromUtf8(s):
        return s
try:
    _encoding = QtGUI.QApplication.UnicodeUTF8
    def _translate(context, text, disambig):
        return QtWidgets.QApplication.translate(context, text, disambig, _encoding)
except AttributeError:
    def _translate(context, text, disambig):
        return QtWidgets.QApplication.translate(context, text, disambig)
#以上代码处理了文字的编码格式
#建立UI函数
class Ui_Dialog(object):
    def __init__(self):
        super(Ui_Dialog, self).__init__()
        self.imgPath=""
        self.face_recognize_object =None
        self.showFullImage = True
        self.brand=[]
        self.color=[]
    def setupUi(self, Form):  #设置界面
        Form.setObjectName("Form")
        Form.resize(817, 630)
        self.horizontalLayoutWidget = QtWidgets.QWidget(Form)
        self.horizontalLayoutWidget.setGeometry(QtCore.QRect(10,20,801,611))
        self.horizontalLayoutWidget.setObjectName("horizontalLayoutWidget")
        self.horizontalLayout = QtWidgets.QHBoxLayout(self.horizontalLayoutWidget)
        self.horizontalLayout.setContentsMargins(0, 0, 0, 0)
        self.horizontalLayout.setObjectName("horizontalLayout")
        self.verticalLayout_3 = QtWidgets.QVBoxLayout()
        self.verticalLayout_3.setObjectName("verticalLayout_3")
        self.label = QtWidgets.QLabel(self.horizontalLayoutWidget)
        self.label.setMinimumSize(QtCore.QSize(330, 50))
font = QtGUI.QFont()
        font.setFamily("汉仪唐美人W")
        font.setPointSize(36)
        font.setUnderline(False)
        self.label.setFont(font)
        self.label.setWordWrap(False)
        self.label.setObjectName("label")
        self.verticalLayout_3.addWidget(self.label)
       self.graphicsView=QtWidgets.QGraphicsView(self.horizontalLayoutWidget)
        self.graphicsView.setObjectName("graphicsView")
        self.verticalLayout_3.addWidget(self.graphicsView)
        self.pushButton = QtWidgets.QPushButton(self.horizontalLayoutWidget)
        font = QtGUI.QFont()
        font.setFamily("汉仪唐美人W")
        self.pushButton.setFont(font)
        self.pushButton.setObjectName("pushButton")
self.pushButton.setMinimumSize(QtCore.QSize(20, 50))
        self.verticalLayout_3.addWidget(self.pushButton)
        self.horizontalLayout.addLayout(self.verticalLayout_3)
        self.verticalLayout_4 = QtWidgets.QVBoxLayout()
        self.verticalLayout_4.setObjectName("verticalLayout_4")
        self.label_2 = QtWidgets.QLabel(self.horizontalLayoutWidget)
        self.label_2.setMinimumSize(QtCore.QSize(330, 50))
        font = QtGUI.QFont()
        font.setFamily("汉仪唐美人W")
        font.setPointSize(36)
        self.label_2.setFont(font)
        self.label_2.setObjectName("label_2")
        self.verticalLayout_4.addWidget(self.label_2)
        self.textBrowser= QtWidgets.QTextBrowser(self.horizontalLayoutWidget)
        self.textBrowser.setObjectName("textBrowser")
        self.verticalLayout_4.addWidget(self.textBrowser)
        self.pushButton_2= QtWidgets.QPushButton(self.horizontalLayoutWidget)
        font = QtGUI.QFont()
        font.setFamily("汉仪唐美人W")
        self.pushButton_2.setFont(font)
        self.pushButton_2.setObjectName("pushButton_2")
self.pushButton_2.setMinimumSize(QtCore.QSize(20, 50))
        self.verticalLayout_4.addWidget(self.pushButton_2)
        self.horizontalLayout.addLayout(self.verticalLayout_4)
        self.retranslateUi(Form)
        self.pushButton.clicked.connect(self.on_pushButton_clicked)
        self.pushButton_2.clicked.connect(self.on_pushButton_2_clicked)
        QtCore.QMetaObject.connectSlotsByName(Form)
def on_pushButton_clicked(self):
        #get the image path and show it in the view
        self.face_recognize_object = my_face_recognition()
        fileName, filetype = QFileDialog.getOpenFileName(None, "选择文件", r"此处需要填写文件路径的起点", "Images (*.png *.jpg)")
        self.imgPath=fileName
        print (self.imgPath)
        if self.imgPath != '':
            self.face_recognize_object.operates_(self.imgPath)
            if self.showFullImage == True:
                self.face_recognize_object.showImg('original')
            scene = QGraphicsScene() #创建场景
            pixmap = QtGUI.QPixmap(self.imgPath)
#调用QtGUI.QPixmap方法,打开一个图片,存放在变量中
            scene.addItem(QtWidgets.QGraphicsPixmapItem(pixmap))
#添加图片到场景中
            self.graphicsView.setScene(scene)
#将场景添加到graphicsView中
            self.graphicsView.show()
#显示
            self.textBrowser.clear()
            self.textBrowser.append(str(self.face_recognize_object.errdet))
#输出图片是否合法
def on_pushButton_2_clicked(self):
        self.face_recognize_object.AI()
        self.brand=self.face_recognize_object.register_lps
        self.color=self.face_recognize_object.register_rgb
        print(self.brand)
        self.textBrowser.clear()
        self.textBrowser.append(str(self.face_recognize_object.errdet))
#输出错误信息,若图片不合法则在引用的函数返回为空。若图片合法则会继续输出,看到口红信息
       strout="最像您输入口红的三只色号库内口红分别为!"
        flag=0  #设定flag用于检测是否非法
        for i in range(len(self.brand)):
            flag=1  #如果是合法输入,那么flag就会置1,后续不会提示错误
            strout=strout+'\n'
            print("flag1")
            for j in range(len(self.brand[i])):
                if(self.brand[i][j]!='none'):
                    strout=strout+str(self.brand[i][j])
        self.textBrowser.append(strout)
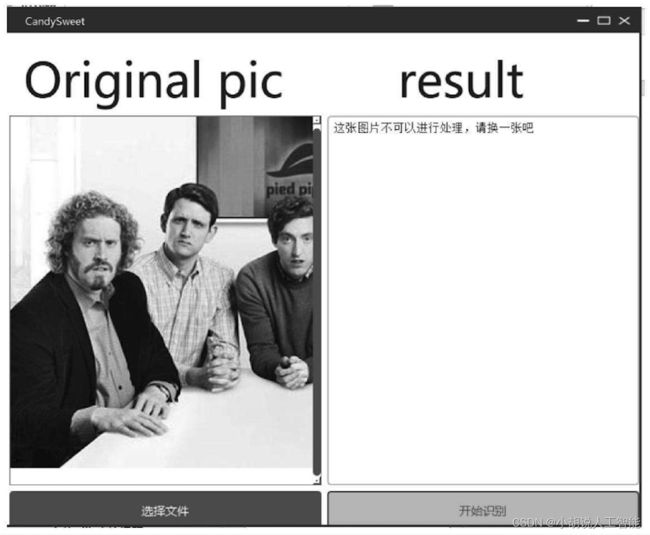
        if(flag==0):
            self.textBrowser.clear()
            self.textBrowser.append("这张图片不可以进行处理,请换一张吧")
            print("flag0")
   #一些有关UI的固定操作,来自ui->py文件的转换器
def retranslateUi(self, Form):
        _translate = QtCore.QCoreApplication.translate
        Form.setWindowTitle(_translate("Form", "Form"))
        self.label.setText(_translate("Form", " Original pic"))
        self.pushButton.setText(_translate("Form", "选择文件"))
        self.label_2.setText(_translate("Form", "     result"))
        self.pushButton_2.setText(_translate("Form", "开始识别"))
if __name__ == "__main__":
    import sys
    app = QtWidgets.QApplication(sys.argv)
    Dialog = QtWidgets.QDialog()
    ui = Ui_Dialog()
    ui.setupUi(Dialog)
    Dialog.show()
    sys.exit(app.exec_())
8)将流程封装为类和函数
将之前描述的主流程代码封装为一个类,通过UI_*.py程序调用这个类中的函数实现相关分类:
def operates_(self,input_path):
        self.imgPath=input_path #展示图片
    def AI(self):
        self.load_pic()
        self.get=self.get_dominant_color(self.resultImg)
       print("the extracted RGB value of the color is {0}".format(self.get))
        self.data_operate()
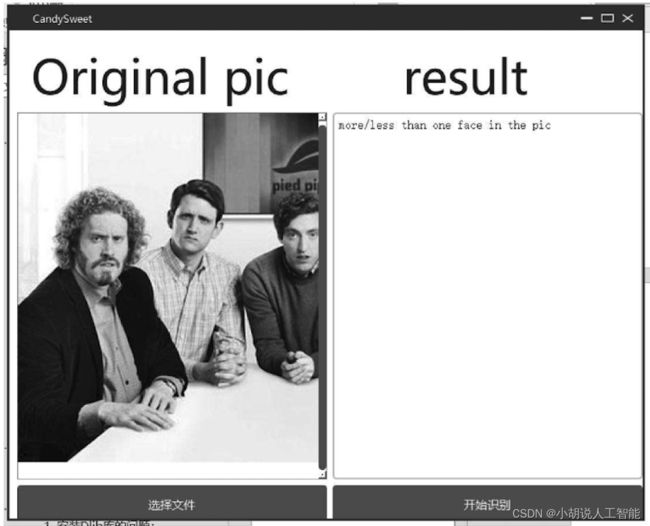
    def errordetect(self): #错误处理
        image = face_recognition.load_image_file(self.imgPath)
        face_locations = face_recognition.face_locations(image)
        if(len(face_locations)!=1): #不是仅有一张人脸在图片中
            if(len(face_locations)==0): #未检测到
                self.errdet="more/less than one face in the pic"
                return "can't find people"
			else:#不只一个人
                self.errdet="more/less than one face in the pic"
            return "more/less than one face in the pic"
        else:
            return "DEAL"
9)对GUI的显示效果进行美化
通过一个小组件对GUI的风格进行转换,改变GUI的外观。引入QCandyUi包:
from QCandyUi import CandyWindow
#调整按钮的大小使之更清晰可见
self.pushButton.setMinimumSize(QtCore.QSize(20, 50))
self.pushButton_2.setMinimumSize(QtCore.QSize(20, 50))
#改变定义窗口类的调用方式
if __name__ == "__main__":
    import sys
    app = QtWidgets.QApplication(sys.argv)
    Dialog = QtWidgets.QDialog()
    ui = Ui_Dialog()
    ui.setupUi(Dialog)
    Dialog = CandyWindow.createWindow(Dialog, 'pink') #增加,使QCandyUi运行
    Dialog.show()
sys.exit(app.exec_())
系统测试
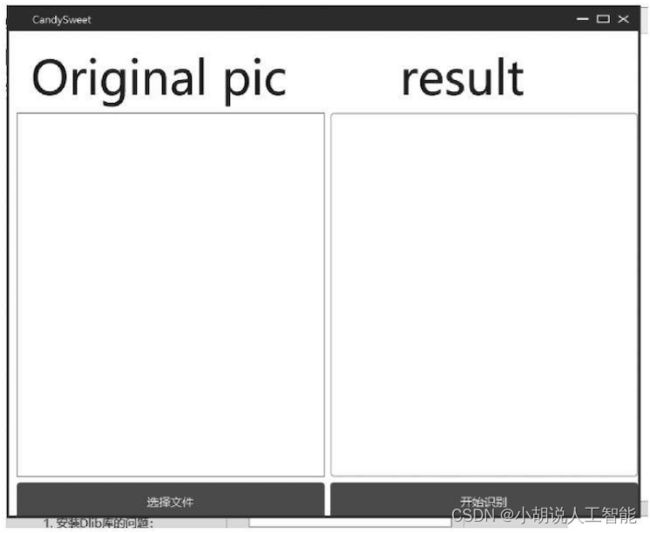
未进行操作时的图形化界面如图所示。
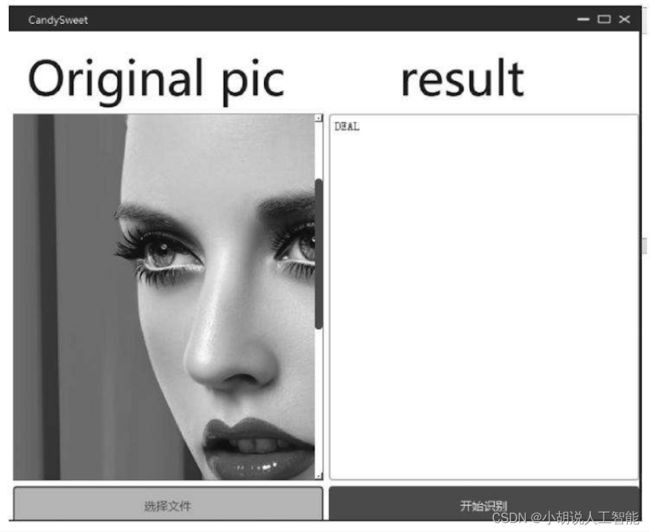
运行程序,当输入一张合规的照片,即输入一张有且只有一个可识别面孔时,右侧文本框中显示的DEAL,如图所示。
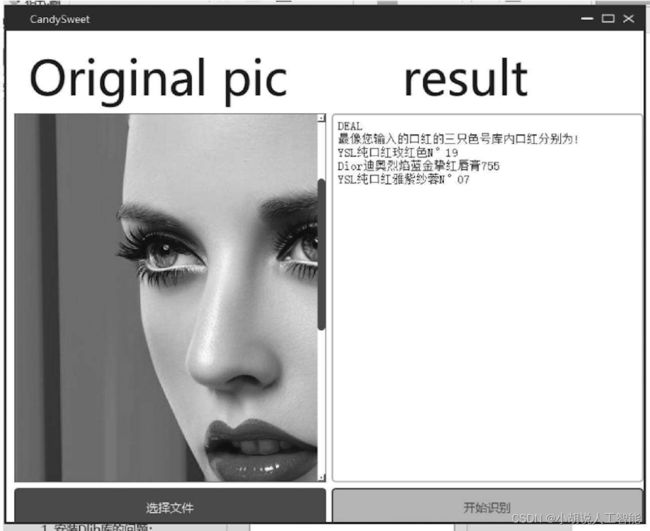
单击“开始识别”,输出的对应色号如图所示。
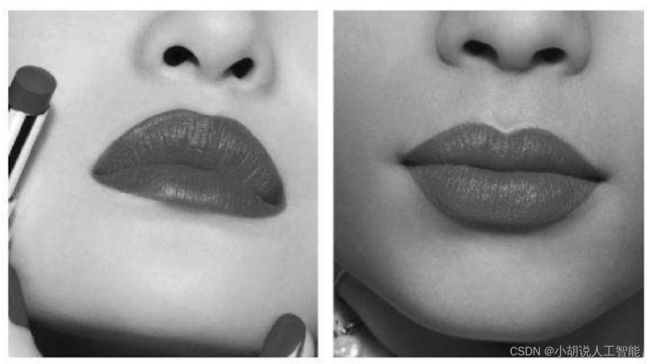
对比得到的色号和官网试色图,如图所示。
若不符合输入照片要求会出现错误提示,单击“开始识别”后会弹出不可识别的提示,如下两图所示。
工程源代码下载
详见本人博客资源下载页
其它资料下载
如果大家想继续了解人工智能相关学习路线和知识体系,欢迎大家翻阅我的另外一篇博客《重磅 | 完备的人工智能AI 学习——基础知识学习路线,所有资料免关注免套路直接网盘下载》
这篇博客参考了Github知名开源平台,AI技术平台以及相关领域专家:Datawhale,ApacheCN,AI有道和黄海广博士等约有近100G相关资料,希望能帮助到所有小伙伴们。
