python-2-pip配置国内镜像加速和pip异常解决
1 镜像加速
1.1 Linux中配置pip加速
(1)创建文件
cd
mkdir .pip
vi .pip/pip.conf
(2)文件pip.conf中的内容
[global]
index-url = https://pypi.tuna.tsinghua.edu.cn/simple
[install]
trusted-host = pypi.tuna.tsinghua.edu.cn
常用的源
1 豆瓣(douban) https://pypi.douban.com/simple
2 清华大学 https://pypi.tuna.tsinghua.edu.cn/simple
3 阿里云 https://mirrors.aliyun.com/pypi/simple
4 中国科技大学 https://pypi.mirrors.ustc.edu.cn/simple
(3)使用
#python3 -m pip install apache-flink
或
#pip3 install apache-flink
(4)阿里的加速器
[global]
index-url = https://mirrors.aliyun.com/pypi/simple/
[install]
trusted-host=mirrors.aliyun.com
1.2 Python更新所有已安装包
#pip list 可以查询所有已安装的包和版本
#pip list --outdated --format=columns获得已安装的包当前版本和最新版本
(1)单独安装
该方法的缺点是包需要一个一个更新
#pip install -U xxxx (xxxx指包的名称)
(2)批量安装方式:pip-review函数
#pip install pip-review
#pip-review --local --interactive
2 异常
2.1 Microsoft Visual C++ 14.0 is required
(1)error: Microsoft Visual C++ 14.0 is required. Get it with "Build Tools for Visual Studi解决方案。
![]() 升级pip和tools都没法解决,安装Microsoft Visual C++又太大,可以通过本地安装的方式来解决。
升级pip和tools都没法解决,安装Microsoft Visual C++又太大,可以通过本地安装的方式来解决。
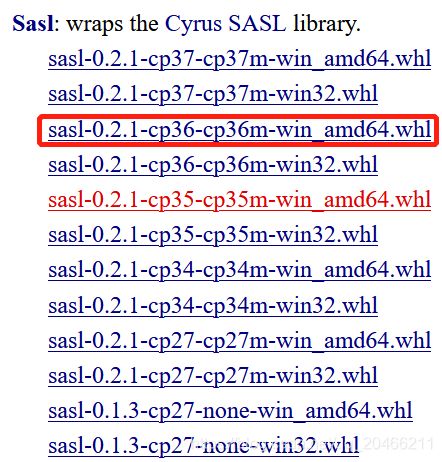
【下载链接】https://www.lfd.uci.edu/~gohlke/pythonlibs/。
 Ctrl + f 搜索需要的模块,例如sasl。

CMD>pip install sasl-0.2.1-cp36-cp36m-win_amd64.whl
2.2 PACKAGES DO NOT MATCH THE HASHES
THESE PACKAGES DO NOT MATCH THE HASHES FROM THE REQUIREMENTS
临时使用
pip install -i https://pypi.tuna.tsinghua.edu.cn/simple some-package
注意,simple 不能少, 是 https 而不是 http。

pip install --upgrade --default-timeout=100000 numpy -i https://pypi.tuna.tsinghua.edu.cn/simple
2.3 not a trusted or secure host
现在最新的pip要求源必须是https的,不然会报错:
WARNING: The repository located at mirrors.aliyun.com is not a trusted or secure host and is being ignored. If this repository is available via HTTPS we recommend you use HTTPS instead, otherwise you may silence this warning and allow it anyway with ‘–trusted-host mirrors.aliyun.com’.
解决方式一:
添加信任
CMD>pip list  --outdated --format=columns --trusted-host mirrors.aliyun.com
解决方式二:
配置pip加速信息。
2.4 ssl module in Python is not available
报错:
pip is configured with locations that require TLS/SSL, however the ssl module in Python is not available.
Can’t connect to HTTPS URL because the SSL module is not available.
分析:openSSL是系统自带的,所以一定是安装了的。
#rpm -aq|grep openssl

进入python3。
 进入python2。
 这说明openssl已经安装了,只是python2可以调用,新安装的python3却不能调用。
查阅资料发现,在./configure过程中,如果没有加上- -with-ssl参数时,默认安装的软件涉及到ssl的功能不可用,刚好pip3过程需要ssl模块,而由于没有指定,所以该功能不可用。
解决办法是重新对python3.6进行编译安装。
tar -xzvf Python-3.6.6.tgz -C /tmp
cd /tmp/Python-3.6.6/
./configure --with-ssl --prefix=/usr/local
make
make install
rm -rf /tmp/Python-3.6.6
报异常python3.6.6,unrecognized options: --with-ssl。
查看./configure --help确实没有这个选项。
2.5 unrecognized options: --with-ssl
报异常版本python3.6.6,unrecognized options: --with-ssl。
解决办法:vi Moudel/Setup 找到如下内容。
 然后再次执行编译./configure prefix=/usr/local
就不用再添加–with-ssl参数了。
重新编译后就可以有ssl的功能了。
3 安装pip
3.1 centos安装pip
#python -V【2.7.5】
安装工具包路径/usr/lib/python2.7/site-packages/。
#yum -y install epel-release
#yum -y install python-pip
#pip --version【8.1.2】
#pip --version
3.2 ununtu安装pip
sudo apt install python3-pip
pip install --upgrade pip升级pip的版本
3.3 windows中配置pip加速
(1)windows直接安装的python里的pip。
在对应目录(当前用户下创建pip文件夹)下新建文件:pip.ini。
C:\Users\user\pip\pip.ini
(2)Anaconda安装的envs中的python里的pip。
对应的配置文件pip.ini的目录
C:\Users\user\AppData\Roaming\pip\pip.ini
(3)配置源
清华
[global]
index-url = https://pypi.tuna.tsinghua.edu.cn/simple
trusted-host = pypi.tuna.tsinghua.edu.cn
阿里云
[global]
index-url = https://mirrors.aliyun.com/pypi/simple
trusted-host = mirrors.aliyun.com
3.4 pip和pip3的区别
其实pip和pip3这两个命令的效果是一样的。
(1)只是当一台电脑同时有多个版本的python的时候,用pip3就可以自动识别出用python3来安装库,避免和python2发生冲突。
pip install numpy
新安装的库放在这个目录中python2.7/site-packages

pip3 install numpy
新安装的库放在这个目录中python3.6/site-packages
(2)如果你的电脑只安装了python3,那么不管用pip还是pip3都是一样的。

4 pip download只下载不安装
将所需的包写入requirement.txt。
numpy
pandas
scipy
PyWavelets==1.1.1
如果还需要其他的包可以依次写,注意一定要写清楚自己所需的版本号避免使用的时候出错。
例如:想将包放在/home/packs目录下
那么就在命令行窗口输入:pip download -d /home/packs -r requirement.txt
注意:服务器环境一般都为linux 环境,所以我们下载所需包的时候最好使用自己的虚拟机或其他相同的环境来进行下载。
#pip3 download -d ./ PyWavelets==1.1.1
#pip3 download -d ./ scipy
#pip3 download -d ./ pandas