安全框架SpringSecurity实战总结(一)
1、SpringSecurity简介
1.1、安全框架概述
- 什么是安全框架?
解决系统安全问题的框架。如果没有安全框架,我们需要手动处理每个资源的访问控制,非常麻烦。使用安全框架,我们可以通过配置的方式实现对资源的访问限制.
1.2、常用安全框架
- Spring Security
Spring家族的一员,是一个高度自定义的安全框架,是一个能够为基于Spring的企业应用系统提供声明式的安全访问控制解决方案的安全框架。它提供了一组可以在Sprin- g应用上下文中配置的Bean,充分利用了 Spring IoC , DI(控制反转Inversion of Control,DI:Dependency Injection 依赖注入) 和 AOP(面向切面编程) 功能,为应用系统提供声明式的安全访问控制功能,减少了为企业系统安全控制编写大量重复代码的工作。
使用 SpringSecruity 的原因有很多,但大部分都是发现了 javaEE的 Servlet 规范或 EJB 规范中的安全功能缺乏典型企业应用场景。同时认识到他们在 WAR 或 EAR 级别无法移植。因此如果你更换服务器环境,还有大量工作去重新配置你的应用程序。使用 Spring Security解决了这些问题,也为你提供许多其他有用的、可定制的安全功能。正如你可能知道的两个应用程序的两个主要区域是**“认证”和“授权”(或者访问控制)。这两点也是 Spring Security 重要核心功能。“认证”,是建立一个他声明的主体的过程(一个“主体”一般是指用户,设备或一些可以在你的应用程序中执行动作的其他系统),通俗点说就是系统认为用户是否能登录**。“授权”指确定一个主体是否允许在你的应用程序执行一个动作的过程。通俗点讲就是系统判断用户是否有权限去做某些事情。 - Apache Shiro
一个功能强大且易于使用的Java安全框架,提供了认证,授权,加密,和会话管理。
2、SpringSecurity项目搭建
接下来我详细总结下关于SpringSecurity的实战操作:
- 1) 导入依赖:
  <parent>
        <groupId>org.springframework.boot</groupId>
        <artifactId>spring-boot-starter-parent</artifactId>
        <version>2.2.2.RELEASE</version>
        <relativePath/> <!-- lookup parent from repository -->
    </parent>
 <properties>
        <java.version>1.8</java.version>
    </properties>
    <dependencies>
        <dependency>
            <groupId>org.springframework.boot</groupId>
            <artifactId>spring-boot-starter-security</artifactId>
        </dependency>
        <dependency>
            <groupId>org.springframework.boot</groupId>
            <artifactId>spring-boot-starter-web</artifactId>
        </dependency>
        <dependency>
            <groupId>org.springframework.session</groupId>
            <artifactId>spring-session-core</artifactId>
        </dependency>

        <dependency>
            <groupId>org.springframework.boot</groupId>
            <artifactId>spring-boot-devtools</artifactId>
            <scope>runtime</scope>
            <optional>true</optional>
        </dependency>
        <dependency>
            <groupId>org.springframework.boot</groupId>
            <artifactId>spring-boot-configuration-processor</artifactId>
            <optional>true</optional>
        </dependency>
        <dependency>
            <groupId>org.projectlombok</groupId>
            <artifactId>lombok</artifactId>
            <optional>true</optional>
        </dependency>
        <dependency>
            <groupId>org.springframework.boot</groupId>
            <artifactId>spring-boot-starter-test</artifactId>
            <scope>test</scope>
        </dependency>
        <dependency>
            <groupId>org.springframework.security</groupId>
            <artifactId>spring-security-test</artifactId>
            <scope>test</scope>
        </dependency>
    </dependencies>

    <build>
        <plugins>
            <plugin>
                <groupId>org.springframework.boot</groupId>
                <artifactId>spring-boot-maven-plugin</artifactId>
                <configuration>
                    <excludes>
                        <exclude>
                            <groupId>org.projectlombok</groupId>
                            <artifactId>lombok</artifactId>
                        </exclude>
                    </excludes>
                </configuration>
            </plugin>
        </plugins>
    </build>
- 2)编写html页面
在resources/static目录下,创建login.html页面
DOCTYPE html>
<html lang="en">
<head>
    <meta charset="UTF-8">
    <title>Titletitle>
head>
<body>

<form action="/login" method="post">
    用户名:
    <input type="text" name="username"/><br/>
    密码:
    <input type="password" name="password"/><br/>
    <input type="submit" value="登录"/>
form>

body>
html>
- 3)访问页面
导入spring-boot-starter-security 启动器后,Spring Security 已经生效,默认拦截全部请求,如果用户没有登录,跳转到内置登录页面。
启动项目,发送请求:localhost:8080/login,结果如下:
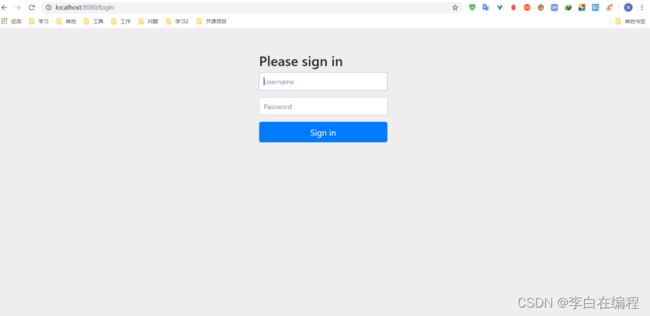
默认的username 为 user,password 打印在控制台中。在浏览器中输入账号和密码后会显示 login.html 页面内容。
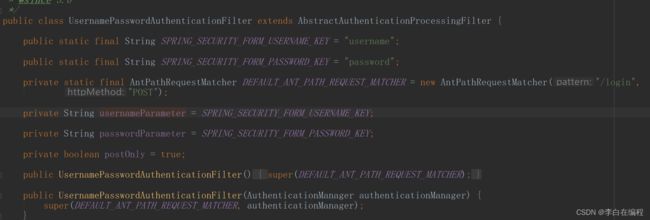
注意:登录表单的请求方式必须要求是POST方式,用户名的name属性 必须是"username",密码必须是"password",否则,发送的请求无法正确接收参数,因为在登录之前会经过一个拦截器链,UsernamePasswordAuthenticationFilter类做出了如上的规定,当然,也可以
实现WebSecurityConfigurerAdapter接口,重写configure方法来另外定义,后序会给出实现。
http.formLogin().usernameParameter("username123")
                .passwordParameter("root123")。
main.html
<div>
    <strong> 登录成功!strong>
div>
- 3)编写Controller
import org.springframework.stereotype.Controller;
import org.springframework.web.bind.annotation.RequestMapping;

@Controller
public class LoginController {

    @RequestMapping("/login")
    public String login(){
        return "redirect:main.html";
    }
}
- 4)主启动类
import org.springframework.boot.SpringApplication;
import org.springframework.boot.autoconfigure.SpringBootApplication;

@SpringBootApplication
public class Security01Application {

    public static void main(String[] args) {
        SpringApplication.run(Security01Application.class, args);
    }

}
- 5)测试
发送请求:http://localhost:8080/login,显示的页面经由SpringSecurity渲染过,添加过css样式(添加SpringSecurity组件,默认会拦截所有的请求,必须要完成登录操作,才能在后序请求到对应的地址)。
默认的用户名为user,密码会在项目启动后的控制台显示。


结果会报404异常,无法找到页面,应该发送请求:http://localhost:8080/login.html


如上图显示,无法访问页面是因为权限不足。后序会解决,由此,SpringSecurity入门项目的环境搭建完成。
3、UserDetailsService详解
当什么也没有配置的时候,账号和密码是由 Spring Security 定义生成的。而在实际项目中账号和密码都是从数据库中查询出来的。所以我们要通过自定义逻辑控制认证逻辑。如果需要自定义逻辑时,只需要实UserDetailsService 接口即可。接口定义如下:
3.1. 返回值
返回值 UserDetails 是一个接口,定义如下:
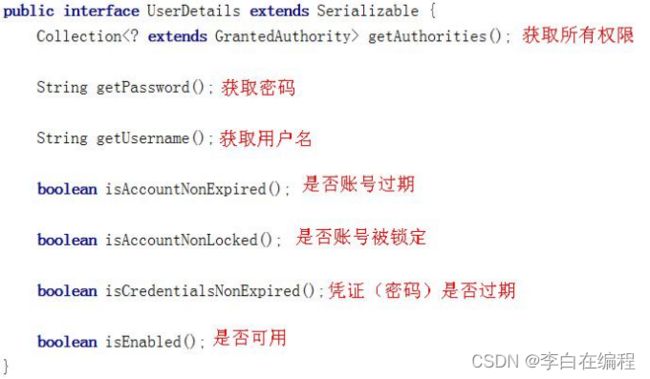
要想返回 UserDetails 的实例就只能返回接口的实现类。SpringSecurity 中提供了如下的实例。对于我们只需要使用里面的 User 类即可。注意 User 的全限定路径是:org.springframework.security.core.userdetails.User 此处经常和系统中自己开发的User 类弄混。 在 User 类中提供了很多方法和属性。

其中构造方法有两个,调用其中任何一个都可以实例化
UserDetails 实现类 User 类的实例。而三个参数的构造方法实际上也是调用 7 个参数的构造方法。
username :用户名
password :密码
authorities :用户具有的权限。此处不允许为 null

此处的用户名应该是客户端传递过来的用户名。而密码应该是从数据库中查询出来的密码。
Spring Security 会根据 User 中的 password 和客户端传递过来的 password 进行比较。如果相同则表示认证通过,如果不相同表示认证失败。
authorities 里面的权限对于后面学习授权是很有必要的,包含的所有内容为此用户具有的权限,如有里面没有包含某个权限,而在做某个事情时必须包含某个权限则会出现 403。通常都是通过 AuthorityUtils.commaSeparatedStringToAuthorityList(“”) 来创建
authorities 集合对象的。参数是一个字符串,多个权限使用逗号分隔。
3.2、方法参数
方法参数表示用户名。此值是客户端表单传递过来的数据。默认情况下必须叫 username ,否则无法接收。
4、PasswordEncoder密码解析器详解
Spring Security 要求容器中必须有 PasswordEncoder 实例。所以当自定义登录逻辑时要求必须给容器注入 PaswordEncoder 的bean对象。
4.1. 接口介绍
encode() :把参数按照特定的解析规则进行解析。
matches() :验证从存储中获取的编码密码与编码后提交的原始密码是否匹配。如果密码匹配,则返回 true;如果不匹配,则返回 false。第一个参数表示需要被解析的密码。第二个参数表示存储的密码。
upgradeEncoding() :如果解析的密码能够再次进行解析且达到更安全的结果则返回true,否则返回 false。默认返回 false。
4.2. 内置解析器介绍
在 Spring Security 中内置了很多解析器。
其中,BCryptPasswordEncoder 是 Spring Security 官方推荐的密码解析器,平时多使用这个解析器。BCryptPasswordEncoder 是对 bcrypt 强散列方法的具体实现。是基于Hash算法实现的单向加密。可以通过strength控制加密强度,默认为10。
5、登录逻辑编码实现
5.1、编写配置类SecurityConfig
package com.xyl.config;

import org.springframework.context.annotation.Bean;
import org.springframework.context.annotation.Configuration;
import org.springframework.security.config.annotation.web.builders.HttpSecurity;
import org.springframework.security.config.annotation.web.configuration.WebSecurityConfigurerAdapter;
import org.springframework.security.crypto.bcrypt.BCryptPasswordEncoder;
import org.springframework.security.crypto.password.PasswordEncoder;

@Configuration
public class SecurityConfig extends WebSecurityConfigurerAdapter {

    @Bean
    public PasswordEncoder pwd(){
        return new BCryptPasswordEncoder();
    }

// 注意: configure方法中的参数http 需要是HttpSecurity
    @Override
    protected void configure(HttpSecurity http) throws Exception {
        //  表单登录
        http.formLogin()
                // 自定义登录页面
                .loginPage("/login.html")
                // 自定义登录逻辑,login.html页面的请求发送过来,由下面的的登录逻辑接收,转而去执行 UserServiceImp实现类
                //  而与Controller中的login请求无关
                .loginProcessingUrl("/login")
                // 登录成功后 跳转页面,必须是POST请求
                .successForwardUrl("/toMain");
       // 授权
        http.authorizeRequests()
                // 放行登录请求,如果不放行,就会出现重定向次数的过多的情况(会一直重定向到login.html)
                .antMatchers("/login.html").permitAll()
                // 让所有请求被认证(登录)之后  才可以访问
                .anyRequest().authenticated();

        // csrf: 可以理解为防火墙,现 关闭 csrf
        http.csrf().disable();
    }
}
5.2、自定义登录逻辑
在Spring Security中,实现UserDetailService接口,在实现类中为用户详情服务,编写用户认证逻辑。
import org.springframework.beans.factory.annotation.Autowired;
import org.springframework.security.core.authority.AuthorityUtils;
import org.springframework.security.core.userdetails.User;
import org.springframework.security.core.userdetails.UserDetails;
import org.springframework.security.core.userdetails.UserDetailsService;
import org.springframework.security.core.userdetails.UsernameNotFoundException;
import org.springframework.security.crypto.password.PasswordEncoder;
import org.springframework.stereotype.Service;

@Service
public class UserServiceImp implements UserDetailsService {

    @Autowired
    private PasswordEncoder passwordEncoder;
    @Override
    public UserDetails loadUserByUsername(String username) throws UsernameNotFoundException {

         //  1、模拟根据username 查询数据库
        if (!"admini".equals(username)){
            throw new UsernameNotFoundException("用户名或密码错误!");
        }
        // 2、根据查询到的对象 比对 密码
        String password = passwordEncoder.encode("123456");


        return new User("admini",password,
                AuthorityUtils.commaSeparatedStringToAuthorityList("admini"));
        //  commaSeparatedStringToAuthorityList方法: 将字符串分割,转化为权限列表,默认是用 逗号 作为分隔符
    }
}
在LoginController中添加请求:
  @RequestMapping("/toMain")
    public String toMain(){
        return "redirect:main.html";
    }
6、访问控制url匹配
前面总结了认证中所有常用配置,主要是对 http.formLogin() 进行操作。而在配置类中http.authorizeRequests() 主要是对url进行控制,也就是我们所说的授权(访问控制)。
http.authorizeRequests() 也支持连缀写法,总体公式为:
url 匹配规则.权限控制方法
通过上面的公式可以有很多 url 匹配规则和很多权限控制方法。这些内容进行各种组合就形成了Spring Security中的授权。
在所有匹配规则中取所有规则的交集。配置顺序影响了之后授权效果,越是具体的应该放在前面,越是笼统的应该放到后面。
6.1、anyRequest()
在之前认证过程中我们就已经使用过 anyRequest(),表示匹配所有的请求。一般情况下此方法都会使用,设置全部内容都需要进行认证(在authenticated方法之前可以放行请求的操作)。
http.authorizeRequests().anyRequest().authenticated();
6.2、antMatcher()
方法定义如下,参数是不定向参数,每个参数是一个 ant 表达式,用于匹配 URL规则。规则如下:
  ? : 匹配一个字符
  * : 匹配 0 个或多个字符
 ** : 匹配 0 个或多个目录
在实际项目中经常需要放行所有静态资源,下面演示放行 js 文件夹下所有脚本文件。
http.authorizeRequests().antMatchers("/js/**","/css/**").permitAll();
还有一种配置方式是只要是.js 文件都放行
http.authorizeRequests().antMatchers("/**/*.js").permitAll();


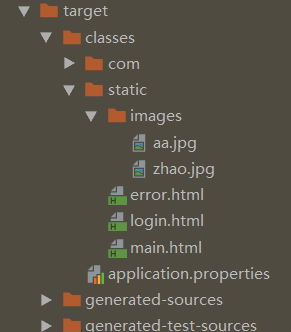
注意:初次导入静态资源(HTML、CSS、JS、图片,静态资源是不需要查数据库也不需要程序处理,直接就能够显示的资源)时,需要清空之前启动项目时所产生的缓存(即需要保证target下对应的目录中需要有对应的静态资源)。
6.3、regexMatchers()
- 使用正则表达式进行匹配,和 antMatchers() 主要的区别就是参数有所不同,antMatchers() 参数是 ant 表达式, regexMatchers() 参数是正则表达式。
以.jpg结尾的资源都被放行 代码:
http.authorizeRequests().regexMatchers( ".+[.]jpg").permitAll();
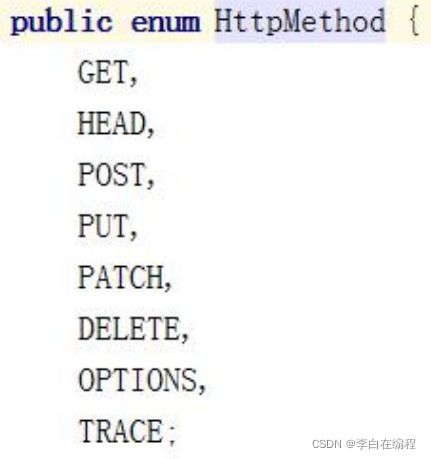
- 无论是 antMatchers() 还是 regexMatchers() 都具有两个参数的方法,其中第一个参数都是HttpMethod ,表示请求方式,当设置了 HttpMethod 后表示只有设定的特定的请求方式才执行对应的权限设置。
枚举类型 HttpMethod 内置属性如下:
7、角色权限判断
- 除了之前讲解的内置权限控制。Spring Security 中还支持很多其他权限控制。这些方法一般都用于用户已经被认证后,判断用户是否具有特定的要求。
1)hasAuthority和hasAnyAuthority
- hasAuthority(String)
判断用户是否具有特定的权限,用户的权限是在自定义登录逻辑中创建 User 对象时指定的。下图中 admin和normal 就是用户的权限。admin和normal 严格区分大小写。

在配置类中通过 hasAuthority(“admini,xyl”)设置具有 admini,xyl 权限时才能访问 main.html。
   http.authorizeRequests()
            .antMatchers("/main.html").hasAuthority("admini,xyl")
            .anyRequest().authenticated();
- hasAnyAuthority(String)
如果用户具备给定权限中某一个,就允许访问。
下面代码中由于大小写和用户的权限不相同,所以用户无权访问
http.authorizeRequests()
    .antMatchers("/main1.html").hasAnyAuthority("adMin","admiN");
2) hasRole和hasAnyRole
- hasRole(String)
如果用户具备给定角色就允许访问,否则出现 403。
参数取值来源于自定义登录逻辑 UserDetailsService 的实现类UserServiceImp 创建 User 对象时,给 User 赋予的授权。
在给用户赋予角色时角色需要以: ROLE_开头 ,后面添加角色名称。例如:ROLE_abc,其中,abc 是角色名,ROLE_是固定的字符开头。
使用 hasRole()时参数也只写 abc 即可。否则启动报错。
给用户赋予角色:
 return new User("admini",password,
                AuthorityUtils.commaSeparatedStringToAuthorityList("admini,xyl,user1,
                ROLE_aaa,ROLE_bbb"));
在配置类SecurityConfig的configure方法中,hasAuthority中 只写入 'aaa’或’bbb’即可:
http.authorizeRequests().antMatchers("/main.html").hasAnyRole("bbb");
- hasAnyRole(String)
如果用户具备给定角色的任意一个,就允许被访问
3) hasIpAddress(String)
如果请求是指定的 IP 就运行访问。
可以通过 request.getRemoteAddr() 获取 ip 地址。
需要注意的是在本机进行测试时 localhost 和 127.0.0.1 输出的 ip地址是不一样的。
当浏览器中通过 localhost 进行访问时控制台打印的内容:
![]()
当浏览器中通过 127.0.0.1 访问时控制台打印的内容:

当浏览器中通过具体 ip 进行访问时控制台打印内容:

http.authorizeRequests().antMatchers("/main1.html").hasIpAddress("127.0.0.1");
8、自定义403方案
使用 Spring Security 时经常会看见 403(无权限),默认情况下显示的效果如下:
而在实际项目中可能都是一个异步请求,显示上述效果对于用户就不是特别友好。Spring Security 支持自定义权限受限。
- 创建AccessDeniedHandler 接口的实现类
import org.springframework.security.access.AccessDeniedException;
import org.springframework.security.web.access.AccessDeniedHandler;
import org.springframework.stereotype.Component;

import javax.servlet.ServletException;
import javax.servlet.http.HttpServletRequest;
import javax.servlet.http.HttpServletResponse;
import java.io.IOException;
import java.io.PrintWriter;

@Component
public class MyAccessDeniedHandler implements AccessDeniedHandler {
    @Override
    public void handle(HttpServletRequest request, HttpServletResponse response, AccessDeniedException accessDeniedException) throws IOException, ServletException {
        response.setStatus(HttpServletResponse.SC_FORBIDDEN);
        response.setContentType("application/json;charset=utf-8");
        PrintWriter writer = response.getWriter();
        writer.write("{\"status\":\"403\",\"msg\":\"权限不够\",\"请联系管理员\"}");
        writer.flush();
        writer.close();

    }
}
- 配置类中重点添加异常处理器。
设置访问受限后交给哪个对象进行处理。myAccessDeniedHandler 是在配置类中进行自动注入的。
//  异常处理
http.exceptionHandling()
    .accessDeniedHandler(accessDeniedHandler);
9、基于表达式的访问控制
9.1、使用access()方法
前面介绍的登录用户权限判断实际上底层实现都是调用access(表达式)。

可以通过 access() 实现和之前学习的权限控制完成相同的功能。
以 hasRole 和 和 permitAll 为例:

9.2、使用自定义方法
虽然这里面已经包含了很多的表达式(方法),但是在实际项目中很有可能出现需要自己自定义逻辑的情况,判断登录用户是否具有访问当前 URL 权限。
1) 创建接口及实现类
 public interface MyService {
    boolean hasPermission(HttpServletRequest request, Authentication authentication);
}
 import org.springframework.security.core.Authentication;
import org.springframework.security.core.GrantedAuthority;
import org.springframework.security.core.authority.SimpleGrantedAuthority;
import org.springframework.security.core.userdetails.UserDetails;
import org.springframework.stereotype.Component;

import javax.servlet.http.HttpServletRequest;
import java.util.Collection;

@Component
public class MyServiceImpl implements MyService {
    @Override
    public boolean hasPermission(HttpServletRequest request, Authentication authentication) {

        String requestURI = request.getRequestURI();
        Object obj = authentication.getPrincipal();   // obj是当前登录的用户对象
        if (obj instanceof UserDetails){  //  判断登录的用户是否 属于UserDetails
            UserDetails userDetails = (UserDetails) obj;

            Collection<? extends GrantedAuthority> authorities = userDetails.getAuthorities();
            //  判断用户权限列表 是否有访问的 url
            return authorities.contains(new SimpleGrantedAuthority(requestURI));
        }
        return false;
    }
}
2)修改配置类
在 access 中通过@bean的id名.方法(参数)的形式进行调用配置类中修改如下:
  // 不需要认证才可以访问,而是根据当前访问的URL 去判断 对应的用户 是否拥有该权限,有权限,则可以访问,否则,不能访问
http.authorizeRequests().antMatchers("/main.html")
.hasAuthority("admini,xyl").anyRequest()
.access("@myServiceImpl.hasPermission(request,authentication)");
10、基于注解的访问控制
在 Spring Security 中提供了一些访问控制的注解,这些注解都默认是都不可用的,需要通过@EnableGlobalMethodSecurity进行开启后使用。如果设置的条件允许,程序正常执行。如果不允许会报 500:
![]()
这些注解可以写到 Service 接口或方法上,也可以写到 Controller或Controller 的方法上。通常情况下都是写在控制器方法上的,控制接口URL是否允许被访问。
1)@Secured
@Secured 是专门用于判断是否具有角色的,能写在方法或类上。参数要以 ROLE_开头。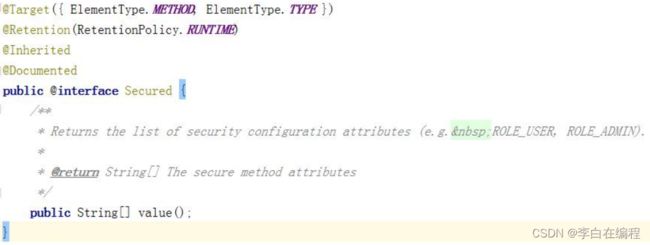
在主启动类上添加注解:@EnableGlobalMethodSecurity(securedEnabled = true)
@Controller
public class LoginController {
    // 其他代码略

    @RequestMapping("/toMain")
    //  @Secured中的value必须以 ROLE开头,区分大小写(即 ROLE_Aaa不同于ROLE_aaa  )
    @Secured("ROLE_aaa")
    public String toMain(){
        return "redirect:main.html";
    }
  }
- hasAnyRole方法不同于@Secured注解的实现,hasAnyRole方法中的参数为
ROLE_后面的后缀。
// 不需要认证才可以访问,而是根据当前访问的URL 去判断 对应的用户 是否拥有该权限,有权限,则可以访问,否则,不能访问
http.authorizeRequests().antMatchers("/error.html")
.hasAnyRole("aaa")
.anyRequest().authenticated();
2)@PreAuthorize/@PostAuthorize
@PreAuthorize 和@PostAuthorize 都是方法或类级别注解。
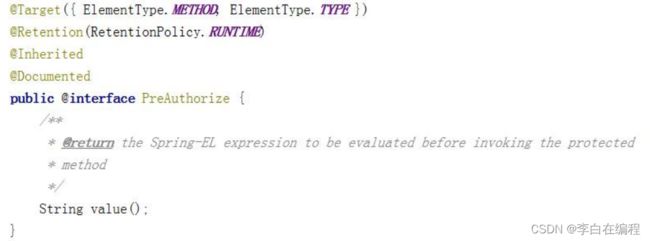
@PreAuthorize :表示访问方法或类在执行之前先判断权限,大多情况下都是使用这个注解,注解的参数和access()方法参数取值相同,都是权限表达式。
@PostAuthorize :表示方法或类执行结束后判断权限,此注解很少被使用到。
@RequestMapping("/toMain")
// @Secured("ROLE_aaa")
   @PreAuthorize("hasRole('ROLE_aaa')")
   public String toMain(){
       return "redirect:main.html";
   }
11、RememberMe功能实现
Spring Security 中 Remember Me 为"记住我"功能,用户只需要在登录时添加 remember me复选框,取值为true。Spring Security 会自动把用户信息存储到数据源中,以后就可以不登录进行访问。
1) 添加依赖
Spring Security 实 现 Remember Me 功能时,底层实现依赖Spring-JDBC,所以需要导入Spring-JDBC。以后多使用 MyBatis 框架而很少直接导入 spring-jdbc,所以此处导入 mybatis启动器,同时还需要添加 MySQL 驱动。
<!-- mybatis 依赖 -->
<dependency>
     <groupId>org.mybatis.spring.boot</groupId>
     <artifactId>mybatis-spring-boot-starter</artifactId>
     <version>2.1.1</version>
 </dependency>
 <!-- mysql 数据库依赖 -->
<dependency>
   <groupId>mysql</groupId>
   <artifactId>mysql-connector-java</artifactId>
   <version>8.0.21</version>
</dependency>
2)配置数据源
在 application.properties 中配置数据源。请确保数据库中已经存在shop数据库:
spring.datasource.driver-class-name= com.mysql.cj.jdbc.Driver
spring.datasource.url= jdbc:mysql://localhost:3306/security?useUnicode=true&characterEncoding=UTF-8&
serverTimezone=Asia/Shanghai
spring.datasource.username=root
spring.datasource.password=123456
3)修改SecurityConfig配置类
     @Autowired
    private UserServiceImp userServiceImp;

    // application.properties配置文件中已经配置了关于数据源的相关 配置
    @Autowired
    private DataSource dataSource;

    @Autowired
    private PersistentTokenRepository tokenRepository;  // 注入持久层对象

   @Bean
    public PersistentTokenRepository getPersistentTokenRepository(){
        JdbcTokenRepositoryImpl jdbcTokenRepository = new JdbcTokenRepositoryImpl();
        jdbcTokenRepository.setDataSource(dataSource);

        // 参数为true时,在项目初次启动时,会自动创建数据表persistent_logins,后续启动项目时,当MySQL的security中有persistent_logins表时,应该注释掉setCreateTableOnStartup方法
        jdbcTokenRepository.setCreateTableOnStartup(true);
        return jdbcTokenRepository;
    }

    @Override
    protected void configure(HttpSecurity http) throws Exception {
        //  表单登录、 授权代码的代码 前面有,略

        // 记住我功能
        http.rememberMe()
                // 登录逻辑交给指定的对象
              .userDetailsService(userServiceImp)
                //  指定采用持久化的方式存储
              .tokenRepository(tokenRepository);

        //  异常处理       http.exceptionHandling().accessDeniedHandler(accessDeniedHandler);

        // csrf: 可以理解为防火墙,现 关闭 csrf
        http.csrf().disable();
    }
如果没有注释掉 jdbcTokenRepository.setCreateTableOnStartup(true);,且数据库中有persistent_logins表,就会报如下persistent_logins已存在的错误。

4)在客户端页面添加记住我复选框
<form action="/login" method="post">
    用户名:
    <input type="text" name="username"/><br/>
    密码:
    <input type="password" name="password"/><br/>
    记住我:
    <input type="checkbox" name="remember-me" value="true"/><br/>
    <input type="submit" value="登录" />
form>
5)测试
启动项目,发送请求:http://localhost:8080/login,用admini、123456登录,可成功来到主页面main.html,关闭浏览器,发送请求 http://localhost:8080/main.html,就可以直接来到主页,不需要再进行登录验证。

- 与此同时,数据库的persistent_logins 表生成了刚才登录验证的记录(persistent_logins表是项目启动时,SpringSecurity自动帮我们创建的)。

- 避坑指南:我一开始使用的spring启动器版本是2.6.1,遇到了如下错误,


错误信息显示是 Bean的循环引用问题,因为在2.6.0之后,SpringBoot 默认情况下完全禁止Bean的循环引用,详情请参考Spring Boot 2.6.0正式发布:默认禁止循环依赖、增强Docker镜像构建…,现在只需要降低下版本就好了。
6)记住我的有效时间
默认情况下,重启项目后登录状态失效了。但是可以通过设置状态有效时间,即使项目重新启动下次也可以正常登录。
http.rememberMe()
 //失效时间,单位秒
  .tokenValiditySeconds(120)
  //登录逻辑交给哪个对象
  .userDetailsService(userService)
  .tokenRepository(persistentTokenRepository);
12、Thymeleaf在SpringSecurity中的使用
- Spring Security 可以在一些视图技术中进行控制显示效果。例如: JSP 或 Thymeleaf 。在非前后端分离且使用 Spring Boot 的项目中多使用 Thymeleaf 作为视图展示技术。
- Thymeleaf 对 Spring Security 的 支 持 都 放 在 thymeleaf-extras-springsecurityX 中,目前最新版本为 5。所以需要在项目中添加此 jar 包的依赖和 thymeleaf 的依赖。
12.1、导入依赖
        <dependency>
            <groupId>org.thymeleaf.extrasgroupId>
            <artifactId>thymeleaf-extras-springsecurity5artifactId>
        dependency>

        <dependency>
            <groupId>org.springframework.bootgroupId>
            <artifactId>spring-boot-starter-thymeleafartifactId>
        dependency>
在 html 页面中引入 thymeleaf 命名空间和 security 命名空间:
DOCTYPE html>
<html xmlns="http://www.w3.org/1999/xhtml"
      xmlns:sec="http://www.thymeleaf.org/thymeleaf-extras-springsecurity5">
12.2、获取属性
- 在html页面中通过 sec:authentication="" 获取
UsernamePasswordAuthenticationToken 中所有 getXXX 的内容,包含父类中的 getXXX 的内容。 - 根据源码得出下面属性:
name :登录账号名称
principal :登录主体,在自定义登录逻辑中是 UserDetails
credentials :凭证
authorities :权限和角色
details :实际上是 WebAuthenticationDetails 的实例。可以获取 remoteAddress (客
户端 ip)和 sessionId (当前 sessionId)
12.3、创建页面demo.html
在项目的resources目录 中新建 templates 文件夹,在 templates 中新建demo.html 页面。
DOCTYPE html>
<html xmlns="http://www.w3.org/1999/xhtml"
      xmlns:sec="http://www.thymeleaf.org/thymeleaf-extras- springsecurity5">
<head>
    <meta charset="UTF-8">
    <title>Titletitle>
head>
<body>
登录账号:
<span sec:authentication="name">span><br/>
登录账号:<span sec:authentication="principal.username">span><br/>
凭证:<span sec:authentication="credentials">span><br/>
权限和角色:<span sec:authentication="authorities">span><br/>
客户端地址:<span sec:authentication="details.remoteAddress">span> <br/>
sessionId:<span sec:authentication="details.sessionId">span><br/>
body>
html>
- 启动项目,发送请求:http://localhost:8080/demo.html,其结果是 404异常,其原因是 templates中的静态html页面需要经过控制器跳转才能成功访问。
import org.springframework.security.access.prepost.PreAuthorize;
import org.springframework.stereotype.Controller;
import org.springframework.web.bind.annotation.RequestMapping;

@Controller
public class LoginController {

    @RequestMapping("/demo")
    public String toDemo(){
        return "demo";
    }
}
12.4、权限判断
1)设置用户角色和权限
设定用户具有 admini,/insert,/delete 权限 ROLE_abc 角色。
import org.springframework.beans.factory.annotation.Autowired;
import org.springframework.security.core.authority.AuthorityUtils;
import org.springframework.security.core.userdetails.User;
import org.springframework.security.core.userdetails.UserDetails;
import org.springframework.security.core.userdetails.UserDetailsService;
import org.springframework.security.core.userdetails.UsernameNotFoundException;
import org.springframework.security.crypto.password.PasswordEncoder;
import org.springframework.stereotype.Service;

@Service
public class UserServiceImp implements UserDetailsService {

    @Autowired
    private PasswordEncoder passwordEncoder;
    @Override
    public UserDetails loadUserByUsername(String username) throws UsernameNotFoundException {

        System.out.println("执行自定义登录逻辑");

         //  1、模拟根据username 查询数据库
        if (!"admini".equals(username)){
            throw new UsernameNotFoundException("用户名或密码错误!");
        }
        // 2、根据查询到的对象 比对 密码
        String password = passwordEncoder.encode("123456");


         return new User("admini",password,
                AuthorityUtils.commaSeparatedStringToAuthorityList("admini,xyl,user1,ROLE_aaa,ROLE_bbb,ROLE_ccc,
                ROLE_abc,/insert,/delete"));
        //  commaSeparatedStringToAuthorityList方法: 将字符串分割,转化为权限列表,默认是用 逗号 作为分隔符
    }
}
2) 控制页面显示效果
在页面中根据用户权限和角色判断页面中显示的内容
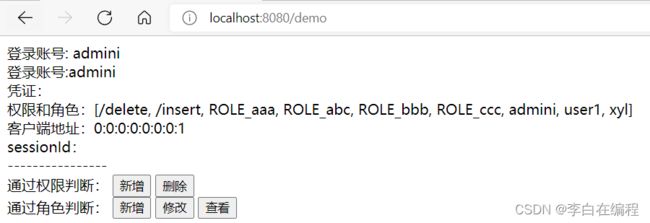
通过权限判断:
<button sec:authorize="hasAuthority('/insert')">新增button>
<button sec:authorize="hasAuthority('/delete')">删除button>
<button sec:authorize="hasAuthority('/update')">修改button>
<button sec:authorize="hasAuthority('/select')">查看button>
<br/>
通过角色判断:
<button sec:authorize="hasRole('abc')">新增button>
<button sec:authorize="hasRole('abcd')">删除button>
<button sec:authorize="hasRole('abc')">修改button>
<button sec:authorize="hasRole('abc')">查看button>
标签中sec:authorize中角色role与AuthorityUtils.commaSeparatedStringToAuthorityList()方法中的ROLE_匹配,对应button标签才会显示在页面中。
12.5、退出登录
用户只需要向 Spring Security 项目中发送 /logout (SpringSecurity中已经设置了 /logout为退出登录的请求), 退出请求即可。
- 退出登录
在login.html页面中添加 /logout 的超链接即可。
<div>
    <strong> 登录成功!strong>
    <a href= "/main1.html">权限测试a>
    <br />
    <a href="/logout">退出登录a>
div>
登录成功后,点击退出登录的链接,页面会跳转到登录页面,此时,登录页的地址栏中 多了 ?logout 后缀。


- 如果不希望使用默认值,可以通过下面的方法进行修改(在SecurityConfig的configure方法中添加如下代码)。
 //  退出登录
 http.logout()
    // 退出登录的url
     .logoutUrl("/myLoginout")
     // 退出登录跳转的url
     .logoutSuccessUrl("/login.html");
同时,退出登录标签的 href 应该改为logoutUrl方法中的参数 /myLoginout。退出登录后的url后缀变为logoutSuccessUrl方法中的参数。

13、 SpringSecurity中的CSRF
在前面提到的SecurityConfig配置类中,一直都有关闭csrf防护的代码:http.csrf().disable();如果没有这行代码,将会导致用户无法被认证。
CSRF(Cross-site request forgery)跨站请求伪造,也被称为“OneClick Attack” 或者Session Riding。通过伪造用户请求访问受信任站点的非法请求访问。
跨域:只要网络协议,ip 地址,端口中任何一个不相同就是跨域请求。
客户端与服务进行交互时,由于 http 协议本身是无状态协议,所以引入了cookie进行记录客户端身份。**在cookie中会存放session id用来识别客户端身份的。**在跨域的情况下,session id可能被第三方恶意劫持,通过这个 session id 向服务端发起请求时,服务端会认为这个请求是合法的,可能会产生许多安全问题。
- 1)编写控制器方法
编写控制器方法,跳转到 templates 中 login.html 页面。
 @RequestMapping("/showLogin")
 public String showLogin(){
    return "login";
    }
- 2)新建login.html
DOCTYPE html>
<html xmlns="http://www.w3.org/1999/xhtml"
      xmlns:th="http://www.thymeleaf.org" >
<head>
    <meta charset="UTF-8">
    <title>Titletitle>
head>
<body>
<form action="/login" method="post">
    <input type="hidden" th:value="${_csrf.token}" name="_csrf" th:if="${_csrf}"/>
    用户名:<input type="text" name="username" /><br/>
    密码:<input type="password" name="password" /><br/>
    <input type="submit" value="登录" />
form>
body>
html>
- 3)修改配置类
//关闭csrf防护 //
 http.csrf().disable();
