人事管理系统
目录
- 1.项目介绍(后端)
- 2.搭建后端项目
-
- 2.1.数据库
- 2.2.插件安装
- 2.3.创建父工程
- 2.4.创建子项目
- 2.5.修改子项目pom文件
- 3.AutoGenerator
-
- 3.1.什么是AutoGenerator类呢?
- 3.2.创建一个AutoGenerator类
- 3.3.启动CodeGenerator
- 4.Kaptcha
1.项目介绍(后端)
整个项目我会分几篇博客发布,尽量保证整个流程的逻辑性和代码的正确性。有兴趣的同学可以跟着博客上的步骤一步一步敲,最后一定会有收获的,可适用于毕业设计。
本项目在技术方面采用最主流的前后端分离开发模式,后端使用业界最流行、社区非常活跃的开源框架Spring Boot来构建后端,旨在实现V人事在线办公系统。包括职位管理、职称管理、部门管理、员工管理、工资管理等模块。
2.搭建后端项目
在搭建项目之前还有准备工作需要做,第一个就是创建数据库;第二就是后面我们将使用lombok依赖,所以需要提前在IDEA中安装lombok插件。
2.1.数据库
需要使用到的表就这些,对应的sql文件我也会文末给出。
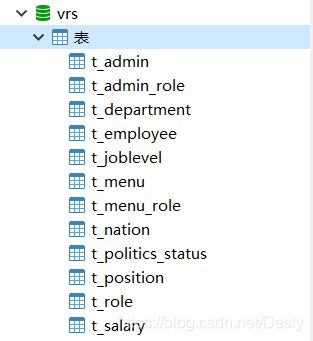
这里讲一下t_menu表格
表结构如图:

t_menu部分截图:

这里的url是和我们的控制层各个方法名上的@RequestMapping后面的路径一致。比如说在实现展示员工基本资料功能时,EmployeeController.java中的@RequestMapping(“/employee/basic”),过滤拦截就是依据数据库中路径前缀判断,所以在写接口的时候需要注意,后面使用到其他column的时候再进行介绍。
2.2.插件安装

2.2.1.找到Lombok插件,点击install即可。

2.3.创建父工程
安装完成后就可以创建我们的项目了。这次项目整体采用的一个Maven聚合的项目,所以首先会对应有一个父工程,父工程下面会有我们的子项目。
这里我们需要创建一个spring项目,需要注意的是,选择依赖的时候只需选择Spring Boot DevTools即可。后面我们需要什么依赖手动添加就行。
由于这个父工程只是用来做我们所有项目的pom依赖管理,所以将一些不必要的文件删除,只需留下pom.xml文件:

紧接着我们去修改pom.xml文件
修改前:
<groupId>com.ktgroupId>
    <artifactId>vrs-adminartifactId>
    <version>0.0.1-SNAPSHOTversion>
    <name>vrs-adminname>
<description>Demo project for Spring Bootdescription>
修改后:
<groupId>com.ktgroupId>
    <artifactId>vrs-adminartifactId>
    <version>0.0.1-SNAPSHOTversion>
    <packaging>pompackaging>
    <name>vrs-adminname>
<description>Demo project for Spring Bootdescription>
我们也可以将父工程中的dependencies以及build删除,后面不会使用到。
2.4.创建子项目

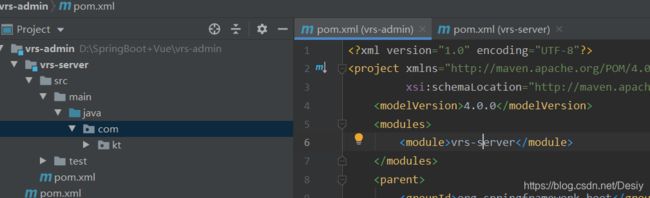
创建完成之后我们可以看到我们的父工程pom文件(成功与我们的子项目vrs-server联立),同理我们的子项目也与父工程联立。(别忘记生成我们的resources目录,并在其创建application.yml)
<modules>
    <module>vrs-servermodule>
modules>
application.yml
# 端口
server:
  port: 8081

spring:
  # 数据库配置
  datasource:
    username: root
    password: ******
    url: jdbc:mysql://localhost:3306/wrs?serverTimezone=Asia/Shanghai&useUnicode=true&characterEncoding=UTF-8
    driver-class-name: com.mysql.cj.jdbc.Driver
    hikari:
      # 连接池名
      pool-name: DateHikariCP
      # 最小空闲连接数
      minimum-idle: 5
      # 空闲连接存活最大时间,默认600000(10min)
      idle-timeout: 180000
      # 最大连接数,默认10
      maximum-pool-size: 10
      # 从连接池返回的连接的自动提交
      auto-commit: true
      # 连接最大存活时间,0代表永久存活,默认1800000(30min)
      max-lifetime: 1800000
      # 连接超时时间,默认30000(30s)
      connection-timeout: 30000
      # 测试连接是否可用的查询语句
      connection-test-query: SELECT 1
# Mybatis-plus
mybatis-plus:
  # 配置mybatis数据返回类型别名(默认别名是类名)
  type-aliases-package: com.kt.pojo
  # 配置mybatis映射文件
  mapper-locations: classpath*:/mapper/*Mapper.xml
  configuration:
    # 自动驼峰命名
    map-underscore-to-camel-case: false

# mybatis sql 打印(方法接口所在的包,不是Mapper.xml所在的包)
logging:
  level:
    com.kt.mapper: debug
2.5.修改子项目pom文件
<properties>
    <project.build.sourceEncoding>UTF-8project.build.sourceEncoding>
    <maven.compiler.source>1.8maven.compiler.source>
    <maven.compiler.target>1.8maven.compiler.target>
properties>
删除build和dependencies
重新添加依赖:
<dependency>
    <groupId>org.springframework.bootgroupId>
        <artifactId>spring-boot-starter-webartifactId>
    dependency>

    <dependency>
        <groupId>com.baomidougroupId>
        <artifactId>mybatis-plus-boot-starterartifactId>
        <version>3.3.2version>
    dependency>

    <dependency>
        <groupId>org.projectlombokgroupId>
        <artifactId>lombokartifactId>
        <optional>trueoptional>
    dependency>

    <dependency>
        <groupId>mysqlgroupId>
        <artifactId>mysql-connector-javaartifactId>
        <scope>runtimescope>
dependency>
目录结构:
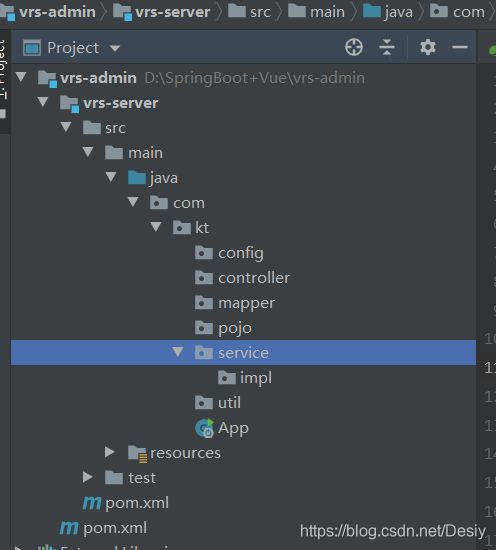
最后修改App.java,将他变成我们的spring启动类
@SpringBootApplication
@MapperScan("com.kt.mapper")
public class App {
    public static void main(String[] args) {
        SpringApplication.run(App.class, args);
    }
}
那么到这里我们的项目搭建就完成了,后续如果我们需要其他依赖,手动添加到vrs-server下的pom文件导入即可。
3.AutoGenerator
3.1.什么是AutoGenerator类呢?
Mybatis-Plus官网介绍AutoGenerator 是 MyBatis-Plus 的代码生成器,通过 AutoGenerator 可以快速生成 Entity、Mapper、Mapper XML、Service、Controller 等各个模块的代码,极大的提升了开发效率。
也就是说一旦我们数据库中表的数量很多的时候,那么对应需要写它的实体类、控制类、服务类以及服务实现类等等就显得非常麻烦,Mybatis-plus就帮我解决了这一难题。而且官方还给出了一个demo方便我们使用,接下来我们就我们的数据库结合AutoGenerator生成对应的代码模块。
3.2.创建一个AutoGenerator类
3.2.1.添加相关pom依赖
<dependency>
    <groupId>com.baomidougroupId>
    <artifactId>mybatis-plus-generatorartifactId>
    <version>3.3.2version>
dependency>

<dependency>
    <groupId>org.freemarkergroupId>
    <artifactId>freemarkerartifactId>
dependency>
3.2.2.CodeGenerator.java
import com.baomidou.mybatisplus.core.exceptions.MybatisPlusException;
import com.baomidou.mybatisplus.core.toolkit.StringPool;
import com.baomidou.mybatisplus.core.toolkit.StringUtils;
import com.baomidou.mybatisplus.generator.AutoGenerator;
import com.baomidou.mybatisplus.generator.InjectionConfig;
import com.baomidou.mybatisplus.generator.config.*;
import com.baomidou.mybatisplus.generator.config.po.TableInfo;
import com.baomidou.mybatisplus.generator.config.rules.NamingStrategy;
import com.baomidou.mybatisplus.generator.engine.FreemarkerTemplateEngine;

import java.util.ArrayList;
import java.util.List;
import java.util.Scanner;

/**
 * Description: 代码生成器
 * Created with IntelliJ IDEA.
 *
 * @author: KamTeng
 * Date: 2021/3/4
 */
public class CodeGenerator {

    /**
     *
     * 读取控制台内容
     *
     */
    public static String scanner(String tip) {
        Scanner scanner = new Scanner(System.in);
        StringBuilder help = new StringBuilder();
        help.append("请输入" + tip + ":");
        System.out.println(help.toString());
        if (scanner.hasNext()) {
            String ipt = scanner.next();
            if (StringUtils.isNotBlank(ipt)) {
                return ipt;
            }
        }
        throw new MybatisPlusException("请输入正确的" + tip + "!");
    }

    public static void main(String[] args) {
        // 代码生成器
        AutoGenerator mpg = new AutoGenerator();

        // 全局配置
        GlobalConfig gc = new GlobalConfig();
        String projectPath = System.getProperty("user.dir");
        gc.setOutputDir(projectPath + "/src/main/java");
        // 作者
        gc.setAuthor("KamTeng");
        // 打开输出目录
        gc.setOpen(false);
        // xml开启 BaseResultMap
        gc.setBaseResultMap(true);
        // xml开启BaseColumnList
        gc.setBaseColumnList(true);
        // 实体属性 Swagger2 注解
        gc.setSwagger2(true);
        mpg.setGlobalConfig(gc);

        // 数据源配置v
        DataSourceConfig dsc = new DataSourceConfig();
        dsc.setUrl("jdbc:mysql://localhost:3306/vrs?serverTimezone=UTC&useUnicode=true&characterEncoding=UTF-8");
        dsc.setDriverName("com.mysql.cj.jdbc.Driver");
        dsc.setUsername("root");
        dsc.setPassword("123456");
        mpg.setDataSource(dsc);

        // 包配置
        PackageConfig pc = new PackageConfig();
        pc.setParent("com.kt")
                .setEntity("pojo")
                .setMapper("mapper")
                .setService("service")
                .setServiceImpl("service.impl")
                .setController("controller");
        mpg.setPackageInfo(pc);

        // 自定义配置
        InjectionConfig cfg = new InjectionConfig() {
            @Override
            public void initMap() {
                // to do nothing
            }
        };

        // 如果模板引擎是 freemarker
        String templatePath = "/templates/mapper.xml.ftl";
        // 如果模板引擎是 velocity
        // String templatePath = "/templates/mapper.xml.vm";

        // 自定义输出配置
        List<FileOutConfig> focList = new ArrayList<>();
        // 自定义配置会被优先输出
        focList.add(new FileOutConfig(templatePath) {
            @Override
            public String outputFile(TableInfo tableInfo) {
                // 自定义输出文件名 , 如果你 Entity 设置了前后缀、此处注意 xml 的名称会跟着发生变化!!
                return projectPath + "/src/main/resources/mapper/" + pc.getModuleName()
                        + "/" + tableInfo.getEntityName() + "Mapper" + StringPool.DOT_XML;
            }
        });
        cfg.setFileOutConfigList(focList);
        mpg.setCfg(cfg);

        // 配置模板
        TemplateConfig templateConfig = new TemplateConfig();

        // 配置自定义输出模板
        //指定自定义模板路径,注意不要带上.ftl/.vm, 会根据使用的模板引擎自动识别
        // templateConfig.setEntity("templates/entity2.java");
        // templateConfig.setService();
        // templateConfig.setController();

        templateConfig.setXml(null);
        mpg.setTemplate(templateConfig);

        // 策略配置
        StrategyConfig strategy = new StrategyConfig();
        // 数据库表映射到实体的命名策略
        strategy.setNaming(NamingStrategy.underline_to_camel);
        // 数据库表字段映射到实体的命名策略
        strategy.setColumnNaming(NamingStrategy.no_change);
        // lombok模板
        strategy.setEntityLombokModel(true);
        // 生成@RestController 控制器
        strategy.setRestControllerStyle(true);
        strategy.setInclude(scanner("表名,多个英文逗号分割").split(","));
        strategy.setControllerMappingHyphenStyle(true);
        // 表前缀
        strategy.setTablePrefix("t_");
        mpg.setStrategy(strategy);
        mpg.setTemplateEngine(new FreemarkerTemplateEngine());
        mpg.execute();
    }

}
3.3.启动CodeGenerator
在控制台中输入表名,用英文逗号隔开,输完回车。

t_admin,t_admin_role,t_department,t_employee,t_joblevel,t_menu,t_menu_role,t_nation,t_politics_status,t_position,t_role,t_salary
他会在我们的父工程下生成一个src目录,我们所需要的代码就在其中,为什么会生成在父工程下呢?可在CodeGenerator类中修改生成路径。不用担心,我们只需要cut到我们的server项目中。

许多类会报错,是因为我们没有导入相关依赖,其中就是缺少Swagger的依赖。
添加依赖Swagger2依赖,默认的Swagger-UI不好看,所以我使用bootstrap提供的UI界面。
<dependency>
    <groupId>io.springfoxgroupId>
    <artifactId>springfox-swagger2artifactId>
    <version>2.9.2version>
dependency>

<dependency>
    <groupId>com.github.xiaoymingroupId>
    <artifactId>swagger-bootstrap-uiartifactId>
    <version>1.9.6version>
dependency>
报红消失
4.Kaptcha
导入依赖:
<dependency>
    <groupId>com.github.pengglegroupId>
    <artifactId>kaptchaartifactId>
    <version>2.3.2version>
dependency>
在config目录下创建CaptchaConfig配置类
CaptchaConfig.java
@Configuration
public class CaptchaConfig {

    @Bean
    public DefaultKaptcha defaultKaptcha() {
        //验证码生成器
        DefaultKaptcha defaultKaptcha = new DefaultKaptcha();
        //配置
        Properties properties = new Properties();
        //是否有边框
        properties.setProperty("kaptcha.border", "yes");
        //设置边框颜色
        properties.setProperty("kaptcha.border.color", "105,179,90");
        //边框粗细度,默认为1
        // properties.setProperty("kaptcha.border.thickness","1");
        //验证码
        properties.setProperty("kaptcha.session.key", "code");
        //验证码文本字符颜色 默认为黑色
        properties.setProperty("kaptcha.textproducer.font.color", "blue");
        //设置字体样式
        properties.setProperty("kaptcha.textproducer.font.names", "宋体,楷体,微软雅黑");
        //字体大小,默认40
        properties.setProperty("kaptcha.textproducer.font.size", "30");
        //验证码文本字符内容范围 默认为abced2345678gfynmnpwx
        // properties.setProperty("kaptcha.textproducer.char.string", "");
        //字符长度,默认为5
        properties.setProperty("kaptcha.textproducer.char.length", "4");
        //字符间距 默认为2
        properties.setProperty("kaptcha.textproducer.char.space", "4");
        //验证码图片宽度 默认为200
        properties.setProperty("kaptcha.image.width", "100");
        //验证码图片高度 默认为40
        properties.setProperty("kaptcha.image.height", "40");
        Config config = new Config(properties);
        defaultKaptcha.setConfig(config);
        return defaultKaptcha;
    }

}
验证码接口
CaptchaController.java
@RestController
public class CaptchaController {

    @Resource
    private DefaultKaptcha defaultKaptcha;

    @ApiOperation(value = "验证码")
    @GetMapping(value = "/captcha", produces = "image/jpeg")
    public void captcha(HttpServletRequest request, HttpServletResponse response) {
        // 定义response输出类型为image/jpeg类型
        response.setDateHeader("Expires", 0);
        // Set standard HTTP/1.1 no-cache headers.
        response.setHeader("Cache-Control", "no-store, no-cache, must-revalidate");
        // 设置IE扩展的HTTP / 1.1无缓存标头(使用addHeader)。
        response.addHeader("Cache-Control", "post-check=0, pre-check=0");
        // 设置标准的HTTP / 1.0无缓存标头。
        response.setHeader("Pragma", "no-cache");
        // 返回一张图片
        response.setContentType("image/jpeg");
        //-------------------生成验证码 begin --------------------------
        //获取验证码文本内容
        String text = defaultKaptcha.createText();
        System.out.println("验证码内容:" + text);
        //将验证码文本内容放入session
        request.getSession().setAttribute("captcha", text);
        //根据文本验证码内容创建图形验证码
        BufferedImage image = defaultKaptcha.createImage(text);
        ServletOutputStream outputStream = null;
        try {
            outputStream = response.getOutputStream();
            //输出流输出图片,格式为jpg
            ImageIO.write(image, "jpg", outputStream);
            outputStream.flush();
        } catch (IOException e) {
            e.printStackTrace();
        } finally {
            if (null != outputStream) {
                try {
                    outputStream.close();
                } catch (IOException e) {
                    e.printStackTrace();
                }
            }
        }
        //-------------------生成验证码 end --------------------------

    }
}
第一篇博客主要是初步搭建项目和创建数据库,下面我们开始写功能实现了,下一篇主要是实现登录功能:
Spring Security结合JWT实现登录功能
点击获取数据库SQL文件