卷积神经网络实现咖啡豆分类 - P7
- 本文为365天深度学习训练营 中的学习记录博客
- 原作者:K同学啊 | 接辅导、项目定制
- 文章来源:K同学的学习圈子
目录
- 环境
- 步骤
-
- 环境设置
-
- 包引用
- 全局设备对象
- 数据准备
-
- 查看图像的信息
- 制作数据集
- 模型设计
-
- 手动搭建的vgg16网络
- 精简后的咖啡豆识别网络
- 模型训练
-
- 编写训练函数
- 编写测试函数
- 开始训练
- 展示训练过程
- 模型效果展示
- 总结与心得体会
环境
- 系统: Linux
- 语言: Python3.8.10
- 深度学习框架: Pytorch2.0.0+cu118
- 显卡:A5000 24G
步骤
环境设置
包引用
import torch
import torch.nn as nn # 网络
import torch.optim as optim # 优化器
from torch.utils.data import DataLoader, random_split # 数据集划分
from torchvision import datasets, transforms # 数据集加载,转换

import pathlib, random, copy # 文件夹遍历,实现模型深拷贝
from PIL import Image # python自带的图像类
import matplotlib.pyplot as plt # 图表
import numpy as np
from torchinfo import summary # 打印模型参数
全局设备对象
方便将模型和数据统一拷贝到目标设备中
device = torch.device('cuda' if torch.cuda.is_available() else 'cpu')
数据准备
查看图像的信息
data_path = 'coffee_data'
data_lib = pathlib.Path(data_path)
coffee_images = list(data_lib.glob('*/*'))

# 打印5张图像的信息
for _ in range(5):
	image = random.choice(coffee_images)
	print(np.array(Image.open(str(image))).shape)

通过打印的信息,可以看出图像的尺寸都是224x224的,这是一个CV经常使用的图像大小,所以后面我就不使用Resize来缩放图像了。
# 打印20张图像粗略的看一下
plt.figure(figsize=(20, 4))
for i in range(20):
	plt.subplot(2, 10, i+1)
	plt.axis('off')
	image = random.choice(coffee_images) # 随机选出一个图像
	plt.title(image.parts[-2]) # 通过glob对象取出它的文件夹名称,也就是分类名
	plt.imshow(Image.open(str(image))) # 展示
制作数据集
先编写数据的预处理过程,用来使用pytorch的api加载文件夹中的图像
transform = transforms.Compose([
	transforms.ToTensor(), # 先把图像转成张量
	transforms.Normalize( # 对像素值做归一化,将数据范围弄到-1,1
       mean=[0.485, 0.456, 0.406],
        std=[0.229, 0.224, 0.225],
	),
])
加载文件夹
dataset = datasets.ImageFolder(data_path, transform=transform)
从数据中取所有的分类名
class_names = [k for k in dataset.class_to_idx]
print(class_names)
![]()
将数据集划分出训练集和验证集
train_size = int(len(dataset) * 0.8)
test_size = len(dataset) - train_size

train_dataset, test_dataset = random_split(dataset, [train_size, test_size])
将数据集按划分成批次,以便使用小批量梯度下降
batch_size = 32
train_loader = DataLoader(train_dataset, shuffle=True, batch_size=batch_size)
test_loader = DataLoader(test_dataset, batch_size=batch_size)
模型设计
在一开始时,直接手动创建了Vgg-16网络,发现少数几个迭代后模型就收敛了,于是开始精简模型。
手动搭建的vgg16网络
class Vgg16(nn.Module):
	def __init__(self, num_classes):
		super().__init__()

		self.block1 = nn.Sequential(
			nn.Conv2d(3, 64, 3, padding=1),
			nn.BatchNorm2d(64),
			nn.ReLU(),
			nn.Conv2d(64, 64, 3, padding=1),
			nn.BatchNorm2d(64),
			nn.ReLU(),
			nn.MaxPool2d(2),
		)
		self.block2 = nn.Sequential(
			nn.Conv2d(64, 128, 3, padding=1),
			nn.BatchNorm2d(128),
			nn.ReLU(),
			nn.Conv2d(128, 128, 3, padding=1),
			nn.BatchNorm2d(128),
			nn.ReLU(),
			nn.MaxPool2d(2),
		)
		self.block3 = nn.Sequential(
			nn.Conv2d(128, 256, 3, padding=1),
			nn.BatchNorm2d(256),
			nn.ReLU(),
			nn.Conv2d(256, 256, 3, padding=1),
			nn.BatchNorm2d(256),
			nn.ReLU(),
			nn.Conv2d(256, 256, 3, padding=1),
			nn.BatchNorm2d(256),
			nn.ReLU(),
			nn.MaxPool2d(2),
		)
		self.block4 = nn.Sequential(
			nn.Conv2d(256, 512, 3, padding=1),
			nn.BatchNorm2d(512),
			nn.ReLU(),
			nn.Conv2d(512, 512, 3, padding=1),
			nn.BatchNorm2d(512),
			nn.ReLU(),
			nn.Conv2d(512, 512, 3, padding=1),
			nn.BatchNorm2d(512),
			nn.ReLU(),
			nn.MaxPool2d(2),
		)
		self.block5 = nn.Sequential(
			nn.Conv2d(512, 512, 3, padding=1),
			nn.BatchNorm2d(512),
			nn.ReLU(),
			nn.Conv2d(512, 512, 3, padding=1),
			nn.BatchNorm2d(512),
			nn.ReLU(),
			nn.Conv2d(512, 512, 3, padding=1),
			nn.BatchNorm2d(512),
			nn.ReLU(),
			nn.MaxPool2d(2),
		)
		self.pool = nn.AdaptiveAvgPool2d(7)
		self.classifier = nn.Sequential(
			nn.Linear(7*7*512, 4096),
			nn.Dropout(0.5),
			nn.ReLU(),
			nn.Linear(4096, 4096),
			nn.Dropout(0.5),
			nn.ReLU(),
			nn.Linear(4096, num_classes),
		)

	def forward(self, x):
		x = self.block1(x)
		x = self.block2(x)
		x = self.block3(x)
		x = self.block4(x)
		x = self.block5(x)
		x = self.pool(x)
		x = x.view(x.size(0),-1)
		x = self.classifier(x)
		return x
vgg = Vgg16(len(class_names)).to(device)
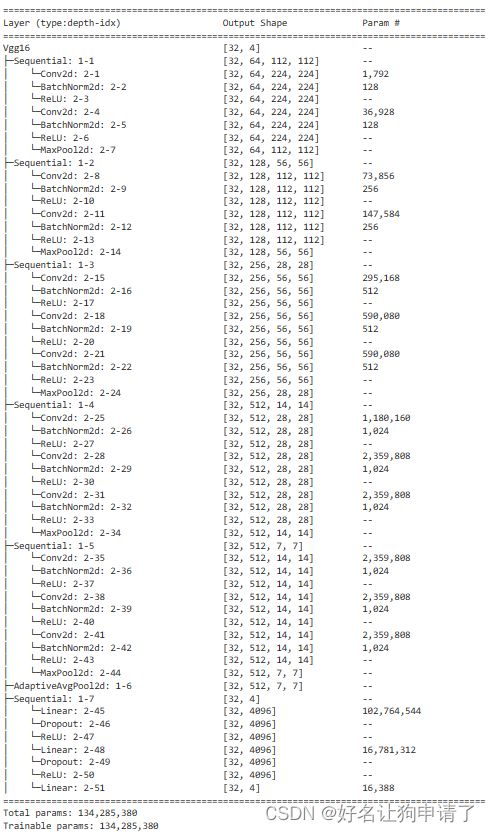
summary(vgg, input_size=(32, 3, 224, 224))

通过模型结构的打印可以发现,VGG-16网络共有134285380个可训练参数(我加了BatchNorm,和官方的比会稍微多出一些),参数量非常巨大,对于咖啡豆识别这种小场景,这么多可训练参数肯定浪费,于是对原始的VGG-16网络结构进行精简。
精简后的咖啡豆识别网络
class Network(nn.Module):
	def __init__(self, num_classes):
		super().__init__()

		self.block1 = nn.Sequential(
			nn.Conv2d(3, 64, 3, padding=1),
			nn.BatchNorm2d(64),
			nn.ReLU(),
			nn.Conv2d(64, 64, 3, padding=1),
			nn.BatchNorm2d(64),
			nn.ReLU(),
			nn.MaxPool2d(2),
		)

		self.block2 = nn.Sequential(
			nn.Conv2d(64, 128, 3, padding=1),
			nn.BatchNorm2d(128),
			nn.ReLU(),
			nn.Conv2d(128, 128, 3, padding=1),
			nn.BatchNorm2d(128),
			nn.ReLU(),
			nn.MaxPool2d(2),
		)

		self.block3 = nn.Sequential(
			nn.Conv2d(128, 64, 3, padding=1),
			nn.BatchNorm2d(64),
			nn.ReLU(),
			nn.Conv2d(64, 64, 3, padding=1),
			nn.BatchNorm2d(64),
			nn.ReLU(),
			nn.MaxPool2d(2),
		)

		self.pool = nn.AdaptiveAvgPool2d(7),

		self.classifier = nn.Sequential(
			nn.Linear(7*7*64, 64),
			nn.Dropout(0.4),
			nn.ReLU(),
			nn.Linear(64, num_classes)
		)

	def forward(self, x):
		x = self.block1(x)
		x = self.block2(x)
		x = self.block3(x)
		x = self.pool(x)
		x = x.view(x.size(0), -1)
		x = self.classifier(x)
		return x
model = Network(len(class_names)).to(device)
summary(model, input_size=(32, 3, 224, 224))

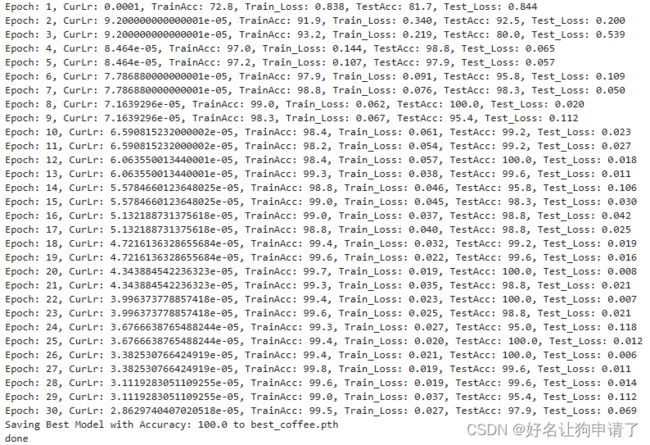
可以看到精简后的网络模型参数量还不到原来的1/10,但是其在测试集上的正确率依然能够达到100%!
模型训练
编写训练函数
def train(train_loader, model, loss_fn, optimizer):
	size = len(train_loader.dataset)
	num_batches = len(train_loader)

	train_loss, train_acc = 0, 0
	for x, y in train_loader:
		x, y = x.to(device), y.to(device)

		pred = model(x)
		loss = loss_fn(pred, y)

		optimizer.zero_grad()
		loss.backward()
		optimizer.step()

		train_loss += loss.item()
		train_acc += (pred.argmax(1) == y).type(torch.float).sum().item()

	train_loss /= num_batches
	train_acc /= size

	return train_loss, train_acc
编写测试函数
def test(test_loader, model, loss_fn):
	size = len(test_loader.dataset)
	num_batches = len(test_loader)

	test_loss, test_acc = 0, 0
	for x, y in test_loader:
		x, y = x.to(device), y.to(device)

		pred = model(x)
		loss = loss_fn(pred, y)

		test_loss += loss.item()
		test_acc += (pred.argmax(1) == y).type(torch.float).sum().item()

	test_loss /= num_batches
	test_acc /= size

	return test_loss, test_acc
开始训练
首先定义损失函数,优化器设置学习率,这里我们再弄一个学习率的衰减,再加上总的迭代次数,最佳模型的保存位置
epochs = 30
loss_fn = nn.CrossEntropyLoss()
optimizer = optim.Adam(model.parameters(), lr=1e-4)
scheduler = optim.lr_scheduler.LambdaLR(optimizer=optimizer, lr_lambda=lambda epoch: 0.92**(epoch//2))
best_model_path = 'best_coffee_model.pth'
然后编写训练+测试的循环,并记录训练过程的数据
best_acc = 0
train_loss, train_acc = [], []
test_loss, test_acc = [], []
for epoch in epochs:
	model.train()
	epoch_train_loss, epoch_train_acc = train(train_loader, model, loss_fn, optimizer)
	scheduler.step()

	model.eval()
	with torch.no_grad();
		epoch_test_loss, epoch_test_acc = test(test_loader, model, loss_fn)

	train_loss.append(epoch_train_loss)
	train_acc.append(epoch_train_acc)
	test_loss.append(epoch_test_loss)
	test_acc.append(epoch_test_acc)

	lr = optimizer.state_dict()['param_groups'][0]['lr']

	if best_acc < epoch_test_acc:
		best_acc = epoch_test_acc
		best_model = copy.deepcopy(model)

	print(f"Epoch: {epoch+1}, Lr:{lr}, TrainAcc: {epoch_train_acc*100:.1f}, TrainLoss: {epoch_train_loss:.3f}, TestAcc: {epoch_test_acc*100:.1f}, TestLoss: {epoch_test_loss:.3f}")

print(f"Saving Best Model with Accuracy: {best_acc*100:.1f} to {best_model_path}")
torch.save(best_model.state_dict(), best_model_path)
print('Done')
展示训练过程
epoch_ranges = range(epochs)
plt.figure(figsize=(20,6))
plt.subplot(121)
plt.plot(epoch_ranges, train_loss, label='train loss')
plt.plot(epoch_ranges, test_loss, label='validation loss')
plt.legend(loc='upper right')
plt.title('Loss')

plt.figure(figsize=(20,6))
plt.subplot(122)
plt.plot(epoch_ranges, train_acc, label='train accuracy')
plt.plot(epoch_ranges, test_acc, label='validation accuracy')
plt.legend(loc='lower right')
plt.title('Accuracy')
模型效果展示
model.load_state_dict(torch.load(best_model_path))
model.to(device)
model.eval()

plt.figure(figsize=(20,4))
for i in range(20):
	plt.subplot(2, 10, i+1)
	plt.axis('off')
	image = random.choice(coffee_images)
	input = transform(Image.open(str(image))).to(device).unsqueeze(0)
	pred = model(input)
	plt.title(f'T:{image.parts[-2]}, P:{class_names[pred.argmax()]}')
	plt.imshow(Image.open(str(image)))
总结与心得体会
- 因为目前网络还是很快就收敛到一个很高的水平,所以应该还有很大的精简的空间,但是可能会稍微牺牲一些正确率。
- 模型的选取要根据实际任务来确定,像咖啡豆种类识别这种任务,使用VGG-16太浪费了。
- 在精简的过程中,没有感觉到训练速度有明显的变化 ,说明参数量和训练速度并没有直接的相关关系。
- 连续多层参数一样的卷积操作好像比只用一层效果要好。


