docker安装nexus私库
dokcer安装nexus
官方文档:https://help.sonatype.com/repomanager3
docker run -d --name nexus \
  -p 8081:8081 \
  --restart always \
  -v nexus-data:/nexus-data \
  sonatype/nexus3
默认用户名为admin,默认密码保存在/nexus-data/admin.password
docker exec -it nexus cat /nexus-data/admin.password
停止时,请确保有足够的时间使数据库完全关闭。
docker stop --time=120 nexus
浏览器访问nexus:http://192.168.93.9:8081

二进制安装nexus
参考:
https://help.sonatype.com/repomanager3/download
https://help.sonatype.com/repomanager3/installation/installation-methods
下载安装nexus
#nexus要求java版本必须为8
yum install -y java-1.8.0-openjdk

wget https://download.sonatype.com/nexus/3/latest-unix.tar.gz
mkdir -p /opt/nexus
tar -zxvf latest-unix.tar.gz -C /opt/nexus --strip 1
修改nexus绑定端口,保持默认即可
# cat /opt/nexus/etc/nexus-default.properties | grep application-port
application-port=8083
修改nexus运行用户,保持默认即可
# cat /opt/nexus/bin/nexus.rc
#run_as_user=""
修改Nexus启动时使用的jdk版本,保持默认即可
# cat /opt/nexus/bin/nexus | grep INSTALL4J_JAVA_HOME_OVERRIDE=
# INSTALL4J_JAVA_HOME_OVERRIDE=
使用systemd管理nexus服务
cat > /etc/systemd/system/nexus.service <<EOF
[Unit]
Description=nexus service
After=network.target

[Service]
Type=forking
LimitNOFILE=65536
ExecStart=/opt/nexus/bin/nexus start
ExecStop=/opt/nexus/bin/nexus stop
User=root
Restart=on-abort
TimeoutSec=600

[Install]
WantedBy=multi-user.target
EOF
启动服务
systemctl daemon-reload
systemctl enable --now nexus.service
systemctl status nexus.service
查看日志
tail -f /opt/sonatype-work/nexus3/log/nexus.log
获取admin用户登录密码
cat /opt/sonatype-work/nexus3/admin.password
nexus创建maven私有仓库
参考:https://help.sonatype.com/repomanager3/formats/maven-repositories
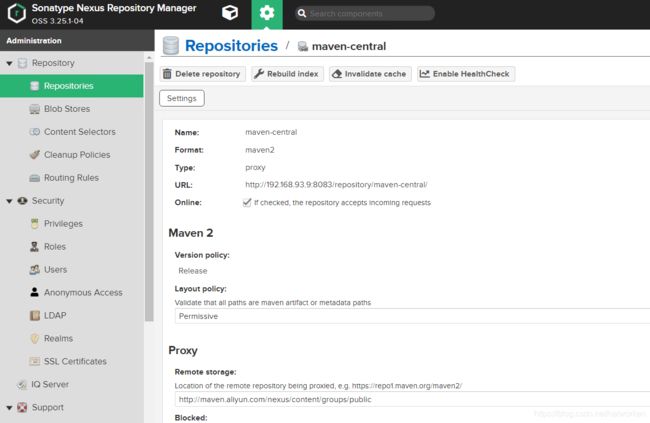
默认nexus已经创建了3个maven仓库,其中maven-central为proxy类型的maven仓库,默认代理的远程仓库地址为https://repo1.maven.org/maven2/,这里改为阿里云maven仓库:
http://maven.aliyun.com/nexus/content/groups/public
配置示例如下:
修改本地maven配置文件settings.xml,将mirror配置为maven-public仓库的地址:
<settings>
  <mirrors>
    <mirror>
      <id>nexusid>
      <mirrorOf>centralmirrorOf>
      <url>http://192.168.93.9:8083/repository/maven-public/url>
    mirror>
  mirrors>
  <profiles>
    <profile>
      <id>nexusid>
      <repositories>
        <repository>
          <id>centralid>
          <url>http://centralurl>
          <releases><enabled>trueenabled>releases>
          <snapshots><enabled>trueenabled>snapshots>
        repository>
      repositories>
     <pluginRepositories>
        <pluginRepository>
          <id>centralid>
          <url>http://centralurl>
          <releases><enabled>trueenabled>releases>
          <snapshots><enabled>trueenabled>snapshots>
        pluginRepository>
      pluginRepositories>
    profile>
  profiles>
  <activeProfiles>
    <activeProfile>nexusactiveProfile>
  activeProfiles>
settings>
执行编译验证
git clone https://github.com/willzhang/spring-demo.git
cd spring-demo
mvn clean package
如果要发布自己的jar到私服,需要修改工程的pom.xml
<project>
...
<distributionManagement>
    <repository>
      <id>nexusid>
      <name>Releasesname>
      <url>http://192.168.93.9:8083/repository/maven-releases/url>
    repository>
    <snapshotRepository>
      <id>nexusid>
      <name>Snapshotname>
      <url>http://192.168.93.9:8083/repository/maven-snapshots/url>
    snapshotRepository>
distributionManagement>
...
在settings.xml中配置认证信息,pom.xml的repository的id值一定要跟settings.xml文件中配置的server一致。
<settings>
....
  <servers>
    <server>
      <id>nexusid>
      <username>adminusername>
      <password>nexus@123password>
    server>
  servers>
开发使用snapshot版本,pom.xml文件中定义的version后缀必须是-SNAPSHOT。
<project>

...
        <groupId>com.examplegroupId>
        <artifactId>demoartifactId>
        <version>0.0.1-SNAPSHOTversion>
        <packaging>jarpackaging>
使用 mvn clean deploy命令编译后即可部署到远程仓库
mvn clean deploy
第三方Jar上传到Nexus,其中-DrepositoryId的值即为在setttings.xml里面配置的server id。
命令格式:
mvn deploy:deploy-file \
    -DgroupId=<group-id> \
    -DartifactId=<artifact-id> \
    -Dversion=<version> \
    -Dpackaging=<type-of-packaging> \
    -Dfile=<path-to-file> \
    -DrepositoryId=<server-id-settings.xml> \
    -Durl=<url-of-the-repository-to-deploy>
示例
mvn deploy:deploy-file \
    -DgroupId=com.example \
    -DartifactId=demo \
    -Dversion=0.0.1-SNAPSHOT \
    -Dpackaging=jar \
    -Dfile=target/demo-0.0.1-SNAPSHOT.jar \
    -DrepositoryId=nexus \
    -Durl=http://192.168.93.9:8083/repository/maven-snapshots/
nexus配置npm私有仓库
参考:https://www.jianshu.com/p/1674a6bc1c12
可以创建以下三种类型npm仓库:
- npm(group)表示分组
- npm(hosted)表示本机私有
- npm(proxy)表示远程代理。
若registry配置为group(包括hosted和proxy),首先会从hosted取,若无则从proxy取并缓存,下次则会从缓存取。
选择设置,点击Create repository按钮创建仓库
- 选择 npm(proxy), 输入 Name: npm-proxy, remote storage 填写 https://registry.npm.taobao.org 或 https://registry.npmjs.org. 用于将包情求代理到地址地址
- 增加 npm(hosted) 输入 Name: npm-hosted 用于存放自己的私有包
- 增加npm(group) 输入 Name: npm-group, 下面Member repositories里选择之前添加的2个移动右边
查看本地默认registry
# npm config get registry
http://registry.cnpmjs.org/
修改默认registry
npm config set registry http://192.168.93.9:8081/repository/npm-group/
设置完成后,可以找到当前用户目录下的.npmrc文件,内容如下:
# cat .npmrc
registry=http://192.168.93.9:8081/repository/npm-group/
随便进入一个目录, 初始化package, 查看是否从自己的仓库地址拉取包
npm init -y
npm --loglevel info install jquery
#查看本地包的缓存地址(和私服无关)命令
npm config get cache
从上图中可以看到,fetch地址即为私服地址。
查看刚搭建的私服里的内容为空, 在安装了依赖包后,就会有一些被缓存了,下次请求就不会走外网了。
发布包到私服
npm发布包是需要先登录的,默认是登录到npm官方服务器,若registry已更改为其它地址则可能登录失败,而这里我们只是想把包发布到自己私有的服务器上。
- 添加权限认证设置权限, Realms 菜单, 将 npm Bearer Token Realm 添加到右边
- 创建nx-deploy角色给角色赋于一个
nx-repository-view-*-*-*权限
创建deployer 用户,密码也为 deployer,同时设定角色为nx-deploy
- 客户端的.npmrc配置
registry=http://127.0.0.1:8081/repository/npm-group/
email=deployer@skytech.com
always-auth=true
_auth="ZGVwbG95ZXI6ZGVwbG95ZXI="
_auth是 username:password 的base64值,这样设置的好处是publish时就不用login了。
- 发布控件到npm私服中在package.json 配置
"publishConfig" : {
    "registry" : "http://localhost:8081/repository/npm-hosted/"
  }
在包根目录执行npm publish即可。