深度学习之模型压缩、加速模型推理
简介
当将一个机器学习模型部署到生产环境中时,通常需要满足一些在模型原型阶段没有考虑到的要求。例如,在生产中使用的模型将不得不处理来自不同用户的大量请求。因此,您将希望进行优化,以获得较低的延迟和/或吞吐量。
延迟:是任务完成所需的时间,就像单击链接后加载网页所需的时间。它是开始某项任务和看到结果之间的等待时间。
吞吐量:是系统在一定时间内可以处理的请求数。
这意味着机器学习模型在进行预测时必须非常快速,为此有各种技术可以提高模型推断的速度,本文将介绍其中最重要的一些。
模型压缩
有一些旨在使模型更小的技术,因此它们被称为模型压缩技术,而另一些则侧重于使模型在推断阶段更快,因此属于模型优化领域。但通常使模型更小也有助于提高推断速度,因此在这两个研究领域之间的界限非常模糊。
低秩分解
这是我们首次看到的第一种方法,它正在受到广泛研究,事实上,最近已经有很多关于它的论文发布。
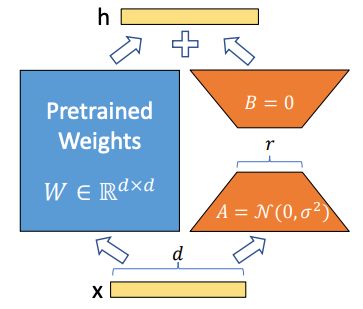
基本思想是用低维度的矩阵(虽然更正确的说法是张量,因为我们经常有超过2维的矩阵)替换神经网络的矩阵(表示网络层的矩阵)。通过这种方式,我们将减少网络参数的数量,从而提高推断速度。
一个微不足道的例子是,在CNN网络中,将3x3的卷积替换为1x1的卷积。这种技术被用于网络结构中,比如SqueezeNet。
最近,类似的思想也被应用于其他用途,比如允许在资源有限的情况下微调大型语言模型。当为下游任务微调预训练模型时,仍然需要在预训练模型的所有参数上训练模型,这可能非常昂贵。
因此,名为“大型语言模型的低秩适应”(或LoRA)的方法的思想是用较小的矩阵对原始模型进行替换(使用矩阵分解),这些矩阵具有较小的尺寸。这样,只需要重新训练这些新矩阵,以使预训练模型适应更多下游任务。
在LoRA中的矩阵分解
现在,让我们看看如何使用Hugging Face的PEFT库来实现对LoRA进行微调。假设我们想要使用LoRA对bigscience/mt0-large进行微调。首先,我们必须确保导入我们需要的内容。
!pip install peft
!pip install transformers
from transformers import AutoModelForSeq2SeqLM
from peft import get_peft_model, LoraConfig, TaskType
model_name_or_path = "bigscience/mt0-large"
tokenizer_name_or_path = "bigscience/mt0-large"接下来的步骤将是创建在微调期间应用于LoRA的配置。
peft_config = LoraConfig(
    task_type=TaskType.SEQ_2_SEQ_LM, inference_mode=False, r=8, lora_alpha=32, lora_dropout=0.1
)
然后,我们使用Transformers库的基本模型以及我们为LoRA创建的配置对象来实例化模型。
model = AutoModelForSeq2SeqLM.from_pretrained(model_name_or_path)
model = get_peft_model(model, peft_config)
model.print_trainable_parameters()
知识蒸馏
这是另一种方法,允许我们将“小”模型放入生产中。思想是有一个称为教师的大模型,和一个称为学生的较小模型,我们将使用教师的知识来教学生如何进行预测。这样,我们可以只将学生放入生产环境中。
这种方法的一个经典示例是以这种方式开发的模型DistillBERT,它是BERT的学生模型。DistilBERT比BERT小40%,但保留了97%的语言理解能力,并且推断速度快60%。这种方法有一个缺点是:您仍然需要拥有大型教师模型,以便对学生进行训练,而您可能没有足够的资源来训练类似教师的模型。
让我们看看如何在Python中进行知识蒸馏的简单示例。要理解的一个关键概念是Kullback–Leibler散度,它是一个用于理解两个分布之间差异的数学概念,实际上在我们的案例中,我们想要理解两个模型的预测之间的差异,因此训练的损失函数将基于这个数学概念。
import tensorflow as tf
from tensorflow.keras import layers, models
from tensorflow.keras.datasets import mnist
from tensorflow.keras.utils import to_categorical
import numpy as np


# Load the MNIST dataset
(train_images, train_labels), (test_images, test_labels) = mnist.load_data()


# Preprocess the data
train_images = train_images.reshape((60000, 28, 28, 1)).astype('float32') / 255
test_images = test_images.reshape((10000, 28, 28, 1)).astype('float32') / 255
train_labels = to_categorical(train_labels)
test_labels = to_categorical(test_labels)


# Define the teacher model (a larger model)
teacher_model = models.Sequential([
    layers.Conv2D(32, (3, 3), activation='relu', input_shape=(28, 28, 1)),
    layers.MaxPooling2D((2, 2)),
    layers.Conv2D(64, (3, 3), activation='relu'),
    layers.MaxPooling2D((2, 2)),
    layers.Conv2D(64, (3, 3), activation='relu'),
    layers.Flatten(),
    layers.Dense(64, activation='relu'),
    layers.Dense(10, activation='softmax')
])


teacher_model.compile(optimizer='adam',
                      loss='categorical_crossentropy',
                      metrics=['accuracy'])


# Train the teacher model
teacher_model.fit(train_images, train_labels, epochs=5, batch_size=64, validation_split=0.2)


# Define the student model (a smaller model)
student_model = models.Sequential([
    layers.Flatten(input_shape=(28, 28, 1)),
    layers.Dense(64, activation='relu'),
    layers.Dense(10, activation='softmax')
])


student_model.compile(optimizer='adam',
                      loss='categorical_crossentropy',
                      metrics=['accuracy'])


# Knowledge distillation step: Transfer knowledge from the teacher to the student
def distillation_loss(y_true, y_pred):
    alpha = 0.1  # Temperature parameter (adjust as needed)
    return tf.keras.losses.KLDivergence()(tf.nn.softmax(y_true / alpha, axis=1),
                                           tf.nn.softmax(y_pred / alpha, axis=1))


# Train the student model using knowledge distillation
student_model.fit(train_images, train_labels, epochs=10, batch_size=64,
                  validation_split=0.2, loss=distillation_loss)


# Evaluate the student model
test_loss, test_acc = student_model.evaluate(test_images, test_labels)
print(f'Test accuracy: {test_acc * 100:.2f}%')
剪枝
剪枝是我在研究生论文中研究过的一种模型压缩方法,事实上,我之前曾发表过一篇关于如何在Julia中实现剪枝的文章:Julia中用于人工神经网络的迭代剪枝方法。
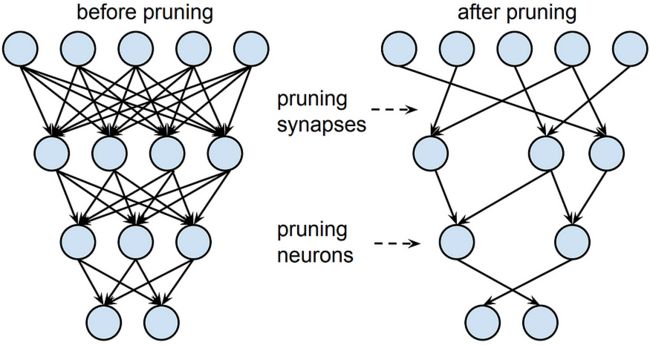
剪枝是为了解决决策树中的过拟合问题而诞生的,实际上是通过剪掉树的分支来减小树的深度。该概念后来被用于神经网络,其中会删除网络中的边和/或节点(取决于是否执行非结构化剪枝或结构化剪枝)。
假设要从网络中删除整个节点,表示层的矩阵将变小,因此您的模型也会变小,因此也会变快。相反,如果我们删除单个边,矩阵的大小将保持不变,但是我们将在删除的边的位置放置零,因此我们将获得非常稀疏的矩阵。因此,在非结构化剪枝中,优势不在于增加速度,而在于内存,因为将稀疏矩阵保存在内存中比保存密集矩阵要占用更少的空间。
但我们要剪枝的是哪些节点或边呢?通常是最不必要的节点或边,推荐大家可以研究下下面两篇论文:《Optimal Brain Damage》和《Optimal Brain Surgeon and general network pruning》。
让我们看一个如何在简单的MNIST模型中实现剪枝的Python脚本。
import tensorflow as tf
from tensorflow.keras.models import Sequential
from tensorflow.keras.layers import Dense
from tensorflow.keras.datasets import mnist
from tensorflow.keras.utils import to_categorical
from tensorflow_model_optimization.sparsity import keras as sparsity
import numpy as np


# Load the MNIST dataset
(train_images, train_labels), (test_images, test_labels) = mnist.load_data()


# Preprocess the data
train_images = train_images.reshape((60000, 28, 28, 1)).astype('float32') / 255
test_images = test_images.reshape((10000, 28, 28, 1)).astype('float32') / 255
train_labels = to_categorical(train_labels)
test_labels = to_categorical(test_labels)


# Create a simple neural network model
def create_model():
    model = Sequential([
        tf.keras.layers.Flatten(input_shape=(28, 28, 1)),
        tf.keras.layers.Dense(128, activation='relu'),
        tf.keras.layers.Dropout(0.2),
        tf.keras.layers.Dense(64, activation='relu'),
        tf.keras.layers.Dropout(0.2),
        tf.keras.layers.Dense(10, activation='softmax')
    ])
    return model


# Create and compile the original model
model = create_model()
model.compile(optimizer='adam',
              loss='categorical_crossentropy',
              metrics=['accuracy'])


# Train the original model
model.fit(train_images, train_labels, epochs=5, batch_size=64, validation_split=0.2)


# Prune the model
# Specify the pruning parameters
pruning_params = {
    'pruning_schedule': sparsity.PolynomialDecay(initial_sparsity=0.50,
                                                 final_sparsity=0.90,
                                                 begin_step=0,
                                                 end_step=2000,
                                                 frequency=100)
}


# Create a pruned model
pruned_model = sparsity.prune_low_magnitude(create_model(), **pruning_params)


# Compile the pruned model
pruned_model.compile(optimizer='adam',
                     loss='categorical_crossentropy',
                     metrics=['accuracy'])


# Train the pruned model (fine-tuning)
pruned_model.fit(train_images, train_labels, epochs=2, batch_size=64, validation_split=0.2)


# Strip pruning wrappers to create a smaller and faster model
final_model = sparsity.strip_pruning(pruned_model)


# Evaluate the final pruned model
test_loss, test_acc = final_model.evaluate(test_images, test_labels)
print(f'Test accuracy after pruning: {test_acc * 100:.2f}%')
量化
我认为没有错的说量化可能是目前最广泛使用的压缩技术。同样,基本思想很简单。通常,我们使用32位浮点数表示神经网络的参数。但如果我们使用更低精度的数值呢?我们可以使用16位、8位、4位,甚至1位,并且拥有二进制网络!
这意味着什么?通过使用较低精度的数字,模型将更轻,更小,但也会失去精度,提供比原始模型更近似的结果。当我们需要在边缘设备上部署时,特别是在某些特殊硬件上,如智能手机上,这是一种经常使用的技术,因为它允许我们大大缩小网络的大小。许多框架允许轻松应用量化,例如TensorFlow Lite、PyTorch或TensorRT。
量化可以在训练前应用,因此我们直接截断了一个网络,其参数只能在某个范围内取值,或者在训练后应用,因此最终会对参数的值进行四舍五入。在这里,我们再次快速看一下如何在Python中应用量化。
import tensorflow as tf
from tensorflow.keras.models import Sequential
from tensorflow.keras.layers import Dense, Flatten, Dropout
from tensorflow.keras.datasets import mnist
from tensorflow.keras.utils import to_categorical
import numpy as np


# Load the MNIST dataset
(train_images, train_labels), (test_images, test_labels) = mnist.load_data()


# Preprocess the data
train_images = train_images.reshape((60000, 28, 28, 1)).astype('float32') / 255
test_images = test_images.reshape((10000, 28, 28, 1)).astype('float32') / 255
train_labels = to_categorical(train_labels)
test_labels = to_categorical(test_labels)


# Create a simple neural network model
def create_model():
    model = Sequential([
        Flatten(input_shape=(28, 28, 1)),
        Dense(128, activation='relu'),
        Dropout(0.2),
        Dense(64, activation='relu'),
        Dropout(0.2),
        Dense(10, activation='softmax')
    ])
    return model


# Create and compile the original model
model = create_model()
model.compile(optimizer='adam',
              loss='categorical_crossentropy',
              metrics=['accuracy'])


# Train the original model
model.fit(train_images, train_labels, epochs=5, batch_size=64, validation_split=0.2)


# Quantize the model to 8-bit integers
converter = tf.lite.TFLiteConverter.from_keras_model(model)
converter.optimizations = [tf.lite.Optimize.DEFAULT]
quantized_model = converter.convert()


# Save the quantized model to a file
with open('quantized_model.tflite', 'wb') as f:
    f.write(quantized_model)


# Load the quantized model for inference
interpreter = tf.lite.Interpreter(model_path='quantized_model.tflite')
interpreter.allocate_tensors()


# Evaluate the quantized model
test_loss, test_acc = 0.0, 0.0
for i in range(len(test_images)):
    input_data = np.array([test_images[i]], dtype=np.float32)
    interpreter.set_tensor(interpreter.get_input_details()[0]['index'], input_data)
    interpreter.invoke()
    output_data = interpreter.get_tensor(interpreter.get_output_details()[0]['index'])
    test_loss += tf.keras.losses.categorical_crossentropy(test_labels[i], output_data).numpy()
    test_acc += np.argmax(test_labels[i]) == np.argmax(output_data)


test_loss /= len(test_images)
test_acc /= len(test_images)


print(f'Test accuracy after quantization: {test_acc * 100:.2f}%')
结论
在本文中,我们探讨了几种模型压缩方法,以加速模型推断阶段,这对于生产中的模型来说可能是一个关键要求。特别是,我们关注了低秩分解、知识蒸馏、剪枝和量化等方法,解释了基本思想,并展示了Python中的简单实现。模型压缩对于在具有有限资源(RAM、GPU等)的特定硬件上部署模型也非常有用,比如智能手机。
· END ·
HAPPY LIFE
本文仅供学习交流使用,如有侵权请联系作者删除


