笔记:Android 应用启动流程
1.点击图标,启动app
点击图标,实际是封装了一个 Intent 然后调用了 startActivity 方法
ComponentName componentName = new ComponentName("包名", "activity 名称");
Intent intent = new Intent(Intent.ACTION_MAIN);
intent.setComponent(componentName);
intent.setFlags(Intent.FLAG_ACTIVITY_NEW_TASK);
startActivity(intent);

最终核心代码是调用了 Instrumentation 的 execStartActivity 方法

通过Binder的跨进程通信获取到了系统服务ActivityManagerService,所以ActivityManager.getService().startActivity()是调用了ActivityManagerService中的startActivity方法
2.AMS 发送启动应用程序进程请求
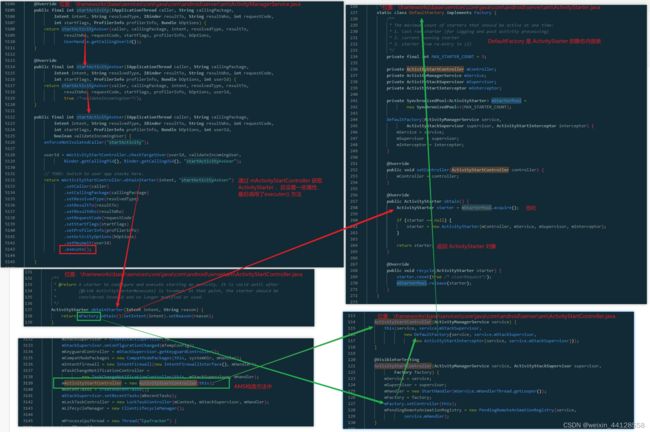
obtainStarter方法获取 ActivityStarter 实例然后设置一系列属性,最后的execute()方法,开始启动应用 activity
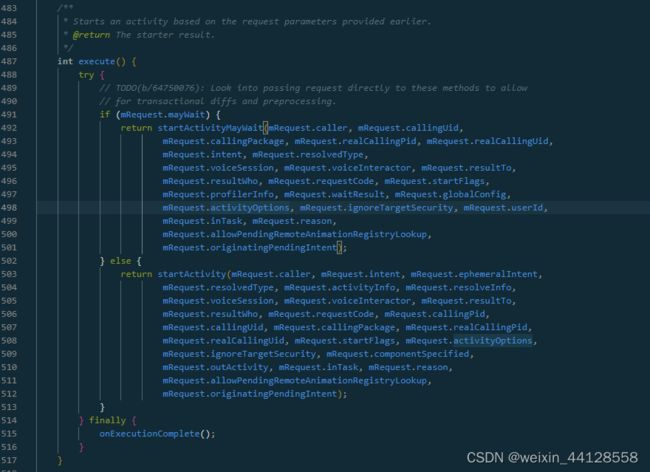
由于上面执行的set方法中有 setMayWait(true) ,所以执行 startActivityMayWait() 方法
 private int startActivityMayWait(IApplicationThread caller, int callingUid,
            String callingPackage, int requestRealCallingPid, int requestRealCallingUid,
            Intent intent, String resolvedType,
            IVoiceInteractionSession voiceSession, IVoiceInteractor voiceInteractor,
            IBinder resultTo, String resultWho, int requestCode, int startFlags,
            ProfilerInfo profilerInfo, WaitResult outResult,
            Configuration globalConfig, SafeActivityOptions options, boolean ignoreTargetSecurity,
            int userId, TaskRecord inTask, String reason,
            boolean allowPendingRemoteAnimationRegistryLookup,
            PendingIntentRecord originatingPendingIntent) {

     。。。。。。

        // Collect information about the target of the Intent.
        // 解析传递进来的 intent 参数,获取 Activity 相关信息,并将数据保存到 aInfo 变量中
        ActivityInfo aInfo = mSupervisor.resolveActivity(intent, rInfo, startFlags, profilerInfo);

        synchronized (mService) {
            。。。。。。

            final ActivityRecord[] outRecord = new ActivityRecord[1];
            // 调用ActivityStarter 的 startActivity 方法
            int res = startActivity(caller, intent, ephemeralIntent, resolvedType, aInfo, rInfo,
                    voiceSession, voiceInteractor, resultTo, resultWho, requestCode, callingPid,
                    callingUid, callingPackage, realCallingPid, realCallingUid, startFlags, options,
                    ignoreTargetSecurity, componentSpecified, outRecord, inTask, reason,
                    allowPendingRemoteAnimationRegistryLookup, originatingPendingIntent);

            。。。。。。

			// 通知跟踪器 Activity 正在启动
            mSupervisor.getActivityMetricsLogger().notifyActivityLaunched(res, outRecord[0]);
            return res;
        }
    }
调用ActivityStarter的startActivity方法
private int startActivity(IApplicationThread caller, Intent intent, Intent ephemeralIntent,
            String resolvedType, ActivityInfo aInfo, ResolveInfo rInfo,
            IVoiceInteractionSession voiceSession, IVoiceInteractor voiceInteractor,
            IBinder resultTo, String resultWho, int requestCode, int callingPid, int callingUid,
            String callingPackage, int realCallingPid, int realCallingUid, int startFlags,
            SafeActivityOptions options,
            boolean ignoreTargetSecurity, boolean componentSpecified, ActivityRecord[] outActivity,
            TaskRecord inTask, boolean allowPendingRemoteAnimationRegistryLookup,
            PendingIntentRecord originatingPendingIntent) {
        。。。。。。 一些判断

		// 检测是否有打开新 Activity 的权限
        boolean abort = !mSupervisor.checkStartAnyActivityPermission(intent, aInfo, resultWho,
                requestCode, callingPid, callingUid, callingPackage, ignoreTargetSecurity,
                inTask != null, callerApp, resultRecord, resultStack);
        abort |= !mService.mIntentFirewall.checkStartActivity(intent, callingUid,
                callingPid, resolvedType, aInfo.applicationInfo);

        。。。。。。

		// 如果开始的活动和当前恢复活动的UID不同,检查是否允许应用程序切换
        if (mService.mController != null) {
            try {
                // The Intent we give to the watcher has the extra data
                // stripped off, since it can contain private information.
                Intent watchIntent = intent.cloneFilter();
                abort |= !mService.mController.activityStarting(watchIntent,
                        aInfo.applicationInfo.packageName);
            } catch (RemoteException e) {
                mService.mController = null;
            }
        }

       。。。。。。
		// 加载PendingActivity
        mController.doPendingActivityLaunches(false);

        maybeLogActivityStart(callingUid, callingPackage, realCallingUid, intent, callerApp, r,
                originatingPendingIntent);

		// 继续调用方法
        return startActivity(r, sourceRecord, voiceSession, voiceInteractor, startFlags,
                true /* doResume */, checkedOptions, inTask, outActivity);
    }
继续调用重载方法 startActivity,在重载的方法 startActivity中又调用 startActivityUnchecked()方法
	private int startActivity(final ActivityRecord r, ActivityRecord sourceRecord,
                IVoiceInteractionSession voiceSession, IVoiceInteractor voiceInteractor,
                int startFlags, boolean doResume, ActivityOptions options, TaskRecord inTask,
                ActivityRecord[] outActivity) {
        int result = START_CANCELED;
        try {
            mService.mWindowManager.deferSurfaceLayout();
            // 调用startActivityUnchecked 方法
            result = startActivityUnchecked(r, sourceRecord, voiceSession, voiceInteractor,
                    startFlags, doResume, options, inTask, outActivity);
        } finally {
            // If we are not able to proceed, disassociate the activity from the task. Leaving an
            // activity in an incomplete state can lead to issues, such as performing operations
            // without a window container.
            final ActivityStack stack = mStartActivity.getStack();
            if (!ActivityManager.isStartResultSuccessful(result) && stack != null) {
                stack.finishActivityLocked(mStartActivity, RESULT_CANCELED,
                        null /* intentResultData */, "startActivity", true /* oomAdj */);
            }
            mService.mWindowManager.continueSurfaceLayout();
        }

        postStartActivityProcessing(r, result, mTargetStack);

        return result;
    }

	// Note: This method should only be called from {@link startActivity}.
    private int startActivityUnchecked(final ActivityRecord r, ActivityRecord sourceRecord,
            IVoiceInteractionSession voiceSession, IVoiceInteractor voiceInteractor,
            int startFlags, boolean doResume, ActivityOptions options, TaskRecord inTask,
            ActivityRecord[] outActivity) {

		// 初始化ActivityStarter全局变量
        setInitialState(r, options, inTask, doResume, startFlags, sourceRecord, voiceSession,
                voiceInteractor);

        computeLaunchingTaskFlags();

        computeSourceStack();

        mIntent.setFlags(mLaunchFlags);

		// 判断是否应将新的Activity 插入到现有的任务栈中,不需要返回null 需要返回该任务栈的信息
        ActivityRecord reusedActivity = getReusableIntentActivity();

        。。。。。。

        if (mDoResume) { // mDoResume 的值由上面参数传递过来,值为 true
            final ActivityRecord topTaskActivity =
                    mStartActivity.getTask().topRunningActivityLocked();
            if (!mTargetStack.isFocusable()
                    || (topTaskActivity != null && topTaskActivity.mTaskOverlay
                    && mStartActivity != topTaskActivity)) {
                // If the activity is not focusable, we can't resume it, but still would like to
                // make sure it becomes visible as it starts (this will also trigger entry
                // animation). An example of this are PIP activities.
                // Also, we don't want to resume activities in a task that currently has an overlay
                // as the starting activity just needs to be in the visible paused state until the
                // over is removed.
                mTargetStack.ensureActivitiesVisibleLocked(null, 0, !PRESERVE_WINDOWS);
                // Go ahead and tell window manager to execute app transition for this activity
                // since the app transition will not be triggered through the resume channel.
                mService.mWindowManager.executeAppTransition();
            } else {
                // If the target stack was not previously focusable (previous top running activity
                // on that stack was not visible) then any prior calls to move the stack to the
                // will not update the focused stack.  If starting the new activity now allows the
                // task stack to be focusable, then ensure that we now update the focused stack
                // accordingly.
                if (mTargetStack.isFocusable() && !mSupervisor.isFocusedStack(mTargetStack)) {
                    mTargetStack.moveToFront("startActivityUnchecked");
                }
                mSupervisor.resumeFocusedStackTopActivityLocked(mTargetStack, mStartActivity,
                        mOptions);
            }
        } else if (mStartActivity != null) {
            mSupervisor.mRecentTasks.add(mStartActivity.getTask());
        }
        mSupervisor.updateUserStackLocked(mStartActivity.userId, mTargetStack);

        mSupervisor.handleNonResizableTaskIfNeeded(mStartActivity.getTask(), preferredWindowingMode,
                preferredLaunchDisplayId, mTargetStack);

        return START_SUCCESS;
    }
这里最终调用 mSupervisor.resumeFocusedStackTopActivityLocked(mTargetStack, mStartActivity,mOptions);
 resumeFocusedStackTopActivityLocked --> resumeTopActivityUncheckedLocked -->resumeTopActivityInnerLocked
resumeTopActivityInnerLocked方法比较长,首先会判断当前是否能启动目标Activity,其中比较重要的检查点是判断当前是否需要先执行 pause Activity的操作,然后结束 startSpecificActivityLocked 方法
startSpecificActivityLocked 比较简单,主要是判断目标APP进程是否存在,若存在,则调用realStartActivityLocked方法继续进行启动流程,否则调用 startProcessLocked 方法先启动目标进程,这里看 startProcessLocked 方法,但最终还是会调用到 realStartActivityLocked方法启动 应用进程
==================
位置:\frameworks\base\services\core\java\com\android\server\am\ActivityManagerService.java
注意:startProcessLocked 有很多重载的方法
	@GuardedBy("this")
    final ProcessRecord startProcessLocked(String processName,
            ApplicationInfo info, boolean knownToBeDead, int intentFlags,
            String hostingType, ComponentName hostingName, boolean allowWhileBooting,
            boolean isolated, boolean keepIfLarge) {
        return startProcessLocked(processName, info, knownToBeDead, intentFlags, hostingType,
                hostingName, allowWhileBooting, isolated, 0 /* isolatedUid */, keepIfLarge,
                null /* ABI override */, null /* entryPoint */, null /* entryPointArgs */,
                null /* crashHandler */);
    }

	@GuardedBy("this")
    final ProcessRecord startProcessLocked(String processName, ApplicationInfo info,
            boolean knownToBeDead, int intentFlags, String hostingType, ComponentName hostingName,
            boolean allowWhileBooting, boolean isolated, int isolatedUid, boolean keepIfLarge,
            String abiOverride, String entryPoint, String[] entryPointArgs, Runnable crashHandler) {
        long startTime = SystemClock.elapsedRealtime(); // 启动进程开始的时间,超时会抛出异常
        ProcessRecord app;

        。。。。。。省略准备启动应用的参数部分
        。。。。。。省略再次判断进程已存在或正在启动相关部分


        if (app == null) {
            checkTime(startTime, "startProcess: creating new process record");
            // 创建ProcessRecord 实例,并将它添加AMS的 mProcessNames中保存
            app = newProcessRecordLocked(info, processName, isolated, isolatedUid);
            if (app == null) {
                Slog.w(TAG, "Failed making new process record for "
                        + processName + "/" + info.uid + " isolated=" + isolated);
                return null;
            }
            app.crashHandler = crashHandler;
            app.isolatedEntryPoint = entryPoint;
            app.isolatedEntryPointArgs = entryPointArgs;
            checkTime(startTime, "startProcess: done creating new process record");
        } else {
            // If this is a new package in the process, add the package to the list
            app.addPackage(info.packageName, info.versionCode, mProcessStats);
            checkTime(startTime, "startProcess: added package to existing proc");
        }

        。。。。。。 省略系统未就绪情况

        checkTime(startTime, "startProcess: stepping in to startProcess"); //检测启动时间,时间太长会抛出日志打印
        // 调用另一个重载的方法进一步执行启动进程
        final boolean success = startProcessLocked(app, hostingType, hostingNameStr, abiOverride);
        checkTime(startTime, "startProcess: done starting proc!");
        return success ? app : null;
    }
@GuardedBy("this")
    private final boolean startProcessLocked(ProcessRecord app,
            String hostingType, String hostingNameStr, String abiOverride) {
        return startProcessLocked(app, hostingType, hostingNameStr,
                false /* disableHiddenApiChecks */, abiOverride);
    }

    /**
     * @return {@code true} if process start is successful, false otherwise.
     */
    @GuardedBy("this")
    private final boolean startProcessLocked(ProcessRecord app, String hostingType,
            String hostingNameStr, boolean disableHiddenApiChecks, String abiOverride) {
        。。。。。。 省略
        try{
        	。。。。。。 省略
            final String seInfo = app.info.seInfo
                    + (TextUtils.isEmpty(app.info.seInfoUser) ? "" : app.info.seInfoUser);
            // Start the process.  It will either succeed and return a result containing
            // the PID of the new process, or else throw a RuntimeException.
            final String entryPoint = "android.app.ActivityThread";
            // 这个值会通过socket 发送给Zygote进程,然后zygote fork出进程后会回调android.app.ActivityThread

			//再次调用重载方法
            return startProcessLocked(hostingType, hostingNameStr, entryPoint, app, uid, gids,
                    runtimeFlags, mountExternal, seInfo, requiredAbi, instructionSet, invokeWith,
                    startTime);
        } catch (RuntimeException e) {
            Slog.e(TAG, "Failure starting process " + app.processName, e);

            // Something went very wrong while trying to start this process; one
            // common case is when the package is frozen due to an active
            // upgrade. To recover, clean up any active bookkeeping related to
            // starting this process. (We already invoked this method once when
            // the package was initially frozen through KILL_APPLICATION_MSG, so
            // it doesn't hurt to use it again.)
            forceStopPackageLocked(app.info.packageName, UserHandle.getAppId(app.uid), false,
                    false, true, false, false, UserHandle.getUserId(app.userId), "start failure");
            return false;
        }
    }

    @GuardedBy("this")
    private boolean startProcessLocked(String hostingType, String hostingNameStr, String entryPoint,
            ProcessRecord app, int uid, int[] gids, int runtimeFlags, int mountExternal,
            String seInfo, String requiredAbi, String instructionSet, String invokeWith,
            long startTime) {
        。。。。。。
        if (mConstants.FLAG_PROCESS_START_ASYNC) {
            。。。。。。
            mProcStartHandler.post(() -> {
                try {
                    。。。。。。
                    final ProcessStartResult startResult = startProcess(app.hostingType, entryPoint,
                            app, app.startUid, gids, runtimeFlags, mountExternal, app.seInfo,
                            requiredAbi, instructionSet, invokeWith, app.startTime);
                    synchronized (ActivityManagerService.this) {
                        handleProcessStartedLocked(app, startResult, startSeq);
                    }
                } catch (RuntimeException e) {
                    synchronized (ActivityManagerService.this) {
                        Slog.e(TAG, "Failure starting process " + app.processName, e);
                        mPendingStarts.remove(startSeq);
                        app.pendingStart = false;
                        forceStopPackageLocked(app.info.packageName, UserHandle.getAppId(app.uid),
                                false, false, true, false, false,
                                UserHandle.getUserId(app.userId), "start failure");
                    }
                }
            });
            return true;
        } else {
            try {
                final ProcessStartResult startResult = startProcess(hostingType, entryPoint, app,
                        uid, gids, runtimeFlags, mountExternal, seInfo, requiredAbi, instructionSet,
                        invokeWith, startTime);
                handleProcessStartedLocked(app, startResult.pid, startResult.usingWrapper,
                        startSeq, false);
            } catch (RuntimeException e) {
                Slog.e(TAG, "Failure starting process " + app.processName, e);
                app.pendingStart = false;
                forceStopPackageLocked(app.info.packageName, UserHandle.getAppId(app.uid),
                        false, false, true, false, false,
                        UserHandle.getUserId(app.userId), "start failure");
            }
            return app.pid > 0;
        }
    }

	private ProcessStartResult startProcess(String hostingType, String entryPoint,
            ProcessRecord app, int uid, int[] gids, int runtimeFlags, int mountExternal,
            String seInfo, String requiredAbi, String instructionSet, String invokeWith,
            long startTime) {
        try {
            Trace.traceBegin(Trace.TRACE_TAG_ACTIVITY_MANAGER, "Start proc: " +
                    app.processName);
            checkTime(startTime, "startProcess: asking zygote to start proc");
            final ProcessStartResult startResult;
            if (hostingType.equals("webview_service")) {
                startResult = startWebView(entryPoint,
                        app.processName, uid, uid, gids, runtimeFlags, mountExternal,
                        app.info.targetSdkVersion, seInfo, requiredAbi, instructionSet,
                        app.info.dataDir, null,
                        new String[] {PROC_START_SEQ_IDENT + app.startSeq});
            } else {
            	//最终调用到了Process.start 方法来请求Zygote创建子app进程
                startResult = Process.start(entryPoint,
                        app.processName, uid, uid, gids, runtimeFlags, mountExternal,
                        app.info.targetSdkVersion, seInfo, requiredAbi, instructionSet,
                        app.info.dataDir, invokeWith,
                        new String[] {PROC_START_SEQ_IDENT + app.startSeq});
            }
            checkTime(startTime, "startProcess: returned from zygote!");
            return startResult;
        } finally {
            Trace.traceEnd(Trace.TRACE_TAG_ACTIVITY_MANAGER);
        }
    }
经过层层调用,最终通过 Process.start 请求 Zytoge 创建子 App 进程

===============
3.Zygote 处理 socket 请求
位置:frameworks/base/core/java/com/android/internal/os/ZygoteInit.java
在zygote 进程创建的时候,就会创建socket 的服务端,来等待接收AMS端发送过来的请求
public static void main(String argv[]) {
        ZygoteServer zygoteServer = new ZygoteServer();
		。。。。。。。略

        try {
            。。。。。。略
            	// preload 提前加载框架通用类和系统资源到进程,加速进程启动
                preload(bootTimingsTraceLog);
            。。。。。。略
            // The select loop returns early in the child process after a fork and
            // loops forever in the zygote.
            caller = zygoteServer.runSelectLoop(abiList);// 进入死循环,等待AMS发送请求过来
        } catch (Throwable ex) {
            Log.e(TAG, "System zygote died with exception", ex);
            throw ex;
        } finally {
            zygoteServer.closeServerSocket();
        }

        // We're in the child process and have exited the select loop. Proceed to execute the
        // command.
        if (caller != null) {
            caller.run();
        }
    }
位置:frameworks/base/core/java/com/android/internal/os/ZygoteServer.java
/**
     * Runs the zygote process's select loop. Accepts new connections as
     * they happen, and reads commands from connections one spawn-request's
     * worth at a time.
     */
    Runnable runSelectLoop(String abiList) {
        ArrayList<FileDescriptor> fds = new ArrayList<FileDescriptor>();
        ArrayList<ZygoteConnection> peers = new ArrayList<ZygoteConnection>();

        fds.add(mServerSocket.getFileDescriptor());
        peers.add(null);

        while (true) { // 死循环
            。。。。。。
            for (int i = pollFds.length - 1; i >= 0; --i) {
                if ((pollFds[i].revents & POLLIN) == 0) {
                    continue;
                }

                if (i == 0) {
                    ZygoteConnection newPeer = acceptCommandPeer(abiList);
                    peers.add(newPeer);
                    fds.add(newPeer.getFileDesciptor());
                } else {
                    try {
                    	//得到一个请求连接封装对象 ZygoteConnection
                        ZygoteConnection connection = peers.get(i);
                        // processCommand函数中处理AMS客户端请求
                        final Runnable command = connection.processOneCommand(this);

                        if (mIsForkChild) {
                            // We're in the child. We should always have a command to run at this
                            // stage if processOneCommand hasn't called "exec".
                            if (command == null) {
                                throw new IllegalStateException("command == null");
                            }
							//返回新创建的进程
                            return command;
                        } else {
                            。。。。。略
                        }
                    } catch (Exception e) {
                    	。。。。。。
                    } finally {
                    	。。。。。。
                    }
                }
            }
        }
    }
当AMS有请求过来时,直接交给 processOneCommand 方法去处理此次请求
位置:\frameworks\base\core\java\com\android\internal\os\ZygoteConnection.java
/**
     * Reads one start command from the command socket. If successful, a child is forked and a
     * {@code Runnable} that calls the childs main method (or equivalent) is returned in the child
     * process. {@code null} is always returned in the parent process (the zygote).
     *
     * If the client closes the socket, an {@code EOF} condition is set, which callers can test
     * for by calling {@code ZygoteConnection.isClosedByPeer}.
     */
    Runnable processOneCommand(ZygoteServer zygoteServer) {
        。。。。。。略

		// fork Zygote进程方式创建子进程
        pid = Zygote.forkAndSpecialize(parsedArgs.uid, parsedArgs.gid, parsedArgs.gids,
                parsedArgs.runtimeFlags, rlimits, parsedArgs.mountExternal, parsedArgs.seInfo,
                parsedArgs.niceName, fdsToClose, fdsToIgnore, parsedArgs.startChildZygote,
                parsedArgs.instructionSet, parsedArgs.appDataDir);

        try {
            if (pid == 0) {
                // in child
                zygoteServer.setForkChild();

                zygoteServer.closeServerSocket();
                IoUtils.closeQuietly(serverPipeFd);
                serverPipeFd = null;
				// pid 为 0,当前处于新创建的子应用进程中,处理请求参数
                return handleChildProc(parsedArgs, descriptors, childPipeFd,
                        parsedArgs.startChildZygote);
            } else {
                。。。。。。
                handleParentProc(pid, descriptors, serverPipeFd);
                return null;
            }
        } finally {
            。。。。。。
        }
    }
/**
     * Handles post-fork setup of child proc, closing sockets as appropriate,
     * reopen stdio as appropriate, and ultimately throwing MethodAndArgsCaller
     * if successful or returning if failed.
     *
     * @param parsedArgs non-null; zygote args
     * @param descriptors null-ok; new file descriptors for stdio if available.
     * @param pipeFd null-ok; pipe for communication back to Zygote.
     * @param isZygote whether this new child process is itself a new Zygote.
     */
    private Runnable handleChildProc(Arguments parsedArgs, FileDescriptor[] descriptors,
            FileDescriptor pipeFd, boolean isZygote) {
        /**
         * By the time we get here, the native code has closed the two actual Zygote
         * socket connections, and substituted /dev/null in their place.  The LocalSocket
         * objects still need to be closed properly.
         */

        closeSocket(); //关闭从父进程zygote继承过来的ZygoteServer服务端地址
        。。。。。。
        if (parsedArgs.invokeWith != null) {
            。。。。。。
        } else {
            if (!isZygote) {
            	// 继续调用 zygoteInit 方法完成子应用进程的相关初始化工作
                return ZygoteInit.zygoteInit(parsedArgs.targetSdkVersion, parsedArgs.remainingArgs,
                        null /* classLoader */);
            } else {
                return ZygoteInit.childZygoteInit(parsedArgs.targetSdkVersion,
                        parsedArgs.remainingArgs, null /* classLoader */);
            }
        }
    }
4.应用初始化
位置:\frameworks\base\core\java\com\android\internal\os\ZygoteInit.java
/**
* The main function called when started through the zygote process. This
* could be unified with main(), if the native code in nativeFinishInit()
* were rationalized with Zygote startup.
*
* Current recognized args:
*
* -
[--] <start class name> <args>
*
*
* @param targetSdkVersion target SDK version
* @param argv arg strings
*/
public static final Runnable zygoteInit(int targetSdkVersion, String[] argv, ClassLoader classLoader) {
if (RuntimeInit.DEBUG) {
Slog.d(RuntimeInit.TAG, "RuntimeInit: Starting application from zygote");
}
Trace.traceBegin(Trace.TRACE_TAG_ACTIVITY_MANAGER, "ZygoteInit");
RuntimeInit.redirectLogStreams();
RuntimeInit.commonInit(); // RuntimeInit.commonInit 方法中设置应用进程默认的java异常处理机制
ZygoteInit.nativeZygoteInit();// nativeZygoteInit函数中JNI调用启动进程的binder线程池
return RuntimeInit.applicationInit(targetSdkVersion, argv, classLoader); //反射机制创建ActivityThread 对象,并调用其main入口方法
}
应用进程启动后会进行初始化工作,主要是
1.初始化进程默认的java异常处理机制(可以实现监听,拦截应用进程所有的Java crash 的逻辑)
2.JNI 调用启动进程的 binder 线程池
3.通过反射创建 ActivityThread 对象并调用其 main 入口方法
位置:frameworks\base\core\java\com\android\internal\os\RuntimeInit.java
	protected static Runnable applicationInit(int targetSdkVersion, String[] argv,
            ClassLoader classLoader) {
        nativeSetExitWithoutCleanup(true);

        VMRuntime.getRuntime().setTargetHeapUtilization(0.75f);
        VMRuntime.getRuntime().setTargetSdkVersion(targetSdkVersion);

        final Arguments args = new Arguments(argv);

        Trace.traceEnd(Trace.TRACE_TAG_ACTIVITY_MANAGER); //结束 Zygoteinit 的 systrace tag

        return findStaticMain(args.startClass, args.startArgs, classLoader);
    }


	protected static Runnable findStaticMain(String className, String[] argv,
            ClassLoader classLoader) {
        Class<?> cl;

        try {
        	// 反射加载创建ActivityThread 类对象
            cl = Class.forName(className, true, classLoader);
        } catch (ClassNotFoundException ex) {
            throw new RuntimeException(
                    "Missing class when invoking static main " + className,
                    ex);
        }

        Method m;
        try {
        	// 反射其main方法
            m = cl.getMethod("main", new Class[] { String[].class });
        } catch (NoSuchMethodException ex) {
            throw new RuntimeException(
                    "Missing static main on " + className, ex);
        } catch (SecurityException ex) {
            throw new RuntimeException(
                    "Problem getting static main on " + className, ex);
        }

        int modifiers = m.getModifiers();
        if (! (Modifier.isStatic(modifiers) && Modifier.isPublic(modifiers))) {
            throw new RuntimeException(
                    "Main method is not public and static on " + className);
        }

        return new MethodAndArgsCaller(m, argv);// 调用 ActivityThread 的 main 方法
    }
位置:\frameworks\base\core\java\android\app\ActivityThread.java
	public static void main(String[] args) {
        Trace.traceBegin(Trace.TRACE_TAG_ACTIVITY_MANAGER, "ActivityThreadMain");
		。。。。。。 略

        Looper.prepareMainLooper(); //创建并启动主线程的loop消息循环
		。。。。。。略

        // attachApplication注册到系统ANS中
        ActivityThread thread = new ActivityThread();
        thread.attach(false, startSeq);
		。。。。。。

        Trace.traceEnd(Trace.TRACE_TAG_ACTIVITY_MANAGER);
        Looper.loop();
        throw new RuntimeException("Main thread loop unexpectedly exited");
    }

	private void attach(boolean system, long startSeq) {
        sCurrentActivityThread = this;
        mSystemThread = system;
        if (!system) {
            。。。。。。
            // IActivityManager 类型对象是 ActivityManagerService
            final IActivityManager mgr = ActivityManager.getService();
            try {
            	//通过 binder调用AMS的attachApplication接口将自己注册到AMS中
                mgr.attachApplication(mAppThread, startSeq);
            } catch (RemoteException ex) {
                throw ex.rethrowFromSystemServer();
            }
           。。。。。。

        ViewRootImpl.addConfigCallback(configChangedCallback);
    }
ActivityThread main 方法主要
1.创建并启动主线程的loop消息循环
初始化完成后主线程就有了完整的 Looper、MessageQueue、Handler,此时Handler就可以处理 Message包括Application、Activity、ContentProvider、Service、Broadcast等组件生命周期
2.通过binder 调用 AMS 的 attachApplication 接口将自己 attach 注册到 AMS 中
位置:\frameworks\base\services\core\java\com\android\server\am\ActivityManagerService.java
	@Override
    public final void attachApplication(IApplicationThread thread, long startSeq) {
        if (thread == null) {
            throw new SecurityException("Invalid application interface");
        }
        synchronized (this) {
            int callingPid = Binder.getCallingPid();
            final int callingUid = Binder.getCallingUid();
            final long origId = Binder.clearCallingIdentity();
            // 直接调用attachApplicationLocked
            attachApplicationLocked(thread, callingPid, callingUid, startSeq);
            Binder.restoreCallingIdentity(origId);
        }
    }

	@GuardedBy("this")
    private boolean attachApplicationLocked(@NonNull IApplicationThread thread,
            int pid, int callingUid, long startSeq) {

        。。。。。。略
			if (app.isolatedEntryPoint != null) {
                // This is an isolated process which should just call an entry point instead of
                // being bound to an application.
                thread.runIsolatedEntryPoint(app.isolatedEntryPoint, app.isolatedEntryPointArgs);
            } else if (app.instr != null) {
            	// 将应用程序的ApplicationThread对象绑定到AMS,既AMS获的ApplicationThread的代理对象
                thread.bindApplication(processName, appInfo, providers,
                        app.instr.mClass,
                        profilerInfo, app.instr.mArguments,
                        app.instr.mWatcher,
                        app.instr.mUiAutomationConnection, testMode,
                        mBinderTransactionTrackingEnabled, enableTrackAllocation,
                        isRestrictedBackupMode || !normalMode, app.persistent,
                        new Configuration(getGlobalConfiguration()), app.compat,
                        getCommonServicesLocked(app.isolated),
                        mCoreSettingsObserver.getCoreSettingsLocked(),
                        buildSerial, isAutofillCompatEnabled);
            } else {
                thread.bindApplication(processName, appInfo, providers, null, profilerInfo,
                        null, null, null, testMode,
                        mBinderTransactionTrackingEnabled, enableTrackAllocation,
                        isRestrictedBackupMode || !normalMode, app.persistent,
                        new Configuration(getGlobalConfiguration()), app.compat,
                        getCommonServicesLocked(app.isolated),
                        mCoreSettingsObserver.getCoreSettingsLocked(),
                        buildSerial, isAutofillCompatEnabled);
            }
		。。。。。。 略

        boolean badApp = false;
        boolean didSomething = false;

        // activity 的处理逻辑
        if (normalMode) {
            try {
            	// 调用 attachApplicationLocked 继续启动应用的Activity
                if (mStackSupervisor.attachApplicationLocked(app)) {
                    didSomething = true;
                }
            } catch (Exception e) {
                Slog.wtf(TAG, "Exception thrown launching activities in " + app, e);
                badApp = true;
            }
        }

        // Service 的处理逻辑
        if (!badApp) {
            try {
                didSomething |= mServices.attachApplicationLocked(app, processName);
                checkTime(startTime, "attachApplicationLocked: after mServices.attachApplicationLocked");
            } catch (Exception e) {
                Slog.wtf(TAG, "Exception thrown starting services in " + app, e);
                badApp = true;
            }
        }

        // BroadcastReceiver的处理逻辑
        if (!badApp && isPendingBroadcastProcessLocked(pid)) {
            try {
                didSomething |= sendPendingBroadcastsLocked(app);
                checkTime(startTime, "attachApplicationLocked: after sendPendingBroadcastsLocked");
            } catch (Exception e) {
                // If the app died trying to launch the receiver we declare it 'bad'
                Slog.wtf(TAG, "Exception thrown dispatching broadcasts in " + app, e);
                badApp = true;
            }
        }

        。。。。。。 略

        return true;
    }
在AMS的 attachApplication 方法中调用了attachApplicationLocked 进行绑定,attachApplicationLocked 中有两个重要的方法,thread.bindApplication 和 mStackSupervisor.attachApplicationLocked 。
thread.bindApplication 方法是将对象绑定到 AMS 的,具体实现是在ApplicationThread的bindApplication方法。
这里先看Activity,server 和 广播接收器 的处理逻辑会有些不同,可以看到activity直接调用mStackSupervisor.attachApplicationLocked(app) 方法
位置:\frameworks\base\services\core\java\com\android\server\am\ActivityStackSupervisor.java
	boolean attachApplicationLocked(ProcessRecord app) throws RemoteException {
        final String processName = app.processName;
        boolean didSomething = false;
        for (int displayNdx = mActivityDisplays.size() - 1; displayNdx >= 0; --displayNdx) {
            final ActivityDisplay display = mActivityDisplays.valueAt(displayNdx);
            for (int stackNdx = display.getChildCount() - 1; stackNdx >= 0; --stackNdx) {
                。。。。。。略
                for (int i = 0; i < size; i++) {
                    final ActivityRecord activity = mTmpActivityList.get(i);
                    if (activity.app == null && app.uid == activity.info.applicationInfo.uid
                            && processName.equals(activity.processName)) {
                        try {
                        	// 调用realStartActivityLocked 方法 真正启动Activity
                            if (realStartActivityLocked(activity, app,
                                    top == activity /* andResume */, true /* checkConfig */)) {
                                didSomething = true;
                            }
                        } catch (RemoteException e) {
                            Slog.w(TAG, "Exception in new application when starting activity "
                                    + top.intent.getComponent().flattenToShortString(), e);
                            throw e;
                        }
                    }
                }
            }
        }
        if (!didSomething) {
            ensureActivitiesVisibleLocked(null, 0, !PRESERVE_WINDOWS);
        }
        return didSomething;
    }
attachApplicationLocked 会调用 realStartActivityLocked 方法,realStartActivityLocked 方法前面讲过,startSpecificActivityLocked 方法中会判断是否有当前进程,有就直接调用 realStartActivityLocked 方法,没有就发出AMS请求去fock进程,就像买东西没钱就绕了一圈去银行取钱
5.执行onCreate方法
位置:\frameworks\base\services\core\java\com\android\server\am\ActivityStackSupervisor.java
	final boolean realStartActivityLocked(ActivityRecord r, ProcessRecord app,
            boolean andResume, boolean checkConfig) throws RemoteException {

        。。。。。。略

                // 添加callback,此时的ActivityLifecycleItem为LaunchActivityItem
                final ClientTransaction clientTransaction = ClientTransaction.obtain(app.thread,
                        r.appToken);
                clientTransaction.addCallback(LaunchActivityItem.obtain(new Intent(r.intent),
                        System.identityHashCode(r), r.info,
                        // TODO: Have this take the merged configuration instead of separate global
                        // and override configs.
                        mergedConfiguration.getGlobalConfiguration(),
                        mergedConfiguration.getOverrideConfiguration(), r.compat,
                        r.launchedFromPackage, task.voiceInteractor, app.repProcState, r.icicle,
                        r.persistentState, results, newIntents, mService.isNextTransitionForward(),
                        profilerInfo));

                // 判断此时的生命周期是resume还是pause
                final ActivityLifecycleItem lifecycleItem;
                if (andResume) {
                    lifecycleItem = ResumeActivityItem.obtain(mService.isNextTransitionForward());
                } else {
                    lifecycleItem = PauseActivityItem.obtain();
                }
                // 设置当前的声明周期
                clientTransaction.setLifecycleStateRequest(lifecycleItem);

           		// mSerice为AMS对象,getLifecycleManager 得到 ClientLifecycleManager对象,在执行其中的scheduleTransaction方法
                mService.getLifecycleManager().scheduleTransaction(clientTransaction);

        。。。。。。略
        return true;
    }
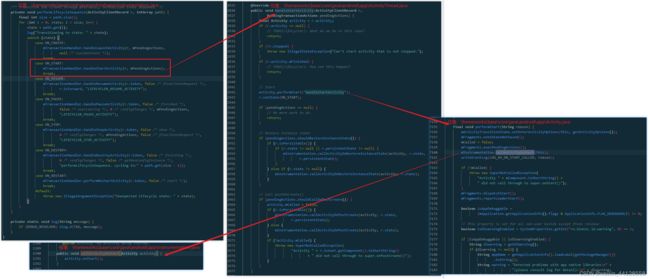
调用ClientLifecycleManager.scheduleTransaction方法执行
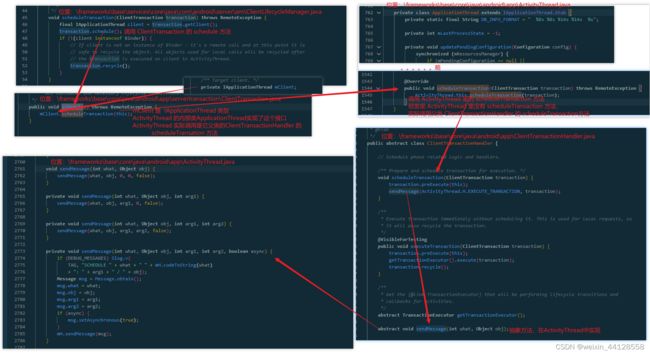
最终通过 ActivityThread 中的 sendMessage 方法,将启动 Activity 的消息发送给 mH,mH 为 内部类H,H 类继承了Handler,其实就是 ActivityThread 的 Handler
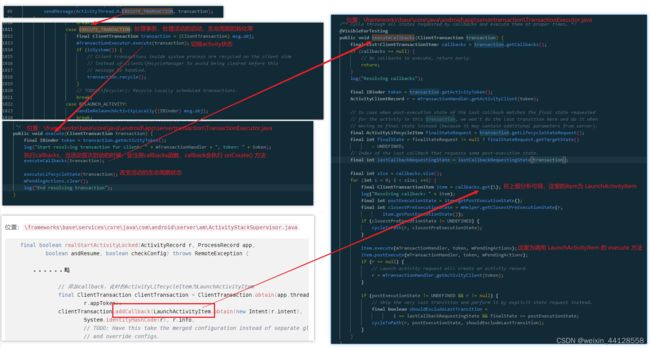
在 execute 方法中,由于现在是 Activity 的启动流程,所以 callback 不为null,会执行executeCallbacks 方法,executeCallbacks 中会获得callback List 中的对象,并调用这个对象的 execute 方法,从上面的分析得知,从 callback 中获得的对象为 LaunchActivityItem,既调用 LaunchActivityItem.execute 方法,注意传进去的 mTransactionHandler 参数 为 ActivityThread
位置:\frameworks\base\core\java\android\app\servertransaction\LaunchActivityItem.java
 @Override
    public void execute(ClientTransactionHandler client, IBinder token,
            PendingTransactionActions pendingActions) {
        Trace.traceBegin(TRACE_TAG_ACTIVITY_MANAGER, "activityStart");
        ActivityClientRecord r = new ActivityClientRecord(token, mIntent, mIdent, mInfo,
                mOverrideConfig, mCompatInfo, mReferrer, mVoiceInteractor, mState, mPersistentState,
                mPendingResults, mPendingNewIntents, mIsForward,
                mProfilerInfo, client);
        client.handleLaunchActivity(r, pendingActions, null /* customIntent */);
        Trace.traceEnd(TRACE_TAG_ACTIVITY_MANAGER);
    }
继续调用ActivityThread的handleLaunchActivity方法
位置:\frameworks\base\core\java\android\app\ActivityThread.java
@Override
    public Activity handleLaunchActivity(ActivityClientRecord r,
            PendingTransactionActions pendingActions, Intent customIntent) {
        。。。。。。略
        //启动 Activity
        final Activity a = performLaunchActivity(r, customIntent);

        if (a != null) {
            。。。。。。 略 启动成功
        } else {
            // If there was an error, for any reason, tell the activity manager to stop us.
            // 出现错误,通知AMS停止活动
            try {
                ActivityManager.getService()
                        .finishActivity(r.token, Activity.RESULT_CANCELED, null,
                                Activity.DONT_FINISH_TASK_WITH_ACTIVITY);
            } catch (RemoteException ex) {
                throw ex.rethrowFromSystemServer();
            }
        }
        return a;
    }
上面又调用 performLaunchActivity 方法来启动活动
位置:\frameworks\base\core\java\android\app\ActivityThread.java
/**  Core implementation of activity launch. */
    private Activity performLaunchActivity(ActivityClientRecord r, Intent customIntent) {
		// ActivityInfo 用于存储代码和 AndroidManifes 设置的 Activity和 receiver节点信息
        ActivityInfo aInfo = r.activityInfo;
        if (r.packageInfo == null) {
        	// 获取apk文件描述类 LoadedApk
            r.packageInfo = getPackageInfo(aInfo.applicationInfo, r.compatInfo,
                    Context.CONTEXT_INCLUDE_CODE);
        }
		//获取要启动该的Activity 的 ComponentName 类,ComponentName 中保存了该 Activity 的包名和类名
        ComponentName component = r.intent.getComponent();
        if (component == null) {
            component = r.intent.resolveActivity(
                mInitialApplication.getPackageManager());
            r.intent.setComponent(component);
        }

        if (r.activityInfo.targetActivity != null) {
            component = new ComponentName(r.activityInfo.packageName,
                    r.activityInfo.targetActivity);
        }
        //创建要启动的 ACtivity 上下文环境
        ContextImpl appContext = createBaseContextForActivity(r);
        Activity activity = null;
        try {
            java.lang.ClassLoader cl = appContext.getClassLoader();
            // 创建activity的实例
            activity = mInstrumentation.newActivity(
                    cl, component.getClassName(), r.intent);
            StrictMode.incrementExpectedActivityCount(activity.getClass());
            r.intent.setExtrasClassLoader(cl);
            r.intent.prepareToEnterProcess();
            if (r.state != null) {
                r.state.setClassLoader(cl);
            }
        }
		。。。。。。。

        try {
        	// 创建Application makeApplication会调用 Application 的 onCreate 方法
            Application app = r.packageInfo.makeApplication(false, mInstrumentation);

			。。。。。。
            if (activity != null) {
                。。。。。。
                // 初始化 Activity ,创建 Window 对象(PhoneWindow)并实现 Activity 和 Window 相关联
                activity.attach(appContext, this, getInstrumentation(), r.token,
                        r.ident, app, r.intent, r.activityInfo, title, r.parent,
                        r.embeddedID, r.lastNonConfigurationInstances, config,
                        r.referrer, r.voiceInteractor, window, r.configCallback);

                。。。。。。
                // 设置主题
                int theme = r.activityInfo.getThemeResource();
                if (theme != 0) {
                    activity.setTheme(theme);
                }

                activity.mCalled = false;
                // 启动活动
                if (r.isPersistable()) {
                    mInstrumentation.callActivityOnCreate(activity, r.state, r.persistentState);
                } else {
                    mInstrumentation.callActivityOnCreate(activity, r.state);
                }
                。。。。。。
            }
            // 设置生命周期为 onCreate
            r.setState(ON_CREATE);
            。。。。。。
        }
        。。。。。。

        return activity;
    }
上面通过 mInstrumentation.newActivity 来创建 activity 的实例,之后做了一堆初始化的操作,最终会在mInstrumentation.callActivityOnCreate 方法中来启动活动,并调用 onCreate 的方法

到这里终于就能看到熟悉的onCreate了
6.执行onStreate方法
回退到 TransactionExecutor.java 中的 execute() 方法中,此时onCreate已经被调用,且生命周期状态变成 ON_CREATE,故 executeCallback 已经执行完毕,继续往下执行 executeLifecycleState 方法

在executeLifecycleState方法中,会先执行 cycleToPath,从上面的分析我们已经知道当根 Activity 启动时,此时的 lifecycleItem 为 ResumeActivityItem,故调用 lifecycleItem.getTargetState 时将得到 ON_RESUME 状态,由于 onCreate 方法已经执行,所以 start 为 ON_CREATE,而 finish 为上面传递的 ON_RESUME,excludeLastState 是否移除最后的状态为 true
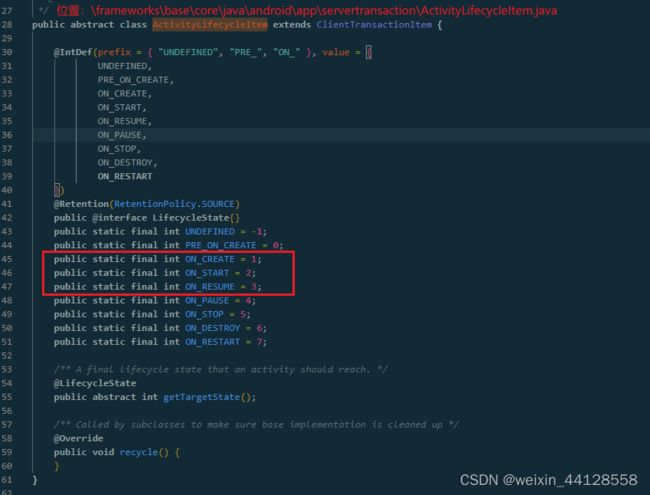
从上面的图可得出,在 getLifecyclePath 方法中会将start 到 finish 之间的状态放到一个 List 中,从上面得知 star 为 ON_CREATE,finish 为 ON_RESUME,所以将 ON_START 和 ON_RESUME 状态添加到 List 列表中,但又因为 excludeLastState 为 true,所以最后会将 ON_RESUME 移除,故列表中只剩 ON_START 状态,然后继续执行 performLifecycleSequence 方法
因为path只包含ON_START状态,所以只执行ActivityThread的handleStartActivity方法,经过多次跳转,最终执行 activity.onStart 方法,至此 cycleToPath 方法执行完毕
6.执行onResume方法
回到 executeLifecycleState 方法,执行完 cycleToPath 方法后 activity 的状态变成了 ON_START,继续向下执行 lifecycleItem.execute,lifecycleItem 上面有提到为 ResumeActivityItem,所以调用的是 ResumeActivityItem 的execute 方法

最终跟 onCreate onStart 流程大致类似,通过多次调用调用到 Activity 的 onResume 方法,此时 activity 就显示到屏幕上被我们看到了