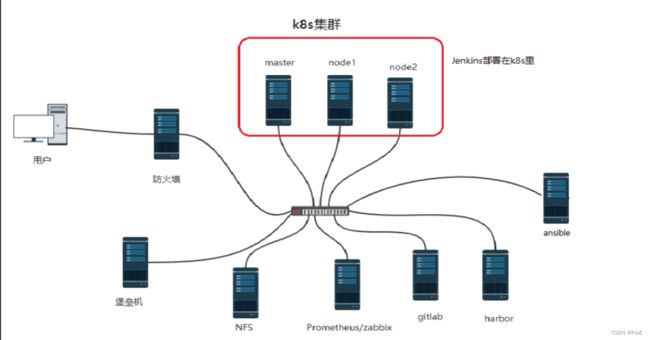
基于 kubernetes+docker构建高可用、高性能的 web 、CICD集群
文章目录
-
- 一、项目架构图
- 二 、项目描述
- 三、项目环境
- 四、环境准备
-
- 1、IP地址规划
- 2、关闭selinux和firewall
- 3、配置静态ip地址
- 4、修改主机名
- 5、升级系统(可做可不做)
- 6、添加hosts解析
- 五、项目步骤
-
- 1、设计整个集群的架构,规划好服务器的IP地址,搭建集群
- 2、部署ansible完成相关软件的自动化运维工作,部署防火墙服务器,部署堡垒机
-
- a、部署堡垒机
- b、部署firewall服务器
- 3、部署nfs服务器,为整个web集群提供数据,让所有的web业务pod都去访问,通过pv、pvc和卷挂载实现
- 4、构建CI/CD环境,部署gitlab,Jenkins,harbor实现相关的代码发布,镜像制作,数据备份等流水线工作
-
- a、部署gitlab
- b、部署Jenkins
- c、部署harbor
- 5、将自己用go开发的web接口系统制作成镜像,部署到k8s里作为web应用;采用HPA技术,当cpu使用率达到50%的时候,进行水平扩缩,最小20个业务pod,最多40个业务pod
- 6、启动mysql的pod,为web业务提供数据库服务
-
- a、尝试:k8s部署有状态的MySQL
- 7、使用探针(liveness、readiness、startup)的(httpget、exec)方法对web业务pod进行监控,一旦出现问题马上重启,增强业务pod的可靠性
- 8、使用ingress给web业务做负载均衡,使用dashboard对整个集群资源进行掌控
- 9、使用dashboard对整个集群资源进行掌控
- 10、安装zabbix和promethues对整个集群资源(cpu,内存,网络带宽,web服务,数据库服务,磁盘IO等)进行监控
- 11、使用测试软件ab对整个k8s集群和相关的服务器进行压力测试
一、项目架构图
二 、项目描述
模拟公司的web业务,部署k8s,web,MySQL,nfs,harbor,zabbix,Prometheus,gitlab,Jenkins,ansible环境,保障web业务的高可用,达到一个高负载的生产环境。
三、项目环境
CentOS 7.9,ansible 2.9.27,Docker 20.10.6,Docker Compose 2.18.1,Kubernetes 1.20.6,Calico 3.23,Harbor 2.4.1,nfs v4,metrics-server 0.6.0,ingress-nginx-controllerv1.1.0,kube-webhook-certgen-v1.1.0,MySQL 5.7.42,Dashboard v2.5.0,Prometheus 2.34.0,zabbix 5.0,Grafana 10.0.0,jenkinsci/blueocean,Gitlab-16.0.4-jh。
四、环境准备
10台全新的Linux服务器,关闭firewalld和seLinux,配置静态ip地址,修改主机名,添加hosts解析
1、IP地址规划
| server | ip |
|---|---|
| k8smaster | 192.168.2.104 |
| k8snode1 | 192.168.2.111 |
| k8snode2 | 192.168.2.112 |
| ansibe | 192.168.2.119 |
| nfs | 192.168.2.121 |
| gitlab | 192.168.2.124 |
| harbor | 192.168.2.106 |
| zabbix | 192.168.2.117 |
| firewalld | 192.168.2.141 |
| Bastionhost | 192.168.2.140 |
2、关闭selinux和firewall
# 防火墙并且设置防火墙开启不启动
service firewalld stop && systemctl disable firewalld

# 临时关闭seLinux
setenforce 0

# 永久关闭seLinux
sed -i 's/SELINUX=enforcing/SELINUX=disabled/g' /etc/selinux/config

[root@k8smaster ~]# service firewalld stop
Redirecting to /bin/systemctl stop firewalld.service
[root@k8smaster ~]# systemctl disable firewalld
Removed symlink /etc/systemd/system/multi-user.target.wants/firewalld.service.
Removed symlink /etc/systemd/system/dbus-org.fedoraproject.FirewallD1.service.
[root@k8smaster ~]# reboot
[root@k8smaster ~]# getenforce
Disabled
3、配置静态ip地址
cd /etc/sysconfig/network-scripts/
vim  ifcfg-ens33

TYPE="Ethernet"
BOOTPROTO="static"
DEVICE="ens33"
NAME="ens33"
ONBOOT="yes"
IPADDR="192.168.2.104"
PREFIX=24
GATEWAY="192.168.2.1"
DNS1=114.114.114.114

TYPE="Ethernet"
BOOTPROTO="static"
DEVICE="ens33"
NAME="ens33"
ONBOOT="yes"
IPADDR="192.168.2.111"
PREFIX=24
GATEWAY="192.168.2.1"
DNS1=114.114.114.114

TYPE="Ethernet"
BOOTPROTO="static"
DEVICE="ens33"
NAME="ens33"
ONBOOT="yes"
IPADDR="192.168.2.112"
PREFIX=24
GATEWAY="192.168.2.1"
DNS1=114.114.114.114
4、修改主机名
hostnamcectl set-hostname k8smaster
hostnamcectl set-hostname k8snode1
hostnamcectl set-hostname k8snode2

#切换用户,重新加载环境
su - root
[root@k8smaster ~]#
[root@k8snode1 ~]#
[root@k8snode2 ~]#
5、升级系统(可做可不做)
yum update -y
6、添加hosts解析
vim /etc/hosts

127.0.0.1   localhost localhost.localdomain localhost4 localhost4.localdomain4
::1         localhost localhost.localdomain localhost6 localhost6.localdomain6
192.168.2.104 k8smaster
192.168.2.111 k8snode1
192.168.2.112 k8snode2
五、项目步骤
1、设计整个集群的架构,规划好服务器的IP地址,搭建集群
# 1.互相之间建立免密通道
ssh-keygen      # 一路回车

ssh-copy-id k8smaster
ssh-copy-id k8snode1
ssh-copy-id k8snode2

# 2.关闭交换分区(Kubeadm初始化的时候会检测)
# 临时关闭:swapoff -a
# 永久关闭:注释swap挂载,给swap这行开头加一下注释
[root@k8smaster ~]# cat /etc/fstab

#
# /etc/fstab
# Created by anaconda on Thu Mar 23 15:22:20 2023
#
# Accessible filesystems, by reference, are maintained under '/dev/disk'
# See man pages fstab(5), findfs(8), mount(8) and/or blkid(8) for more info
#
/dev/mapper/centos-root /                       xfs     defaults        0 0
UUID=00236222-82bd-4c15-9c97-e55643144ff3 /boot                   xfs     defaults        0 0
/dev/mapper/centos-home /home                   xfs     defaults        0 0
#/dev/mapper/centos-swap swap                    swap    defaults        0 0

# 3.加载相关内核模块
modprobe br_netfilter

echo "modprobe br_netfilter" >> /etc/profile

cat > /etc/sysctl.d/k8s.conf <.bridge.bridge-nf-call-ip6tables = 1
net.bridge.bridge-nf-call-iptables = 1
net.ipv4.ip_forward = 1
EOF

#重新加载,使配置生效
sysctl -p /etc/sysctl.d/k8s.conf


# 为什么要执行modprobe br_netfilter?
#    "modprobe br_netfilter"命令用于在Linux系统中加载br_netfilter内核模块。这个模块是Linux内# 核中的一个网络桥接模块,它允许管理员使用iptables等工具对桥接到同一网卡的流量进行过滤和管理。
# 因为要使用Linux系统作为路由器或防火墙,并且需要对来自不同网卡的数据包进行过滤、转发或NAT操作。

# 为什么要开启net.ipv4.ip_forward = 1参数?
#   要让Linux系统具有路由转发功能,需要配置一个Linux的内核参数net.ipv4.ip_forward。这个参数指# 定了Linux系统当前对路由转发功能的支持情况;其值为0时表示禁止进行IP转发;如果是1,则说明IP转发# 功能已经打开。

# 4.配置阿里云的repo源
yum install -y yum-utils
yum-config-manager --add-repo http://mirrors.aliyun.com/docker-ce/linux/centos/docker-ce.repo

yum install -y yum-utils device-mapper-persistent-data lvm2 wget net-tools nfs-utils lrzsz gcc gcc-c++ make cmake libxml2-devel openssl-devel curl curl-devel unzip sudo ntp libaio-devel wget vim ncurses-devel autoconf automake zlib-devel  python-devel epel-release openssh-server socat  ipvsadm conntrack ntpdate telnet ipvsadm

# 5.配置安装k8s组件需要的阿里云的repo源
[root@k8smaster ~]# vim  /etc/yum.repos.d/kubernetes.repo
[kubernetes]
name=Kubernetes
baseurl=https://mirrors.aliyun.com/kubernetes/yum/repos/kubernetes-el7-x86_64/
enabled=1
gpgcheck=0

# 6.配置时间同步
[root@k8smaster ~]# crontab -e
* */1 * * * /usr/sbin/ntpdate   cn.pool.ntp.org

#重启crond服务
[root@k8smaster ~]# service crond restart

# 7.安装docker服务
yum install docker-ce-20.10.6 -y


# 启动docker,设置开机自启
systemctl start docker && systemctl enable docker.service

# 8.配置docker镜像加速器和驱动
vim  /etc/docker/daemon.json

{
 "registry-mirrors":["https://rsbud4vc.mirror.aliyuncs.com","https://registry.docker-cn.com","https://docker.mirrors.ustc.edu.cn","https://dockerhub.azk8s.cn","http://hub-mirror.c.163.com"],
  "exec-opts": ["native.cgroupdriver=systemd"]
}

# 重新加载配置,重启docker服务
systemctl daemon-reload  && systemctl restart docker

# 9.安装初始化k8s需要的软件包
yum install -y kubelet-1.20.6 kubeadm-1.20.6 kubectl-1.20.6

# 设置kubelet开机启动
systemctl enable kubelet

#注:每个软件包的作用
#Kubeadm:  kubeadm是一个工具,用来初始化k8s集群的
#kubelet:   安装在集群所有节点上,用于启动Pod的
#kubectl:   通过kubectl可以部署和管理应用,查看各种资源,创建、删除和更新各种组件

# 10.kubeadm初始化k8s集群
# 把初始化k8s集群需要的离线镜像包上传到k8smaster、k8snode1、k8snode2机器上,然后解压
docker load -i k8simage-1-20-6.tar.gz

# 把文件远程拷贝到node节点
root@k8smaster ~]# scp k8simage-1-20-6.tar.gz root@k8snode1:/root
root@k8smaster ~]# scp k8simage-1-20-6.tar.gz root@k8snode2:/root

# 查看镜像
[root@k8snode1 ~]# docker images
REPOSITORY                                                        TAG        IMAGE ID       CREATED       SIZE
registry.aliyuncs.com/google_containers/kube-proxy                v1.20.6    9a1ebfd8124d   2 years ago   118MB
registry.aliyuncs.com/google_containers/kube-scheduler            v1.20.6    b93ab2ec4475   2 years ago   47.3MB
registry.aliyuncs.com/google_containers/kube-controller-manager   v1.20.6    560dd11d4550   2 years ago   116MB
registry.aliyuncs.com/google_containers/kube-apiserver            v1.20.6    b05d611c1af9   2 years ago   122MB
calico/pod2daemon-flexvol                                         v3.18.0    2a22066e9588   2 years ago   21.7MB
calico/node                                                       v3.18.0    5a7c4970fbc2   2 years ago   172MB
calico/cni                                                        v3.18.0    727de170e4ce   2 years ago   131MB
calico/kube-controllers                                           v3.18.0    9a154323fbf7   2 years ago   53.4MB
registry.aliyuncs.com/google_containers/etcd                      3.4.13-0   0369cf4303ff   2 years ago   253MB
registry.aliyuncs.com/google_containers/coredns                   1.7.0      bfe3a36ebd25   3 years ago   45.2MB
registry.aliyuncs.com/google_containers/pause                     3.2        80d28bedfe5d   3 years ago   683kB

# 11.使用kubeadm初始化k8s集群
kubeadm config print init-defaults > kubeadm.yaml

[root@k8smaster ~]# vim kubeadm.yaml
apiVersion: kubeadm.k8s.io/v1beta2
bootstrapTokens:
- groups:
  - system:bootstrappers:kubeadm:default-node-token
  token: abcdef.0123456789abcdef
  ttl: 24h0m0s
  usages:
  - signing
  - authentication
kind: InitConfiguration
localAPIEndpoint:
  advertiseAddress: 192.168.2.104         #控制节点的ip
  bindPort: 6443
nodeRegistration:
  criSocket: /var/run/dockershim.sock
  name: k8smaster                        #控制节点主机名
  taints:
  - effect: NoSchedule
    key: node-role.kubernetes.io/master
---
apiServer:
  timeoutForControlPlane: 4m0s
apiVersion: kubeadm.k8s.io/v1beta2
certificatesDir: /etc/kubernetes/pki
clusterName: kubernetes
controllerManager: {}
dns:
  type: CoreDNS
etcd:
  local:
    dataDir: /var/lib/etcd
imageRepository: registry.aliyuncs.com/google_containers  # 需要修改为阿里云的仓库
kind: ClusterConfiguration
kubernetesVersion: v1.20.6
networking:
  dnsDomain: cluster.local
  serviceSubnet: 10.96.0.0/12
  podSubnet: 10.244.0.0/16         #指定pod网段,需要新增加这个
scheduler: {}
#追加如下几行
---
apiVersion: kubeproxy.config.k8s.io/v1alpha1
kind: KubeProxyConfiguration
mode: ipvs
---
apiVersion: kubelet.config.k8s.io/v1beta1
kind: KubeletConfiguration
cgroupDriver: systemd

# 12.基于kubeadm.yaml文件初始化k8s
[root@k8smaster ~]# kubeadm init --config=kubeadm.yaml --ignore-preflight-errors=SystemVerification

mkdir -p $HOME/.kube
sudo cp -i /etc/kubernetes/admin.conf $HOME/.kube/config
sudo chown $(id -u):$(id -g) $HOME/.kube/config

kubeadm join 192.168.2.104:6443 --token abcdef.0123456789abcdef \
    --discovery-token-ca-cert-hash sha256:83421a7d1baa62269508259b33e6563e45fbeb9139a9c214cbe9fc107f07cb4c

# 13.扩容k8s集群-添加工作节点
[root@k8snode1 ~]# kubeadm join 192.168.2.104:6443 --token abcdef.0123456789abcdef \
    --discovery-token-ca-cert-hash sha256:83421a7d1baa62269508259b33e6563e45fbeb9139a9c214cbe9fc107f07cb4c

[root@k8snode2 ~]# kubeadm join 192.168.2.104:6443 --token abcdef.0123456789abcdef \
    --discovery-token-ca-cert-hash sha256:83421a7d1baa62269508259b33e6563e45fbeb9139a9c214cbe9fc107f07cb4c

# 14.在k8smaster上查看集群节点状况
[root@k8smaster ~]# kubectl get nodes
NAME        STATUS     ROLES                  AGE     VERSION
k8smaster   NotReady   control-plane,master   2m49s   v1.20.6
k8snode1    NotReady                    19s     v1.20.6
k8snode2    NotReady                    14s     v1.20.6

# 15.k8snode1,k8snode2的ROLES角色为空,就表示这个节点是工作节点。
可以把k8snode1,k8snode2的ROLES变成work
[root@k8smaster ~]# kubectl label node k8snode1 node-role.kubernetes.io/worker=worker
node/k8snode1 labeled

[root@k8smaster ~]# kubectl label node k8snode2 node-role.kubernetes.io/worker=worker
node/k8snode2 labeled
[root@k8smaster ~]# kubectl get nodes
NAME        STATUS     ROLES                  AGE     VERSION
k8smaster   NotReady   control-plane,master   2m43s   v1.20.6
k8snode1    NotReady   worker                 2m15s   v1.20.6
k8snode2    NotReady   worker                 2m11s   v1.20.6
# 注意:上面状态都是NotReady状态,说明没有安装网络插件

# 16.安装kubernetes网络组件-Calico
# 上传calico.yaml到k8smaster上,使用yaml文件安装calico网络插件 。
wget https://docs.projectcalico.org/v3.23/manifests/calico.yaml --no-check-certificate

[root@k8smaster ~]# kubectl apply -f  calico.yaml
configmap/calico-config created
customresourcedefinition.apiextensions.k8s.io/bgpconfigurations.crd.projectcalico.org created
customresourcedefinition.apiextensions.k8s.io/bgppeers.crd.projectcalico.org created
customresourcedefinition.apiextensions.k8s.io/blockaffinities.crd.projectcalico.org created
customresourcedefinition.apiextensions.k8s.io/clusterinformations.crd.projectcalico.org created
customresourcedefinition.apiextensions.k8s.io/felixconfigurations.crd.projectcalico.org created
customresourcedefinition.apiextensions.k8s.io/globalnetworkpolicies.crd.projectcalico.org created
customresourcedefinition.apiextensions.k8s.io/globalnetworksets.crd.projectcalico.org created
customresourcedefinition.apiextensions.k8s.io/hostendpoints.crd.projectcalico.org created
customresourcedefinition.apiextensions.k8s.io/ipamblocks.crd.projectcalico.org created
customresourcedefinition.apiextensions.k8s.io/ipamconfigs.crd.projectcalico.org created
customresourcedefinition.apiextensions.k8s.io/ipamhandles.crd.projectcalico.org created
customresourcedefinition.apiextensions.k8s.io/ippools.crd.projectcalico.org created
customresourcedefinition.apiextensions.k8s.io/kubecontrollersconfigurations.crd.projectcalico.org created
customresourcedefinition.apiextensions.k8s.io/networkpolicies.crd.projectcalico.org created
customresourcedefinition.apiextensions.k8s.io/networksets.crd.projectcalico.org created
clusterrole.rbac.authorization.k8s.io/calico-kube-controllers created
clusterrolebinding.rbac.authorization.k8s.io/calico-kube-controllers created
clusterrole.rbac.authorization.k8s.io/calico-node created
clusterrolebinding.rbac.authorization.k8s.io/calico-node created
daemonset.apps/calico-node created
serviceaccount/calico-node created
deployment.apps/calico-kube-controllers created
serviceaccount/calico-kube-controllers created
poddisruptionbudget.policy/calico-kube-controllers created

# 再次查看集群状态
[root@k8smaster ~]# kubectl get nodes
NAME        STATUS   ROLES                  AGE     VERSION
k8smaster   Ready    control-plane,master   5m57s   v1.20.6
k8snode1    Ready    worker                 3m27s   v1.20.6
k8snode2    Ready    worker                 3m22s   v1.20.6
# STATUS状态是Ready,说明k8s集群正常运行了
2、部署ansible完成相关软件的自动化运维工作,部署防火墙服务器,部署堡垒机
# 1.建立免密通道 在ansible主机上生成密钥对
[root@ansible ~]# ssh-keygen -t ecdsa
Generating public/private ecdsa key pair.
Enter file in which to save the key (/root/.ssh/id_ecdsa):
Created directory '/root/.ssh'.
Enter passphrase (empty for no passphrase):
Enter same passphrase again:
Your identification has been saved in /root/.ssh/id_ecdsa.
Your public key has been saved in /root/.ssh/id_ecdsa.pub.
The key fingerprint is:
SHA256:FNgCSDVk6i3foP88MfekA2UzwNn6x3kyi7V+mLdoxYE root@ansible
The key's randomart image is:
+---[ECDSA 256]---+
| ..+*o =.        |
|  .o .* o.       |
|  .    +.  .     |
| . .  ..= E .    |
|  o o  +S+ o .   |
|   + o+ o O +    |
|  . . .= B X     |
|   . .. + B.o    |
|    ..o. +oo..   |
+----[SHA256]-----+
[root@ansible ~]# cd /root/.ssh
[root@ansible .ssh]# ls
id_ecdsa  id_ecdsa.pub
# 2.上传公钥到所有服务器的root用户家目录下
#     所有服务器上开启ssh服务 ,开放22号端口,允许root用户登录
# 上传公钥到k8smaster
[root@ansible .ssh]# ssh-copy-id -i id_ecdsa.pub [email protected]
/usr/bin/ssh-copy-id: INFO: Source of key(s) to be installed: "id_ecdsa.pub"
The authenticity of host '192.168.2.104 (192.168.2.104)' can't be established.
ECDSA key fingerprint is SHA256:l7LRfACELrI6mU2XvYaCz+sDBWiGkYnAecPgnxJxdvE.
ECDSA key fingerprint is MD5:b6:f7:e1:c5:23:24:5c:16:1f:66:42:ba:80:a6:3c:fd.
Are you sure you want to continue connecting (yes/no)? yes
/usr/bin/ssh-copy-id: INFO: attempting to log in with the new key(s), to filter out any that are already installed
/usr/bin/ssh-copy-id: INFO: 1 key(s) remain to be installed -- if you are prompted now it is to install the new keys
root@192.168.2.104's password:
Number of key(s) added: 1
Now try logging into the machine, with:   "ssh 'root@192.168.2.104'"
and check to make sure that only the key(s) you wanted were added.
# 上传公钥到k8snode
[root@ansible .ssh]# ssh-copy-id -i id_ecdsa.pub [email protected]
/usr/bin/ssh-copy-id: INFO: Source of key(s) to be installed: "id_ecdsa.pub"
The authenticity of host '192.168.2.111 (192.168.2.111)' can't be established.
ECDSA key fingerprint is SHA256:l7LRfACELrI6mU2XvYaCz+sDBWiGkYnAecPgnxJxdvE.
ECDSA key fingerprint is MD5:b6:f7:e1:c5:23:24:5c:16:1f:66:42:ba:80:a6:3c:fd.
Are you sure you want to continue connecting (yes/no)? yes
/usr/bin/ssh-copy-id: INFO: attempting to log in with the new key(s), to filter out any that are already installed
/usr/bin/ssh-copy-id: INFO: 1 key(s) remain to be installed -- if you are prompted now it is to install the new keys
root@192.168.2.111's password:
Number of key(s) added: 1
Now try logging into the machine, with:   "ssh 'root@192.168.2.111'"
and check to make sure that only the key(s) you wanted were added.
[root@ansible .ssh]# ssh-copy-id -i id_ecdsa.pub [email protected]
/usr/bin/ssh-copy-id: INFO: Source of key(s) to be installed: "id_ecdsa.pub"
The authenticity of host '192.168.2.112 (192.168.2.112)' can't be established.
ECDSA key fingerprint is SHA256:l7LRfACELrI6mU2XvYaCz+sDBWiGkYnAecPgnxJxdvE.
ECDSA key fingerprint is MD5:b6:f7:e1:c5:23:24:5c:16:1f:66:42:ba:80:a6:3c:fd.
Are you sure you want to continue connecting (yes/no)? yes
/usr/bin/ssh-copy-id: INFO: attempting to log in with the new key(s), to filter out any that are already installed
/usr/bin/ssh-copy-id: INFO: 1 key(s) remain to be installed -- if you are prompted now it is to install the new keys
root@192.168.2.112's password:
Number of key(s) added: 1
Now try logging into the machine, with:   "ssh 'root@192.168.2.112'"
and check to make sure that only the key(s) you wanted were added.
# 验证是否实现免密码密钥认证
[root@ansible .ssh]# ssh [email protected]
Last login: Tue Jun 20 10:33:33 2023 from 192.168.2.240
[root@nfs ~]# exit
登出
Connection to 192.168.2.121 closed.
[root@ansible .ssh]# ssh [email protected]
Last login: Tue Jun 20 10:34:18 2023 from 192.168.2.240
[root@k8snode2 ~]# exit
登出
Connection to 192.168.2.112 closed.
[root@ansible .ssh]#
# 3.安装ansible,在管理节点上
#     目前,只要机器上安装了 Python 2.6 或 Python 2.7 (windows系统不可以做控制主机),都可以运行Ansible.
[root@ansible .ssh]# yum install epel-release -y
[root@ansible .ssh]# yum  install ansible -y
[root@ansible ~]# ansible --version
ansible 2.9.27
  config file = /etc/ansible/ansible.cfg
  configured module search path = [u'/root/.ansible/plugins/modules', u'/usr/share/ansible/plugins/modules']
  ansible python module location = /usr/lib/python2.7/site-packages/ansible
  executable location = /usr/bin/ansible
  python version = 2.7.5 (default, Oct 14 2020, 14:45:30) [GCC 4.8.5 20150623 (Red Hat 4.8.5-44)]
# 4.编写主机清单
[root@ansible .ssh]# cd /etc/ansible
[root@ansible ansible]# ls
ansible.cfg  hosts  roles
[root@ansible ansible]# vim hosts
## 192.168.1.110
[k8smaster]
192.168.2.104
[k8snode]
192.168.2.111
192.168.2.112
[nfs]
192.168.2.121
[gitlab]
192.168.2.124
[harbor]
192.168.2.106
[zabbix]
192.168.2.117
# 测试
[root@ansible ansible]# ansible all -m shell -a "ip add"
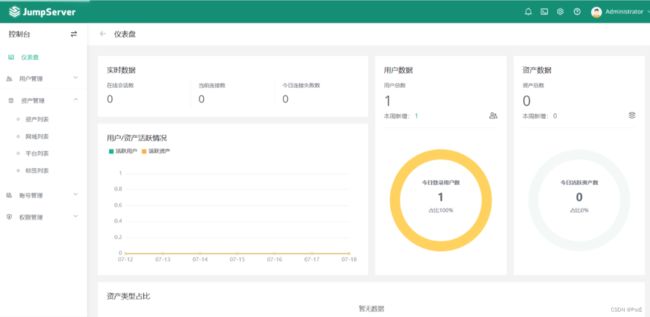
a、部署堡垒机
仅需两步快速安装 JumpServer:
准备一台 2核4G (最低)且可以访问互联网的 64 位 Linux 主机;
以 root 用户执行如下命令一键安装 JumpServer。
curl -sSL https://resource.fit2cloud.com/jumpserver/jumpserver/releases/latest/download/quick_start.sh | bash
b、部署firewall服务器
# 关闭虚拟机,增加一块网卡(ens37)

# 编写脚本实现SNAT_DNAT功能
[root@firewalld ~]# cat snat_dnat.sh
#!/bin/bash

# open  route
echo 1 >/proc/sys/net/ipv4/ip_forward

# stop firewall
systemctl   stop  firewalld
systemctl disable firewalld

# clear iptables rule
iptables -F
iptables -t nat -F

# enable snat
iptables -t nat  -A POSTROUTING  -s 192.168.2.0/24  -o ens33  -j  MASQUERADE
#内网来的192.168.2.0网段过来的ip地址全部伪装(替换)为ens33接口的公网ip地址,好处就是不需要考虑ens33接口的ip地址是多少,你是哪个ip地址,我就伪装成哪个ip地址


# enable dnat
iptables  -t nat -A PREROUTING  -d 192.168.0.169 -i ens33  -p tcp  --dport 2233 -j DNAT  --to-destination 192.168.2.104:22

# open web 80
iptables  -t nat -A PREROUTING  -d 192.168.0.169 -i ens33  -p tcp  --dport 80   -j DNAT  --to-destination 192.168.2.104:80


# web服务器上操作
[root@k8smaster ~]# cat open_app.sh
#!/bin/bash

# open ssh
iptables -t filter  -A INPUT  -p tcp  --dport  22 -j ACCEPT

# open dns
iptables -t filter  -A INPUT  -p udp  --dport 53 -s 192.168.2.0/24 -j ACCEPT

# open dhcp
iptables -t filter  -A INPUT  -p udp   --dport 67 -j ACCEPT

# open http/https
iptables -t filter  -A INPUT -p tcp   --dport 80 -j ACCEPT
iptables -t filter  -A INPUT -p tcp   --dport 443 -j ACCEPT

# open mysql
iptables  -t filter  -A INPUT -p tcp  --dport 3306  -j ACCEPT

# default policy DROP
iptables  -t filter  -P INPUT DROP

# drop icmp request
iptables -t filter  -A INPUT -p icmp  --icmp-type 8 -j DROP
3、部署nfs服务器,为整个web集群提供数据,让所有的web业务pod都去访问,通过pv、pvc和卷挂载实现
# 1.搭建好nfs服务器
[root@nfs ~]# yum install nfs-utils -y

# 建议k8s集群内的所有的节点都安装nfs-utils软件,因为节点服务器里创建卷需要支持nfs网络文件系统
[root@k8smaster ~]# yum install nfs-utils -y

[root@k8smaster ~]# service nfs restart
Redirecting to /bin/systemctl restart nfs.service

[root@k8smaster ~]# ps aux |grep nfs
root      87368  0.0  0.0      0     0 ?        S<   16:49   0:00 [nfsd4_callbacks]
root      87374  0.0  0.0      0     0 ?        S    16:49   0:00 [nfsd]
root      87375  0.0  0.0      0     0 ?        S    16:49   0:00 [nfsd]
root      87376  0.0  0.0      0     0 ?        S    16:49   0:00 [nfsd]
root      87377  0.0  0.0      0     0 ?        S    16:49   0:00 [nfsd]
root      87378  0.0  0.0      0     0 ?        S    16:49   0:00 [nfsd]
root      87379  0.0  0.0      0     0 ?        S    16:49   0:00 [nfsd]
root      87380  0.0  0.0      0     0 ?        S    16:49   0:00 [nfsd]
root      87381  0.0  0.0      0     0 ?        S    16:49   0:00 [nfsd]
root      96648  0.0  0.0 112824   988 pts/0    S+   17:02   0:00 grep --color=auto nfs

# 2.设置共享目录
[root@nfs ~]# vim /etc/exports
[root@nfs ~]# cat /etc/exports
/web   192.168.2.0/24(rw,no_root_squash,sync)

# 3.新建共享目录和index.html
[root@nfs ~]# mkdir /web
[root@nfs ~]# cd /web
[root@nfs web]# echo "welcome to changsha" >index.html
[root@nfs web]# ls
index.html
[root@nfs web]# ll -d /web
drwxr-xr-x. 2 root root 24 6月  18 16:46 /web

# 4.刷新nfs或者重新输出共享目录
[root@nfs ~]# exportfs -r   #输出所有共享目录
[root@nfs ~]# exportfs -v   #显示输出的共享目录
/web            192.168.2.0/24(sync,wdelay,hide,no_subtree_check,sec=sys,rw,secure,no_root_squash,no_all_squash)

# 5.重启nfs服务并且设置nfs开机自启
[root@nfs web]# systemctl restart nfs && systemctl enable nfs
Created symlink from /etc/systemd/system/multi-user.target.wants/nfs-server.service to /usr/lib/systemd/system/nfs-server.service.

# 6.在k8s集群里的任意一个节点服务器上测试能否挂载nfs服务器共享的目录
[root@k8snode1 ~]# mkdir /node1_nfs
[root@k8snode1 ~]# mount 192.168.2.121:/web /node1_nfs
您在 /var/spool/mail/root 中有新邮件
[root@k8snode1 ~]# df -Th|grep nfs
192.168.2.121:/web      nfs4       17G  1.5G   16G    9% /node1_nfs

# 7.取消挂载
[root@k8snode1 ~]# umount  /node1_nfs

# 8.创建pv使用nfs服务器上的共享目录
[root@k8smaster pv]# vim nfs-pv.yml
[root@k8smaster pv]# cat nfs-pv.yml
apiVersion: v1
kind: PersistentVolume
metadata:
  name: pv-web
  labels:
    type: pv-web
spec:
  capacity:
    storage: 10Gi
  accessModes:
    - ReadWriteMany
  storageClassName: nfs         # pv对应的名字
  nfs:
    path: "/web"       # nfs共享的目录
    server: 192.168.2.121   # nfs服务器的ip地址
    readOnly: false   # 访问模式

[root@k8smaster pv]# kubectl apply -f nfs-pv.yml
persistentvolume/pv-web created
[root@k8smaster pv]# kubectl get pv
NAME     CAPACITY   ACCESS MODES   RECLAIM POLICY   STATUS      CLAIM   STORAGECLASS   REASON   AGE
pv-web   10Gi       RWX            Retain           Available           nfs                     5s

# 9.创建pvc使用pv
[root@k8smaster pv]# vim nfs-pvc.yml
[root@k8smaster pv]# cat nfs-pvc.yml
apiVersion: v1
kind: PersistentVolumeClaim
metadata:
  name: pvc-web
spec:
  accessModes:
  - ReadWriteMany
  resources:
     requests:
       storage: 1Gi
  storageClassName: nfs #使用nfs类型的pv

[root@k8smaster pv]# kubectl apply -f pvc-nfs.yaml
persistentvolumeclaim/sc-nginx-pvc created
[root@k8smaster pv]# kubectl apply -f nfs-pvc.yml
persistentvolumeclaim/pvc-web created

[root@k8smaster pv]# kubectl get pvc
NAME      STATUS   VOLUME   CAPACITY   ACCESS MODES   STORAGECLASS   AGE
pvc-web   Bound    pv-web   10Gi       RWX            nfs            6s

# 10.创建pod使用pvc
[root@k8smaster pv]# vim nginx-deployment.yaml
[root@k8smaster pv]# cat nginx-deployment.yaml
apiVersion: apps/v1
kind: Deployment
metadata:
  name: nginx-deployment
  labels:
    app: nginx
spec:
  replicas: 3
  selector:
    matchLabels:
      app: nginx
  template:
    metadata:
      labels:
        app: nginx
    spec:
      volumes:
        - name: sc-pv-storage-nfs
          persistentVolumeClaim:
            claimName: pvc-web
      containers:
        - name: sc-pv-container-nfs
          image: nginx
          imagePullPolicy: IfNotPresent
          ports:
            - containerPort: 80
              name: "http-server"
          volumeMounts:
            - mountPath: "/usr/share/nginx/html"
              name: sc-pv-storage-nfs

[root@k8smaster pv]# kubectl apply -f nginx-deployment.yaml
deployment.apps/nginx-deployment created

[root@k8smaster pv]# kubectl get pod -o wide
NAME                                READY   STATUS    RESTARTS   AGE   IP               NODE       NOMINATED NODE   READINESS GATES
nginx-deployment-76855d4d79-2q4vh   1/1     Running   0          42s   10.244.185.194   k8snode2
nginx-deployment-76855d4d79-mvgq7   1/1     Running   0          42s   10.244.185.195   k8snode2
nginx-deployment-76855d4d79-zm8v4   1/1     Running   0          42s   10.244.249.3     k8snode1

# 11.测试访问
[root@k8smaster pv]# curl 10.244.185.194
welcome to changsha
[root@k8smaster pv]# curl 10.244.185.195
welcome to changsha
[root@k8smaster pv]# curl 10.244.249.3
welcome to changsha

[root@k8snode1 ~]# curl 10.244.185.194
welcome to changsha
[root@k8snode1 ~]# curl 10.244.185.195
welcome to changsha
[root@k8snode1 ~]# curl 10.244.249.3
welcome to changsha

[root@k8snode2 ~]# curl 10.244.185.194
welcome to changsha
[root@k8snode2 ~]# curl 10.244.185.195
welcome to changsha
[root@k8snode2 ~]# curl 10.244.249.3
welcome to changsha

# 12.修改内容
[root@nfs web]# echo "hello,world" >> index.html
[root@nfs web]# cat index.html
welcome to changsha
hello,world

# 13.再次访问
[root@k8snode1 ~]# curl 10.244.249.3
welcome to changsha
hello,world
4、构建CI/CD环境,部署gitlab,Jenkins,harbor实现相关的代码发布,镜像制作,数据备份等流水线工作
a、部署gitlab
# 部署gitlab
https://gitlab.cn/install/

[root@localhost ~]# hostnamectl set-hostname gitlab
[root@localhost ~]# su - root
su - root
上一次登录:日 6月 18 18:28:08 CST 2023从 192.168.2.240pts/0 上
[root@gitlab ~]# cd /etc/sysconfig/network-scripts/
[root@gitlab network-scripts]# vim ifcfg-ens33
[root@gitlab network-scripts]# service network restart
Restarting network (via systemctl):                        [  确定  ]
[root@gitlab network-scripts]# sed -i 's/SELINUX=enforcing/SELINUX=disabled/g' /etc/selinux/config
[root@gitlab network-scripts]# service firewalld stop && systemctl disable firewalld
Redirecting to /bin/systemctl stop firewalld.service
Removed symlink /etc/systemd/system/multi-user.target.wants/firewalld.service.
Removed symlink /etc/systemd/system/dbus-org.fedoraproject.FirewallD1.service.
[root@gitlab network-scripts]# reboot
[root@gitlab ~]# getenforce
Disabled

# 1.安装和配置必须的依赖项
yum install -y curl policycoreutils-python openssh-server perl

# 2.配置极狐GitLab 软件源镜像
[root@gitlab ~]# curl -fsSL https://packages.gitlab.cn/repository/raw/scripts/setup.sh | /bin/bash
==> Detected OS centos

==> Add yum repo file to /etc/yum.repos.d/gitlab-jh.repo

[gitlab-jh]
name=JiHu GitLab
baseurl=https://packages.gitlab.cn/repository/el/$releasever/
gpgcheck=0
gpgkey=https://packages.gitlab.cn/repository/raw/gpg/public.gpg.key
priority=1
enabled=1

==> Generate yum cache for gitlab-jh

==> Successfully added gitlab-jh repo. To install JiHu GitLab, run "sudo yum/dnf install gitlab-jh".

[root@gitlab ~]# yum install gitlab-jh -y
Thank you for installing JiHu GitLab!
GitLab was unable to detect a valid hostname for your instance.
Please configure a URL for your JiHu GitLab instance by setting `external_url`
configuration in /etc/gitlab/gitlab.rb file.
Then, you can start your JiHu GitLab instance by running the following command:
  sudo gitlab-ctl reconfigure

For a comprehensive list of configuration options please see the Omnibus GitLab readme
https://jihulab.com/gitlab-cn/omnibus-gitlab/-/blob/main-jh/README.md

Help us improve the installation experience, let us know how we did with a 1 minute survey:
https://wj.qq.com/s2/10068464/dc66

[root@gitlab ~]# vim /etc/gitlab/gitlab.rb
external_url 'http://myweb.first.com'

[root@gitlab ~]# gitlab-ctl reconfigure
Notes:
Default admin account has been configured with following details:
Username: root
Password: You didn't opt-in to print initial root password to STDOUT.
Password stored to /etc/gitlab/initial_root_password. This file will be cleaned up in first reconfigure run after 24 hours.
NOTE: Because these credentials might be present in your log files in plain text, it is highly recommended to reset the password following https://docs.gitlab.com/ee/security/reset_user_password.html#reset-your-root-password.
gitlab Reconfigured!
# 查看密码
[root@gitlab ~]# cat /etc/gitlab/initial_root_password
# WARNING: This value is valid only in the following conditions
#          1. If provided manually (either via `GITLAB_ROOT_PASSWORD` environment variable or via `gitlab_rails['initial_root_password']` setting in `gitlab.rb`, it was provided before database was seeded for the first time (usually, the first reconfigure run).
#          2. Password hasn't been changed manually, either via UI or via command line.
#
#          If the password shown here doesn't work, you must reset the admin password following https://docs.gitlab.com/ee/security/reset_user_password.html#reset-your-root-password.

Password: Al5rgYomhXDz5kNfDl3y8qunrSX334aZZxX5vONJ05s=

# NOTE: This file will be automatically deleted in the first reconfigure run after 24 hours.

# 可以登录后修改语言为中文
# 用户的profile/preferences

# 修改密码

[root@gitlab ~]# gitlab-rake gitlab:env:info

System information
System:
Proxy:      no
Current User:   git
Using RVM:  no
Ruby Version:   3.0.6p216
Gem Version:    3.4.13
Bundler Version:2.4.13
Rake Version:   13.0.6
Redis Version:  6.2.11
Sidekiq Version:6.5.7
Go Version: unknown

GitLab information
Version:    16.0.4-jh
Revision:   c2ed99db36f
Directory:  /opt/gitlab/embedded/service/gitlab-rails
DB Adapter: PostgreSQL
DB Version: 13.11
URL:        http://myweb.first.com
HTTP Clone URL: http://myweb.first.com/some-group/some-project.git
SSH Clone URL:  git@myweb.first.com:some-group/some-project.git
Elasticsearch:  no
Geo:        no
Using LDAP: no
Using Omniauth: yes
Omniauth Providers:

GitLab Shell
Version:    14.20.0
Repository storages:
- default:  unix:/var/opt/gitlab/gitaly/gitaly.socket
GitLab Shell path:      /opt/gitlab/embedded/service/gitlab-shell
b、部署Jenkins
# Jenkins部署到k8s里
# 1.安装git软件
[root@k8smaster jenkins]# yum install git -y

# 2.下载相关的yaml文件
[root@k8smaster jenkins]# git clone https://github.com/scriptcamp/kubernetes-jenkins
正克隆到 'kubernetes-jenkins'...
remote: Enumerating objects: 16, done.
remote: Counting objects: 100% (7/7), done.
remote: Compressing objects: 100% (7/7), done.
remote: Total 16 (delta 1), reused 0 (delta 0), pack-reused 9
Unpacking objects: 100% (16/16), done.
[root@k8smaster jenkins]# ls
kubernetes-jenkins
[root@k8smaster jenkins]# cd kubernetes-jenkins/
[root@k8smaster kubernetes-jenkins]# ls
deployment.yaml  namespace.yaml  README.md  serviceAccount.yaml  service.yaml  volume.yaml

# 3.创建命名空间
[root@k8smaster kubernetes-jenkins]# cat namespace.yaml
apiVersion: v1
kind: Namespace
metadata:
  name: devops-tools
[root@k8smaster kubernetes-jenkins]# kubectl apply -f namespace.yaml
namespace/devops-tools created

[root@k8smaster kubernetes-jenkins]# kubectl get ns
NAME                   STATUS   AGE
default                Active   22h
devops-tools           Active   19s
ingress-nginx          Active   139m
kube-node-lease        Active   22h
kube-public            Active   22h
kube-system            Active   22h

# 4.创建服务账号,集群角色,绑定
[root@k8smaster kubernetes-jenkins]# cat serviceAccount.yaml
---
apiVersion: rbac.authorization.k8s.io/v1
kind: ClusterRole
metadata:
  name: jenkins-admin
rules:
  - apiGroups: [""]
    resources: ["*"]
    verbs: ["*"]

---
apiVersion: v1
kind: ServiceAccount
metadata:
  name: jenkins-admin
  namespace: devops-tools

---
apiVersion: rbac.authorization.k8s.io/v1
kind: ClusterRoleBinding
metadata:
  name: jenkins-admin
roleRef:
  apiGroup: rbac.authorization.k8s.io
  kind: ClusterRole
  name: jenkins-admin
subjects:
- kind: ServiceAccount
  name: jenkins-admin

[root@k8smaster kubernetes-jenkins]# kubectl apply -f serviceAccount.yaml
clusterrole.rbac.authorization.k8s.io/jenkins-admin created
serviceaccount/jenkins-admin created
clusterrolebinding.rbac.authorization.k8s.io/jenkins-admin created

# 5.创建卷,用来存放数据
[root@k8smaster kubernetes-jenkins]# cat volume.yaml
kind: StorageClass
apiVersion: storage.k8s.io/v1
metadata:
  name: local-storage
provisioner: kubernetes.io/no-provisioner
volumeBindingMode: WaitForFirstConsumer

---
apiVersion: v1
kind: PersistentVolume
metadata:
  name: jenkins-pv-volume
  labels:
    type: local
spec:
  storageClassName: local-storage
  claimRef:
    name: jenkins-pv-claim
    namespace: devops-tools
  capacity:
    storage: 10Gi
  accessModes:
    - ReadWriteOnce
  local:
    path: /mnt
  nodeAffinity:
    required:
      nodeSelectorTerms:
      - matchExpressions:
        - key: kubernetes.io/hostname
          operator: In
          values:
          - k8snode1   # 需要修改为k8s里的node节点的名字

---
apiVersion: v1
kind: PersistentVolumeClaim
metadata:
  name: jenkins-pv-claim
  namespace: devops-tools
spec:
  storageClassName: local-storage
  accessModes:
    - ReadWriteOnce
  resources:
    requests:
      storage: 3Gi

[root@k8smaster kubernetes-jenkins]# kubectl apply -f volume.yaml
storageclass.storage.k8s.io/local-storage created
persistentvolume/jenkins-pv-volume created
persistentvolumeclaim/jenkins-pv-claim created

[root@k8smaster kubernetes-jenkins]# kubectl get pv
NAME                CAPACITY   ACCESS MODES   RECLAIM POLICY   STATUS   CLAIM                           STORAGECLASS    REASON   AGE
jenkins-pv-volume   10Gi       RWO            Retain           Bound    devops-tools/jenkins-pv-claim   local-storage            33s
pv-web              10Gi       RWX            Retain           Bound    default/pvc-web                 nfs                      21h

[root@k8smaster kubernetes-jenkins]# kubectl describe pv jenkins-pv-volume
Name:              jenkins-pv-volume
Labels:            type=local
Annotations:
Finalizers:        [kubernetes.io/pv-protection]
StorageClass:      local-storage
Status:            Bound
Claim:             devops-tools/jenkins-pv-claim
Reclaim Policy:    Retain
Access Modes:      RWO
VolumeMode:        Filesystem
Capacity:          10Gi
Node Affinity:
  Required Terms:
    Term 0:        kubernetes.io/hostname in [k8snode1]
Message:
Source:
    Type:  LocalVolume (a persistent volume backed by local storage on a node)
    Path:  /mnt
Events:

# 6.部署Jenkins
[root@k8smaster kubernetes-jenkins]# cat deployment.yaml
apiVersion: apps/v1
kind: Deployment
metadata:
  name: jenkins
  namespace: devops-tools
spec:
  replicas: 1
  selector:
    matchLabels:
      app: jenkins-server
  template:
    metadata:
      labels:
        app: jenkins-server
    spec:
      securityContext:
            fsGroup: 1000
            runAsUser: 1000
      serviceAccountName: jenkins-admin
      containers:
        - name: jenkins
          image: jenkins/jenkins:lts
          imagePullPolicy: IfNotPresent
          resources:
            limits:
              memory: "2Gi"
              cpu: "1000m"
            requests:
              memory: "500Mi"
              cpu: "500m"
          ports:
            - name: httpport
              containerPort: 8080
            - name: jnlpport
              containerPort: 50000
          livenessProbe:
            httpGet:
              path: "/login"
              port: 8080
            initialDelaySeconds: 90
            periodSeconds: 10
            timeoutSeconds: 5
            failureThreshold: 5
          readinessProbe:
            httpGet:
              path: "/login"
              port: 8080
            initialDelaySeconds: 60
            periodSeconds: 10
            timeoutSeconds: 5
            failureThreshold: 3
          volumeMounts:
            - name: jenkins-data
              mountPath: /var/jenkins_home
      volumes:
        - name: jenkins-data
          persistentVolumeClaim:
              claimName: jenkins-pv-claim

[root@k8smaster kubernetes-jenkins]# kubectl apply -f deployment.yaml
deployment.apps/jenkins created

[root@k8smaster kubernetes-jenkins]# kubectl get deploy -n devops-tools
NAME      READY   UP-TO-DATE   AVAILABLE   AGE
jenkins   1/1     1            1           5m36s

[root@k8smaster kubernetes-jenkins]# kubectl get pod -n devops-tools
NAME                       READY   STATUS    RESTARTS   AGE
jenkins-7fdc8dd5fd-bg66q   1/1     Running   0          19s

# 7.启动服务发布Jenkins的pod
[root@k8smaster kubernetes-jenkins]# cat service.yaml
apiVersion: v1
kind: Service
metadata:
  name: jenkins-service
  namespace: devops-tools
  annotations:
      prometheus.io/scrape: 'true'
      prometheus.io/path:   /
      prometheus.io/port:   '8080'
spec:
  selector:
    app: jenkins-server
  type: NodePort
  ports:
    - port: 8080
      targetPort: 8080
      nodePort: 32000

[root@k8smaster kubernetes-jenkins]# kubectl apply -f service.yaml
service/jenkins-service created

[root@k8smaster kubernetes-jenkins]# kubectl get svc -n devops-tools
NAME              TYPE       CLUSTER-IP      EXTERNAL-IP   PORT(S)          AGE
jenkins-service   NodePort   10.104.76.252           8080:32000/TCP   24s

# 8.在Windows机器上访问Jenkins,宿主机ip+端口号
http://192.168.2.104:32000/login?from=%2F

# 9.进入pod里获取登录的密码
[root@k8smaster kubernetes-jenkins]# kubectl exec -it jenkins-7fdc8dd5fd-bg66q  -n devops-tools -- bash
bash-5.1$ cat /var/jenkins_home/secrets/initialAdminPassword
b0232e2dad164f89ad2221e4c46b0d46

# 修改密码

[root@k8smaster kubernetes-jenkins]# kubectl get pod -n devops-tools
NAME                       READY   STATUS    RESTARTS   AGE
jenkins-7fdc8dd5fd-5nn7m   1/1     Running   0          91s
c、部署harbor
# 前提是安装好 docker 和 docker compose
# 1.配置阿里云的repo源
yum install -y yum-utils

yum-config-manager --add-repo http://mirrors.aliyun.com/docker-ce/linux/centos/docker-ce.repo

# 2.安装docker服务
yum install docker-ce-20.10.6 -y

# 启动docker,设置开机自启
systemctl start docker && systemctl enable docker.service

# 3.查看docker版本,docker compose版本
[root@harbor ~]# docker version
Client: Docker Engine - Community
 Version:           24.0.2
 API version:       1.41 (downgraded from 1.43)
 Go version:        go1.20.4
 Git commit:        cb74dfc
 Built:             Thu May 25 21:55:21 2023
 OS/Arch:           linux/amd64
 Context:           default

Server: Docker Engine - Community
 Engine:
  Version:          20.10.6
  API version:      1.41 (minimum version 1.12)
  Go version:       go1.13.15
  Git commit:       8728dd2
  Built:            Fri Apr  9 22:43:57 2021
  OS/Arch:          linux/amd64
  Experimental:     false
 containerd:
  Version:          1.6.21
  GitCommit:        3dce8eb055cbb6872793272b4f20ed16117344f8
 runc:
  Version:          1.1.7
  GitCommit:        v1.1.7-0-g860f061
 docker-init:
  Version:          0.19.0
  GitCommit:        de40ad0

[root@harbor ~]# docker compose version
Docker Compose version v2.18.1

# 4.安装 docker-compose
[root@harbor ~]# ls
anaconda-ks.cfg  docker-compose-linux-x86_64  harbor
[root@harbor ~]# chmod +x docker-compose-linux-x86_64
[root@harbor ~]# mv docker-compose-linux-x86_64 /usr/local/sbin/docker-compose

# 5.安装 harbor,到 harbor 官网或者 github 下载harbor源码包
[root@harbor harbor]# ls
harbor-offline-installer-v2.4.1.tgz

# 6.解压
[root@harbor harbor]# tar xf harbor-offline-installer-v2.4.1.tgz
[root@harbor harbor]# ls
harbor  harbor-offline-installer-v2.4.1.tgz
[root@harbor harbor]# cd harbor
[root@harbor harbor]# ls
common.sh  harbor.v2.4.1.tar.gz  harbor.yml.tmpl  install.sh  LICENSE  prepare
[root@harbor harbor]# pwd
/root/harbor/harbor

# 7.修改配置文件
[root@harbor harbor]# cat harbor.yml
# Configuration file of Harbor

# The IP address or hostname to access admin UI and registry service.
# DO NOT use localhost or 127.0.0.1, because Harbor needs to be accessed by external clients.
hostname: 192.168.2.106  # 修改为主机ip地址

# http related config
http:
  # port for http, default is 80. If https enabled, this port will redirect to https port
  port: 5000  # 修改成其他端口号

#https可以全关闭
# https related config
#https:
  # https port for harbor, default is 443
  #port: 443
  # The path of cert and key files for nginx
  #certificate: /your/certificate/path
  #private_key: /your/private/key/path

# # Uncomment following will enable tls communication between all harbor components
# internal_tls:
#   # set enabled to true means internal tls is enabled
#   enabled: true
#   # put your cert and key files on dir
#   dir: /etc/harbor/tls/internal

# Uncomment external_url if you want to enable external proxy
# And when it enabled the hostname will no longer used
# external_url: https://reg.mydomain.com:8433

# The initial password of Harbor admin
# It only works in first time to install harbor
# Remember Change the admin password from UI after launching Harbor.
harbor_admin_password: Harbor12345  #登录密码

# Harbor DB configuration
database:
  # The password for the root user of Harbor DB. Change this before any production use.
  password: root123
  # The maximum number of connections in the idle connection pool. If it <=0, no idle connections are retained.
  max_idle_conns: 100
  # The maximum number of open connections to the database. If it <= 0, then there is no limit on the number of open connections.
  # Note: the default number of connections is 1024 for postgres of harbor.
  max_open_conns: 900

# The default data volume
data_volume: /data

# 8.执行部署脚本
[root@harbor harbor]# ./install.sh

[Step 0]: checking if docker is installed ...

Note: docker version: 24.0.2

[Step 1]: checking docker-compose is installed ...
✖ Need to install docker-compose(1.18.0+) by yourself first and run this script again.

[root@harbor harbor]# ./install.sh
[+] Running 10/10
 ⠿ Network harbor_harbor        Created                                                                                                                                                                                                0.7s
 ⠿ Container harbor-log         Started                                                                                                                                                                                                1.6s
 ⠿ Container registry           Started                                                                                                                                                                                                5.2s
 ⠿ Container harbor-db          Started                                                                                                                                                                                                4.9s
 ⠿ Container harbor-portal      Started                                                                                                                                                                                                5.1s
 ⠿ Container registryctl        Started                                                                                                                                                                                                4.8s
 ⠿ Container redis              Started                                                                                                                                                                                                3.9s
 ⠿ Container harbor-core        Started                                                                                                                                                                                                6.5s
 ⠿ Container harbor-jobservice  Started                                                                                                                                                                                                9.0s
 ⠿ Container nginx              Started                                                                                                                                                                                                9.1s
✔ ----Harbor has been installed and started successfully.----

# 9.配置开机自启
[root@harbor harbor]# vim /etc/rc.local
[root@harbor harbor]# cat /etc/rc.local
#!/bin/bash
# THIS FILE IS ADDED FOR COMPATIBILITY PURPOSES
#
# It is highly advisable to create own systemd services or udev rules
# to run scripts during boot instead of using this file.
#
# In contrast to previous versions due to parallel execution during boot
# this script will NOT be run after all other services.
#
# Please note that you must run 'chmod +x /etc/rc.d/rc.local' to ensure
# that this script will be executed during boot.

touch /var/lock/subsys/local
/usr/local/sbin/docker-compose -f /root/harbor/harbor/docker-compose.yml up -d


# 10.设置权限
[root@harbor harbor]# chmod +x /etc/rc.local /etc/rc.d/rc.local

# 11.登录
http://192.168.2.106:5000/

# 账号:admin
# 密码:Harbor12345

# 新建一个项目
# 测试(以nginx为例进行推送到harbor上)
[root@harbor harbor]# docker image ls | grep nginx
nginx                           latest    605c77e624dd   17 months ago   141MB
goharbor/nginx-photon           v2.4.1    78aad8c8ef41   18 months ago   45.7MB

[root@harbor harbor]# docker tag nginx:latest 192.168.2.106:5000/test/nginx1:v1

[root@harbor harbor]# docker image ls | grep nginx
192.168.2.106:5000/test/nginx1   v1        605c77e624dd   17 months ago   141MB
nginx                            latest    605c77e624dd   17 months ago   141MB
goharbor/nginx-photon            v2.4.1    78aad8c8ef41   18 months ago   45.7MB
[root@harbor harbor]# docker push 192.168.2.106:5000/test/nginx1:v1
The push refers to repository [192.168.2.106:5000/test/nginx1]
Get https://192.168.2.106:5000/v2/: http: server gave HTTP response to HTTPS client

[root@harbor harbor]# vim /etc/docker/daemon.json
{
 "insecure-registries":["192.168.2.106:5000"]
}

[root@harbor harbor]# docker login 192.168.2.106:5000
Username: admin
Password:
WARNING! Your password will be stored unencrypted in /root/.docker/config.json.
Configure a credential helper to remove this warning. See
https://docs.docker.com/engine/reference/commandline/login/#credentials-store

Login Succeeded

[root@harbor harbor]# docker push 192.168.2.106:5000/test/nginx1:v1
The push refers to repository [192.168.2.106:5000/test/nginx1]
d874fd2bc83b: Pushed
32ce5f6a5106: Pushed
f1db227348d0: Pushed
b8d6e692a25e: Pushed
e379e8aedd4d: Pushed
2edcec3590a4: Pushed
v1: digest: sha256:ee89b00528ff4f02f2405e4ee221743ebc3f8e8dd0bfd5c4c20a2fa2aaa7ede3 size: 1570
[root@harbor harbor]# cat /etc/docker/daemon.json
{
 "insecure-registries":["192.168.2.106:5000"]
}
5、将自己用go开发的web接口系统制作成镜像,部署到k8s里作为web应用;采用HPA技术,当cpu使用率达到50%的时候,进行水平扩缩,最小20个业务pod,最多40个业务pod
# k8s集群每个节点都登入到harbor中,以便于从harbor中拉回镜像。
[root@k8snode2 ~]# cat /etc/docker/daemon.json
{
 "registry-mirrors":["https://rsbud4vc.mirror.aliyuncs.com","https://registry.docker-cn.com","https://docker.mirrors.ustc.edu.cn","https://dockerhub.azk8s.cn","http://hub-mirror.c.163.com"],
  "insecure-registries":["192.168.2.106:5000"],
  "exec-opts": ["native.cgroupdriver=systemd"]
}


# 重新加载配置,重启docker服务
systemctl daemon-reload  && systemctl restart docker

# 登录harbor
[root@k8smaster mysql]# docker login 192.168.2.106:5000
Username: admin
Password:
WARNING! Your password will be stored unencrypted in /root/.docker/config.json.
Configure a credential helper to remove this warning. See
https://docs.docker.com/engine/reference/commandline/login/#credentials-store

Login Succeeded

[root@k8snode1 ~]# docker login 192.168.2.106:5000
Username: admin
Password:
WARNING! Your password will be stored unencrypted in /root/.docker/config.json.
Configure a credential helper to remove this warning. See
https://docs.docker.com/engine/reference/commandline/login/#credentials-store

Login Succeeded

[root@k8snode2 ~]# docker login 192.168.2.106:5000
Username: admin
Password:
WARNING! Your password will be stored unencrypted in /root/.docker/config.json.
Configure a credential helper to remove this warning. See
https://docs.docker.com/engine/reference/commandline/login/#credentials-store

Login Succeeded

# 测试:从harbor拉取nginx镜像
[root@k8snode1 ~]# docker pull 192.168.2.106:5000/test/nginx1:v1

[root@k8snode1 ~]# docker images
REPOSITORY                                                                     TAG        IMAGE ID       CREATED         SIZE
mysql                                                                          5.7.42     2be84dd575ee   5 days ago      569MB
nginx                                                                          latest     605c77e624dd   17 months ago   141MB
192.168.2.106:5000/test/nginx1                                                 v1         605c77e624dd   17 months ago   141MB

# 制作镜像
[root@harbor ~]# cd go
[root@harbor go]# ls
scweb  Dockerfile
[root@harbor go]# cat Dockerfile
FROM centos:7
WORKDIR /go
COPY . /go
RUN ls /go && pwd
ENTRYPOINT ["/go/scweb"]

[root@harbor go]# docker build  -t scmyweb:1.1 .

[root@harbor go]# docker image ls | grep scweb
scweb                            1.1       f845e97e9dfd   4 hours ago      214MB

[root@harbor go]#  docker tag scweb:1.1 192.168.2.106:5000/test/web:v2

[root@harbor go]# docker image ls | grep web
192.168.2.106:5000/test/web      v2        00900ace4935   4 minutes ago   214MB
scweb                            1.1       00900ace4935   4 minutes ago   214MB

[root@harbor go]# docker push 192.168.2.106:5000/test/web:v2
The push refers to repository [192.168.2.106:5000/test/web]
3e252407b5c2: Pushed
193a27e04097: Pushed
b13a87e7576f: Pushed
174f56854903: Pushed
v1: digest: sha256:a723c83407c49e6fcf9aa67a041a4b6241cf9856170c1703014a61dec3726b29 size: 1153

[root@k8snode1 ~]# docker login 192.168.2.106:5000
Authenticating with existing credentials...
WARNING! Your password will be stored unencrypted in /root/.docker/config.json.
Configure a credential helper to remove this warning. See
https://docs.docker.com/engine/reference/commandline/login/#credentials-store

Login Succeeded

[root@k8snode1 ~]# docker pull 192.168.2.106:5000/test/web:v2
v1: Pulling from test/web
2d473b07cdd5: Pull complete
bc5e56dd1476: Pull complete
694440c745ce: Pull complete
78694d1cffbb: Pull complete
Digest: sha256:a723c83407c49e6fcf9aa67a041a4b6241cf9856170c1703014a61dec3726b29
Status: Downloaded newer image for 192.168.2.106:5000/test/web:v2
192.168.2.106:5000/test/web:v1

[root@k8snode1 ~]# docker images
REPOSITORY                                                                     TAG        IMAGE ID       CREATED         SIZE
192.168.2.106:5000/test/web                                                    v2         f845e97e9dfd   4 hours ago     214MB

[root@k8snode2 ~]# docker login 192.168.2.106:5000
Authenticating with existing credentials...
WARNING! Your password will be stored unencrypted in /root/.docker/config.json.
Configure a credential helper to remove this warning. See
https://docs.docker.com/engine/reference/commandline/login/#credentials-store

Login Succeeded

[root@k8snode2 ~]# docker pull 192.168.2.106:5000/test/web:v2
v1: Pulling from test/web
2d473b07cdd5: Pull complete
bc5e56dd1476: Pull complete
694440c745ce: Pull complete
78694d1cffbb: Pull complete
Digest: sha256:a723c83407c49e6fcf9aa67a041a4b6241cf9856170c1703014a61dec3726b29
Status: Downloaded newer image for 192.168.2.106:5000/test/web:v2
192.168.2.106:5000/test/web:v1

[root@k8snode2 ~]# docker images
REPOSITORY                                                                     TAG        IMAGE ID       CREATED         SIZE
192.168.2.106:5000/test/web                                                    v2         f845e97e9dfd   4 hours ago     214MB

# 采用HPA技术,当cpu使用率达到50%的时候,进行水平扩缩,最小1个,最多10个pod
# HorizontalPodAutoscaler(简称 HPA )自动更新工作负载资源(例如Deployment),目的是自动扩缩# 工作负载以满足需求。
https://kubernetes.io/zh-cn/docs/tasks/run-application/horizontal-pod-autoscale-walkthrough/

# 1.安装metrics server
# 下载components.yaml配置文件
wget https://github.com/kubernetes-sigs/metrics-server/releases/latest/download/components.yaml

# 替换image
        image: registry.aliyuncs.com/google_containers/metrics-server:v0.6.0
        imagePullPolicy: IfNotPresent
        args:
#        // 新增下面两行参数
        - --kubelet-insecure-tls
        - --kubelet-preferred-address-types=InternalDNS,InternalIP,ExternalDNS,ExternalIP,Hostname

# 修改components.yaml配置文件
[root@k8smaster ~]# cat components.yaml
    spec:
      containers:
      - args:
        - --kubelet-insecure-tls
        - --kubelet-preferred-address-types=InternalIP
        - --cert-dir=/tmp
        - --secure-port=4443
        - --kubelet-preferred-address-types=InternalDNS,InternalIP,ExternalIP,Hostname
        - --kubelet-use-node-status-port
        - --metric-resolution=15s
        image: registry.aliyuncs.com/google_containers/metrics-server:v0.6.0
        imagePullPolicy: IfNotPresent

# 执行安装命令
[root@k8smaster metrics]# kubectl apply -f components.yaml
serviceaccount/metrics-server created
clusterrole.rbac.authorization.k8s.io/system:aggregated-metrics-reader created
clusterrole.rbac.authorization.k8s.io/system:metrics-server created
rolebinding.rbac.authorization.k8s.io/metrics-server-auth-reader created
clusterrolebinding.rbac.authorization.k8s.io/metrics-server:system:auth-delegator created
clusterrolebinding.rbac.authorization.k8s.io/system:metrics-server created
service/metrics-server created
deployment.apps/metrics-server created
apiservice.apiregistration.k8s.io/v1beta1.metrics.k8s.io created

# 查看效果
[root@k8smaster metrics]# kubectl get pod -n kube-system
NAME                                       READY   STATUS    RESTARTS   AGE
calico-kube-controllers-6949477b58-xdk88   1/1     Running   1          22h
calico-node-4knc8                          1/1     Running   4          22h
calico-node-8jzrn                          1/1     Running   1          22h
calico-node-9d7pt                          1/1     Running   2          22h
coredns-7f89b7bc75-52c4x                   1/1     Running   2          22h
coredns-7f89b7bc75-82jrx                   1/1     Running   1          22h
etcd-k8smaster                             1/1     Running   1          22h
kube-apiserver-k8smaster                   1/1     Running   1          22h
kube-controller-manager-k8smaster          1/1     Running   1          22h
kube-proxy-8wp9c                           1/1     Running   2          22h
kube-proxy-d46jp                           1/1     Running   1          22h
kube-proxy-whg4f                           1/1     Running   1          22h
kube-scheduler-k8smaster                   1/1     Running   1          22h
metrics-server-6c75959ddf-hw7cs            1/1     Running   0          61s

# 能够使用下面的命令查看到pod的效果,说明metrics server已经安装成功
[root@k8smaster metrics]# kubectl top node
NAME        CPU(cores)   CPU%   MEMORY(bytes)   MEMORY%
k8smaster   322m         16%    1226Mi          71%
k8snode1    215m         10%    874Mi           50%
k8snode2    190m         9%     711Mi           41%

# 确保metrics-server安装好
# 查看pod、apiservice验证metrics-server安装好了
[root@k8smaster HPA]# kubectl get pod -n kube-system|grep metrics
metrics-server-6c75959ddf-hw7cs            1/1     Running   4          6h35m

[root@k8smaster HPA]# kubectl get apiservice |grep metrics
v1beta1.metrics.k8s.io                 kube-system/metrics-server   True        6h35m

[root@k8smaster HPA]# kubectl top node
NAME        CPU(cores)   CPU%   MEMORY(bytes)   MEMORY%
k8smaster   349m         17%    1160Mi          67%
k8snode1    271m         13%    1074Mi          62%
k8snode2    226m         11%    1224Mi          71%

[root@k8snode1 ~]# docker images|grep metrics
registry.aliyuncs.com/google_containers/metrics-server            v0.6.0     5787924fe1d8   14 months ago   68.8MB
您在 /var/spool/mail/root 中有新邮件

# node节点上查看
[root@k8snode1 ~]# docker images|grep metrics
registry.aliyuncs.com/google_containers/metrics-server                         v0.6.0     5787924fe1d8   17 months ago   68.8MB
kubernetesui/metrics-scraper                                                   v1.0.7     7801cfc6d5c0   2 years ago     34.4MB

# 2.以yaml文件启动web并暴露服务
[root@k8smaster hpa]# cat my-web.yaml
apiVersion: apps/v1
kind: Deployment
metadata:
  labels:
    app: myweb
  name: myweb
spec:
  replicas: 3
  selector:
    matchLabels:
      app: myweb
  template:
    metadata:
      labels:
        app: myweb
    spec:
      containers:
      - name: myweb
        image: 192.168.2.106:5000/test/web:v2
        imagePullPolicy: IfNotPresent
        ports:
        - containerPort: 8000
        resources:
          limits:
            cpu: 300m
          requests:
            cpu: 100m
---
apiVersion: v1
kind: Service
metadata:
  labels:
    app: myweb-svc
  name: myweb-svc
spec:
  selector:
    app: myweb
  type: NodePort
  ports:
  - port: 8000
    protocol: TCP
    targetPort: 8000
    nodePort: 30001

[root@k8smaster HPA]# kubectl apply -f my-web.yaml
deployment.apps/myweb created
service/myweb-svc created

# 3.创建HPA功能
[root@k8smaster HPA]# kubectl autoscale deployment myweb --cpu-percent=50 --min=1 --max=10
horizontalpodautoscaler.autoscaling/myweb autoscaled

[root@k8smaster HPA]# kubectl get pod
NAME                     READY   STATUS    RESTARTS   AGE
myweb-6dc7b4dfcb-9q85g   1/1     Running   0          9s
myweb-6dc7b4dfcb-ddq82   1/1     Running   0          9s
myweb-6dc7b4dfcb-l7sw7   1/1     Running   0          9s
[root@k8smaster HPA]# kubectl get svc
NAME         TYPE        CLUSTER-IP      EXTERNAL-IP   PORT(S)          AGE
kubernetes   ClusterIP   10.96.0.1               443/TCP          3d2h
myweb-svc    NodePort    10.102.83.168           8000:30001/TCP   15s
[root@k8smaster HPA]# kubectl get hpa
NAME    REFERENCE          TARGETS         MINPODS   MAXPODS   REPLICAS   AGE
myweb   Deployment/myweb   /50%   1         10        3          16s

# 4.访问
http://192.168.2.112:30001/

[root@k8smaster HPA]# kubectl get hpa
NAME    REFERENCE          TARGETS   MINPODS   MAXPODS   REPLICAS   AGE
myweb   Deployment/myweb   1%/50%    1         10        1          11m

[root@k8smaster HPA]# kubectl get pod
NAME                     READY   STATUS    RESTARTS   AGE
myweb-6dc7b4dfcb-ddq82   1/1     Running   0          10m

# 5.删除hpa
[root@k8smaster HPA]# kubectl delete hpa myweb-svc
6、启动mysql的pod,为web业务提供数据库服务
[root@k8smaster mysql]# cat mysql-deployment.yaml
# 定义mysql的Deployment
apiVersion: apps/v1
kind: Deployment
metadata:
  labels:
    app: mysql
  name: mysql
spec:
  replicas: 1
  selector:
    matchLabels:
      app: mysql
  template:
    metadata:
      labels:
        app: mysql
    spec:
      containers:
      - image: mysql:5.7.42
        name: mysql
        imagePullPolicy: IfNotPresent
        env:
        - name: MYSQL_ROOT_PASSWORD
          value: "123456"
        ports:
        - containerPort: 3306
---
#定义mysql的Service
apiVersion: v1
kind: Service
metadata:
  labels:
    app: svc-mysql
  name: svc-mysql
spec:
  selector:
    app: mysql
  type: NodePort
  ports:
  - port: 3306
    protocol: TCP
    targetPort: 3306
    nodePort: 30007

[root@k8smaster mysql]# kubectl apply -f mysql-deployment.yaml
deployment.apps/mysql created
service/svc-mysql created

[root@k8smaster mysql]# kubectl get svc
NAME             TYPE        CLUSTER-IP      EXTERNAL-IP   PORT(S)          AGE
kubernetes       ClusterIP   10.96.0.1               443/TCP          28h
svc-mysql        NodePort    10.105.96.217           3306:30007/TCP   10m

[root@k8smaster mysql]# kubectl get pod
NAME                                READY   STATUS    RESTARTS   AGE
mysql-5f9bccd855-6kglf              1/1     Running   0          8m59s

[root@k8smaster mysql]# kubectl exec -it mysql-5f9bccd855-6kglf -- bash
bash-4.2# mysql -uroot -p123456
mysql: [Warning] Using a password on the command line interface can be insecure.
Welcome to the MySQL monitor.  Commands end with ; or \g.
Your MySQL connection id is 2
Server version: 5.7.42 MySQL Community Server (GPL)

Copyright (c) 2000, 2023, Oracle and/or its affiliates.

Oracle is a registered trademark of Oracle Corporation and/or its
affiliates. Other names may be trademarks of their respective
owners.

Type 'help;' or '\h' for help. Type '\c' to clear the current input statement.

mysql> show databases;
+--------------------+
| Database           |
+--------------------+
| information_schema |
| mysql              |
| performance_schema |
| sys                |
+--------------------+
4 rows in set (0.01 sec)

mysql> exit
Bye
bash-4.2# exit
exit
[root@k8smaster mysql]#

# Web服务和MySQL数据库结合起来
# 第一种:在mysql的service中增加以下内容
  ports:
    - name: mysql
      protocol: TCP
      port: 3306
      targetPort: 3306

# 在web的pod中增加以下内容
        env:
          - name: MYSQL_HOST
            value: mysql
          - name: MYSQL_PORT
            value: "3306"

# 第二种:安装MySQL驱动程序,在 Go 代码中引入并初始化该驱动程序。
# 1.导入必要的包和驱动程序import (    "database/sql"
    "fmt"

    _ "github.com/go-sql-driver/mysql" # 导入 MySQL 驱动程序
)

# 2.建立数据库连接db, err := sql.Open("mysql", "username:password@tcp(hostname:port)/dbname")
if err != nil {
    fmt.Println("Failed to connect to database:", err)
    return
}
defer db.Close() #  记得关闭数据库连接
a、尝试:k8s部署有状态的MySQL
# 1.创建 ConfigMap
[root@k8smaster mysql]# cat mysql-configmap.yaml
apiVersion: v1
kind: ConfigMap
metadata:
name: mysql
labels:
app: mysql
data:
primary.cnf: |
# 仅在主服务器上应用此配置
[mysqld]
log-bin
replica.cnf: |
# 仅在副本服务器上应用此配置
[mysqld]
super-read-only
[root@k8smaster mysql]# kubectl apply -f mysql-configmap.yaml
configmap/mysql created
[root@k8smaster mysql]# kubectl get cm
NAME DATA AGE
kube-root-ca.crt 1 6d22h
mysql 2 5s
# 2.创建服务
[root@k8smaster mysql]# cat mysql-services.yaml
# 为 StatefulSet 成员提供稳定的 DNS 表项的无头服务(Headless Service)
apiVersion: v1
kind: Service
metadata:
name: mysql
labels:
app: mysql
app.kubernetes.io/name: mysql
spec:
ports:
- name: mysql
port: 3306
clusterIP: None
selector:
app: mysql
---
# 用于连接到任一 MySQL 实例执行读操作的客户端服务
# 对于写操作,你必须连接到主服务器:mysql-0.mysql
apiVersion: v1
kind: Service
metadata:
name: mysql-read
labels:
app: mysql
app.kubernetes.io/name: mysql
readonly: "true"
spec:
ports:
- name: mysql
port: 3306
selector:
app: mysql
[root@k8smaster mysql]# kubectl apply -f mysql-services.yaml
service/mysql created
service/mysql-read created
[root@k8smaster mysql]# kubectl get svc
NAME TYPE CLUSTER-IP EXTERNAL-IP PORT(S) AGE
kubernetes ClusterIP 10.96.0.1 443/TCP 6d22h
mysql ClusterIP None 3306/TCP 7s
mysql-read ClusterIP 10.102.31.144 3306/TCP 7s
# 3.创建 StatefulSet
[root@k8smaster mysql]# cat mysql-statefulset.yaml
apiVersion: apps/v1
kind: StatefulSet
metadata:
name: mysql
spec:
selector:
matchLabels:
app: mysql
app.kubernetes.io/name: mysql
serviceName: mysql
replicas: 3
template:
metadata:
labels:
app: mysql
app.kubernetes.io/name: mysql
spec:
initContainers:
- name: init-mysql
image: mysql:5.7.42
imagePullPolicy: IfNotPresent
command:
- bash
- "-c"
- |
set -ex
# 基于 Pod 序号生成 MySQL 服务器的 ID。
[[ $HOSTNAME =~ -([0-9]+)$ ]] || exit 1
ordinal=${BASH_REMATCH[1]}
echo [mysqld] > /mnt/conf.d/server-id.cnf
# 添加偏移量以避免使用 server-id=0 这一保留值。
echo server-id=$((100 + $ordinal)) >> /mnt/conf.d/server-id.cnf
# 将合适的 conf.d 文件从 config-map 复制到 emptyDir。
if [[ $ordinal -eq 0 ]]; then
cp /mnt/config-map/primary.cnf /mnt/conf.d/
else
cp /mnt/config-map/replica.cnf /mnt/conf.d/
fi
volumeMounts:
- name: conf
mountPath: /mnt/conf.d
- name: config-map
mountPath: /mnt/config-map
- name: clone-mysql
image: registry.cn-hangzhou.aliyuncs.com/google_samples_thepoy/xtrabackup:1.0
command:
- bash
- "-c"
- |
set -ex
# 如果已有数据,则跳过克隆。
[[ -d /var/lib/mysql/mysql ]] && exit 0
# 跳过主实例(序号索引 0)的克隆。
[[ `hostname` =~ -([0-9]+)$ ]] || exit 1
ordinal=${BASH_REMATCH[1]}
[[ $ordinal -eq 0 ]] && exit 0
# 从原来的对等节点克隆数据。
ncat --recv-only mysql-$(($ordinal-1)).mysql 3307 | xbstream -x -C /var/lib/mysql
# 准备备份。
xtrabackup --prepare --target-dir=/var/lib/mysql
volumeMounts:
- name: data
mountPath: /var/lib/mysql
subPath: mysql
- name: conf
mountPath: /etc/mysql/conf.d
containers:
- name: mysql
image: mysql:5.7.42
imagePullPolicy: IfNotPresent
env:
- name: MYSQL_ALLOW_EMPTY_PASSWORD
value: "1"
ports:
- name: mysql
containerPort: 3306
volumeMounts:
- name: data
mountPath: /var/lib/mysql
subPath: mysql
- name: conf
mountPath: /etc/mysql/conf.d
resources:
requests:
cpu: 500m
memory: 1Gi
livenessProbe:
exec:
command: ["mysqladmin", "ping"]
initialDelaySeconds: 30
periodSeconds: 10
timeoutSeconds: 5
readinessProbe:
exec:
# 检查我们是否可以通过 TCP 执行查询(skip-networking 是关闭的)。
command: ["mysql", "-h", "127.0.0.1", "-e", "SELECT 1"]
initialDelaySeconds: 5
periodSeconds: 2
timeoutSeconds: 1
- name: xtrabackup
image: registry.cn-hangzhou.aliyuncs.com/google_samples_thepoy/xtrabackup:1.0
ports:
- name: xtrabackup
containerPort: 3307
command:
- bash
- "-c"
- |
set -ex
cd /var/lib/mysql
# 确定克隆数据的 binlog 位置(如果有的话)。
if [[ -f xtrabackup_slave_info && "x$() " != "x" ]]; then
# XtraBackup 已经生成了部分的 “CHANGE MASTER TO” 查询
# 因为我们从一个现有副本进行克隆。(需要删除末尾的分号!)
cat xtrabackup_slave_info | sed -E 's/;$//g' > change_master_to.sql.in
# 在这里要忽略 xtrabackup_binlog_info (它是没用的)。
rm -f xtrabackup_slave_info xtrabackup_binlog_info
elif [[ -f xtrabackup_binlog_info ]]; then
# 我们直接从主实例进行克隆。解析 binlog 位置。
[[ `cat xtrabackup_binlog_info` =~ ^(.*?)[[:space:]]+(.*?)$ ]] || exit 1
rm -f xtrabackup_binlog_info xtrabackup_slave_info
echo "CHANGE MASTER TO MASTER_LOG_FILE='${BASH_REMATCH[1]}',\
MASTER_LOG_POS=${BASH_REMATCH[2]}" > change_master_to.sql.in
fi
# 检查我们是否需要通过启动复制来完成克隆。
if [[ -f change_master_to.sql.in ]]; then
echo "Waiting for mysqld to be ready (accepting connections)"
until mysql -h 127.0.0.1 -e "SELECT 1"; do sleep 1; done
echo "Initializing replication from clone position"
mysql -h 127.0.0.1 \
-e "$(. sql.in), \
MASTER_HOST='mysql-0.mysql', \
MASTER_USER='root', \
MASTER_PASSWORD='', \
MASTER_CONNECT_RETRY=10; \
START SLAVE;" || exit 1
# 如果容器重新启动,最多尝试一次。
mv change_master_to.sql.in change_master_to.sql.orig
fi
# 当对等点请求时,启动服务器发送备份。
exec ncat --listen --keep-open --send-only --max-conns=1 3307 -c \
"xtrabackup --backup --slave-info --stream=xbstream --host=127.0.0.1 --user=root"
volumeMounts:
- name: data
mountPath: /var/lib/mysql
subPath: mysql
- name: conf
mountPath: /etc/mysql/conf.d
resources:
requests:
cpu: 100m
memory: 100Mi
volumes:
- name: conf
emptyDir: {}
- name: config-map
configMap:
name: mysql
volumeClaimTemplates:
- metadata:
name: data
spec:
accessModes: ["ReadWriteOnce"]
resources:
requests:
storage: 1Gi
[root@k8smaster mysql]# kubectl apply -f mysql-statefulset.yaml
statefulset.apps/mysql created
[root@k8smaster mysql]# kubectl get pod
NAME READY STATUS RESTARTS AGE
mysql-0 0/2 Pending 0 3s
[root@k8smaster mysql]# kubectl describe pod mysql-0
Events:
Type Reason Age From Message
---- ------ ---- ---- -------
Warning FailedScheduling 16s (x2 over 16s) default-scheduler 0/3 nodes are available: 3 pod has unbound immediate PersistentVolumeClaims.
[root@k8smaster mysql]# kubectl get pvc
NAME STATUS VOLUME CAPACITY ACCESS MODES STORAGECLASS AGE
data-mysql-0 Pending 3m27s
[root@k8smaster mysql]# kubectl get pvc data-mysql-0 -o yaml
apiVersion: v1
kind: PersistentVolumeClaim
metadata:
creationTimestamp: "2023-06-25T06:17:36Z"
finalizers:
- kubernetes.io/pvc-protection
labels:
app: mysql
app.kubernetes.io/name: mysql
[root@k8smaster mysql]# cat mysql-pv.yaml
apiVersion: v1
kind: PersistentVolume
metadata:
name: mysql-pv
spec:
capacity:
storage: 1Gi
accessModes:
- ReadWriteOnce
nfs:
path: "/data/db" # nfs共享的目录
server: 192.168.2.121 # nfs服务器的ip地址
[root@k8smaster mysql]# kubectl apply -f mysql-pv.yaml
persistentvolume/mysql-pv created
[root@k8smaster mysql]# kubectl get pv
NAME CAPACITY ACCESS MODES RECLAIM POLICY STATUS CLAIM STORAGECLASS REASON AGE
jenkins-pv-volume 10Gi RWO Retain Terminating devops-tools/jenkins-pv-claim local-storage 5d23h
mysql-pv 1Gi RWO Retain Terminating default/data-mysql-0 15m
[root@k8smaster mysql]# kubectl patch pv jenkins-pv-volume -p '{"metadata":{"finalizers":null}}'
persistentvolume/jenkins-pv-volume patched
[root@k8smaster mysql]# kubectl patch pv mysql-pv -p '{"metadata":{"finalizers":null}}'
persistentvolume/mysql-pv patched
[root@k8smaster mysql]# kubectl get pv
No resources found
[root@k8smaster mysql]# kubectl get pod
NAME READY STATUS RESTARTS AGE
mysql-0 0/2 Init:0/2 0 7m20s
[root@k8smaster mysql]# kubectl describe pod mysql-0
Events:
Type Reason Age From Message
---- ------ ---- ---- -------
Warning FailedScheduling 10m (x3 over 10m) default-scheduler 0/3 nodes are available: 1 node(s) had taint {node-role.kubernetes.io/master: }, that the pod didn't tolerate, 2 pvc(s) bound to non-existent pv(s).
Normal Scheduled 10m default-scheduler Successfully assigned default/mysql-0 to k8snode2
Warning FailedMount 10m kubelet Unable to attach or mount volumes: unmounted volumes=[data], unattached volumes=[data conf config-map default-token-24tkk]: error processing PVC default/data-mysql-0: PVC is not bound
Warning FailedMount 9m46s kubelet Unable to attach or mount volumes: unmounted volumes=[data], unattached volumes=[default-token-24tkk data conf config-map]: error processing PVC default/data-mysql-0: PVC is not bound
Warning FailedMount 5m15s kubelet Unable to attach or mount volumes: unmounted volumes=[data], unattached volumes=[data conf config-map default-token-24tkk]: timed out waiting for the condition
Warning FailedMount 3m kubelet Unable to attach or mount volumes: unmounted volumes=[data], unattached volumes=[config-map default-token-24tkk data conf]: timed out waiting for the condition
Warning FailedMount 74s (x12 over 9m31s) kubelet MountVolume.SetUp failed for volume "mysql-pv" : mount failed: exit status 32
Mounting command: mount
Mounting arguments: -t nfs 192.168.2.121:/data/db /var/lib/kubelet/pods/424bb72d-8bf5-400f-b954-7fa3666ca0b3/volumes/kubernetes.io~nfs/mysql-pv
Output: mount.nfs: mounting 192.168.2.121:/data/db failed, reason given by server: No such file or directory
Warning FailedMount 42s (x2 over 7m29s) kubelet Unable to attach or mount volumes: unmounted volumes=[data], unattached volumes=[conf config-map default-token-24tkk data]: timed out waiting for the condition
1Gi RWO Retain Terminating default/data-mysql-0 15m
[root@nfs data]# pwd
/data
[root@nfs data]# mkdir db replica replica-3
[root@nfs data]# ls
db replica replica-3
[root@k8smaster mysql]# kubectl get pod
NAME READY STATUS RESTARTS AGE
mysql-0 2/2 Running 0 21m
mysql-1 0/2 Pending 0 2m34s
[root@k8smaster mysql]# kubectl describe pod mysql-1
Events:
Type Reason Age From Message
---- ------ ---- ---- -------
Warning FailedScheduling 58s (x4 over 3m22s) default-scheduler 0/3 nodes are available: 3 pod has unbound immediate PersistentVolumeClaims.
[root@k8smaster mysql]# cat mysql-pv-2.yaml
apiVersion: v1
kind: PersistentVolume
metadata:
name: mysql-pv-2
spec:
capacity:
storage: 1Gi
accessModes:
- ReadWriteOnce
nfs:
path: "/data/replica" # nfs共享的目录
server: 192.168.2.121 # nfs服务器的ip地址
[root@k8smaster mysql]# kubectl apply -f mysql-pv-2.yaml
persistentvolume/mysql-pv-2 created
[root@k8smaster mysql]# kubectl get pv
NAME CAPACITY ACCESS MODES RECLAIM POLICY STATUS CLAIM STORAGECLASS REASON AGE
mysql-pv 1Gi RWO Retain Bound default/data-mysql-0 24m
mysql-pv-2 1Gi RWO Retain Bound default/data-mysql-1 7s
[root@k8smaster mysql]# kubectl get pod
NAME READY STATUS RESTARTS AGE
mysql-0 2/2 Running 0 25m
mysql-1 1/2 Running 0 7m20s
[root@k8smaster mysql]# cat mysql-pv-3.yaml
apiVersion: v1
kind: PersistentVolume
metadata:
name: mysql-pv-3
spec:
capacity:
storage: 1Gi
accessModes:
- ReadWriteOnce
nfs:
path: "/data/replicai-3" # nfs共享的目录
server: 192.168.2.121 # nfs服务器的ip地址
[root@k8smaster mysql]# kubectl apply -f mysql-pv-3.yaml
persistentvolume/mysql-pv-3 created
[root@k8smaster mysql]# kubectl get pod
NAME READY STATUS RESTARTS AGE
mysql-0 2/2 Running 0 29m
mysql-1 2/2 Running 0 11m
mysql-2 0/2 Pending 0 3m46s
[root@k8smaster mysql]# kubectl describe pod mysql-2
Events:
Type Reason Age From Message
---- ------ ---- ---- -------
Warning FailedScheduling 2m13s (x4 over 4m16s) default-scheduler 0/3 nodes are available: 3 pod has unbound immediate PersistentVolumeClaims.
Warning FailedScheduling 47s (x2 over 2m5s) default-scheduler 0/3 nodes are available: 1 Insufficient cpu, 1 node(s) had taint {node-role.kubernetes.io/master: }, that the pod didn't tolerate, 2 Insufficient memory.
7、使用探针(liveness、readiness、startup)的(httpget、exec)方法对web业务pod进行监控,一旦出现问题马上重启,增强业务pod的可靠性
        livenessProbe:
          exec:
            command:
            - ls
            - /tmp
          initialDelaySeconds: 5
          periodSeconds: 5

        readinessProbe:
          exec:
            command:
            - ls
            - /tmp
          initialDelaySeconds: 5
          periodSeconds: 5

        startupProbe:
          httpGet:
            path: /
            port: 8000
          failureThreshold: 30
          periodSeconds: 10

[root@k8smaster probe]# vim my-web.yaml
apiVersion: apps/v1
kind: Deployment
metadata:
  labels:
    app: myweb
  name: myweb
spec:
  replicas: 3
  selector:
    matchLabels:
      app: myweb
  template:
    metadata:
      labels:
        app: myweb
    spec:
      containers:
      - name: myweb
        image: 192.168.2.106:5000/test/web:v2
        imagePullPolicy: IfNotPresent
        ports:
        - containerPort: 8000
        resources:
          limits:
            cpu: 300m
          requests:
            cpu: 100m
        livenessProbe:
          exec:
            command:
            - ls
            - /tmp
          initialDelaySeconds: 5
          periodSeconds: 5
        readinessProbe:
          exec:
            command:
            - ls
            - /tmp
          initialDelaySeconds: 5
          periodSeconds: 5
        startupProbe:
          httpGet:
            path: /
            port: 8000
          failureThreshold: 30
          periodSeconds: 10
---
apiVersion: v1
kind: Service
metadata:
  labels:
    app: myweb-svc
  name: myweb-svc
spec:
  selector:
    app: myweb
  type: NodePort
  ports:
  - port: 8000
    protocol: TCP
    targetPort: 8000
    nodePort: 30001

[root@k8smaster probe]# kubectl apply -f my-web.yaml
deployment.apps/myweb created
service/myweb-svc created

[root@k8smaster probe]# kubectl get pod
NAME                     READY   STATUS    RESTARTS   AGE
myweb-6b89fb9c7b-4cdh9   1/1     Running   0          53s
myweb-6b89fb9c7b-dh87w   1/1     Running   0          53s
myweb-6b89fb9c7b-zvc52   1/1     Running   0          53s

[root@k8smaster probe]# kubectl describe pod myweb-6b89fb9c7b-4cdh9
Name:         myweb-6b89fb9c7b-4cdh9
Namespace:    default
Priority:     0
Node:         k8snode2/192.168.2.112
Start Time:   Thu, 22 Jun 2023 16:47:20 +0800
Labels:       app=myweb
              pod-template-hash=6b89fb9c7b
Annotations:  cni.projectcalico.org/podIP: 10.244.185.219/32
              cni.projectcalico.org/podIPs: 10.244.185.219/32
Status:       Running
IP:           10.244.185.219
IPs:
  IP:           10.244.185.219
Controlled By:  ReplicaSet/myweb-6b89fb9c7b
Containers:
  myweb:
    Container ID:   docker://8c55c0c825483f86e4b3c87413984415b2ccf5cad78ed005eed8bedb4252c130
    Image:          192.168.2.106:5000/test/web:v2
    Image ID:       docker-pullable://192.168.2.106:5000/test/web@sha256:3bef039aa5c13103365a6868c9f052a000de376a45eaffcbad27d6ddb1f6e354
    Port:           8000/TCP
    Host Port:      0/TCP
    State:          Running
      Started:      Thu, 22 Jun 2023 16:47:23 +0800
    Ready:          True
    Restart Count:  0
    Limits:
      cpu:  300m
    Requests:
      cpu:        100m
    Liveness:     exec [ls /tmp] delay=5s timeout=1s period=5s #success=1 #failure=3
    Readiness:    exec [ls /tmp] delay=5s timeout=1s period=5s #success=1 #failure=3
    Startup:      http-get http://:8000/ delay=0s timeout=1s period=10s #success=1 #failure=30
    Environment:
    Mounts:
      /var/run/secrets/kubernetes.io/serviceaccount from default-token-24tkk (ro)
Conditions:
  Type              Status
  Initialized       True
  Ready             True
  ContainersReady   True
  PodScheduled      True
Volumes:
  default-token-24tkk:
    Type:        Secret (a volume populated by a Secret)
    SecretName:  default-token-24tkk
    Optional:    false
QoS Class:       Burstable
Node-Selectors:
Tolerations:     node.kubernetes.io/not-ready:NoExecute op=Exists for 300s
                 node.kubernetes.io/unreachable:NoExecute op=Exists for 300s
Events:
  Type    Reason     Age   From               Message
  ----    ------     ----  ----               -------
  Normal  Scheduled  55s   default-scheduler  Successfully assigned default/myweb-6b89fb9c7b-4cdh9 to k8snode2
  Normal  Pulled     52s   kubelet            Container image "192.168.2.106:5000/test/web:v2" already present on machine
  Normal  Created    52s   kubelet            Created container myweb
  Normal  Started    52s   kubelet            Started container myweb
8、使用ingress给web业务做负载均衡,使用dashboard对整个集群资源进行掌控
# ingress controller 本质上是一个nginx软件,用来做负载均衡。
# ingress 是k8s内部管理nginx配置(nginx.conf)的组件,用来给ingress controller传参。
[root@k8smaster ingress]# ls
ingress-controller-deploy.yaml kube-webhook-certgen-v1.1.0.tar.gz sc-nginx-svc-1.yaml
ingress-nginx-controllerv1.1.0.tar.gz sc-ingress.yaml
ingress-controller-deploy.yaml 是部署ingress controller使用的yaml文件
ingress-nginx-controllerv1.1.0.tar.gz ingress-nginx-controller镜像
kube-webhook-certgen-v1.1.0.tar.gz kube-webhook-certgen镜像
sc-ingress.yaml 创建ingress的配置文件
sc-nginx-svc-1.yaml 启动sc-nginx-svc-1服务和相关pod的yaml
nginx-deployment-nginx-svc-2.yaml 启动nginx-deployment-nginx-svc-2服务和相关pod的yaml
# 第1大步骤:安装ingress controller
# 1.将镜像scp到所有的node节点服务器上
[root@k8smaster ingress]# scp ingress-nginx-controllerv1.1.0.tar.gz k8snode1:/root
ingress-nginx-controllerv1.1.0.tar.gz 100% 276MB 101.1MB/s 00:02
[root@k8smaster ingress]# scp ingress-nginx-controllerv1.1.0.tar.gz k8snode2:/root
ingress-nginx-controllerv1.1.0.tar.gz 100% 276MB 98.1MB/s 00:02
[root@k8smaster ingress]# scp kube-webhook-certgen-v1.1.0.tar.gz k8snode1:/root
kube-webhook-certgen-v1.1.0.tar.gz 100% 47MB 93.3MB/s 00:00
[root@k8smaster ingress]# scp kube-webhook-certgen-v1.1.0.tar.gz k8snode2:/root
kube-webhook-certgen-v1.1.0.tar.gz 100% 47MB 39.3MB/s 00:01
# 2.导入镜像,在所有的节点服务器上进行
[root@k8snode1 ~]# docker load -i ingress-nginx-controllerv1.1.0.tar.gz
[root@k8snode1 ~]# docker load -i kube-webhook-certgen-v1.1.0.tar.gz
[root@k8snode2 ~]# docker load -i ingress-nginx-controllerv1.1.0.tar.gz
[root@k8snode2 ~]# docker load -i kube-webhook-certgen-v1.1.0.tar.gz
[root@k8snode1 ~]# docker images
REPOSITORY TAG IMAGE ID CREATED SIZE
nginx latest 605c77e624dd 17 months ago 141MB
registry.cn-hangzhou.aliyuncs.com/google_containers/nginx-ingress-controller v1.1.0 ae1a7201ec95 19 months ago 285MB
registry.cn-hangzhou.aliyuncs.com/google_containers/kube-webhook-certgen v1.1.1 c41e9fcadf5a 20 months ago 47.7MB
[root@k8snode2 ~]# docker images
REPOSITORY TAG IMAGE ID CREATED SIZE
nginx latest 605c77e624dd 17 months ago 141MB
registry.cn-hangzhou.aliyuncs.com/google_containers/nginx-ingress-controller v1.1.0 ae1a7201ec95 19 months ago 285MB
registry.cn-hangzhou.aliyuncs.com/google_containers/kube-webhook-certgen v1.1.1 c41e9fcadf5a 20 months ago 47.7MB
# 3.执行yaml文件去创建ingres controller
[root@k8smaster ingress]# kubectl apply -f ingress-controller-deploy.yaml
namespace/ingress-nginx created
serviceaccount/ingress-nginx created
configmap/ingress-nginx-controller created
clusterrole.rbac.authorization.k8s.io/ingress-nginx created
clusterrolebinding.rbac.authorization.k8s.io/ingress-nginx created
role.rbac.authorization.k8s.io/ingress-nginx created
rolebinding.rbac.authorization.k8s.io/ingress-nginx created
service/ingress-nginx-controller-admission created
service/ingress-nginx-controller created
deployment.apps/ingress-nginx-controller created
ingressclass.networking.k8s.io/nginx created
validatingwebhookconfiguration.admissionregistration.k8s.io/ingress-nginx-admission created
serviceaccount/ingress-nginx-admission created
clusterrole.rbac.authorization.k8s.io/ingress-nginx-admission created
clusterrolebinding.rbac.authorization.k8s.io/ingress-nginx-admission created
role.rbac.authorization.k8s.io/ingress-nginx-admission created
rolebinding.rbac.authorization.k8s.io/ingress-nginx-admission created
job.batch/ingress-nginx-admission-create created
job.batch/ingress-nginx-admission-patch created
# 4.查看ingress controller的相关命名空间
[root@k8smaster ingress]# kubectl get ns
NAME STATUS AGE
default Active 20h
ingress-nginx Active 30s
kube-node-lease Active 20h
kube-public Active 20h
kube-system Active 20h
# 5.查看ingress controller的相关service
[root@k8smaster ingress]# kubectl get svc -n ingress-nginx
NAME TYPE CLUSTER-IP EXTERNAL-IP PORT(S) AGE
ingress-nginx-controller NodePort 10.105.213.95 80:31457/TCP,443:32569/TCP 64s
ingress-nginx-controller-admission ClusterIP 10.98.225.196 443/TCP 64s
# 6.查看ingress controller的相关pod
[root@k8smaster ingress]# kubectl get pod -n ingress-nginx
NAME READY STATUS RESTARTS AGE
ingress-nginx-admission-create-9sg56 0/1 Completed 0 80s
ingress-nginx-admission-patch-8sctb 0/1 Completed 1 80s
ingress-nginx-controller-6c8ffbbfcf-bmdj9 1/1 Running 0 80s
ingress-nginx-controller-6c8ffbbfcf-j576v 1/1 Running 0 80s
# 第2大步骤:创建pod和暴露pod的服务
[root@k8smaster new]# cat sc-nginx-svc-1.yaml
apiVersion: apps/v1
kind: Deployment
metadata:
name: sc-nginx-deploy
labels:
app: sc-nginx-feng
spec:
replicas: 3
selector:
matchLabels:
app: sc-nginx-feng
template:
metadata:
labels:
app: sc-nginx-feng
spec:
containers:
- name: sc-nginx-feng
image: nginx
imagePullPolicy: IfNotPresent
ports:
- containerPort: 80
---
apiVersion: v1
kind: Service
metadata:
name: sc-nginx-svc
labels:
app: sc-nginx-svc
spec:
selector:
app: sc-nginx-feng
ports:
- name: name-of-service-port
protocol: TCP
port: 80
targetPort: 80
[root@k8smaster new]# kubectl apply -f sc-nginx-svc-1.yaml
deployment.apps/sc-nginx-deploy created
service/sc-nginx-svc created
[root@k8smaster ingress]# kubectl get pod
NAME READY STATUS RESTARTS AGE
sc-nginx-deploy-7bb895f9f5-hmf2n 1/1 Running 0 7s
sc-nginx-deploy-7bb895f9f5-mczzg 1/1 Running 0 7s
sc-nginx-deploy-7bb895f9f5-zzndv 1/1 Running 0 7s
[root@k8smaster ingress]# kubectl get svc
NAME TYPE CLUSTER-IP EXTERNAL-IP PORT(S) AGE
kubernetes ClusterIP 10.96.0.1 443/TCP 20h
sc-nginx-svc ClusterIP 10.96.76.55 80/TCP 26s
# 查看服务器的详细信息,查看Endpoints对应的pod的ip和端口是否正常
[root@k8smaster ingress]# kubectl describe svc sc-nginx-svc
Name: sc-nginx-svc
Namespace: default
Labels: app=sc-nginx-svc
Annotations:
Selector: app=sc-nginx-feng
Type: ClusterIP
IP Families:
IP: 10.96.76.55
IPs: 10.96.76.55
Port: name-of-service-port 80/TCP
TargetPort: 80/TCP
Endpoints: 10.244.185.209:80,10.244.185.210:80,10.244.249.16:80
Session Affinity: None
Events:
# 访问服务暴露的ip
[root@k8smaster ingress]# curl 10.96.76.55
<!DOCTYPE html>
Welcome to nginx!<<span class="token operator">/</span>title>
<style>
html <span class="token punctuation">{</span> color-scheme: light dark<span class="token punctuation">;</span> <span class="token punctuation">}</span>
body <span class="token punctuation">{</span> width: 35em<span class="token punctuation">;</span> margin: 0 auto<span class="token punctuation">;</span>
font-family: Tahoma<span class="token punctuation">,</span> Verdana<span class="token punctuation">,</span> Arial<span class="token punctuation">,</span> sans-serif<span class="token punctuation">;</span> <span class="token punctuation">}</span>
<<span class="token operator">/</span>style>
<<span class="token operator">/</span>head>
<body>
<h1>Welcome to nginx!<<span class="token operator">/</span>h1>
<p><span class="token keyword">If</span> you see this page<span class="token punctuation">,</span> the nginx web server is successfully installed and
working<span class="token punctuation">.</span> Further configuration is required<span class="token punctuation">.</span><<span class="token operator">/</span>p>
<p><span class="token keyword">For</span> online documentation and support please refer to
<a href=<span class="token string">"http://nginx.org/"</span>>nginx<span class="token punctuation">.</span>org<<span class="token operator">/</span>a><span class="token punctuation">.</span><br/>
Commercial support is available at
<a href=<span class="token string">"http://nginx.com/"</span>>nginx<span class="token punctuation">.</span>com<<span class="token operator">/</span>a><span class="token punctuation">.</span><<span class="token operator">/</span>p>
<p><em>Thank you <span class="token keyword">for</span> <span class="token keyword">using</span> nginx<span class="token punctuation">.</span><<span class="token operator">/</span>em><<span class="token operator">/</span>p>
<<span class="token operator">/</span>body>
<<span class="token operator">/</span>html>
<span class="token comment"># 第3大步骤:启用ingress关联ingress controller 和service</span>
<span class="token comment"># 创建一个yaml文件,去启动ingress</span>
<span class="token namespace">[root@k8smaster ingress]</span><span class="token comment"># cat sc-ingress.yaml </span>
apiVersion: networking<span class="token punctuation">.</span>k8s<span class="token punctuation">.</span>io/v1
kind: Ingress
metadata:
name: <span class="token function">sc</span><span class="token operator">-</span>ingress
annotations:
kubernets<span class="token punctuation">.</span>io/ingress<span class="token punctuation">.</span><span class="token keyword">class</span>: nginx <span class="token comment">#注释 这个ingress 是关联ingress controller的</span>
spec:
ingressClassName: nginx <span class="token comment">#关联ingress controller</span>
rules:
<span class="token operator">-</span> host: www<span class="token punctuation">.</span>feng<span class="token punctuation">.</span>com
http:
paths:
<span class="token operator">-</span> pathType: Prefix
path: <span class="token operator">/</span>
backend:
service:
name: <span class="token function">sc</span><span class="token operator">-</span>nginx-svc
port:
number: 80
<span class="token operator">-</span> host: www<span class="token punctuation">.</span>zhang<span class="token punctuation">.</span>com
http:
paths:
<span class="token operator">-</span> pathType: Prefix
path: <span class="token operator">/</span>
backend:
service:
name: <span class="token function">sc</span><span class="token operator">-</span>nginx-svc-2
port:
number: 80
<span class="token namespace">[root@k8smaster ingress]</span><span class="token comment"># kubectl apply -f my-ingress.yaml </span>
ingress<span class="token punctuation">.</span>networking<span class="token punctuation">.</span>k8s<span class="token punctuation">.</span>io/my-ingress created
<span class="token comment"># 查看ingress</span>
<span class="token namespace">[root@k8smaster ingress]</span><span class="token comment"># kubectl get ingress</span>
NAME <span class="token keyword">CLASS</span> HOSTS ADDRESS PORTS AGE
<span class="token function">sc</span><span class="token operator">-</span>ingress nginx www<span class="token punctuation">.</span>feng<span class="token punctuation">.</span>com<span class="token punctuation">,</span>www<span class="token punctuation">.</span>zhang<span class="token punctuation">.</span>com 192<span class="token punctuation">.</span>168<span class="token punctuation">.</span>2<span class="token punctuation">.</span>111<span class="token punctuation">,</span>192<span class="token punctuation">.</span>168<span class="token punctuation">.</span>2<span class="token punctuation">.</span>112 80 52s
<span class="token comment"># 第4大步骤:查看ingress controller 里的nginx.conf 文件里是否有ingress对应的规则</span>
<span class="token namespace">[root@k8smaster ingress]</span><span class="token comment"># kubectl get pod -n ingress-nginx</span>
NAME READY STATUS RESTARTS AGE
ingress-nginx-admission-create-9sg56 0/1 Completed 0 6m53s
ingress-nginx-admission-patch-8sctb 0/1 Completed 1 6m53s
ingress-nginx-controller-6c8ffbbfcf-bmdj9 1/1 Running 0 6m53s
ingress-nginx-controller-6c8ffbbfcf-j576v 1/1 Running 0 6m53s
<span class="token namespace">[root@k8smaster ingress]</span><span class="token comment"># kubectl exec -n ingress-nginx -it ingress-nginx-controller-6c8ffbbfcf-bmdj9 -- bash</span>
bash-5<span class="token punctuation">.</span>1$ <span class="token function">cat</span> nginx<span class="token punctuation">.</span>conf <span class="token punctuation">|</span>grep feng<span class="token punctuation">.</span>com
<span class="token comment">## start server www.feng.com</span>
server_name www<span class="token punctuation">.</span>feng<span class="token punctuation">.</span>com <span class="token punctuation">;</span>
<span class="token comment">## end server www.feng.com</span>
bash-5<span class="token punctuation">.</span>1$ <span class="token function">cat</span> nginx<span class="token punctuation">.</span>conf <span class="token punctuation">|</span>grep zhang<span class="token punctuation">.</span>com
<span class="token comment">## start server www.zhang.com</span>
server_name www<span class="token punctuation">.</span>zhang<span class="token punctuation">.</span>com <span class="token punctuation">;</span>
<span class="token comment">## end server www.zhang.com</span>
bash-5<span class="token punctuation">.</span>1$ <span class="token function">cat</span> nginx<span class="token punctuation">.</span>conf<span class="token punctuation">|</span>grep <span class="token operator">-</span>C3 upstream_balancer
error_log <span class="token operator">/</span><span class="token keyword">var</span><span class="token operator">/</span>log/nginx/error<span class="token punctuation">.</span>log notice<span class="token punctuation">;</span>
upstream upstream_balancer <span class="token punctuation">{</span>
server 0<span class="token punctuation">.</span>0<span class="token punctuation">.</span>0<span class="token punctuation">.</span>1:1234<span class="token punctuation">;</span> <span class="token comment"># placeholder</span>
<span class="token comment"># 获取ingress controller对应的service暴露宿主机的端口,访问宿主机和相关端口,就可以验证ingress controller是否能进行负载均衡</span>
<span class="token namespace">[root@k8smaster ingress]</span><span class="token comment"># kubectl get svc -n ingress-nginx</span>
NAME <span class="token function">TYPE</span> CLUSTER-IP EXTERNAL-IP PORT<span class="token punctuation">(</span>S<span class="token punctuation">)</span> AGE
ingress-nginx-controller NodePort 10<span class="token punctuation">.</span>105<span class="token punctuation">.</span>213<span class="token punctuation">.</span>95 <none> 80:31457/TCP<span class="token punctuation">,</span>443:32569/TCP 8m12s
ingress-nginx-controller-admission ClusterIP 10<span class="token punctuation">.</span>98<span class="token punctuation">.</span>225<span class="token punctuation">.</span>196 <none> 443/TCP 8m12s
<span class="token comment"># 在其他的宿主机或者windows机器上使用域名进行访问</span>
<span class="token namespace">[root@zabbix ~]</span><span class="token comment"># vim /etc/hosts</span>
<span class="token namespace">[root@zabbix ~]</span><span class="token comment"># cat /etc/hosts</span>
127<span class="token punctuation">.</span>0<span class="token punctuation">.</span>0<span class="token punctuation">.</span>1 localhost localhost<span class="token punctuation">.</span>localdomain localhost4 localhost4<span class="token punctuation">.</span>localdomain4
::1 localhost localhost<span class="token punctuation">.</span>localdomain localhost6 localhost6<span class="token punctuation">.</span>localdomain6
192<span class="token punctuation">.</span>168<span class="token punctuation">.</span>2<span class="token punctuation">.</span>111 www<span class="token punctuation">.</span>feng<span class="token punctuation">.</span>com
192<span class="token punctuation">.</span>168<span class="token punctuation">.</span>2<span class="token punctuation">.</span>112 www<span class="token punctuation">.</span>zhang<span class="token punctuation">.</span>com
<span class="token comment"># 因为我们是基于域名做的负载均衡的配置,所以必须要在浏览器里使用域名去访问,不能使用ip地址</span>
<span class="token comment"># 同时ingress controller做负载均衡的时候是基于http协议的,7层负载均衡。</span>
<span class="token namespace">[root@zabbix ~]</span><span class="token comment"># curl www.feng.com</span>
<<span class="token operator">!</span>DOCTYPE html>
<html>
<head>
<title>Welcome to nginx!<<span class="token operator">/</span>title>
<style>
html <span class="token punctuation">{</span> color-scheme: light dark<span class="token punctuation">;</span> <span class="token punctuation">}</span>
body <span class="token punctuation">{</span> width: 35em<span class="token punctuation">;</span> margin: 0 auto<span class="token punctuation">;</span>
font-family: Tahoma<span class="token punctuation">,</span> Verdana<span class="token punctuation">,</span> Arial<span class="token punctuation">,</span> sans-serif<span class="token punctuation">;</span> <span class="token punctuation">}</span>
<<span class="token operator">/</span>style>
<<span class="token operator">/</span>head>
<body>
<h1>Welcome to nginx!<<span class="token operator">/</span>h1>
<p><span class="token keyword">If</span> you see this page<span class="token punctuation">,</span> the nginx web server is successfully installed and
working<span class="token punctuation">.</span> Further configuration is required<span class="token punctuation">.</span><<span class="token operator">/</span>p>
<p><span class="token keyword">For</span> online documentation and support please refer to
<a href=<span class="token string">"http://nginx.org/"</span>>nginx<span class="token punctuation">.</span>org<<span class="token operator">/</span>a><span class="token punctuation">.</span><br/>
Commercial support is available at
<a href=<span class="token string">"http://nginx.com/"</span>>nginx<span class="token punctuation">.</span>com<<span class="token operator">/</span>a><span class="token punctuation">.</span><<span class="token operator">/</span>p>
<p><em>Thank you <span class="token keyword">for</span> <span class="token keyword">using</span> nginx<span class="token punctuation">.</span><<span class="token operator">/</span>em><<span class="token operator">/</span>p>
<<span class="token operator">/</span>body>
<<span class="token operator">/</span>html>
<span class="token comment"># 访问www.zhang.com出现异常,503错误,是nginx内部错误</span>
<span class="token namespace">[root@zabbix ~]</span><span class="token comment"># curl www.zhang.com</span>
<html>
<head><title>503 Service Temporarily Unavailable<<span class="token operator">/</span>title><<span class="token operator">/</span>head>
<body>
<center><h1>503 Service Temporarily Unavailable<<span class="token operator">/</span>h1><<span class="token operator">/</span>center>
<hr><center>nginx<<span class="token operator">/</span>center>
<<span class="token operator">/</span>body>
<<span class="token operator">/</span>html>
<span class="token comment"># 第5大步骤:启动第2个服务和pod,使用了pv+pvc+nfs</span>
<span class="token comment"># 需要提前准备好nfs服务器+创建pv和pvc</span>
<span class="token namespace">[root@k8smaster pv]</span><span class="token comment"># pwd</span>
<span class="token operator">/</span>root/pv
<span class="token namespace">[root@k8smaster pv]</span><span class="token comment"># ls</span>
nfs-pvc<span class="token punctuation">.</span>yml nfs-pv<span class="token punctuation">.</span>yml nginx-deployment<span class="token punctuation">.</span>yml
<span class="token namespace">[root@k8smaster pv]</span><span class="token comment"># cat nfs-pv.yml </span>
apiVersion: v1
kind: PersistentVolume
metadata:
name: pv-web
labels:
<span class="token function">type</span>: pv-web
spec:
capacity:
storage: 10Gi
accessModes:
<span class="token operator">-</span> ReadWriteMany
storageClassName: nfs <span class="token comment"># pv对应的名字</span>
nfs:
path: <span class="token string">"/web"</span> <span class="token comment"># nfs共享的目录</span>
server: 192<span class="token punctuation">.</span>168<span class="token punctuation">.</span>2<span class="token punctuation">.</span>121 <span class="token comment"># nfs服务器的ip地址</span>
readOnly: false <span class="token comment"># 访问模式</span>
<span class="token namespace">[root@k8smaster pv]</span><span class="token comment"># kubectl apply -f nfs-pv.yaml</span>
<span class="token namespace">[root@k8smaster pv]</span><span class="token comment"># kubectl apply -f nfs-pvc.yaml</span>
<span class="token namespace">[root@k8smaster pv]</span><span class="token comment"># kubectl get pv</span>
NAME CAPACITY ACCESS MODES RECLAIM POLICY STATUS CLAIM STORAGECLASS REASON AGE
pv-web 10Gi RWX Retain Bound default/pvc-web nfs 19h
<span class="token namespace">[root@k8smaster pv]</span><span class="token comment"># kubectl get pvc</span>
NAME STATUS VOLUME CAPACITY ACCESS MODES STORAGECLASS AGE
pvc-web Bound pv-web 10Gi RWX nfs 19h
<span class="token namespace">[root@k8smaster ingress]</span><span class="token comment"># cat nginx-deployment-nginx-svc-2.yaml </span>
apiVersion: apps/v1
kind: Deployment
metadata:
name: nginx-deployment
labels:
app: nginx
spec:
replicas: 3
selector:
matchLabels:
app: <span class="token function">sc</span><span class="token operator">-</span>nginx-feng-2
template:
metadata:
labels:
app: <span class="token function">sc</span><span class="token operator">-</span>nginx-feng-2
spec:
volumes:
<span class="token operator">-</span> name: <span class="token function">sc</span><span class="token operator">-</span>pv-storage-nfs
persistentVolumeClaim:
claimName: pvc-web
containers:
<span class="token operator">-</span> name: <span class="token function">sc</span><span class="token operator">-</span>pv-container-nfs
image: nginx
imagePullPolicy: IfNotPresent
ports:
<span class="token operator">-</span> containerPort: 80
name: <span class="token string">"http-server"</span>
volumeMounts:
<span class="token operator">-</span> mountPath: <span class="token string">"/usr/share/nginx/html"</span>
name: <span class="token function">sc</span><span class="token operator">-</span>pv-storage-nfs
<span class="token operator">--</span><span class="token operator">-</span>
apiVersion: v1
kind: Service
metadata:
name: <span class="token function">sc</span><span class="token operator">-</span>nginx-svc-2
labels:
app: <span class="token function">sc</span><span class="token operator">-</span>nginx-svc-2
spec:
selector:
app: <span class="token function">sc</span><span class="token operator">-</span>nginx-feng-2
ports:
<span class="token operator">-</span> name: name-of-service-port
protocol: TCP
port: 80
targetPort: 80
<span class="token namespace">[root@k8smaster ingress]</span><span class="token comment"># kubectl apply -f nginx-deployment-nginx-svc-2.yaml </span>
deployment<span class="token punctuation">.</span>apps/nginx-deployment created
service/<span class="token function">sc</span><span class="token operator">-</span>nginx-svc-2 created
<span class="token namespace">[root@k8smaster ingress]</span><span class="token comment"># kubectl get svc -n ingress-nginx</span>
NAME <span class="token function">TYPE</span> CLUSTER-IP EXTERNAL-IP PORT<span class="token punctuation">(</span>S<span class="token punctuation">)</span> AGE
ingress-nginx-controller NodePort 10<span class="token punctuation">.</span>105<span class="token punctuation">.</span>213<span class="token punctuation">.</span>95 <none> 80:31457/TCP<span class="token punctuation">,</span>443:32569/TCP 24m
ingress-nginx-controller-admission ClusterIP 10<span class="token punctuation">.</span>98<span class="token punctuation">.</span>225<span class="token punctuation">.</span>196 <none> 443/TCP 24m
<span class="token namespace">[root@k8smaster ingress]</span><span class="token comment"># kubectl get ingress</span>
NAME <span class="token keyword">CLASS</span> HOSTS ADDRESS PORTS AGE
<span class="token function">sc</span><span class="token operator">-</span>ingress nginx www<span class="token punctuation">.</span>feng<span class="token punctuation">.</span>com<span class="token punctuation">,</span>www<span class="token punctuation">.</span>zhang<span class="token punctuation">.</span>com 192<span class="token punctuation">.</span>168<span class="token punctuation">.</span>2<span class="token punctuation">.</span>111<span class="token punctuation">,</span>192<span class="token punctuation">.</span>168<span class="token punctuation">.</span>2<span class="token punctuation">.</span>112 80 18m
<span class="token comment"># 访问宿主机暴露的端口号30092或者80都可以</span>
<span class="token comment"># 使用ingress controller暴露服务,感觉不需要使用30000以上的端口访问,可以直接访问80或者443</span>
比使用service 暴露服务还是有点优势
<span class="token namespace">[root@zabbix ~]</span><span class="token comment"># curl www.zhang.com</span>
welcome to changsha
hello<span class="token punctuation">,</span>world
<span class="token namespace">[root@zabbix ~]</span><span class="token comment"># curl www.feng.com</span>
<<span class="token operator">!</span>DOCTYPE html>
<html>
<head>
<title>Welcome to nginx!<<span class="token operator">/</span>title>
<style>
html <span class="token punctuation">{</span> color-scheme: light dark<span class="token punctuation">;</span> <span class="token punctuation">}</span>
body <span class="token punctuation">{</span> width: 35em<span class="token punctuation">;</span> margin: 0 auto<span class="token punctuation">;</span>
font-family: Tahoma<span class="token punctuation">,</span> Verdana<span class="token punctuation">,</span> Arial<span class="token punctuation">,</span> sans-serif<span class="token punctuation">;</span> <span class="token punctuation">}</span>
<<span class="token operator">/</span>style>
<<span class="token operator">/</span>head>
<body>
<h1>Welcome to nginx!<<span class="token operator">/</span>h1>
<p><span class="token keyword">If</span> you see this page<span class="token punctuation">,</span> the nginx web server is successfully installed and
working<span class="token punctuation">.</span> Further configuration is required<span class="token punctuation">.</span><<span class="token operator">/</span>p>
<p><span class="token keyword">For</span> online documentation and support please refer to
<a href=<span class="token string">"http://nginx.org/"</span>>nginx<span class="token punctuation">.</span>org<<span class="token operator">/</span>a><span class="token punctuation">.</span><br/>
Commercial support is available at
<a href=<span class="token string">"http://nginx.com/"</span>>nginx<span class="token punctuation">.</span>com<<span class="token operator">/</span>a><span class="token punctuation">.</span><<span class="token operator">/</span>p>
<p><em>Thank you <span class="token keyword">for</span> <span class="token keyword">using</span> nginx<span class="token punctuation">.</span><<span class="token operator">/</span>em><<span class="token operator">/</span>p>
<<span class="token operator">/</span>body>
<<span class="token operator">/</span>html>
</code></pre>
<h3>9、使用dashboard对整个集群资源进行掌控</h3>
<pre><code class="prism language-powershell"><span class="token comment"># 1.先下载recommended.yaml文件</span>
<span class="token namespace">[root@k8smaster dashboard]</span><span class="token comment"># wget https://raw.githubusercontent.com/kubernetes/dashboard/v2.5.0/aio/deploy/recommended.yaml</span>
<span class="token operator">--</span>2023-06-19 10:18:50-<span class="token operator">-</span> https:<span class="token operator">/</span><span class="token operator">/</span>raw<span class="token punctuation">.</span>githubusercontent<span class="token punctuation">.</span>com/kubernetes/dashboard/v2<span class="token punctuation">.</span>5<span class="token punctuation">.</span>0/aio/deploy/recommended<span class="token punctuation">.</span>yaml
正在解析主机 raw<span class="token punctuation">.</span>githubusercontent<span class="token punctuation">.</span>com <span class="token punctuation">(</span>raw<span class="token punctuation">.</span>githubusercontent<span class="token punctuation">.</span>com<span class="token punctuation">)</span><span class="token punctuation">.</span><span class="token punctuation">.</span><span class="token punctuation">.</span> 185<span class="token punctuation">.</span>199<span class="token punctuation">.</span>110<span class="token punctuation">.</span>133<span class="token punctuation">,</span> 185<span class="token punctuation">.</span>199<span class="token punctuation">.</span>108<span class="token punctuation">.</span>133<span class="token punctuation">,</span> 185<span class="token punctuation">.</span>199<span class="token punctuation">.</span>111<span class="token punctuation">.</span>133<span class="token punctuation">,</span> <span class="token punctuation">.</span><span class="token punctuation">.</span><span class="token punctuation">.</span>
正在连接 raw<span class="token punctuation">.</span>githubusercontent<span class="token punctuation">.</span>com <span class="token punctuation">(</span>raw<span class="token punctuation">.</span>githubusercontent<span class="token punctuation">.</span>com<span class="token punctuation">)</span><span class="token punctuation">|</span>185<span class="token punctuation">.</span>199<span class="token punctuation">.</span>110<span class="token punctuation">.</span>133<span class="token punctuation">|</span>:443<span class="token punctuation">.</span><span class="token punctuation">.</span><span class="token punctuation">.</span> 已连接。
已发出 HTTP 请求,正在等待回应<span class="token punctuation">.</span><span class="token punctuation">.</span><span class="token punctuation">.</span> 200 OK
长度:7621 <span class="token punctuation">(</span>7<span class="token punctuation">.</span>4K<span class="token punctuation">)</span> <span class="token namespace">[text/plain]</span>
正在保存至: “recommended<span class="token punctuation">.</span>yaml”
100%<span class="token punctuation">[</span>=============================================================================><span class="token punctuation">]</span> 7<span class="token punctuation">,</span>621 <span class="token operator">--</span><span class="token punctuation">.</span><span class="token operator">-</span>K/s 用时 0s
2023-06-19 10:18:52 <span class="token punctuation">(</span>23<span class="token punctuation">.</span>6 MB/s<span class="token punctuation">)</span> <span class="token operator">-</span> 已保存 “recommended<span class="token punctuation">.</span>yaml” <span class="token punctuation">[</span>7621/7621<span class="token punctuation">]</span><span class="token punctuation">)</span>
<span class="token namespace">[root@k8smaster dashboard]</span><span class="token comment"># ls</span>
recommended<span class="token punctuation">.</span>yaml
<span class="token comment"># 2.启动</span>
<span class="token namespace">[root@k8smaster dashboard]</span><span class="token comment"># kubectl apply -f recommended.yaml </span>
namespace/kubernetes-dashboard created
serviceaccount/kubernetes-dashboard created
service/kubernetes-dashboard created
secret/kubernetes-dashboard-certs created
secret/kubernetes-dashboard-csrf created
secret/kubernetes-dashboard-key-holder created
configmap/kubernetes-dashboard-settings created
role<span class="token punctuation">.</span>rbac<span class="token punctuation">.</span>authorization<span class="token punctuation">.</span>k8s<span class="token punctuation">.</span>io/kubernetes-dashboard created
clusterrole<span class="token punctuation">.</span>rbac<span class="token punctuation">.</span>authorization<span class="token punctuation">.</span>k8s<span class="token punctuation">.</span>io/kubernetes-dashboard created
rolebinding<span class="token punctuation">.</span>rbac<span class="token punctuation">.</span>authorization<span class="token punctuation">.</span>k8s<span class="token punctuation">.</span>io/kubernetes-dashboard created
clusterrolebinding<span class="token punctuation">.</span>rbac<span class="token punctuation">.</span>authorization<span class="token punctuation">.</span>k8s<span class="token punctuation">.</span>io/kubernetes-dashboard created
deployment<span class="token punctuation">.</span>apps/kubernetes-dashboard created
service/dashboard-metrics-scraper created
deployment<span class="token punctuation">.</span>apps/dashboard-metrics-scraper created
<span class="token comment"># 3.查看是否启动dashboard的pod</span>
<span class="token namespace">[root@k8smaster dashboard]</span><span class="token comment"># kubectl get ns</span>
NAME STATUS AGE
default Active 18h
ingress-nginx Active 13h
kube-node-lease Active 18h
kube-public Active 18h
kube-system Active 18h
kubernetes-dashboard Active 9s
<span class="token comment"># kubernetes-dashboard 是dashboard自己的命名空间</span>
<span class="token namespace">[root@k8smaster dashboard]</span><span class="token comment"># kubectl get pod -n kubernetes-dashboard</span>
NAME READY STATUS RESTARTS AGE
dashboard-metrics-scraper-5b8896d7fc-6kjlr 1/1 Running 0 4m56s
kubernetes-dashboard-cb988587b-s2f6z 1/1 Running 0 4m57s
<span class="token comment"># 4.查看dashboard对应的服务,因为发布服务的类型是ClusterIP ,外面的机器不能访问,不便于我们通过浏览器访问,因此需要改成NodePort</span>
<span class="token namespace">[root@k8smaster dashboard]</span><span class="token comment"># kubectl get svc -n kubernetes-dashboard</span>
NAME <span class="token function">TYPE</span> CLUSTER-IP EXTERNAL-IP PORT<span class="token punctuation">(</span>S<span class="token punctuation">)</span> AGE
dashboard-metrics-scraper ClusterIP 10<span class="token punctuation">.</span>110<span class="token punctuation">.</span>32<span class="token punctuation">.</span>41 <none> 8000/TCP 4m24s
kubernetes-dashboard ClusterIP 10<span class="token punctuation">.</span>106<span class="token punctuation">.</span>104<span class="token punctuation">.</span>124 <none> 443/TCP 4m24s
<span class="token comment"># 5.删除已经创建的dashboard 的服务</span>
<span class="token namespace">[root@k8smaster dashboard]</span><span class="token comment"># kubectl delete svc kubernetes-dashboard -n kubernetes-dashboard</span>
service <span class="token string">"kubernetes-dashboard"</span> deleted
<span class="token namespace">[root@k8smaster dashboard]</span><span class="token comment"># kubectl get svc -n kubernetes-dashboard</span>
NAME <span class="token function">TYPE</span> CLUSTER-IP EXTERNAL-IP PORT<span class="token punctuation">(</span>S<span class="token punctuation">)</span> AGE
dashboard-metrics-scraper ClusterIP 10<span class="token punctuation">.</span>110<span class="token punctuation">.</span>32<span class="token punctuation">.</span>41 <none> 8000/TCP 5m39s
<span class="token comment"># 6.创建一个nodeport的service</span>
<span class="token namespace">[root@k8smaster dashboard]</span><span class="token comment"># vim dashboard-svc.yml</span>
<span class="token namespace">[root@k8smaster dashboard]</span><span class="token comment"># cat dashboard-svc.yml</span>
kind: Service
apiVersion: v1
metadata:
labels:
k8s-app: kubernetes-dashboard
name: kubernetes-dashboard
namespace: kubernetes-dashboard
spec:
<span class="token function">type</span>: NodePort
ports:
<span class="token operator">-</span> port: 443
targetPort: 8443
selector:
k8s-app: kubernetes-dashboard
<span class="token namespace">[root@k8smaster dashboard]</span><span class="token comment"># kubectl apply -f dashboard-svc.yml</span>
service/kubernetes-dashboard created
<span class="token namespace">[root@k8smaster dashboard]</span><span class="token comment"># kubectl get svc -n kubernetes-dashboard</span>
NAME <span class="token function">TYPE</span> CLUSTER-IP EXTERNAL-IP PORT<span class="token punctuation">(</span>S<span class="token punctuation">)</span> AGE
dashboard-metrics-scraper ClusterIP 10<span class="token punctuation">.</span>110<span class="token punctuation">.</span>32<span class="token punctuation">.</span>41 <none> 8000/TCP 8m11s
kubernetes-dashboard NodePort 10<span class="token punctuation">.</span>103<span class="token punctuation">.</span>185<span class="token punctuation">.</span>254 <none> 443:32571/TCP 37s
<span class="token comment"># 7.想要访问dashboard服务,就要有访问权限,创建kubernetes-dashboard管理员角色</span>
<span class="token namespace">[root@k8smaster dashboard]</span><span class="token comment"># vim dashboard-svc-account.yaml</span>
<span class="token namespace">[root@k8smaster dashboard]</span><span class="token comment"># cat dashboard-svc-account.yaml </span>
apiVersion: v1
kind: ServiceAccount
metadata:
name: dashboard-admin
namespace: kube-system
<span class="token operator">--</span><span class="token operator">-</span>
kind: ClusterRoleBinding
apiVersion: rbac<span class="token punctuation">.</span>authorization<span class="token punctuation">.</span>k8s<span class="token punctuation">.</span>io/v1
metadata:
name: dashboard-admin
subjects:
<span class="token operator">-</span> kind: ServiceAccount
name: dashboard-admin
namespace: kube-system
roleRef:
kind: ClusterRole
name: cluster-admin
apiGroup: rbac<span class="token punctuation">.</span>authorization<span class="token punctuation">.</span>k8s<span class="token punctuation">.</span>io
<span class="token namespace">[root@k8smaster dashboard]</span><span class="token comment"># kubectl apply -f dashboard-svc-account.yaml </span>
serviceaccount/dashboard-admin created
clusterrolebinding<span class="token punctuation">.</span>rbac<span class="token punctuation">.</span>authorization<span class="token punctuation">.</span>k8s<span class="token punctuation">.</span>io/dashboard-admin created
<span class="token comment"># 8.获取dashboard的secret对象的名字</span>
<span class="token namespace">[root@k8smaster dashboard]</span><span class="token comment"># kubectl get secret -n kube-system|grep admin|awk '{print $1}'</span>
dashboard-admin-token-hd2nl
<span class="token namespace">[root@k8smaster dashboard]</span><span class="token comment"># kubectl describe secret dashboard-admin-token-hd2nl -n kube-system</span>
Name: dashboard-admin-token-hd2nl
Namespace: kube-system
Labels: <none>
Annotations: kubernetes<span class="token punctuation">.</span>io/service-account<span class="token punctuation">.</span>name: dashboard-admin
kubernetes<span class="token punctuation">.</span>io/service-account<span class="token punctuation">.</span>uid: 4e42ca6a-e5eb-4672-bf3e-ae22935417ef
<span class="token function">Type</span>: kubernetes<span class="token punctuation">.</span>io/service-account-token
<span class="token keyword">Data</span>
====
ca<span class="token punctuation">.</span>crt: 1066 bytes
namespace: 11 bytes
token: eyJhbGciOiJSUzI1NiIsImtpZCI6InBBckJ2U051Y3J4NjVPY2VxOVZzRjBIdzdjNzgycFppcVZ5WWFnQlNsS00ifQ<span class="token punctuation">.</span>eyJpc3MiOiJrdWJlcm5ldGVzL3NlcnZpY2VhY2NvdW50Iiwia3ViZXJuZXRlcy5pby9zZXJ2aWNlYWNjb3VudC9uYW1lc3BhY2UiOiJrdWJlLXN5c3RlbSIsImt1YmVybmV0ZXMuaW8vc2VydmljZWFjY291bnQvc2VjcmV0Lm5hbWUiOiJkYXNoYm9hcmQtYWRtaW4tdG9rZW4taGQybmwiLCJrdWJlcm5ldGVzLmlvL3NlcnZpY2VhY2NvdW50L3NlcnZpY2UtYWNjb3VudC5uYW1lIjoiZGFzaGJvYXJkLWFkbWluIiwia3ViZXJuZXRlcy5pby9zZXJ2aWNlYWNjb3VudC9zZXJ2aWNlLWFjY291bnQudWlkIjoiNGU0MmNhNmEtZTVlYi00NjcyLWJmM2UtYWUyMjkzNTQxN2VmIiwic3ViIjoic3lzdGVtOnNlcnZpY2VhY2NvdW50Omt1YmUtc3lzdGVtOmRhc2hib2FyZC1hZG1pbiJ9<span class="token punctuation">.</span>EAVV-s6OnS4htu4kvv3UvlZpqzg5Ei1_tNiBLr08GquUxKX09JGvQhsZQYgluNmS2yqad_lxK_Ie_RgwayqfBdXYtugQPM8m9gZHScsUdo_3b8b4ZEUz7KlDzJVBdBvDFSJjz-7cJhtj-HtazRuLluJbeoQV4zXMXvfhDhYt0k126eiqKzvbHhJmNM8U5XViAUmpUPCUjqFHm8tS1Su7aW75R-qXH6aGjGOv7kTpQdOjFeVO-AbFRIcbDOcqYRrKMyZu0yuH9QZGL35L1Lj3HgePsDbwd3jm2ZS05BjuacSFGle6CdZTOB0b5haeUlFrZ6FWsU-2qoQ67ysOwB0xKQ
<span class="token namespace">[root@k8smaster dashboard]</span><span class="token comment"># </span>
<span class="token comment"># 9.获取secret里的token的内容--》token理解为认证的密码</span>
<span class="token namespace">[root@k8smaster dashboard]</span><span class="token comment"># kubectl describe secret dashboard-admin-token-hd2nl -n kube-system|awk '/^token/ {print $2}'</span>
eyJhbGciOiJSUzI1NiIsImtpZCI6InBBckJ2U051Y3J4NjVPY2VxOVZzRjBIdzdjNzgycFppcVZ5WWFnQlNsS00ifQ<span class="token punctuation">.</span>eyJpc3MiOiJrdWJlcm5ldGVzL3NlcnZpY2VhY2NvdW50Iiwia3ViZXJuZXRlcy5pby9zZXJ2aWNlYWNjb3VudC9uYW1lc3BhY2UiOiJrdWJlLXN5c3RlbSIsImt1YmVybmV0ZXMuaW8vc2VydmljZWFjY291bnQvc2VjcmV0Lm5hbWUiOiJkYXNoYm9hcmQtYWRtaW4tdG9rZW4taGQybmwiLCJrdWJlcm5ldGVzLmlvL3NlcnZpY2VhY2NvdW50L3NlcnZpY2UtYWNjb3VudC5uYW1lIjoiZGFzaGJvYXJkLWFkbWluIiwia3ViZXJuZXRlcy5pby9zZXJ2aWNlYWNjb3VudC9zZXJ2aWNlLWFjY291bnQudWlkIjoiNGU0MmNhNmEtZTVlYi00NjcyLWJmM2UtYWUyMjkzNTQxN2VmIiwic3ViIjoic3lzdGVtOnNlcnZpY2VhY2NvdW50Omt1YmUtc3lzdGVtOmRhc2hib2FyZC1hZG1pbiJ9<span class="token punctuation">.</span>EAVV-s6OnS4htu4kvv3UvlZpqzg5Ei1_tNiBLr08GquUxKX09JGvQhsZQYgluNmS2yqad_lxK_Ie_RgwayqfBdXYtugQPM8m9gZHScsUdo_3b8b4ZEUz7KlDzJVBdBvDFSJjz-7cJhtj-HtazRuLluJbeoQV4zXMXvfhDhYt0k126eiqKzvbHhJmNM8U5XViAUmpUPCUjqFHm8tS1Su7aW75R-qXH6aGjGOv7kTpQdOjFeVO-AbFRIcbDOcqYRrKMyZu0yuH9QZGL35L1Lj3HgePsDbwd3jm2ZS05BjuacSFGle6CdZTOB0b5haeUlFrZ6FWsU-2qoQ67ysOwB0xKQ
<span class="token comment"># 10.浏览器里访问</span>
<span class="token namespace">[root@k8smaster dashboard]</span><span class="token comment"># kubectl get svc -n kubernetes-dashboard</span>
NAME <span class="token function">TYPE</span> CLUSTER-IP EXTERNAL-IP PORT<span class="token punctuation">(</span>S<span class="token punctuation">)</span> AGE
dashboard-metrics-scraper ClusterIP 10<span class="token punctuation">.</span>110<span class="token punctuation">.</span>32<span class="token punctuation">.</span>41 <none> 8000/TCP 11m
kubernetes-dashboard NodePort 10<span class="token punctuation">.</span>103<span class="token punctuation">.</span>185<span class="token punctuation">.</span>254 <none> 443:32571/TCP 4m4s
<span class="token comment"># 访问宿主机的ip+端口号</span>
https:<span class="token operator">/</span><span class="token operator">/</span>192<span class="token punctuation">.</span>168<span class="token punctuation">.</span>2<span class="token punctuation">.</span>104:32571/<span class="token comment">#/login</span>
<span class="token comment"># 11.输入上面获得的token,登录。</span>
thisisunsafe
https:<span class="token operator">/</span><span class="token operator">/</span>192<span class="token punctuation">.</span>168<span class="token punctuation">.</span>2<span class="token punctuation">.</span>104:32571/<span class="token comment">#/workloads?namespace=default</span>
</code></pre>
<h3>10、安装zabbix和promethues对整个集群资源(cpu,内存,网络带宽,web服务,数据库服务,磁盘IO等)进行监控</h3>
<pre><code class="prism language-powershell"><span class="token comment"># 部署zabbix</span>
<span class="token comment"># 1.安装zabbix服务器的源</span>
源:repository 软件仓库,用来找到zabbix官方网站提供的软件,可以下载软件的地方
<span class="token namespace">[root@zabbix ~]</span><span class="token comment"># rpm -Uvh https://repo.zabbix.com/zabbix/5.0/rhel/7/x86_64/zabbix-release-5.0-1.el7.noarch.rpm</span>
获取https:<span class="token operator">/</span><span class="token operator">/</span>repo<span class="token punctuation">.</span>zabbix<span class="token punctuation">.</span>com/zabbix/5<span class="token punctuation">.</span>0/rhel/7/x86_64/zabbix-release-5<span class="token punctuation">.</span>0-1<span class="token punctuation">.</span>el7<span class="token punctuation">.</span>noarch<span class="token punctuation">.</span>rpm
警告:<span class="token operator">/</span><span class="token keyword">var</span><span class="token operator">/</span>tmp/rpm-tmp<span class="token punctuation">.</span>lL96Rw: 头V4 RSA/SHA512 Signature<span class="token punctuation">,</span> 密钥 ID a14fe591: NOKEY
准备中<span class="token punctuation">.</span><span class="token punctuation">.</span><span class="token punctuation">.</span> <span class="token comment">################################# [100%]</span>
正在升级<span class="token operator">/</span>安装<span class="token punctuation">.</span><span class="token punctuation">.</span><span class="token punctuation">.</span>
1:zabbix-release-5<span class="token punctuation">.</span>0-1<span class="token punctuation">.</span>el7 <span class="token comment">################################# [100%]</span>
<span class="token namespace">[root@zabbix ~]</span><span class="token comment"># cd /etc/yum.repos.d/</span>
<span class="token namespace">[root@zabbix yum.repos.d]</span><span class="token comment"># ls</span>
CentOS-Base<span class="token punctuation">.</span>repo CentOS-Debuginfo<span class="token punctuation">.</span>repo CentOS-Media<span class="token punctuation">.</span>repo CentOS-Vault<span class="token punctuation">.</span>repo zabbix<span class="token punctuation">.</span>repo
CentOS-CR<span class="token punctuation">.</span>repo CentOS-fasttrack<span class="token punctuation">.</span>repo CentOS-Sources<span class="token punctuation">.</span>repo CentOS-x86_64-kernel<span class="token punctuation">.</span>repo
CentOS-Base<span class="token punctuation">.</span>repo 仓库文件: 用来找到centos官方提供的下载软件的地方的文件
Base 存放centos官方基本软件的仓库
zabbix<span class="token punctuation">.</span>repo 帮助我们找到zabbix官方提供的软件下载地方的文件
<span class="token namespace">[root@zabbix yum.repos.d]</span><span class="token comment"># cat zabbix.repo</span>
<span class="token namespace">[zabbix]</span> 源的名字
name=Zabbix Official Repository <span class="token operator">-</span> <span class="token variable">$basearch</span> 对这个源的介绍
baseurl=http:<span class="token operator">/</span><span class="token operator">/</span>repo<span class="token punctuation">.</span>zabbix<span class="token punctuation">.</span>com/zabbix/5<span class="token punctuation">.</span>0/rhel/7/<span class="token variable">$basearch</span><span class="token operator">/</span> 具体源的位置
enabled=1 表示这个源可以使用
gpgcheck=1 操作系统会对下载的软件进行gpg检验码的检查,防止软件不是正版的
gpgkey=file:<span class="token operator">/</span><span class="token operator">/</span><span class="token operator">/</span>etc/pki/rpm-gpg/RPM-GPG-KEY-ZABBIX-A14FE591 <span class="token operator">--</span>》防伪码
<span class="token comment"># 2.安装zabbix相关的软件</span>
<span class="token namespace">[root@zabbix yum.repos.d]</span><span class="token comment"># yum install zabbix-server-mysql zabbix-agent -y</span>
zabbix-server-mysql 安装zabbix server和连接mysql功能的软件
zabbix-agent zabbix的代理软件
<span class="token comment"># 3.安装Zabbix前端</span>
<span class="token namespace">[root@zabbix yum.repos.d]</span><span class="token comment"># yum install centos-release-scl -y </span>
<span class="token comment"># 修改仓库文件,启用前端的源</span>
<span class="token namespace">[root@zabbix yum.repos.d]</span><span class="token comment"># vim zabbix.repo</span>
<span class="token namespace">[zabbix-frontend]</span>
name=Zabbix Official Repository frontend <span class="token operator">-</span> <span class="token variable">$basearch</span>
baseurl=http:<span class="token operator">/</span><span class="token operator">/</span>repo<span class="token punctuation">.</span>zabbix<span class="token punctuation">.</span>com/zabbix/5<span class="token punctuation">.</span>0/rhel/7/<span class="token variable">$basearch</span><span class="token operator">/</span>frontend
enabled=1 <span class="token comment"># 修改为1</span>
gpgcheck=1
gpgkey=file:<span class="token operator">/</span><span class="token operator">/</span><span class="token operator">/</span>etc/pki/rpm-gpg/RPM-GPG-KEY-ZABBIX-A14FE591
<span class="token comment"># 安装web相关的软件</span>
<span class="token namespace">[root@zabbix yum.repos.d]</span><span class="token comment"># yum install zabbix-web-mysql-scl zabbix-nginx-conf-scl -y</span>
<span class="token comment"># 4.安装mariadb数据库</span>
<span class="token namespace">[root@zabbix yum.repos.d]</span><span class="token comment"># yum install mariadb mariadb-server -y </span>
mariadb-server 服务器端的软件包
mariadb 提供客户端命令的软件包
<span class="token comment"># 注意:如果已经安装过mysql的centos系统,就不需要安装mariadb</span>
<span class="token namespace">[root@zabbix yum.repos.d]</span><span class="token comment"># service mariadb start # 启动mariadb</span>
Redirecting to <span class="token operator">/</span>bin/systemctl <span class="token function">start</span> mariadb<span class="token punctuation">.</span>service
<span class="token namespace">[root@zabbix yum.repos.d]</span><span class="token comment"># systemctl enable mariadb # 设置开机启动mariadb数据库</span>
Created symlink <span class="token keyword">from</span> <span class="token operator">/</span>etc/systemd/system/multi-user<span class="token punctuation">.</span>target<span class="token punctuation">.</span>wants/mariadb<span class="token punctuation">.</span>service to <span class="token operator">/</span>usr/lib/systemd/system/mariadb<span class="token punctuation">.</span>service<span class="token punctuation">.</span>
<span class="token comment"># 查看mysqld进程运行</span>
<span class="token namespace">[root@zabbix yum.repos.d]</span><span class="token comment"># ps aux|grep mysqld</span>
mysql 11940 0<span class="token punctuation">.</span>1 0<span class="token punctuation">.</span>0 113412 1596 ? Ss 15:09 0:00 <span class="token operator">/</span>bin/sh <span class="token operator">/</span>usr/bin/mysqld_safe <span class="token operator">--</span>basedir=<span class="token operator">/</span>usr
mysql 12105 1<span class="token punctuation">.</span>1 4<span class="token punctuation">.</span>3 968920 80820 ? <span class="token function">Sl</span> 15:09 0:00 <span class="token operator">/</span>usr/libexec/mysqld <span class="token operator">--</span>basedir=<span class="token operator">/</span>usr <span class="token operator">--</span>datadir=<span class="token operator">/</span><span class="token keyword">var</span><span class="token operator">/</span>lib/mysql <span class="token operator">--</span>plugin-<span class="token function">dir</span>=<span class="token operator">/</span>usr/lib64/mysql/plugin <span class="token operator">--</span>log-error=<span class="token operator">/</span><span class="token keyword">var</span><span class="token operator">/</span>log/mariadb/mariadb<span class="token punctuation">.</span>log <span class="token operator">--</span>pid-file=<span class="token operator">/</span><span class="token keyword">var</span><span class="token operator">/</span>run/mariadb/mariadb<span class="token punctuation">.</span>pid <span class="token operator">--</span>socket=<span class="token operator">/</span><span class="token keyword">var</span><span class="token operator">/</span>lib/mysql/mysql<span class="token punctuation">.</span>sock
root 12159 0<span class="token punctuation">.</span>0 0<span class="token punctuation">.</span>0 112824 980 pts/0 S+ 15:09 0:00 grep <span class="token operator">--</span>color=auto mysqld
<span class="token namespace">[root@zabbix yum.repos.d]</span><span class="token comment"># netstat -anplut|grep 3306</span>
tcp 0 0 0<span class="token punctuation">.</span>0<span class="token punctuation">.</span>0<span class="token punctuation">.</span>0:3306 0<span class="token punctuation">.</span>0<span class="token punctuation">.</span>0<span class="token punctuation">.</span>0:<span class="token operator">*</span> LISTEN 12105/mysqld
<span class="token comment"># 5.在数据库主机上运行以下命令</span>
<span class="token namespace">[root@zabbix yum.repos.d]</span><span class="token comment"># mysql -uroot -p</span>
Enter password:
Welcome to the MariaDB monitor<span class="token punctuation">.</span> Commands <span class="token keyword">end</span> with <span class="token punctuation">;</span> or \g<span class="token punctuation">.</span>
Your MariaDB connection id is 2
Server version: 5<span class="token punctuation">.</span>5<span class="token punctuation">.</span>68-MariaDB MariaDB Server
Copyright <span class="token punctuation">(</span>c<span class="token punctuation">)</span> 2000<span class="token punctuation">,</span> 2018<span class="token punctuation">,</span> Oracle<span class="token punctuation">,</span> MariaDB Corporation Ab and others<span class="token punctuation">.</span>
<span class="token function">Type</span> <span class="token string">'help;'</span> or <span class="token string">'\h'</span> <span class="token keyword">for</span> help<span class="token punctuation">.</span> <span class="token function">Type</span> <span class="token string">'\c'</span> to clear the current input statement<span class="token punctuation">.</span>
MariaDB <span class="token punctuation">[</span><span class="token punctuation">(</span>none<span class="token punctuation">)</span><span class="token punctuation">]</span>> show databases<span class="token punctuation">;</span>
<span class="token operator">+</span><span class="token operator">--</span><span class="token operator">--</span><span class="token operator">--</span><span class="token operator">--</span><span class="token operator">--</span><span class="token operator">--</span><span class="token operator">--</span><span class="token operator">--</span><span class="token operator">--</span><span class="token operator">--</span><span class="token operator">+</span>
<span class="token punctuation">|</span> Database <span class="token punctuation">|</span>
<span class="token operator">+</span><span class="token operator">--</span><span class="token operator">--</span><span class="token operator">--</span><span class="token operator">--</span><span class="token operator">--</span><span class="token operator">--</span><span class="token operator">--</span><span class="token operator">--</span><span class="token operator">--</span><span class="token operator">--</span><span class="token operator">+</span>
<span class="token punctuation">|</span> information_schema <span class="token punctuation">|</span>
<span class="token punctuation">|</span> mysql <span class="token punctuation">|</span>
<span class="token punctuation">|</span> performance_schema <span class="token punctuation">|</span>
<span class="token punctuation">|</span> test <span class="token punctuation">|</span>
<span class="token operator">+</span><span class="token operator">--</span><span class="token operator">--</span><span class="token operator">--</span><span class="token operator">--</span><span class="token operator">--</span><span class="token operator">--</span><span class="token operator">--</span><span class="token operator">--</span><span class="token operator">--</span><span class="token operator">--</span><span class="token operator">+</span>
4 rows in <span class="token function">set</span> <span class="token punctuation">(</span>0<span class="token punctuation">.</span>01 sec<span class="token punctuation">)</span>
MariaDB <span class="token punctuation">[</span><span class="token punctuation">(</span>none<span class="token punctuation">)</span><span class="token punctuation">]</span>> create database zabbix character <span class="token function">set</span> utf8 collate utf8_bin<span class="token punctuation">;</span>
Query OK<span class="token punctuation">,</span> 1 row affected <span class="token punctuation">(</span>0<span class="token punctuation">.</span>00 sec<span class="token punctuation">)</span>
MariaDB <span class="token punctuation">[</span><span class="token punctuation">(</span>none<span class="token punctuation">)</span><span class="token punctuation">]</span>> create user zabbix@localhost identified by <span class="token string">'sc123456'</span><span class="token punctuation">;</span> <span class="token comment"># 创建用户zabbix@localhost 密码是sc123456</span>
Query OK<span class="token punctuation">,</span> 0 rows affected <span class="token punctuation">(</span>0<span class="token punctuation">.</span>00 sec<span class="token punctuation">)</span>
MariaDB <span class="token punctuation">[</span><span class="token punctuation">(</span>none<span class="token punctuation">)</span><span class="token punctuation">]</span>> grant all privileges on zabbix<span class="token punctuation">.</span><span class="token operator">*</span> to zabbix@localhost<span class="token punctuation">;</span> <span class="token comment">#授权zabbix@localhost用户对zabbix.*库里的表有所有的权限(insert,delete,update,select等)</span>
Query OK<span class="token punctuation">,</span> 0 rows affected <span class="token punctuation">(</span>0<span class="token punctuation">.</span>00 sec<span class="token punctuation">)</span>
MariaDB <span class="token punctuation">[</span><span class="token punctuation">(</span>none<span class="token punctuation">)</span><span class="token punctuation">]</span>> <span class="token function">set</span> global log_bin_trust_function_creators = 1<span class="token punctuation">;</span>
Query OK<span class="token punctuation">,</span> 0 rows affected <span class="token punctuation">(</span>0<span class="token punctuation">.</span>00 sec<span class="token punctuation">)</span>
MariaDB <span class="token punctuation">[</span><span class="token punctuation">(</span>none<span class="token punctuation">)</span><span class="token punctuation">]</span>> <span class="token keyword">exit</span>
Bye
<span class="token comment"># 导入初始化数据,会在zabbix库里新建很多的表</span>
<span class="token namespace">[root@zabbix yum.repos.d]</span><span class="token comment"># cd /usr/share/doc/zabbix-server-mysql-5.0.35/</span>
<span class="token namespace">[root@zabbix zabbix-server-mysql-5.0.35]</span><span class="token comment"># ls</span>
AUTHORS ChangeLog COPYING create<span class="token punctuation">.</span>sql<span class="token punctuation">.</span>gz double<span class="token punctuation">.</span>sql NEWS README
<span class="token namespace">[root@zabbix zabbix-server-mysql-5.0.33]</span><span class="token comment"># zcat create.sql.gz |mysql -uzabbix -p'sc123456' zabbix</span>
<span class="token namespace">[root@zabbix zabbix-server-mysql-5.0.33]</span><span class="token comment"># mysql -uzabbix -psc123456</span>
Welcome to the MariaDB monitor<span class="token punctuation">.</span> Commands <span class="token keyword">end</span> with <span class="token punctuation">;</span> or \g<span class="token punctuation">.</span>
Your MariaDB connection id is 4
Server version: 5<span class="token punctuation">.</span>5<span class="token punctuation">.</span>68-MariaDB MariaDB Server
Copyright <span class="token punctuation">(</span>c<span class="token punctuation">)</span> 2000<span class="token punctuation">,</span> 2018<span class="token punctuation">,</span> Oracle<span class="token punctuation">,</span> MariaDB Corporation Ab and others<span class="token punctuation">.</span>
<span class="token function">Type</span> <span class="token string">'help;'</span> or <span class="token string">'\h'</span> <span class="token keyword">for</span> help<span class="token punctuation">.</span> <span class="token function">Type</span> <span class="token string">'\c'</span> to clear the current input statement<span class="token punctuation">.</span>
MariaDB <span class="token punctuation">[</span><span class="token punctuation">(</span>none<span class="token punctuation">)</span><span class="token punctuation">]</span>> show databases<span class="token punctuation">;</span>
<span class="token operator">+</span><span class="token operator">--</span><span class="token operator">--</span><span class="token operator">--</span><span class="token operator">--</span><span class="token operator">--</span><span class="token operator">--</span><span class="token operator">--</span><span class="token operator">--</span><span class="token operator">--</span><span class="token operator">--</span><span class="token operator">+</span>
<span class="token punctuation">|</span> Database <span class="token punctuation">|</span>
<span class="token operator">+</span><span class="token operator">--</span><span class="token operator">--</span><span class="token operator">--</span><span class="token operator">--</span><span class="token operator">--</span><span class="token operator">--</span><span class="token operator">--</span><span class="token operator">--</span><span class="token operator">--</span><span class="token operator">--</span><span class="token operator">+</span>
<span class="token punctuation">|</span> information_schema <span class="token punctuation">|</span>
<span class="token punctuation">|</span> test <span class="token punctuation">|</span>
<span class="token punctuation">|</span> zabbix <span class="token punctuation">|</span>
<span class="token operator">+</span><span class="token operator">--</span><span class="token operator">--</span><span class="token operator">--</span><span class="token operator">--</span><span class="token operator">--</span><span class="token operator">--</span><span class="token operator">--</span><span class="token operator">--</span><span class="token operator">--</span><span class="token operator">--</span><span class="token operator">+</span>
3 rows in <span class="token function">set</span> <span class="token punctuation">(</span>0<span class="token punctuation">.</span>00 sec<span class="token punctuation">)</span>
MariaDB <span class="token punctuation">[</span><span class="token punctuation">(</span>none<span class="token punctuation">)</span><span class="token punctuation">]</span>> use zabbix<span class="token punctuation">;</span>
Reading table information <span class="token keyword">for</span> completion of table and column names
You can turn off this feature to get a quicker startup with <span class="token operator">-</span>A
Database changed
MariaDB <span class="token namespace">[zabbix]</span>> show tables<span class="token punctuation">;</span>
<span class="token operator">+</span><span class="token operator">--</span><span class="token operator">--</span><span class="token operator">--</span><span class="token operator">--</span><span class="token operator">--</span><span class="token operator">--</span><span class="token operator">--</span><span class="token operator">--</span><span class="token operator">--</span><span class="token operator">--</span><span class="token operator">--</span><span class="token operator">--</span><span class="token operator">--</span><span class="token operator">--</span><span class="token operator">+</span>
<span class="token punctuation">|</span> Tables_in_zabbix <span class="token punctuation">|</span>
<span class="token operator">+</span><span class="token operator">--</span><span class="token operator">--</span><span class="token operator">--</span><span class="token operator">--</span><span class="token operator">--</span><span class="token operator">--</span><span class="token operator">--</span><span class="token operator">--</span><span class="token operator">--</span><span class="token operator">--</span><span class="token operator">--</span><span class="token operator">--</span><span class="token operator">--</span><span class="token operator">--</span><span class="token operator">+</span>
<span class="token punctuation">|</span> acknowledges <span class="token punctuation">|</span>
<span class="token punctuation">|</span> actions <span class="token punctuation">|</span>
<span class="token punctuation">|</span> alerts <span class="token punctuation">|</span>
<span class="token punctuation">|</span> application_discovery <span class="token punctuation">|</span>
<span class="token punctuation">|</span> application_prototype <span class="token punctuation">|</span>
<span class="token comment"># 导入数据库架构后禁用log_bin_trust_function_creators选项</span>
<span class="token namespace">[root@zabbix zabbix-server-mysql-5.0.33]</span><span class="token comment"># mysql -uroot -p</span>
Enter password:
Welcome to the MariaDB monitor<span class="token punctuation">.</span> Commands <span class="token keyword">end</span> with <span class="token punctuation">;</span> or \g<span class="token punctuation">.</span>
Your MariaDB connection id is 5
Server version: 5<span class="token punctuation">.</span>5<span class="token punctuation">.</span>68-MariaDB MariaDB Server
Copyright <span class="token punctuation">(</span>c<span class="token punctuation">)</span> 2000<span class="token punctuation">,</span> 2018<span class="token punctuation">,</span> Oracle<span class="token punctuation">,</span> MariaDB Corporation Ab and others<span class="token punctuation">.</span>
<span class="token function">Type</span> <span class="token string">'help;'</span> or <span class="token string">'\h'</span> <span class="token keyword">for</span> help<span class="token punctuation">.</span> <span class="token function">Type</span> <span class="token string">'\c'</span> to clear the current input statement<span class="token punctuation">.</span>
MariaDB <span class="token punctuation">[</span><span class="token punctuation">(</span>none<span class="token punctuation">)</span><span class="token punctuation">]</span>> <span class="token function">set</span> global log_bin_trust_function_creators = 0<span class="token punctuation">;</span>
Query OK<span class="token punctuation">,</span> 0 rows affected <span class="token punctuation">(</span>0<span class="token punctuation">.</span>00 sec<span class="token punctuation">)</span>
MariaDB <span class="token punctuation">[</span><span class="token punctuation">(</span>none<span class="token punctuation">)</span><span class="token punctuation">]</span>> <span class="token keyword">exit</span>
Bye
<span class="token comment"># 6.为 Zabbix 服务器配置数据库</span>
<span class="token comment"># 编辑文件 /etc/zabbix/zabbix_server.conf</span>
<span class="token namespace">[root@zabbix zabbix-server-mysql-5.0.33]</span><span class="token comment"># cd /etc/zabbix/</span>
<span class="token namespace">[root@zabbix zabbix]</span><span class="token comment"># vim zabbix_server.conf </span>
<span class="token comment"># DBPassword=</span>
DBPassword=sc123456
<span class="token comment"># 7.为 Zabbix 前端配置 PHP</span>
<span class="token comment"># 编辑文件 /etc/opt/rh/rh-nginx116/nginx/conf.d/zabbix.conf 取消注释</span>
<span class="token namespace">[root@zabbix conf.d]</span><span class="token comment"># cd /etc/opt/rh/rh-nginx116/nginx/conf.d/</span>
<span class="token namespace">[root@zabbix conf.d]</span><span class="token comment"># ls</span>
zabbix<span class="token punctuation">.</span>conf
<span class="token namespace">[root@zabbix conf.d]</span><span class="token comment"># vim zabbix.conf </span>
server <span class="token punctuation">{</span>
listen 8080<span class="token punctuation">;</span>
server_name zabbix<span class="token punctuation">.</span>com<span class="token punctuation">;</span>
<span class="token comment"># 编辑/etc/opt/rh/rh-nginx116/nginx/nginx.conf</span>
<span class="token namespace">[root@zabbix conf.d]</span><span class="token comment"># cd /etc/opt/rh/rh-nginx116/nginx/ </span>
<span class="token namespace">[root@zabbix nginx]</span><span class="token comment"># vim nginx.conf </span>
server <span class="token punctuation">{</span>
listen 80 default_server<span class="token punctuation">;</span> <span class="token comment">#修改80为8080</span>
listen <span class="token punctuation">[</span>::<span class="token punctuation">]</span>:80 default_server<span class="token punctuation">;</span>
<span class="token comment"># 避免zabbix和nginx监听同一个端口,导致zabbix启动不起来。</span>
<span class="token comment"># 编辑文件 /etc/opt/rh/rh-php72/php-fpm.d/zabbix.conf</span>
<span class="token namespace">[root@zabbix nginx]</span><span class="token comment"># cd /etc/opt/rh/rh-php72/php-fpm.d</span>
<span class="token namespace">[root@zabbix php-fpm.d]</span><span class="token comment"># ls</span>
www<span class="token punctuation">.</span>conf zabbix<span class="token punctuation">.</span>conf
<span class="token namespace">[root@zabbix php-fpm.d]</span><span class="token comment"># vim zabbix.conf </span>
listen<span class="token punctuation">.</span>acl_users = apache<span class="token punctuation">,</span>nginx
php_value<span class="token namespace">[date.timezone]</span> = Asia/Shanghai
<span class="token comment"># 建议一定要关闭selinux,不然会导致zabbix_server启动不了</span>
<span class="token comment"># 8.启动Zabbix服务器和代理进程并且设置开机启动</span>
<span class="token namespace">[root@zabbix php-fpm.d]</span><span class="token comment"># systemctl restart zabbix-server zabbix-agent rh-nginx116-nginx rh-php72-php-fpm</span>
<span class="token namespace">[root@zabbix php-fpm.d]</span><span class="token comment"># systemctl enable zabbix-server zabbix-agent rh-nginx116-nginx rh-php72-php-fpm</span>
Created symlink <span class="token keyword">from</span> <span class="token operator">/</span>etc/systemd/system/multi-user<span class="token punctuation">.</span>target<span class="token punctuation">.</span>wants/zabbix-server<span class="token punctuation">.</span>service to <span class="token operator">/</span>usr/lib/systemd/system/zabbix-server<span class="token punctuation">.</span>service<span class="token punctuation">.</span>
Created symlink <span class="token keyword">from</span> <span class="token operator">/</span>etc/systemd/system/multi-user<span class="token punctuation">.</span>target<span class="token punctuation">.</span>wants/zabbix-agent<span class="token punctuation">.</span>service to <span class="token operator">/</span>usr/lib/systemd/system/zabbix-agent<span class="token punctuation">.</span>service<span class="token punctuation">.</span>
Created symlink <span class="token keyword">from</span> <span class="token operator">/</span>etc/systemd/system/multi-user<span class="token punctuation">.</span>target<span class="token punctuation">.</span>wants/rh-nginx116-nginx<span class="token punctuation">.</span>service to <span class="token operator">/</span>usr/lib/systemd/system/rh-nginx116-nginx<span class="token punctuation">.</span>service<span class="token punctuation">.</span>
Created symlink <span class="token keyword">from</span> <span class="token operator">/</span>etc/systemd/system/multi-user<span class="token punctuation">.</span>target<span class="token punctuation">.</span>wants/rh-php72-php-fpm<span class="token punctuation">.</span>service to <span class="token operator">/</span>usr/lib/systemd/system/rh-php72-php-fpm<span class="token punctuation">.</span>service<span class="token punctuation">.</span>
<span class="token comment"># 9.浏览器里访问</span>
http:<span class="token operator">/</span><span class="token operator">/</span>192<span class="token punctuation">.</span>168<span class="token punctuation">.</span>2<span class="token punctuation">.</span>117:8080
<span class="token comment"># 默认登录的账号和密码</span>
username: Admin
password: zabbix
<span class="token comment"># 使用Prometheus监控Kubernetes</span>
<span class="token comment"># 1.在所有节点提前下载镜像</span>
docker pull prom/node-exporter
docker pull prom/prometheus:v2<span class="token punctuation">.</span>0<span class="token punctuation">.</span>0
docker pull grafana/grafana:6<span class="token punctuation">.</span>1<span class="token punctuation">.</span>4
<span class="token namespace">[root@k8smaster ~]</span><span class="token comment"># docker images</span>
REPOSITORY TAG IMAGE ID CREATED SIZE
prom/node-exporter latest 1dbe0e931976 18 months ago 20<span class="token punctuation">.</span>9MB
grafana/grafana 6<span class="token punctuation">.</span>1<span class="token punctuation">.</span>4 d9bdb6044027 4 years ago 245MB
prom/prometheus v2<span class="token punctuation">.</span>0<span class="token punctuation">.</span>0 67141fa03496 5 years ago 80<span class="token punctuation">.</span>2MB
<span class="token namespace">[root@k8snode1 ~]</span><span class="token comment"># docker images</span>
REPOSITORY TAG IMAGE ID CREATED SIZE
prom/node-exporter latest 1dbe0e931976 18 months ago 20<span class="token punctuation">.</span>9MB
grafana/grafana 6<span class="token punctuation">.</span>1<span class="token punctuation">.</span>4 d9bdb6044027 4 years ago 245MB
prom/prometheus
<span class="token namespace">[root@k8snode2 ~]</span><span class="token comment"># docker images</span>
REPOSITORY TAG IMAGE ID CREATED SIZE
prom/node-exporter latest 1dbe0e931976 18 months ago 20<span class="token punctuation">.</span>9MB
grafana/grafana 6<span class="token punctuation">.</span>1<span class="token punctuation">.</span>4 d9bdb6044027 4 years ago 245MB
prom/prometheus v2<span class="token punctuation">.</span>0<span class="token punctuation">.</span>0 67141fa03496 5 years ago 80<span class="token punctuation">.</span>2MB
<span class="token comment"># 2.采用daemonset方式部署node-exporter</span>
<span class="token namespace">[root@k8smaster prometheus]</span><span class="token comment"># ll</span>
总用量 36
<span class="token operator">-</span>rw-r-<span class="token operator">-</span>r-<span class="token operator">-</span> 1 root root 5632 6月 25 16:23 configmap<span class="token punctuation">.</span>yaml
<span class="token operator">-</span>rw-r-<span class="token operator">-</span>r-<span class="token operator">-</span> 1 root root 1515 6月 25 16:26 grafana-deploy<span class="token punctuation">.</span>yaml
<span class="token operator">-</span>rw-r-<span class="token operator">-</span>r-<span class="token operator">-</span> 1 root root 256 6月 25 16:27 grafana-ing<span class="token punctuation">.</span>yaml
<span class="token operator">-</span>rw-r-<span class="token operator">-</span>r-<span class="token operator">-</span> 1 root root 225 6月 25 16:27 grafana-svc<span class="token punctuation">.</span>yaml
<span class="token operator">-</span>rw-r-<span class="token operator">-</span>r-<span class="token operator">-</span> 1 root root 716 6月 25 16:22 node-exporter<span class="token punctuation">.</span>yaml
<span class="token operator">-</span>rw-r-<span class="token operator">-</span>r-<span class="token operator">-</span> 1 root root 1104 6月 25 16:25 prometheus<span class="token punctuation">.</span>deploy<span class="token punctuation">.</span>yml
<span class="token operator">-</span>rw-r-<span class="token operator">-</span>r-<span class="token operator">-</span> 1 root root 233 6月 25 16:25 prometheus<span class="token punctuation">.</span>svc<span class="token punctuation">.</span>yml
<span class="token operator">-</span>rw-r-<span class="token operator">-</span>r-<span class="token operator">-</span> 1 root root 716 6月 25 16:23 rbac-setukp<span class="token punctuation">.</span>yaml
<span class="token namespace">[root@k8smaster prometheus]</span><span class="token comment"># cat node-exporter.yaml </span>
<span class="token operator">--</span><span class="token operator">-</span>
apiVersion: apps/v1
kind: DaemonSet
metadata:
name: node-exporter
namespace: kube-system
labels:
k8s-app: node-exporter
spec:
selector:
matchLabels:
k8s-app: node-exporter
template:
metadata:
labels:
k8s-app: node-exporter
spec:
containers:
<span class="token operator">-</span> image: prom/node-exporter
name: node-exporter
ports:
<span class="token operator">-</span> containerPort: 9100
protocol: TCP
name: http
<span class="token operator">--</span><span class="token operator">-</span>
apiVersion: v1
kind: Service
metadata:
labels:
k8s-app: node-exporter
name: node-exporter
namespace: kube-system
spec:
ports:
<span class="token operator">-</span> name: http
port: 9100
nodePort: 31672
protocol: TCP
<span class="token function">type</span>: NodePort
selector:
k8s-app: node-exporter
<span class="token namespace">[root@k8smaster prometheus]</span><span class="token comment"># kubectl apply -f node-exporter.yaml</span>
daemonset<span class="token punctuation">.</span>apps/node-exporter created
service/node-exporter created
<span class="token namespace">[root@k8smaster prometheus]</span><span class="token comment"># kubectl get pods -A</span>
NAMESPACE NAME READY STATUS RESTARTS AGE
kube-system node-exporter-fcmx5 1/1 Running 0 47s
kube-system node-exporter-qccwb 1/1 Running 0 47s
<span class="token namespace">[root@k8smaster prometheus]</span><span class="token comment"># kubectl get daemonset -A</span>
NAMESPACE NAME DESIRED CURRENT READY UP-TO-DATE AVAILABLE NODE SELECTOR AGE
kube-system calico-node 3 3 3 3 3 kubernetes<span class="token punctuation">.</span>io/os=linux 7d
kube-system kube-proxy 3 3 3 3 3 kubernetes<span class="token punctuation">.</span>io/os=linux 7d
kube-system node-exporter 2 2 2 2 2 <none> 2m29s
<span class="token namespace">[root@k8smaster prometheus]</span><span class="token comment"># kubectl get service -A</span>
NAMESPACE NAME <span class="token function">TYPE</span> CLUSTER-IP EXTERNAL-IP PORT<span class="token punctuation">(</span>S<span class="token punctuation">)</span> AGE
kube-system node-exporter NodePort 10<span class="token punctuation">.</span>111<span class="token punctuation">.</span>247<span class="token punctuation">.</span>142 <none> 9100:31672/TCP 3m24s
<span class="token comment"># 3.部署Prometheus</span>
<span class="token namespace">[root@k8smaster prometheus]</span><span class="token comment"># cat rbac-setup.yaml </span>
apiVersion: rbac<span class="token punctuation">.</span>authorization<span class="token punctuation">.</span>k8s<span class="token punctuation">.</span>io/v1
kind: ClusterRole
metadata:
name: prometheus
rules:
<span class="token operator">-</span> apiGroups: <span class="token punctuation">[</span><span class="token string">""</span><span class="token punctuation">]</span>
resources:
<span class="token operator">-</span> nodes
<span class="token operator">-</span> nodes/proxy
<span class="token operator">-</span> services
<span class="token operator">-</span> endpoints
<span class="token operator">-</span> pods
verbs: <span class="token punctuation">[</span><span class="token string">"get"</span><span class="token punctuation">,</span> <span class="token string">"list"</span><span class="token punctuation">,</span> <span class="token string">"watch"</span><span class="token punctuation">]</span>
<span class="token operator">-</span> apiGroups:
<span class="token operator">-</span> extensions
resources:
<span class="token operator">-</span> ingresses
verbs: <span class="token punctuation">[</span><span class="token string">"get"</span><span class="token punctuation">,</span> <span class="token string">"list"</span><span class="token punctuation">,</span> <span class="token string">"watch"</span><span class="token punctuation">]</span>
<span class="token operator">-</span> nonResourceURLs: <span class="token punctuation">[</span><span class="token string">"/metrics"</span><span class="token punctuation">]</span>
verbs: <span class="token punctuation">[</span><span class="token string">"get"</span><span class="token punctuation">]</span>
<span class="token operator">--</span><span class="token operator">-</span>
apiVersion: v1
kind: ServiceAccount
metadata:
name: prometheus
namespace: kube-system
<span class="token operator">--</span><span class="token operator">-</span>
apiVersion: rbac<span class="token punctuation">.</span>authorization<span class="token punctuation">.</span>k8s<span class="token punctuation">.</span>io/v1
kind: ClusterRoleBinding
metadata:
name: prometheus
roleRef:
apiGroup: rbac<span class="token punctuation">.</span>authorization<span class="token punctuation">.</span>k8s<span class="token punctuation">.</span>io
kind: ClusterRole
name: prometheus
subjects:
<span class="token operator">-</span> kind: ServiceAccount
name: prometheus
namespace: kube-system
<span class="token namespace">[root@k8smaster prometheus]</span><span class="token comment"># kubectl apply -f rbac-setup.yaml</span>
clusterrole<span class="token punctuation">.</span>rbac<span class="token punctuation">.</span>authorization<span class="token punctuation">.</span>k8s<span class="token punctuation">.</span>io/prometheus created
serviceaccount/prometheus created
clusterrolebinding<span class="token punctuation">.</span>rbac<span class="token punctuation">.</span>authorization<span class="token punctuation">.</span>k8s<span class="token punctuation">.</span>io/prometheus created
<span class="token namespace">[root@k8smaster prometheus]</span><span class="token comment"># cat configmap.yaml </span>
apiVersion: v1
kind: ConfigMap
metadata:
name: prometheus-config
namespace: kube-system
<span class="token keyword">data</span>:
prometheus<span class="token punctuation">.</span>yml: <span class="token punctuation">|</span>
global:
scrape_interval: 15s
evaluation_interval: 15s
scrape_configs:
<span class="token operator">-</span> job_name: <span class="token string">'kubernetes-apiservers'</span>
kubernetes_sd_configs:
<span class="token operator">-</span> role: endpoints
scheme: https
tls_config:
ca_file: <span class="token operator">/</span><span class="token keyword">var</span><span class="token operator">/</span>run/secrets/kubernetes<span class="token punctuation">.</span>io/serviceaccount/ca<span class="token punctuation">.</span>crt
bearer_token_file: <span class="token operator">/</span><span class="token keyword">var</span><span class="token operator">/</span>run/secrets/kubernetes<span class="token punctuation">.</span>io/serviceaccount/token
relabel_configs:
<span class="token operator">-</span> source_labels: <span class="token punctuation">[</span>__meta_kubernetes_namespace<span class="token punctuation">,</span> __meta_kubernetes_service_name<span class="token punctuation">,</span> __meta_kubernetes_endpoint_port_name<span class="token punctuation">]</span>
action: keep
regex: default<span class="token punctuation">;</span>kubernetes<span class="token punctuation">;</span>https
<span class="token operator">-</span> job_name: <span class="token string">'kubernetes-nodes'</span>
kubernetes_sd_configs:
<span class="token operator">-</span> role: node
scheme: https
tls_config:
ca_file: <span class="token operator">/</span><span class="token keyword">var</span><span class="token operator">/</span>run/secrets/kubernetes<span class="token punctuation">.</span>io/serviceaccount/ca<span class="token punctuation">.</span>crt
bearer_token_file: <span class="token operator">/</span><span class="token keyword">var</span><span class="token operator">/</span>run/secrets/kubernetes<span class="token punctuation">.</span>io/serviceaccount/token
relabel_configs:
<span class="token operator">-</span> action: labelmap
regex: __meta_kubernetes_node_label_<span class="token punctuation">(</span><span class="token punctuation">.</span><span class="token operator">+</span><span class="token punctuation">)</span>
<span class="token operator">-</span> target_label: __address__
replacement: kubernetes<span class="token punctuation">.</span>default<span class="token punctuation">.</span>svc:443
<span class="token operator">-</span> source_labels: <span class="token punctuation">[</span>__meta_kubernetes_node_name<span class="token punctuation">]</span>
regex: <span class="token punctuation">(</span><span class="token punctuation">.</span><span class="token operator">+</span><span class="token punctuation">)</span>
target_label: __metrics_path__
replacement: <span class="token operator">/</span>api/v1/nodes/$<span class="token punctuation">{</span>1<span class="token punctuation">}</span><span class="token operator">/</span>proxy/metrics
<span class="token operator">-</span> job_name: <span class="token string">'kubernetes-cadvisor'</span>
kubernetes_sd_configs:
<span class="token operator">-</span> role: node
scheme: https
tls_config:
ca_file: <span class="token operator">/</span><span class="token keyword">var</span><span class="token operator">/</span>run/secrets/kubernetes<span class="token punctuation">.</span>io/serviceaccount/ca<span class="token punctuation">.</span>crt
bearer_token_file: <span class="token operator">/</span><span class="token keyword">var</span><span class="token operator">/</span>run/secrets/kubernetes<span class="token punctuation">.</span>io/serviceaccount/token
relabel_configs:
<span class="token operator">-</span> action: labelmap
regex: __meta_kubernetes_node_label_<span class="token punctuation">(</span><span class="token punctuation">.</span><span class="token operator">+</span><span class="token punctuation">)</span>
<span class="token operator">-</span> target_label: __address__
replacement: kubernetes<span class="token punctuation">.</span>default<span class="token punctuation">.</span>svc:443
<span class="token operator">-</span> source_labels: <span class="token punctuation">[</span>__meta_kubernetes_node_name<span class="token punctuation">]</span>
regex: <span class="token punctuation">(</span><span class="token punctuation">.</span><span class="token operator">+</span><span class="token punctuation">)</span>
target_label: __metrics_path__
replacement: <span class="token operator">/</span>api/v1/nodes/$<span class="token punctuation">{</span>1<span class="token punctuation">}</span><span class="token operator">/</span>proxy/metrics/cadvisor
<span class="token operator">-</span> job_name: <span class="token string">'kubernetes-service-endpoints'</span>
kubernetes_sd_configs:
<span class="token operator">-</span> role: endpoints
relabel_configs:
<span class="token operator">-</span> source_labels: <span class="token punctuation">[</span>__meta_kubernetes_service_annotation_prometheus_io_scrape<span class="token punctuation">]</span>
action: keep
regex: true
<span class="token operator">-</span> source_labels: <span class="token punctuation">[</span>__meta_kubernetes_service_annotation_prometheus_io_scheme<span class="token punctuation">]</span>
action: replace
target_label: __scheme__
regex: <span class="token punctuation">(</span>https?<span class="token punctuation">)</span>
<span class="token operator">-</span> source_labels: <span class="token punctuation">[</span>__meta_kubernetes_service_annotation_prometheus_io_path<span class="token punctuation">]</span>
action: replace
target_label: __metrics_path__
regex: <span class="token punctuation">(</span><span class="token punctuation">.</span><span class="token operator">+</span><span class="token punctuation">)</span>
<span class="token operator">-</span> source_labels: <span class="token punctuation">[</span>__address__<span class="token punctuation">,</span> __meta_kubernetes_service_annotation_prometheus_io_port<span class="token punctuation">]</span>
action: replace
target_label: __address__
regex: <span class="token punctuation">(</span><span class="token punctuation">[</span>^:<span class="token punctuation">]</span><span class="token operator">+</span><span class="token punctuation">)</span><span class="token punctuation">(</span>?::\d+<span class="token punctuation">)</span>?<span class="token punctuation">;</span><span class="token punctuation">(</span>\d+<span class="token punctuation">)</span>
replacement: <span class="token variable">$1</span>:<span class="token variable">$2</span>
<span class="token operator">-</span> action: labelmap
regex: __meta_kubernetes_service_label_<span class="token punctuation">(</span><span class="token punctuation">.</span><span class="token operator">+</span><span class="token punctuation">)</span>
<span class="token operator">-</span> source_labels: <span class="token punctuation">[</span>__meta_kubernetes_namespace<span class="token punctuation">]</span>
action: replace
target_label: kubernetes_namespace
<span class="token operator">-</span> source_labels: <span class="token punctuation">[</span>__meta_kubernetes_service_name<span class="token punctuation">]</span>
action: replace
target_label: kubernetes_name
<span class="token operator">-</span> job_name: <span class="token string">'kubernetes-services'</span>
kubernetes_sd_configs:
<span class="token operator">-</span> role: service
metrics_path: <span class="token operator">/</span>probe
params:
module: <span class="token namespace">[http_2xx]</span>
relabel_configs:
<span class="token operator">-</span> source_labels: <span class="token punctuation">[</span>__meta_kubernetes_service_annotation_prometheus_io_probe<span class="token punctuation">]</span>
action: keep
regex: true
<span class="token operator">-</span> source_labels: <span class="token punctuation">[</span>__address__<span class="token punctuation">]</span>
target_label: __param_target
<span class="token operator">-</span> target_label: __address__
replacement: blackbox-exporter<span class="token punctuation">.</span>example<span class="token punctuation">.</span>com:9115
<span class="token operator">-</span> source_labels: <span class="token punctuation">[</span>__param_target<span class="token punctuation">]</span>
target_label: instance
<span class="token operator">-</span> action: labelmap
regex: __meta_kubernetes_service_label_<span class="token punctuation">(</span><span class="token punctuation">.</span><span class="token operator">+</span><span class="token punctuation">)</span>
<span class="token operator">-</span> source_labels: <span class="token punctuation">[</span>__meta_kubernetes_namespace<span class="token punctuation">]</span>
target_label: kubernetes_namespace
<span class="token operator">-</span> source_labels: <span class="token punctuation">[</span>__meta_kubernetes_service_name<span class="token punctuation">]</span>
target_label: kubernetes_name
<span class="token operator">-</span> job_name: <span class="token string">'kubernetes-ingresses'</span>
kubernetes_sd_configs:
<span class="token operator">-</span> role: ingress
relabel_configs:
<span class="token operator">-</span> source_labels: <span class="token punctuation">[</span>__meta_kubernetes_ingress_annotation_prometheus_io_probe<span class="token punctuation">]</span>
action: keep
regex: true
<span class="token operator">-</span> source_labels: <span class="token punctuation">[</span>__meta_kubernetes_ingress_scheme<span class="token punctuation">,</span>__address__<span class="token punctuation">,</span>__meta_kubernetes_ingress_path<span class="token punctuation">]</span>
regex: <span class="token punctuation">(</span><span class="token punctuation">.</span><span class="token operator">+</span><span class="token punctuation">)</span><span class="token punctuation">;</span><span class="token punctuation">(</span><span class="token punctuation">.</span><span class="token operator">+</span><span class="token punctuation">)</span><span class="token punctuation">;</span><span class="token punctuation">(</span><span class="token punctuation">.</span><span class="token operator">+</span><span class="token punctuation">)</span>
replacement: $<span class="token punctuation">{</span>1<span class="token punctuation">}</span>:<span class="token operator">/</span><span class="token operator">/</span>$<span class="token punctuation">{</span>2<span class="token punctuation">}</span>$<span class="token punctuation">{</span>3<span class="token punctuation">}</span>
target_label: __param_target
<span class="token operator">-</span> target_label: __address__
replacement: blackbox-exporter<span class="token punctuation">.</span>example<span class="token punctuation">.</span>com:9115
<span class="token operator">-</span> source_labels: <span class="token punctuation">[</span>__param_target<span class="token punctuation">]</span>
target_label: instance
<span class="token operator">-</span> action: labelmap
regex: __meta_kubernetes_ingress_label_<span class="token punctuation">(</span><span class="token punctuation">.</span><span class="token operator">+</span><span class="token punctuation">)</span>
<span class="token operator">-</span> source_labels: <span class="token punctuation">[</span>__meta_kubernetes_namespace<span class="token punctuation">]</span>
target_label: kubernetes_namespace
<span class="token operator">-</span> source_labels: <span class="token punctuation">[</span>__meta_kubernetes_ingress_name<span class="token punctuation">]</span>
target_label: kubernetes_name
<span class="token operator">-</span> job_name: <span class="token string">'kubernetes-pods'</span>
kubernetes_sd_configs:
<span class="token operator">-</span> role: pod
relabel_configs:
<span class="token operator">-</span> source_labels: <span class="token punctuation">[</span>__meta_kubernetes_pod_annotation_prometheus_io_scrape<span class="token punctuation">]</span>
action: keep
regex: true
<span class="token operator">-</span> source_labels: <span class="token punctuation">[</span>__meta_kubernetes_pod_annotation_prometheus_io_path<span class="token punctuation">]</span>
action: replace
target_label: __metrics_path__
regex: <span class="token punctuation">(</span><span class="token punctuation">.</span><span class="token operator">+</span><span class="token punctuation">)</span>
<span class="token operator">-</span> source_labels: <span class="token punctuation">[</span>__address__<span class="token punctuation">,</span> __meta_kubernetes_pod_annotation_prometheus_io_port<span class="token punctuation">]</span>
action: replace
regex: <span class="token punctuation">(</span><span class="token punctuation">[</span>^:<span class="token punctuation">]</span><span class="token operator">+</span><span class="token punctuation">)</span><span class="token punctuation">(</span>?::\d+<span class="token punctuation">)</span>?<span class="token punctuation">;</span><span class="token punctuation">(</span>\d+<span class="token punctuation">)</span>
replacement: <span class="token variable">$1</span>:<span class="token variable">$2</span>
target_label: __address__
<span class="token operator">-</span> action: labelmap
regex: __meta_kubernetes_pod_label_<span class="token punctuation">(</span><span class="token punctuation">.</span><span class="token operator">+</span><span class="token punctuation">)</span>
<span class="token operator">-</span> source_labels: <span class="token punctuation">[</span>__meta_kubernetes_namespace<span class="token punctuation">]</span>
action: replace
target_label: kubernetes_namespace
<span class="token operator">-</span> source_labels: <span class="token punctuation">[</span>__meta_kubernetes_pod_name<span class="token punctuation">]</span>
action: replace
target_label: kubernetes_pod_name
<span class="token namespace">[root@k8smaster prometheus]</span><span class="token comment"># kubectl apply -f configmap.yaml</span>
configmap/prometheus-config created
<span class="token namespace">[root@k8smaster prometheus]</span><span class="token comment"># cat prometheus.deploy.yml </span>
apiVersion: apps/v1
kind: Deployment
metadata:
labels:
name: prometheus-deployment
name: prometheus
namespace: kube-system
spec:
replicas: 1
selector:
matchLabels:
app: prometheus
template:
metadata:
labels:
app: prometheus
spec:
containers:
<span class="token operator">-</span> image: prom/prometheus:v2<span class="token punctuation">.</span>0<span class="token punctuation">.</span>0
name: prometheus
command:
<span class="token operator">-</span> <span class="token string">"/bin/prometheus"</span>
args:
<span class="token operator">-</span> <span class="token string">"--config.file=/etc/prometheus/prometheus.yml"</span>
<span class="token operator">-</span> <span class="token string">"--storage.tsdb.path=/prometheus"</span>
<span class="token operator">-</span> <span class="token string">"--storage.tsdb.retention=24h"</span>
ports:
<span class="token operator">-</span> containerPort: 9090
protocol: TCP
volumeMounts:
<span class="token operator">-</span> mountPath: <span class="token string">"/prometheus"</span>
name: <span class="token keyword">data</span>
<span class="token operator">-</span> mountPath: <span class="token string">"/etc/prometheus"</span>
name: config-volume
resources:
requests:
cpu: 100m
memory: 100Mi
limits:
cpu: 500m
memory: 2500Mi
serviceAccountName: prometheus
volumes:
<span class="token operator">-</span> name: <span class="token keyword">data</span>
emptyDir: <span class="token punctuation">{</span><span class="token punctuation">}</span>
<span class="token operator">-</span> name: config-volume
configMap:
name: prometheus-config
<span class="token namespace">[root@k8smaster prometheus]</span><span class="token comment"># kubectl apply -f prometheus.deploy.yml</span>
deployment<span class="token punctuation">.</span>apps/prometheus created
<span class="token namespace">[root@k8smaster prometheus]</span><span class="token comment"># cat prometheus.svc.yml </span>
kind: Service
apiVersion: v1
metadata:
labels:
app: prometheus
name: prometheus
namespace: kube-system
spec:
<span class="token function">type</span>: NodePort
ports:
<span class="token operator">-</span> port: 9090
targetPort: 9090
nodePort: 30003
selector:
app: prometheus
<span class="token namespace">[root@k8smaster prometheus]</span><span class="token comment"># kubectl apply -f prometheus.svc.yml</span>
service/prometheus created
4<span class="token punctuation">.</span>部署grafana
<span class="token namespace">[root@k8smaster prometheus]</span><span class="token comment"># cat grafana-deploy.yaml </span>
apiVersion: apps/v1
kind: Deployment
metadata:
name: grafana-core
namespace: kube-system
labels:
app: grafana
component: core
spec:
replicas: 1
selector:
matchLabels:
app: grafana
template:
metadata:
labels:
app: grafana
component: core
spec:
containers:
<span class="token operator">-</span> image: grafana/grafana:6<span class="token punctuation">.</span>1<span class="token punctuation">.</span>4
name: grafana-core
imagePullPolicy: IfNotPresent
<span class="token comment"># env:</span>
resources:
<span class="token comment"># keep request = limit to keep this container in guaranteed class</span>
limits:
cpu: 100m
memory: 100Mi
requests:
cpu: 100m
memory: 100Mi
env:
<span class="token comment"># The following env variables set up basic auth twith the default admin user and admin password.</span>
<span class="token operator">-</span> name: GF_AUTH_BASIC_ENABLED
value: <span class="token string">"true"</span>
<span class="token operator">-</span> name: GF_AUTH_ANONYMOUS_ENABLED
value: <span class="token string">"false"</span>
<span class="token comment"># - name: GF_AUTH_ANONYMOUS_ORG_ROLE</span>
<span class="token comment"># value: Admin</span>
<span class="token comment"># does not really work, because of template variables in exported dashboards:</span>
<span class="token comment"># - name: GF_DASHBOARDS_JSON_ENABLED</span>
<span class="token comment"># value: "true"</span>
readinessProbe:
httpGet:
path: <span class="token operator">/</span>login
port: 3000
<span class="token comment"># initialDelaySeconds: 30</span>
<span class="token comment"># timeoutSeconds: 1</span>
<span class="token comment">#volumeMounts: #先不进行挂载</span>
<span class="token comment">#- name: grafana-persistent-storage</span>
<span class="token comment"># mountPath: /var</span>
<span class="token comment">#volumes:</span>
<span class="token comment">#- name: grafana-persistent-storage</span>
<span class="token comment">#emptyDir: {}</span>
<span class="token namespace">[root@k8smaster prometheus]</span><span class="token comment"># kubectl apply -f grafana-deploy.yaml</span>
deployment<span class="token punctuation">.</span>apps/grafana-core created
<span class="token namespace">[root@k8smaster prometheus]</span><span class="token comment"># cat grafana-svc.yaml </span>
apiVersion: v1
kind: Service
metadata:
name: grafana
namespace: kube-system
labels:
app: grafana
component: core
spec:
<span class="token function">type</span>: NodePort
ports:
<span class="token operator">-</span> port: 3000
selector:
app: grafana
component: core
<span class="token namespace">[root@k8smaster prometheus]</span><span class="token comment"># kubectl apply -f grafana-svc.yaml </span>
service/grafana created
<span class="token namespace">[root@k8smaster prometheus]</span><span class="token comment"># cat grafana-ing.yaml </span>
apiVersion: extensions/v1beta1
kind: Ingress
metadata:
name: grafana
namespace: kube-system
spec:
rules:
<span class="token operator">-</span> host: k8s<span class="token punctuation">.</span>grafana
http:
paths:
<span class="token operator">-</span> path: <span class="token operator">/</span>
backend:
serviceName: grafana
servicePort: 3000
<span class="token namespace">[root@k8smaster prometheus]</span><span class="token comment"># kubectl apply -f grafana-ing.yaml</span>
Warning: extensions/v1beta1 Ingress is deprecated in v1<span class="token punctuation">.</span>14+<span class="token punctuation">,</span> unavailable in v1<span class="token punctuation">.</span>22+<span class="token punctuation">;</span> use networking<span class="token punctuation">.</span>k8s<span class="token punctuation">.</span>io/v1 Ingress
ingress<span class="token punctuation">.</span>extensions/grafana created
<span class="token comment"># 5.检查、测试</span>
<span class="token namespace">[root@k8smaster prometheus]</span><span class="token comment"># kubectl get pods -A</span>
NAMESPACE NAME READY STATUS RESTARTS AGE
kube-system grafana-core-78958d6d67-49c56 1/1 Running 0 31m
kube-system node-exporter-fcmx5 1/1 Running 0 9m33s
kube-system node-exporter-qccwb 1/1 Running 0 9m33s
kube-system prometheus-68546b8d9-qxsm7 1/1 Running 0 2m47s
<span class="token namespace">[root@k8smaster mysql]</span><span class="token comment"># kubectl get svc -A</span>
NAMESPACE NAME <span class="token function">TYPE</span> CLUSTER-IP EXTERNAL-IP PORT<span class="token punctuation">(</span>S<span class="token punctuation">)</span> AGE
kube-system grafana NodePort 10<span class="token punctuation">.</span>110<span class="token punctuation">.</span>87<span class="token punctuation">.</span>158 <none> 3000:31267/TCP 31m
kube-system node-exporter NodePort 10<span class="token punctuation">.</span>111<span class="token punctuation">.</span>247<span class="token punctuation">.</span>142 <none> 9100:31672/TCP 39m
kube-system prometheus NodePort 10<span class="token punctuation">.</span>102<span class="token punctuation">.</span>0<span class="token punctuation">.</span>186 <none> 9090:30003/TCP 32m
<span class="token comment"># 访问</span>
<span class="token comment"># node-exporter采集的数据</span>
http:<span class="token operator">/</span><span class="token operator">/</span>192<span class="token punctuation">.</span>168<span class="token punctuation">.</span>2<span class="token punctuation">.</span>104:31672/metrics
<span class="token comment"># Prometheus的页面</span>
http:<span class="token operator">/</span><span class="token operator">/</span>192<span class="token punctuation">.</span>168<span class="token punctuation">.</span>2<span class="token punctuation">.</span>104:30003
<span class="token comment"># grafana的页面,</span>
http:<span class="token operator">/</span><span class="token operator">/</span>192<span class="token punctuation">.</span>168<span class="token punctuation">.</span>2<span class="token punctuation">.</span>104:31267
<span class="token comment"># 账户:admin;密码:*******</span>
</code></pre>
<h3>11、使用测试软件ab对整个k8s集群和相关的服务器进行压力测试</h3>
<pre><code class="prism language-powershell"><span class="token comment"># 1.运行php-apache服务器并暴露服务</span>
<span class="token namespace">[root@k8smaster hpa]</span><span class="token comment"># ls</span>
php-apache<span class="token punctuation">.</span>yaml
<span class="token namespace">[root@k8smaster hpa]</span><span class="token comment"># cat php-apache.yaml </span>
apiVersion: apps/v1
kind: Deployment
metadata:
name: php-apache
spec:
selector:
matchLabels:
run: php-apache
template:
metadata:
labels:
run: php-apache
spec:
containers:
<span class="token operator">-</span> name: php-apache
image: k8s<span class="token punctuation">.</span>gcr<span class="token punctuation">.</span>io/hpa-example
imagePullPolicy: IfNotPresent
ports:
<span class="token operator">-</span> containerPort: 80
resources:
limits:
cpu: 500m
requests:
cpu: 200m
<span class="token operator">--</span><span class="token operator">-</span>
apiVersion: v1
kind: Service
metadata:
name: php-apache
labels:
run: php-apache
spec:
ports:
<span class="token operator">-</span> port: 80
selector:
run: php-apache
<span class="token namespace">[root@k8smaster hpa]</span><span class="token comment"># kubectl apply -f php-apache.yaml </span>
deployment<span class="token punctuation">.</span>apps/php-apache created
service/php-apache created
<span class="token namespace">[root@k8smaster hpa]</span><span class="token comment"># kubectl get deploy</span>
NAME READY UP-TO-DATE AVAILABLE AGE
php-apache 1/1 1 1 93s
<span class="token namespace">[root@k8smaster hpa]</span><span class="token comment"># kubectl get pod</span>
NAME READY STATUS RESTARTS AGE
php-apache-567d9f79d-mhfsp 1/1 Running 0 44s
<span class="token comment"># 创建HPA功能</span>
<span class="token namespace">[root@k8smaster hpa]</span><span class="token comment"># kubectl autoscale deployment php-apache --cpu-percent=10 --min=1 --max=10</span>
horizontalpodautoscaler<span class="token punctuation">.</span>autoscaling/php-apache autoscaled
<span class="token namespace">[root@k8smaster hpa]</span><span class="token comment"># kubectl get hpa</span>
NAME REFERENCE TARGETS MINPODS MAXPODS REPLICAS AGE
php-apache Deployment/php-apache <unknown><span class="token operator">/</span>10% 1 10 0 7s
<span class="token comment"># 测试,增加负载</span>
<span class="token namespace">[root@k8smaster hpa]</span><span class="token comment"># kubectl run -i --tty load-generator --rm --image=busybox:1.28 --restart=Never -- /bin/sh -c "while sleep 0.01; do wget -q -O- http://php-apache; done"</span>
<span class="token keyword">If</span> you don't see a command prompt<span class="token punctuation">,</span> <span class="token keyword">try</span> pressing enter<span class="token punctuation">.</span>
OK!OK!OK!OK!OK!OK!OK!OK!OK!OK!OK!OK!OK!OK!OK!OK!OK!OK!OK!OK!OK!OK!OK!OK!OK!OK!OK!OK!OK!OK!OK!OK!OK!OK!OK!OK!OK!OK!OK!OK!OK!OK!OK!OK!OK!OK!OK!OK!OK
<span class="token namespace">[root@k8smaster hpa]</span><span class="token comment"># kubectl get hpa</span>
NAME REFERENCE TARGETS MINPODS MAXPODS REPLICAS AGE
php-apache Deployment/php-apache 0%<span class="token operator">/</span>10% 1 10 1 3m24s
<span class="token namespace">[root@k8smaster hpa]</span><span class="token comment"># kubectl get hpa</span>
NAME REFERENCE TARGETS MINPODS MAXPODS REPLICAS AGE
php-apache Deployment/php-apache 238%<span class="token operator">/</span>10% 1 10 1 3m41s
<span class="token namespace">[root@k8smaster hpa]</span><span class="token comment"># kubectl get hpa</span>
NAME REFERENCE TARGETS MINPODS MAXPODS REPLICAS AGE
php-apache Deployment/php-apache 250%<span class="token operator">/</span>10% 1 10 4 3m57s
<span class="token comment"># 一旦CPU利用率降至0,HPA会自动将副本数缩减为 1。自动扩缩完成副本数量的改变可能需要几分钟的时间</span>
<span class="token comment"># 2.对web服务进行压力测试,观察promethues和dashboard</span>
<span class="token comment"># ab命令访问web:192.168.2.112:30001 同时进入prometheus和dashboard观察pod</span>
<span class="token comment"># 四种方式观察</span>
kubectl top pod
http:<span class="token operator">/</span><span class="token operator">/</span>192<span class="token punctuation">.</span>168<span class="token punctuation">.</span>2<span class="token punctuation">.</span>117:3000/
http:<span class="token operator">/</span><span class="token operator">/</span>192<span class="token punctuation">.</span>168<span class="token punctuation">.</span>2<span class="token punctuation">.</span>117:9090/targets
https:<span class="token operator">/</span><span class="token operator">/</span>192<span class="token punctuation">.</span>168<span class="token punctuation">.</span>2<span class="token punctuation">.</span>104:32571/
<span class="token namespace">[root@nfs ~]</span><span class="token comment"># yum install httpd-tools -y</span>
<span class="token namespace">[root@nfs data]</span><span class="token comment"># ab -n 1000000 -c 10000 -g output.dat http://192.168.2.112:30001/</span>
This is ApacheBench<span class="token punctuation">,</span> Version 2<span class="token punctuation">.</span>3 <<span class="token variable">$Revision</span>: 1430300 $>
Copyright 1996 Adam Twiss<span class="token punctuation">,</span> Zeus Technology Ltd<span class="token punctuation">,</span> http:<span class="token operator">/</span><span class="token operator">/</span>www<span class="token punctuation">.</span>zeustech<span class="token punctuation">.</span>net/
Licensed to The Apache Software Foundation<span class="token punctuation">,</span> http:<span class="token operator">/</span><span class="token operator">/</span>www<span class="token punctuation">.</span>apache<span class="token punctuation">.</span>org/
Benchmarking 192<span class="token punctuation">.</span>168<span class="token punctuation">.</span>2<span class="token punctuation">.</span>112 <span class="token punctuation">(</span>be patient<span class="token punctuation">)</span>
apr_socket_recv: Connection reset by peer <span class="token punctuation">(</span>104<span class="token punctuation">)</span>
Total of 3694 requests completed
<span class="token comment"># 1000个请求,10并发数 ab -n 1000 -c 10 -g output.dat http://192.168.2.112:30001/</span>
<span class="token operator">-</span>t 60 在60秒内发送尽可能多的请求
</code></pre>
</div>
</div>
</div>
</div>
</div>
<!--PC和WAP自适应版-->
<div id="SOHUCS" sid="1703028481014706176"></div>
<script type="text/javascript" src="/views/front/js/chanyan.js"></script>
<!-- 文章页-底部 动态广告位 -->
<div class="youdao-fixed-ad" id="detail_ad_bottom"></div>
</div>
<div class="col-md-3">
<div class="row" id="ad">
<!-- 文章页-右侧1 动态广告位 -->
<div id="right-1" class="col-lg-12 col-md-12 col-sm-4 col-xs-4 ad">
<div class="youdao-fixed-ad" id="detail_ad_1"> </div>
</div>
<!-- 文章页-右侧2 动态广告位 -->
<div id="right-2" class="col-lg-12 col-md-12 col-sm-4 col-xs-4 ad">
<div class="youdao-fixed-ad" id="detail_ad_2"></div>
</div>
<!-- 文章页-右侧3 动态广告位 -->
<div id="right-3" class="col-lg-12 col-md-12 col-sm-4 col-xs-4 ad">
<div class="youdao-fixed-ad" id="detail_ad_3"></div>
</div>
</div>
</div>
</div>
</div>
</div>
<div class="container">
<h4 class="pt20 mb15 mt0 border-top">你可能感兴趣的:(k8s,kubernetes,docker,容器,云原生)</h4>
<div id="paradigm-article-related">
<div class="recommend-post mb30">
<ul class="widget-links">
<li><a href="/article/1939027950192095232.htm"
title="docker网络_docker之间的网络协议" target="_blank">docker网络_docker之间的网络协议</a>
<span class="text-muted">2401_89224733</span>
<a class="tag" taget="_blank" href="/search/%E7%BD%91%E7%BB%9C/1.htm">网络</a><a class="tag" taget="_blank" href="/search/docker/1.htm">docker</a><a class="tag" taget="_blank" href="/search/%E7%BD%91%E7%BB%9C%E5%8D%8F%E8%AE%AE/1.htm">网络协议</a>
<div>一、docker网络模式docker0网络docker容器的虚拟网关loopback:回环网卡、TCP/IP网卡virtualbridge:linux自身继承了一个虚拟化功能(kvm架构),是原生架构的一个虚拟化平台,安装了一个虚拟化平台之后就会系统就会自动安装虚拟网卡。安装workstation(虚拟化平台)之后,会在网络适配器中会多出VMnet1VMnet8VMnet0)docker0:容器的</div>
</li>
<li><a href="/article/1938994540732018688.htm"
title="Golang微服务配置管理:Nacos整合实战指南" target="_blank">Golang微服务配置管理:Nacos整合实战指南</a>
<span class="text-muted">Golang编程笔记</span>
<a class="tag" taget="_blank" href="/search/golang/1.htm">golang</a><a class="tag" taget="_blank" href="/search/%E5%BE%AE%E6%9C%8D%E5%8A%A1/1.htm">微服务</a><a class="tag" taget="_blank" href="/search/%E5%BC%80%E5%8F%91%E8%AF%AD%E8%A8%80/1.htm">开发语言</a><a class="tag" taget="_blank" href="/search/ai/1.htm">ai</a>
<div>Golang微服务配置管理:Nacos整合实战指南关键词:Golang、微服务、配置管理、Nacos、服务发现、动态配置、云原生摘要:本文将深入探讨如何在Golang微服务架构中使用Nacos进行高效的配置管理。我们将从基础概念入手,逐步讲解Nacos的核心功能,并通过完整的实战示例展示如何将Nacos集成到Golang微服务中。文章涵盖配置管理、服务发现、动态更新等关键场景,帮助开发者构建更灵活</div>
</li>
<li><a href="/article/1938989494292246528.htm"
title="如何在 Manjaro Linux 上安装 Docker 容器" target="_blank">如何在 Manjaro Linux 上安装 Docker 容器</a>
<span class="text-muted"></span>
<div>在ManjaroLinux上通过DockerHub安装、创建和运行Docker容器的简单步骤,以便在虚拟环境中使用各种应用程序。使用虚拟机有其自身的优势,它能够更好地利用硬件资源,节省成本和空间。然而,在传统虚拟机上运行每一个应用程序不仅耗时,还需要更多的资源。为了解决这一问题,Docker应运而生。它使我们能够在名为容器的虚拟化环境中即时运行应用程序。这些容器可以相互构建并相互通信……例如,这些</div>
</li>
<li><a href="/article/1938983445170548736.htm"
title="Qt的概述和安装、信号与槽、元对象系统、动态属性、字符串QString、容器、窗口部件与布局管理器、顺序容器、UI界面设计、数值输入输出、时间和日期、界面UI组件、模型视图、关联与集合容器、对话框" target="_blank">Qt的概述和安装、信号与槽、元对象系统、动态属性、字符串QString、容器、窗口部件与布局管理器、顺序容器、UI界面设计、数值输入输出、时间和日期、界面UI组件、模型视图、关联与集合容器、对话框</a>
<span class="text-muted">zhxup606</span>
<a class="tag" taget="_blank" href="/search/C%2B%2B/1.htm">C++</a><a class="tag" taget="_blank" href="/search/qt/1.htm">qt</a><a class="tag" taget="_blank" href="/search/ui/1.htm">ui</a><a class="tag" taget="_blank" href="/search/%E5%BC%80%E5%8F%91%E8%AF%AD%E8%A8%80/1.htm">开发语言</a>
<div>涵盖Qt的概述和安装、信号与槽、元对象系统、动态属性、字符串QString、容器、窗口部件与布局管理器、顺序容器、UI界面设计、数值输入输出、时间和日期、界面UI组件、模型视图、关联与集合容器、对话框、多窗口开发、绘图、QGraphicsView绘图框架、文件处理、文件读写与事件、补充知识、INI配置文件、JSON文件操作、XML文件读写、和网络编程。每章将包含详细讲解、代码示例(demo),并确</div>
</li>
<li><a href="/article/1938979031101796352.htm"
title="C++:vector容器(上篇)" target="_blank">C++:vector容器(上篇)</a>
<span class="text-muted">李白同学</span>
<a class="tag" taget="_blank" href="/search/C%2B%2B/1.htm">C++</a><a class="tag" taget="_blank" href="/search/c%2B%2B/1.htm">c++</a><a class="tag" taget="_blank" href="/search/%E5%BC%80%E5%8F%91%E8%AF%AD%E8%A8%80/1.htm">开发语言</a>
<div>1.vector的介绍及使用1.1vector的介绍vector文档说明链接:vector-C++Reference(cplusplus.com)1.2vector的使用1.2.1vector的定义(constructor)构造函数声明接口说明vector()(重点)无参构造vector(size_typen,constvalue_type&val=value_type())构造并初始化n个val</div>
</li>
<li><a href="/article/1938977388742373376.htm"
title="SpringBoot生态全景图:从SpringCloud到云原生技术栈演进" target="_blank">SpringBoot生态全景图:从SpringCloud到云原生技术栈演进</a>
<span class="text-muted">fanxbl957</span>
<a class="tag" taget="_blank" href="/search/Web/1.htm">Web</a><a class="tag" taget="_blank" href="/search/spring/1.htm">spring</a><a class="tag" taget="_blank" href="/search/boot/1.htm">boot</a><a class="tag" taget="_blank" href="/search/spring/1.htm">spring</a><a class="tag" taget="_blank" href="/search/cloud/1.htm">cloud</a><a class="tag" taget="_blank" href="/search/%E4%BA%91%E5%8E%9F%E7%94%9F/1.htm">云原生</a>
<div>博主介绍:Java、Python、js全栈开发“多面手”,精通多种编程语言和技术,痴迷于人工智能领域。秉持着对技术的热爱与执着,持续探索创新,愿在此分享交流和学习,与大家共进步。DeepSeek-行业融合之万象视界(附实战案例详解100+)全栈开发环境搭建运行攻略:多语言一站式指南(环境搭建+运行+调试+发布+保姆级详解)感兴趣的可以先收藏起来,希望帮助更多的人SpringBoot生态全景图:从S</div>
</li>
<li><a href="/article/1938977136585011200.htm"
title="c++STL库与快速排序" target="_blank">c++STL库与快速排序</a>
<span class="text-muted">浪子小院</span>
<a class="tag" taget="_blank" href="/search/%E5%9F%BA%E7%A1%80%E7%B2%BE%E8%AE%B2/1.htm">基础精讲</a><a class="tag" taget="_blank" href="/search/c%2B%2B/1.htm">c++</a><a class="tag" taget="_blank" href="/search/%E7%AE%97%E6%B3%95/1.htm">算法</a><a class="tag" taget="_blank" href="/search/%E5%BC%80%E5%8F%91%E8%AF%AD%E8%A8%80/1.htm">开发语言</a><a class="tag" taget="_blank" href="/search/%E6%95%B0%E6%8D%AE%E7%BB%93%E6%9E%84/1.htm">数据结构</a>
<div>什么是STL库STL=StandardTemplateLibrary,标准模板库,是一系列软件的统称。从根本上说,STL是一些“容器”的集合,这些“容器”有list,vector,set,map等,STL也是算法和其他一些组件的集合。前面已经学习过的中sort函数、中string类都是STL的内容。STL库还有很多内容,比如:向量(vector)、栈(stack)、队列(queue)、优先队列(p</div>
</li>
<li><a href="/article/1938943461801652224.htm"
title="docker-compose配置文件解析" target="_blank">docker-compose配置文件解析</a>
<span class="text-muted">疯狂吧小飞牛</span>
<a class="tag" taget="_blank" href="/search/docker/1.htm">docker</a><a class="tag" taget="_blank" href="/search/%E5%AE%B9%E5%99%A8/1.htm">容器</a><a class="tag" taget="_blank" href="/search/%E8%BF%90%E7%BB%B4/1.htm">运维</a>
<div>原文地址:docker-compose配置文件解析–无敌牛欢迎参观我的个人博客:无敌牛–技术/著作/典籍/分享等我们在把服务docker化的时候,不仅需要把各个服务做成docker镜像,还需要编辑各个服务之间的启动方式。对于不需要暴露的端口,还需要通过虚拟网桥的方式,保证各个服务之间的正常通讯。这就需要用到docker-compose工具,并且需要编辑对应的DockerCompose配置文件来控制</div>
</li>
<li><a href="/article/1938943462816673792.htm"
title="Windows Server 2019 安装 Docker 完整指南" target="_blank">Windows Server 2019 安装 Docker 完整指南</a>
<span class="text-muted">z日火</span>
<a class="tag" taget="_blank" href="/search/docker/1.htm">docker</a><a class="tag" taget="_blank" href="/search/windows/1.htm">windows</a><a class="tag" taget="_blank" href="/search/docker/1.htm">docker</a><a class="tag" taget="_blank" href="/search/%E5%AE%B9%E5%99%A8/1.htm">容器</a>
<div>博主本人使用的是离线安装1.安装前准备系统要求操作系统:WindowsServer2019(或2016/2022)权限:管理员权限的PowerShell网络:可访问互联网(或离线安装包)启用容器功能Install-WindowsFeature-NameContainers如果提示需要重启,但Restart-Computer-Force失败,请手动重启服务器。2.安装Docker方法1:在线安装(推</div>
</li>
<li><a href="/article/1938940562451263488.htm"
title="Tair向量数据库:阿里云原生内存数据库服务的高性能向量检索解决方案" target="_blank">Tair向量数据库:阿里云原生内存数据库服务的高性能向量检索解决方案</a>
<span class="text-muted">mmlihaio</span>
<a class="tag" taget="_blank" href="/search/%E6%95%B0%E6%8D%AE%E5%BA%93/1.htm">数据库</a><a class="tag" taget="_blank" href="/search/%E4%BA%91%E5%8E%9F%E7%94%9F/1.htm">云原生</a><a class="tag" taget="_blank" href="/search/python/1.htm">python</a>
<div>Tair向量数据库:阿里云原生内存数据库服务的高性能向量检索解决方案1.引言在当今的人工智能和大数据时代,高效的向量检索已成为许多应用场景的关键需求。Tair作为阿里云开发的云原生内存数据库服务,不仅提供了丰富的数据模型和企业级能力,还引入了基于非易失性内存(NVM)存储介质的持久内存优化实例。本文将深入探讨如何利用Tair向量数据库功能,实现高性能的向量存储和检索。2.Tair向量数据库概述Ta</div>
</li>
<li><a href="/article/1938939681085386752.htm"
title="【攻防篇】解决:阿里云docker 容器中自动启动xmrig挖矿-- 实战" target="_blank">【攻防篇】解决:阿里云docker 容器中自动启动xmrig挖矿-- 实战</a>
<span class="text-muted">ladymorgana</span>
<a class="tag" taget="_blank" href="/search/%E6%97%A5%E5%B8%B8%E5%B7%A5%E4%BD%9C%E6%80%BB%E7%BB%93/1.htm">日常工作总结</a><a class="tag" taget="_blank" href="/search/docker/1.htm">docker</a><a class="tag" taget="_blank" href="/search/%E6%8C%96%E7%9F%BF/1.htm">挖矿</a><a class="tag" taget="_blank" href="/search/%E5%AE%9E%E6%88%98/1.htm">实战</a>
<div>文章目录场景一、问题二、原因三、解决方案1、控制台处理2、[清除与防护](https://blog.csdn.net/ladymorgana/article/details/148921668?spm=1001.2014.3001.5501)1.紧急处理:停止挖矿进程2.清理被感染的容器3.防护措施:防止再次被入侵4.排查入侵来源四、实战Step1:检查服务器是否被植入挖矿程序Step2:删除被感</div>
</li>
<li><a href="/article/1938913207326404608.htm"
title="[python系列] 创建虚拟环境 venv" target="_blank">[python系列] 创建虚拟环境 venv</a>
<span class="text-muted">en-route</span>
<a class="tag" taget="_blank" href="/search/python/1.htm">python</a><a class="tag" taget="_blank" href="/search/virtualenv/1.htm">virtualenv</a>
<div>虚拟环境定义Python中的虚拟环境是一个隔离的运行环境,旨在为每个Python项目提供独立的执行空间,支持在不同的项目中分别管理依赖关系,而不会影响到其他项目或系统的原始Python安装。可以将虚拟环境视为每个Python项目的“独立容器”,每个容器具备以下特点:拥有独立的Python解释器拥有各自独立的包管理和安装的软件包与其他虚拟环境相互隔离允许同一包存在不同版本使用虚拟环境的重要性体现在以</div>
</li>
<li><a href="/article/1938910809077903360.htm"
title="浏览器移动端html右边有一点白_手机端页面在项目中遇到的一些问题及解决办法..." target="_blank">浏览器移动端html右边有一点白_手机端页面在项目中遇到的一些问题及解决办法...</a>
<span class="text-muted">weixin_39804335</span>
<div>1.解决页面使用overflow:scroll在iOS上滑动卡顿的问题?首先你可能会给页面的html和body增加了height:100%,然后就可能造成IOS上页面滑动的卡顿问题。解决方案是:(1)看是否能把body和html的height:100%去除掉。(2)在滚动的容器中增加:-webkit-overflow-scrolling:touch或者给body增加:body{overflow-x</div>
</li>
<li><a href="/article/1938895932221353984.htm"
title="使用 Docker 部署 MySQL 8" target="_blank">使用 Docker 部署 MySQL 8</a>
<span class="text-muted"></span>
<div>使用Docker部署MySQL8详细指南MySQL是一个广泛使用的开源关系型数据库管理系统。通过Docker部署MySQL8可以快速搭建一个可移植、可扩展的数据库环境。本文将详细介绍如何使用Docker部署MySQL8,并讲解如何根据需求配置MySQL。从拉取镜像开始的详细步骤1.拉取MySQL8镜像首先,从DockerHub拉取MySQL8的官方镜像。dockerpullmysql:8.0mys</div>
</li>
<li><a href="/article/1938894921788354560.htm"
title="Docker+Portainer 离线安装" target="_blank">Docker+Portainer 离线安装</a>
<span class="text-muted">qq_30024063</span>
<a class="tag" taget="_blank" href="/search/docker/1.htm">docker</a><a class="tag" taget="_blank" href="/search/%E5%AE%B9%E5%99%A8/1.htm">容器</a><a class="tag" taget="_blank" href="/search/%E8%BF%90%E7%BB%B4/1.htm">运维</a>
<div>1.Docker安装步骤一:官网下载docker安装包步骤二:解压安装包;tar-zxvfdocker-24.0.6.tgz步骤三:将解压之后的docker文件移到/usr/bin目录下;cpdocker/*/usr/bin/步骤四:将docker注册成系统服务;vim/etc/systemd/system/docker.service然后在文件中添加以下内容,退出并保存(:wq!)[Unit]D</div>
</li>
<li><a href="/article/1938892020219179008.htm"
title="如何用Docker部署Mysql" target="_blank">如何用Docker部署Mysql</a>
<span class="text-muted">小楠小楠小楠</span>
<a class="tag" taget="_blank" href="/search/docker/1.htm">docker</a><a class="tag" taget="_blank" href="/search/mysql/1.htm">mysql</a><a class="tag" taget="_blank" href="/search/%E5%AE%B9%E5%99%A8/1.htm">容器</a>
<div>1.安装Docker确保已安装Docker,并启动Docker服务。Linux:bash复制sudoaptupdatesudoaptinstalldocker.iosudosystemctlstartdockersudosystemctlenabledocker2.拉取MySQL镜像从DockerHub拉取官方MySQL镜像。bash复制dockerpullmysql:latest3.启动MySQ</div>
</li>
<li><a href="/article/1938891012902547456.htm"
title="使用Docker部署mysql8" target="_blank">使用Docker部署mysql8</a>
<span class="text-muted">小莫分享</span>
<a class="tag" taget="_blank" href="/search/docker/1.htm">docker</a><a class="tag" taget="_blank" href="/search/adb/1.htm">adb</a><a class="tag" taget="_blank" href="/search/%E5%AE%B9%E5%99%A8/1.htm">容器</a>
<div>1、拉取mysql8的镜像:1[root@i-zgn6som8~]#dockerpullmysql:8.02、创建配置和数据文件夹并修改权限:1234mkdir-p/data/mysql8/confmkdir-p/data/mysql8/datachmod-R755/data/mysql8/3、配置一个自定义的配置文件my.cnf:1vim/data/mysql8/conf/my.cnf文件内容如</div>
</li>
<li><a href="/article/1938886222583754752.htm"
title="带标签的 Docker 镜像打包为 tar 文件" target="_blank">带标签的 Docker 镜像打包为 tar 文件</a>
<span class="text-muted">大霸王龙</span>
<a class="tag" taget="_blank" href="/search/docker/1.htm">docker</a><a class="tag" taget="_blank" href="/search/%E5%AE%B9%E5%99%A8/1.htm">容器</a><a class="tag" taget="_blank" href="/search/%E8%BF%90%E7%BB%B4/1.htm">运维</a>
<div>现在还有人用docker吗要将带标签的Docker镜像打包为tar文件,请使用dockersave命令。以下是详细操作指南:一、单镜像打包(推荐方式)#基础格式dockersave-o[输出文件名].tar[镜像名]:[标签]#示例:将my-app:1.0保存为app-backup.tardockersave-oapp-backup.tarmy-app:1.0二、多镜像打包#同时打包多个镜像到单个</div>
</li>
<li><a href="/article/1938884708679086080.htm"
title="Script to save all images from a docker-compose.yml file" target="_blank">Script to save all images from a docker-compose.yml file</a>
<span class="text-muted">唧唧歪歪的</span>
<a class="tag" taget="_blank" href="/search/docker/1.htm">docker</a><a class="tag" taget="_blank" href="/search/docker/1.htm">docker</a><a class="tag" taget="_blank" href="/search/docker-compose/1.htm">docker-compose</a>
<div>通过docker-compose.yml导出镜像到单个文件Scripttosaveallimagesfromadocker-compose.ymlfile1st#!/bin/bashmkdir-poutforimgin`grepimage$1|sed-e's/^.*image\://g'`;docleanname=${img/\//-}tag=`dockerimages|grep$img|awk'</div>
</li>
<li><a href="/article/1938884329736302592.htm"
title="RPC:跨越代码与硅晶的“握手”——你每天都在用,却可能从未真正理解它" target="_blank">RPC:跨越代码与硅晶的“握手”——你每天都在用,却可能从未真正理解它</a>
<span class="text-muted">老马爱知</span>
<a class="tag" taget="_blank" href="/search/%E4%BF%A1%E6%81%AF%E6%8A%80%E6%9C%AF/1.htm">信息技术</a><a class="tag" taget="_blank" href="/search/%23%E5%88%86%E5%B8%83%E5%BC%8F%E8%AE%A1%E7%AE%97/1.htm">#分布式计算</a><a class="tag" taget="_blank" href="/search/rpc/1.htm">rpc</a><a class="tag" taget="_blank" href="/search/%E7%BD%91%E7%BB%9C%E5%8D%8F%E8%AE%AE/1.htm">网络协议</a><a class="tag" taget="_blank" href="/search/%E7%BD%91%E7%BB%9C/1.htm">网络</a><a class="tag" taget="_blank" href="/search/%E5%88%86%E5%B8%83%E5%BC%8F%E7%B3%BB%E7%BB%9F/1.htm">分布式系统</a><a class="tag" taget="_blank" href="/search/%E5%BE%AE%E6%9C%8D%E5%8A%A1/1.htm">微服务</a><a class="tag" taget="_blank" href="/search/%E8%BD%AF%E4%BB%B6%E6%9E%B6%E6%9E%84/1.htm">软件架构</a><a class="tag" taget="_blank" href="/search/%E7%A1%AC%E6%A0%B8%E7%A7%91%E6%99%AE/1.htm">硬核科普</a>
<div>——从本地调用的幻觉到服务万物的底座,解析这个支配云原生时代的隐形协议引言:一个程序员的日常困境想象一下这个场景:你正在构建一个电商系统。用户服务(管理用户信息)在一台服务器上,订单服务在另一台,而支付服务,则由远在天边的第三方提供。当一个用户下单时,订单服务需要先向用户服务确认用户身份,再调用支付服务完成扣款。这三个服务如同三座孤岛,如何让它们高效、优雅地对话?难道你要手动编写Socket连接,</div>
</li>
<li><a href="/article/1938878525255774208.htm"
title="导出docker-compse.yml中docker镜像成tar文件" target="_blank">导出docker-compse.yml中docker镜像成tar文件</a>
<span class="text-muted">青春不流名</span>
<a class="tag" taget="_blank" href="/search/eureka/1.htm">eureka</a><a class="tag" taget="_blank" href="/search/%E4%BA%91%E5%8E%9F%E7%94%9F/1.htm">云原生</a>
<div>#!/bin/bash#确保脚本在正确的目录下运行SCRIPT_DIR=$(dirname"$(realpath"$0")")cd"$SCRIPT_DIR"||exit1#定义docker-compose文件路径COMPOSE_FILE="${SCRIPT_DIR}/docker-compose.yml"#创建导出目录EXPORT_DIR="${SCRIPT_DIR}/docker_images"</div>
</li>
<li><a href="/article/1938852301515059200.htm"
title="企业级知识库私有化部署:腾讯混元+云容器服务TKE实战" target="_blank">企业级知识库私有化部署:腾讯混元+云容器服务TKE实战</a>
<span class="text-muted">大熊计算机</span>
<a class="tag" taget="_blank" href="/search/%23/1.htm">#</a><a class="tag" taget="_blank" href="/search/%E8%85%BE%E8%AE%AF%E4%BA%91/1.htm">腾讯云</a><a class="tag" taget="_blank" href="/search/%E8%AF%AD%E8%A8%80%E6%A8%A1%E5%9E%8B/1.htm">语言模型</a>
<div>1.背景需求分析在金融、医疗等数据敏感行业,企业需要构建完全自主可控的知识库系统。本文以某证券机构智能投研系统为原型,演示如何基于腾讯混元大模型与TKE容器服务实现:千亿级参数模型的私有化部署金融领域垂直场景微调高并发低延迟推理服务全链路安全合规方案1.1典型技术挑战#性能基准测试数据(单位:QPS)|场景|裸机部署|容器化部署|优化后||--------------------|--------</div>
</li>
<li><a href="/article/1938848774784872448.htm"
title="GitHub Actions与AWS OIDC实现安全的ECR/ECS自动化部署" target="_blank">GitHub Actions与AWS OIDC实现安全的ECR/ECS自动化部署</a>
<span class="text-muted">ivwdcwso</span>
<a class="tag" taget="_blank" href="/search/%E8%BF%90%E7%BB%B4%E4%B8%8E%E4%BA%91%E5%8E%9F%E7%94%9F/1.htm">运维与云原生</a><a class="tag" taget="_blank" href="/search/github/1.htm">github</a><a class="tag" taget="_blank" href="/search/aws/1.htm">aws</a><a class="tag" taget="_blank" href="/search/%E5%AE%89%E5%85%A8/1.htm">安全</a><a class="tag" taget="_blank" href="/search/ecr/1.htm">ecr</a><a class="tag" taget="_blank" href="/search/ecs/1.htm">ecs</a><a class="tag" taget="_blank" href="/search/oldc/1.htm">oldc</a><a class="tag" taget="_blank" href="/search/CI%2FCD/1.htm">CI/CD</a>
<div>引言在现代云原生应用开发中,实现安全、高效的CI/CD流程至关重要。本文将详细介绍如何利用GitHubActions和AWSOIDC(OpenIDConnect)构建一个无需长期凭证的安全部署管道,将容器化应用自动部署到AmazonECR和ECS服务。架构概述整个解决方案的架构包含三个主要部分:GitHub端:代码仓库和GitHubActions工作流AWS端:OIDC身份验证、ECR容器仓库和E</div>
</li>
<li><a href="/article/1938844109796077568.htm"
title="Spring Cloud 微服务架构部署模式" target="_blank">Spring Cloud 微服务架构部署模式</a>
<span class="text-muted">Java技术栈实战</span>
<a class="tag" taget="_blank" href="/search/%E6%9E%B6%E6%9E%84/1.htm">架构</a><a class="tag" taget="_blank" href="/search/spring/1.htm">spring</a><a class="tag" taget="_blank" href="/search/cloud/1.htm">cloud</a><a class="tag" taget="_blank" href="/search/%E5%BE%AE%E6%9C%8D%E5%8A%A1/1.htm">微服务</a><a class="tag" taget="_blank" href="/search/ai/1.htm">ai</a>
<div>SpringCloud微服务架构部署模式:从单体到云原生的进化路径关键词:SpringCloud、微服务架构、部署模式、容器化、Kubernetes、服务网格、DevOps摘要:本文系统解析SpringCloud微服务架构的核心部署模式,涵盖传统物理机部署、容器化部署、Kubernetes集群编排、服务网格集成等技术栈。通过技术原理剖析、实战案例演示和最佳实践总结,揭示不同部署模式的适用场景、技术</div>
</li>
<li><a href="/article/1938842847335739392.htm"
title="三阶落地:腾讯云Serverless+Spring Cloud的微服务实战架构" target="_blank">三阶落地:腾讯云Serverless+Spring Cloud的微服务实战架构</a>
<span class="text-muted">大熊计算机</span>
<a class="tag" taget="_blank" href="/search/%23/1.htm">#</a><a class="tag" taget="_blank" href="/search/%E8%85%BE%E8%AE%AF%E4%BA%91/1.htm">腾讯云</a><a class="tag" taget="_blank" href="/search/%E6%9E%B6%E6%9E%84/1.htm">架构</a><a class="tag" taget="_blank" href="/search/%E8%85%BE%E8%AE%AF%E4%BA%91/1.htm">腾讯云</a><a class="tag" taget="_blank" href="/search/serverless/1.htm">serverless</a>
<div>云原生演进的关键挑战(1)传统微服务架构痛点资源利用率低(非峰值期资源闲置率>60%)运维复杂度高(需管理数百个容器实例)突发流量处理能力弱(扩容延迟导致P99延迟飙升)(2)Serverless的破局价值腾讯云SCF(ServerlessCloudFunction)提供:毫秒级计费粒度(成本下降40%~70%)百毫秒级弹性伸缩(支持每秒万级并发扩容)零基础设施运维同步调用异步事件用户请求API网</div>
</li>
<li><a href="/article/1938836168598679552.htm"
title="Nginx与Tomcat:谁更适合你的服务器?" target="_blank">Nginx与Tomcat:谁更适合你的服务器?</a>
<span class="text-muted">当归1024</span>
<a class="tag" taget="_blank" href="/search/java/1.htm">java</a><a class="tag" taget="_blank" href="/search/%E4%B8%AD%E9%97%B4%E4%BB%B6/1.htm">中间件</a><a class="tag" taget="_blank" href="/search/nginx/1.htm">nginx</a><a class="tag" taget="_blank" href="/search/nginx/1.htm">nginx</a><a class="tag" taget="_blank" href="/search/tomcat/1.htm">tomcat</a><a class="tag" taget="_blank" href="/search/%E6%9C%8D%E5%8A%A1%E5%99%A8/1.htm">服务器</a>
<div>nginx和Tomcat是两种不同类型的服务器软件,它们各有不同的用途和特点:基本定义nginx轻量级的HTTP服务器和反向代理服务器主要用于静态文件服务、负载均衡、反向代理TomcatJavaWeb应用服务器专门用于运行JavaWeb应用(JSP、Servlet)主要区别1.功能定位nginx:静态文件服务器反向代理服务器负载均衡器HTTP缓存服务器Tomcat:Java应用容器JSP/Serv</div>
</li>
<li><a href="/article/1938821295370203136.htm"
title="Sonatype Nexus3安装配置及使用" target="_blank">Sonatype Nexus3安装配置及使用</a>
<span class="text-muted">無法複制</span>
<a class="tag" taget="_blank" href="/search/nexus/1.htm">nexus</a>
<div>1、简介SonatypeNexusRepositoryManager是一款强大的仓库管理工具,用于存储、管理和发布软件组件。它能够支持多种格式的仓库,如Maven、npm、Docker等。在企业开发中,私有Maven仓库常用于存储自定义依赖和发布组件,确保代码安全性和内部共享。本文将从服务器环境搭建、Nexus安装与配置、仓库创建、依赖上传,再到Maven项目中使用私有仓库的全过程,帮助你掌握如何</div>
</li>
<li><a href="/article/1938807803552526336.htm"
title="Minikube Unable to resolve the current Docker CLI context “default“" target="_blank">Minikube Unable to resolve the current Docker CLI context “default“</a>
<span class="text-muted">LF-DevJourney</span>
<a class="tag" taget="_blank" href="/search/docker/1.htm">docker</a><a class="tag" taget="_blank" href="/search/%E5%AE%B9%E5%99%A8/1.htm">容器</a><a class="tag" taget="_blank" href="/search/%E8%BF%90%E7%BB%B4/1.htm">运维</a><a class="tag" taget="_blank" href="/search/k8s/1.htm">k8s</a><a class="tag" taget="_blank" href="/search/minikube/1.htm">minikube</a>
<div>问题描述minikube安装后,执行任何minikube命令,均报下面的信息。解决方法确认docker是否运行查看docker当前的context$dockercontextlsNAMETYPEDESCRIPTIONDOCKERENDPOINTKUBERNETESENDPOINTORCHESTRATORdefault*mobyCurrentDOCKER_HOSTbasedconfiguration</div>
</li>
<li><a href="/article/1938796330361090048.htm"
title="运行两个不同项目(`ragflow` 和 `dify`)时,出现了 Redis 容器互相替换" target="_blank">运行两个不同项目(`ragflow` 和 `dify`)时,出现了 Redis 容器互相替换</a>
<span class="text-muted">z日火</span>
<a class="tag" taget="_blank" href="/search/%E4%BA%BA%E5%B7%A5%E6%99%BA%E8%83%BD%E7%B1%BB%E9%A1%B9%E7%9B%AE/1.htm">人工智能类项目</a><a class="tag" taget="_blank" href="/search/redis/1.htm">redis</a><a class="tag" taget="_blank" href="/search/%E6%95%B0%E6%8D%AE%E5%BA%93/1.htm">数据库</a><a class="tag" taget="_blank" href="/search/docker/1.htm">docker</a>
<div>问题描述在同时运行两个不同项目(ragflow和dify)时,出现了Redis容器互相替换的问题。具体表现为,当启动一个项目的Redis容器时,另一个项目的Redis容器会被停止或替换,导致两个项目的Redis容器无法同时存在。问题经过最初发现:在运行dify项目时,发现ragflow项目的Redis容器被替换为dify项目的Redis容器。尝试解决:通过修改docker-compose.yml文</div>
</li>
<li><a href="/article/1938763934370689024.htm"
title="使用docker搭建redis主从架构,一主2从" target="_blank">使用docker搭建redis主从架构,一主2从</a>
<span class="text-muted">黑皮爱学习</span>
<a class="tag" taget="_blank" href="/search/redis%E8%87%AA%E5%AD%A6%E7%AC%94%E8%AE%B0/1.htm">redis自学笔记</a><a class="tag" taget="_blank" href="/search/docker/1.htm">docker</a><a class="tag" taget="_blank" href="/search/redis/1.htm">redis</a><a class="tag" taget="_blank" href="/search/%E6%9E%B6%E6%9E%84/1.htm">架构</a>
<div>使用Docker搭建Redis主从架构(一主两从)Redis主从架构是提高系统可用性和读取性能的重要方案,通过Docker可以快速搭建该架构。下面将详细介绍搭建步骤。架构设计我们将搭建包含以下组件的架构:1个主节点(Master):负责写入操作,端口63792个从节点(Slave):负责读取操作,端口分别为6380和6381所有节点通过DockerCompose管理,共享一个自定义网络搭建步骤1.</div>
</li>
<li><a href="/article/18.htm"
title="jQuery 跨域访问的三种方式 No 'Access-Control-Allow-Origin' header is present on the reque" target="_blank">jQuery 跨域访问的三种方式 No 'Access-Control-Allow-Origin' header is present on the reque</a>
<span class="text-muted">qiaolevip</span>
<a class="tag" taget="_blank" href="/search/%E6%AF%8F%E5%A4%A9%E8%BF%9B%E6%AD%A5%E4%B8%80%E7%82%B9%E7%82%B9/1.htm">每天进步一点点</a><a class="tag" taget="_blank" href="/search/%E5%AD%A6%E4%B9%A0%E6%B0%B8%E6%97%A0%E6%AD%A2%E5%A2%83/1.htm">学习永无止境</a><a class="tag" taget="_blank" href="/search/%E8%B7%A8%E5%9F%9F/1.htm">跨域</a><a class="tag" taget="_blank" href="/search/%E4%BC%97%E8%A7%82%E5%8D%83%E8%B1%A1/1.htm">众观千象</a>
<div>XMLHttpRequest cannot load http://v.xxx.com. No 'Access-Control-Allow-Origin' header is present on the requested resource. Origin 'http://localhost:63342' is therefore not allowed access. test.html:1
</div>
</li>
<li><a href="/article/145.htm"
title="mysql 分区查询优化" target="_blank">mysql 分区查询优化</a>
<span class="text-muted">annan211</span>
<a class="tag" taget="_blank" href="/search/java/1.htm">java</a><a class="tag" taget="_blank" href="/search/%E5%88%86%E5%8C%BA/1.htm">分区</a><a class="tag" taget="_blank" href="/search/%E4%BC%98%E5%8C%96/1.htm">优化</a><a class="tag" taget="_blank" href="/search/mysql/1.htm">mysql</a>
<div>
分区查询优化
引入分区可以给查询带来一定的优势,但同时也会引入一些bug.
分区最大的优点就是优化器可以根据分区函数来过滤掉一些分区,通过分区过滤可以让查询扫描更少的数据。
所以,对于访问分区表来说,很重要的一点是要在where 条件中带入分区,让优化器过滤掉无需访问的分区。
可以通过查看explain执行计划,是否携带 partitions</div>
</li>
<li><a href="/article/272.htm"
title="MYSQL存储过程中使用游标" target="_blank">MYSQL存储过程中使用游标</a>
<span class="text-muted">chicony</span>
<a class="tag" taget="_blank" href="/search/Mysql%E5%AD%98%E5%82%A8%E8%BF%87%E7%A8%8B/1.htm">Mysql存储过程</a>
<div>DELIMITER $$
DROP PROCEDURE IF EXISTS getUserInfo $$
CREATE PROCEDURE getUserInfo(in date_day datetime)-- -- 实例-- 存储过程名为:getUserInfo-- 参数为:date_day日期格式:2008-03-08-- BEGINdecla</div>
</li>
<li><a href="/article/399.htm"
title="mysql 和 sqlite 区别" target="_blank">mysql 和 sqlite 区别</a>
<span class="text-muted">Array_06</span>
<a class="tag" taget="_blank" href="/search/sqlite/1.htm">sqlite</a>
<div>转载:
http://www.cnblogs.com/ygm900/p/3460663.html
mysql 和 sqlite 区别
SQLITE是单机数据库。功能简约,小型化,追求最大磁盘效率
MYSQL是完善的服务器数据库。功能全面,综合化,追求最大并发效率
MYSQL、Sybase、Oracle等这些都是试用于服务器数据量大功能多需要安装,例如网站访问量比较大的。而sq</div>
</li>
<li><a href="/article/526.htm"
title="pinyin4j使用" target="_blank">pinyin4j使用</a>
<span class="text-muted">oloz</span>
<a class="tag" taget="_blank" href="/search/pinyin4j/1.htm">pinyin4j</a>
<div>首先需要pinyin4j的jar包支持;jar包已上传至附件内
方法一:把汉字转换为拼音;例如:编程转换后则为biancheng
/**
* 将汉字转换为全拼
* @param src 你的需要转换的汉字
* @param isUPPERCASE 是否转换为大写的拼音; true:转换为大写;fal</div>
</li>
<li><a href="/article/653.htm"
title="微博发送私信" target="_blank">微博发送私信</a>
<span class="text-muted">随意而生</span>
<a class="tag" taget="_blank" href="/search/%E5%BE%AE%E5%8D%9A/1.htm">微博</a>
<div>在前面文章中说了如和获取登陆时候所需要的cookie,现在只要拿到最后登陆所需要的cookie,然后抓包分析一下微博私信发送界面
http://weibo.com/message/history?uid=****&name=****
可以发现其发送提交的Post请求和其中的数据,
让后用程序模拟发送POST请求中的数据,带着cookie发送到私信的接入口,就可以实现发私信的功能了。 </div>
</li>
<li><a href="/article/780.htm"
title="jsp" target="_blank">jsp</a>
<span class="text-muted">香水浓</span>
<a class="tag" taget="_blank" href="/search/jsp/1.htm">jsp</a>
<div>JSP初始化
容器载入JSP文件后,它会在为请求提供任何服务前调用jspInit()方法。如果您需要执行自定义的JSP初始化任务,复写jspInit()方法就行了
JSP执行
这一阶段描述了JSP生命周期中一切与请求相关的交互行为,直到被销毁。
当JSP网页完成初始化后</div>
</li>
<li><a href="/article/907.htm"
title="在 Windows 上安装 SVN Subversion 服务端" target="_blank">在 Windows 上安装 SVN Subversion 服务端</a>
<span class="text-muted">AdyZhang</span>
<a class="tag" taget="_blank" href="/search/SVN/1.htm">SVN</a>
<div>在 Windows 上安装 SVN Subversion 服务端2009-09-16高宏伟哈尔滨市道里区通达街291号
最佳阅读效果请访问原地址:http://blog.donews.com/dukejoe/archive/2009/09/16/1560917.aspx
现在的Subversion已经足够稳定,而且已经进入了它的黄金时段。我们看到大量的项目都在使</div>
</li>
<li><a href="/article/1034.htm"
title="android开发中如何使用 alertDialog从listView中删除数据?" target="_blank">android开发中如何使用 alertDialog从listView中删除数据?</a>
<span class="text-muted">aijuans</span>
<a class="tag" taget="_blank" href="/search/android/1.htm">android</a>
<div>我现在使用listView展示了很多的配置信息,我现在想在点击其中一条的时候填出 alertDialog,点击确认后就删除该条数据,( ArrayAdapter ,ArrayList,listView 全部删除),我知道在 下面的onItemLongClick 方法中 参数 arg2 是选中的序号,但是我不知道如何继续处理下去 1 2 3 </div>
</li>
<li><a href="/article/1161.htm"
title="jdk-6u26-linux-x64.bin 安装" target="_blank">jdk-6u26-linux-x64.bin 安装</a>
<span class="text-muted">baalwolf</span>
<a class="tag" taget="_blank" href="/search/linux/1.htm">linux</a>
<div>1.上传安装文件(jdk-6u26-linux-x64.bin)
2.修改权限
[root@localhost ~]# ls -l /usr/local/jdk-6u26-linux-x64.bin
3.执行安装文件
[root@localhost ~]# cd /usr/local
[root@localhost local]# ./jdk-6u26-linux-x64.bin&nbs</div>
</li>
<li><a href="/article/1288.htm"
title="MongoDB经典面试题集锦" target="_blank">MongoDB经典面试题集锦</a>
<span class="text-muted">BigBird2012</span>
<a class="tag" taget="_blank" href="/search/mongodb/1.htm">mongodb</a>
<div>1.什么是NoSQL数据库?NoSQL和RDBMS有什么区别?在哪些情况下使用和不使用NoSQL数据库?
NoSQL是非关系型数据库,NoSQL = Not Only SQL。
关系型数据库采用的结构化的数据,NoSQL采用的是键值对的方式存储数据。
在处理非结构化/半结构化的大数据时;在水平方向上进行扩展时;随时应对动态增加的数据项时可以优先考虑使用NoSQL数据库。
在考虑数据库的成熟</div>
</li>
<li><a href="/article/1415.htm"
title="JavaScript异步编程Promise模式的6个特性" target="_blank">JavaScript异步编程Promise模式的6个特性</a>
<span class="text-muted">bijian1013</span>
<a class="tag" taget="_blank" href="/search/JavaScript/1.htm">JavaScript</a><a class="tag" taget="_blank" href="/search/Promise/1.htm">Promise</a>
<div> Promise是一个非常有价值的构造器,能够帮助你避免使用镶套匿名方法,而使用更具有可读性的方式组装异步代码。这里我们将介绍6个最简单的特性。
在我们开始正式介绍之前,我们想看看Javascript Promise的样子:
var p = new Promise(function(r</div>
</li>
<li><a href="/article/1542.htm"
title="[Zookeeper学习笔记之八]Zookeeper源代码分析之Zookeeper.ZKWatchManager" target="_blank">[Zookeeper学习笔记之八]Zookeeper源代码分析之Zookeeper.ZKWatchManager</a>
<span class="text-muted">bit1129</span>
<a class="tag" taget="_blank" href="/search/zookeeper/1.htm">zookeeper</a>
<div>ClientWatchManager接口
//接口的唯一方法materialize用于确定那些Watcher需要被通知
//确定Watcher需要三方面的因素1.事件状态 2.事件类型 3.znode的path
public interface ClientWatchManager {
/**
* Return a set of watchers that should</div>
</li>
<li><a href="/article/1669.htm"
title="【Scala十五】Scala核心九:隐式转换之二" target="_blank">【Scala十五】Scala核心九:隐式转换之二</a>
<span class="text-muted">bit1129</span>
<a class="tag" taget="_blank" href="/search/scala/1.htm">scala</a>
<div>隐式转换存在的必要性,
在Java Swing中,按钮点击事件的处理,转换为Scala的的写法如下:
val button = new JButton
button.addActionListener(
new ActionListener {
def actionPerformed(event: ActionEvent) {
</div>
</li>
<li><a href="/article/1796.htm"
title="Android JSON数据的解析与封装小Demo" target="_blank">Android JSON数据的解析与封装小Demo</a>
<span class="text-muted">ronin47</span>
<div>转自:http://www.open-open.com/lib/view/open1420529336406.html
package com.example.jsondemo;
import org.json.JSONArray;
import org.json.JSONException;
import org.json.JSONObject;
impor</div>
</li>
<li><a href="/article/1923.htm"
title="[设计]字体创意设计方法谈" target="_blank">[设计]字体创意设计方法谈</a>
<span class="text-muted">brotherlamp</span>
<a class="tag" taget="_blank" href="/search/UI/1.htm">UI</a><a class="tag" taget="_blank" href="/search/ui%E8%87%AA%E5%AD%A6/1.htm">ui自学</a><a class="tag" taget="_blank" href="/search/ui%E8%A7%86%E9%A2%91/1.htm">ui视频</a><a class="tag" taget="_blank" href="/search/ui%E6%95%99%E7%A8%8B/1.htm">ui教程</a><a class="tag" taget="_blank" href="/search/ui%E8%B5%84%E6%96%99/1.htm">ui资料</a>
<div>
从古至今,文字在我们的生活中是必不可少的事物,我们不能想象没有文字的世界将会是怎样。在平面设计中,UI设计师在文字上所花的心思和功夫最多,因为文字能直观地表达UI设计师所的意念。在文字上的创造设计,直接反映出平面作品的主题。
如设计一幅戴尔笔记本电脑的广告海报,假设海报上没有出现“戴尔”两个文字,即使放上所有戴尔笔记本电脑的图片都不能让人们得知这些电脑是什么品牌。只要写上“戴尔笔</div>
</li>
<li><a href="/article/2050.htm"
title="单调队列-用一个长度为k的窗在整数数列上移动,求窗里面所包含的数的最大值" target="_blank">单调队列-用一个长度为k的窗在整数数列上移动,求窗里面所包含的数的最大值</a>
<span class="text-muted">bylijinnan</span>
<a class="tag" taget="_blank" href="/search/java/1.htm">java</a><a class="tag" taget="_blank" href="/search/%E7%AE%97%E6%B3%95/1.htm">算法</a><a class="tag" taget="_blank" href="/search/%E9%9D%A2%E8%AF%95%E9%A2%98/1.htm">面试题</a>
<div>import java.util.LinkedList;
/*
单调队列 滑动窗口
单调队列是这样的一个队列:队列里面的元素是有序的,是递增或者递减
题目:给定一个长度为N的整数数列a(i),i=0,1,...,N-1和窗长度k.
要求:f(i) = max{a(i-k+1),a(i-k+2),..., a(i)},i = 0,1,...,N-1
问题的另一种描述就</div>
</li>
<li><a href="/article/2177.htm"
title="struts2处理一个form多个submit" target="_blank">struts2处理一个form多个submit</a>
<span class="text-muted">chiangfai</span>
<a class="tag" taget="_blank" href="/search/struts2/1.htm">struts2</a>
<div>web应用中,为完成不同工作,一个jsp的form标签可能有多个submit。如下代码:
<s:form action="submit" method="post" namespace="/my">
<s:textfield name="msg" label="叙述:"></div>
</li>
<li><a href="/article/2304.htm"
title="shell查找上个月,陷阱及野路子" target="_blank">shell查找上个月,陷阱及野路子</a>
<span class="text-muted">chenchao051</span>
<a class="tag" taget="_blank" href="/search/shell/1.htm">shell</a>
<div>date -d "-1 month" +%F
以上这段代码,假如在2012/10/31执行,结果并不会出现你预计的9月份,而是会出现八月份,原因是10月份有31天,9月份30天,所以-1 month在10月份看来要减去31天,所以直接到了8月31日这天,这不靠谱。
野路子解决:假设当天日期大于15号</div>
</li>
<li><a href="/article/2431.htm"
title="mysql导出数据中文乱码问题" target="_blank">mysql导出数据中文乱码问题</a>
<span class="text-muted">daizj</span>
<a class="tag" taget="_blank" href="/search/mysql/1.htm">mysql</a><a class="tag" taget="_blank" href="/search/%E4%B8%AD%E6%96%87%E4%B9%B1%E7%A0%81/1.htm">中文乱码</a><a class="tag" taget="_blank" href="/search/%E5%AF%BC%E6%95%B0%E6%8D%AE/1.htm">导数据</a>
<div>解决mysql导入导出数据乱码问题方法:
1、进入mysql,通过如下命令查看数据库编码方式:
mysql> show variables like 'character_set_%';
+--------------------------+----------------------------------------+
| Variable_name&nbs</div>
</li>
<li><a href="/article/2558.htm"
title="SAE部署Smarty出现:Uncaught exception 'SmartyException' with message 'unable to write" target="_blank">SAE部署Smarty出现:Uncaught exception 'SmartyException' with message 'unable to write</a>
<span class="text-muted">dcj3sjt126com</span>
<a class="tag" taget="_blank" href="/search/PHP/1.htm">PHP</a><a class="tag" taget="_blank" href="/search/smarty/1.htm">smarty</a><a class="tag" taget="_blank" href="/search/sae/1.htm">sae</a>
<div>
对于SAE出现的问题:Uncaught exception 'SmartyException' with message 'unable to write file...。
官方给出了详细的FAQ:http://sae.sina.com.cn/?m=faqs&catId=11#show_213
解决方案为:
01
$path </div>
</li>
<li><a href="/article/2685.htm"
title="《教父》系列台词" target="_blank">《教父》系列台词</a>
<span class="text-muted">dcj3sjt126com</span>
<div>Your love is also your weak point.
你的所爱同时也是你的弱点。
If anything in this life is certain, if history has taught us anything, it is
that you can kill anyone.
不顾家的人永远不可能成为一个真正的男人。 &</div>
</li>
<li><a href="/article/2812.htm"
title="mongodb安装与使用" target="_blank">mongodb安装与使用</a>
<span class="text-muted">dyy_gusi</span>
<a class="tag" taget="_blank" href="/search/mongo/1.htm">mongo</a>
<div>一.MongoDB安装和启动,widndows和linux基本相同
1.下载数据库,
linux:mongodb-linux-x86_64-ubuntu1404-3.0.3.tgz
2.解压文件,并且放置到合适的位置
tar -vxf mongodb-linux-x86_64-ubun</div>
</li>
<li><a href="/article/2939.htm"
title="Git排除目录" target="_blank">Git排除目录</a>
<span class="text-muted">geeksun</span>
<a class="tag" taget="_blank" href="/search/git/1.htm">git</a>
<div>在Git的版本控制中,可能有些文件是不需要加入控制的,那我们在提交代码时就需要忽略这些文件,下面讲讲应该怎么给Git配置一些忽略规则。
有三种方法可以忽略掉这些文件,这三种方法都能达到目的,只不过适用情景不一样。
1. 针对单一工程排除文件
这种方式会让这个工程的所有修改者在克隆代码的同时,也能克隆到过滤规则,而不用自己再写一份,这就能保证所有修改者应用的都是同一</div>
</li>
<li><a href="/article/3066.htm"
title="Ubuntu 创建开机自启动脚本的方法" target="_blank">Ubuntu 创建开机自启动脚本的方法</a>
<span class="text-muted">hongtoushizi</span>
<a class="tag" taget="_blank" href="/search/ubuntu/1.htm">ubuntu</a>
<div>转载自: http://rongjih.blog.163.com/blog/static/33574461201111504843245/
Ubuntu 创建开机自启动脚本的步骤如下:
1) 将你的启动脚本复制到 /etc/init.d目录下 以下假设你的脚本文件名为 test。
2) 设置脚本文件的权限 $ sudo chmod 755</div>
</li>
<li><a href="/article/3193.htm"
title="第八章 流量复制/AB测试/协程" target="_blank">第八章 流量复制/AB测试/协程</a>
<span class="text-muted">jinnianshilongnian</span>
<a class="tag" taget="_blank" href="/search/nginx/1.htm">nginx</a><a class="tag" taget="_blank" href="/search/lua/1.htm">lua</a><a class="tag" taget="_blank" href="/search/coroutine/1.htm">coroutine</a>
<div>流量复制
在实际开发中经常涉及到项目的升级,而该升级不能简单的上线就完事了,需要验证该升级是否兼容老的上线,因此可能需要并行运行两个项目一段时间进行数据比对和校验,待没问题后再进行上线。这其实就需要进行流量复制,把流量复制到其他服务器上,一种方式是使用如tcpcopy引流;另外我们还可以使用nginx的HttpLuaModule模块中的ngx.location.capture_multi进行并发</div>
</li>
<li><a href="/article/3320.htm"
title="电商系统商品表设计" target="_blank">电商系统商品表设计</a>
<span class="text-muted">lkl</span>
<div>DROP TABLE IF EXISTS `category`; -- 类目表
/*!40101 SET @saved_cs_client = @@character_set_client */;
/*!40101 SET character_set_client = utf8 */;
CREATE TABLE `category` (
`id` int(11) NOT NUL</div>
</li>
<li><a href="/article/3447.htm"
title="修改phpMyAdmin导入SQL文件的大小限制" target="_blank">修改phpMyAdmin导入SQL文件的大小限制</a>
<span class="text-muted">pda158</span>
<a class="tag" taget="_blank" href="/search/sql/1.htm">sql</a><a class="tag" taget="_blank" href="/search/mysql/1.htm">mysql</a>
<div> 用phpMyAdmin导入mysql数据库时,我的10M的
数据库不能导入,提示mysql数据库最大只能导入2M。
phpMyAdmin数据库导入出错: You probably tried to upload too large file. Please refer to documentation for ways to workaround this limit. </div>
</li>
<li><a href="/article/3574.htm"
title="Tomcat性能调优方案" target="_blank">Tomcat性能调优方案</a>
<span class="text-muted">Sobfist</span>
<a class="tag" taget="_blank" href="/search/apache/1.htm">apache</a><a class="tag" taget="_blank" href="/search/jvm/1.htm">jvm</a><a class="tag" taget="_blank" href="/search/tomcat/1.htm">tomcat</a><a class="tag" taget="_blank" href="/search/%E5%BA%94%E7%94%A8%E6%9C%8D%E5%8A%A1%E5%99%A8/1.htm">应用服务器</a>
<div>一、操作系统调优
对于操作系统优化来说,是尽可能的增大可使用的内存容量、提高CPU的频率,保证文件系统的读写速率等。经过压力测试验证,在并发连接很多的情况下,CPU的处理能力越强,系统运行速度越快。。
【适用场景】 任何项目。
二、Java虚拟机调优
应该选择SUN的JVM,在满足项目需要的前提下,尽量选用版本较高的JVM,一般来说高版本产品在速度和效率上比低版本会有改进。
J</div>
</li>
<li><a href="/article/3701.htm"
title="SQLServer学习笔记" target="_blank">SQLServer学习笔记</a>
<span class="text-muted">vipbooks</span>
<a class="tag" taget="_blank" href="/search/%E6%95%B0%E6%8D%AE%E7%BB%93%E6%9E%84/1.htm">数据结构</a><a class="tag" taget="_blank" href="/search/xml/1.htm">xml</a>
<div>1、create database school 创建数据库school
2、drop database school 删除数据库school
3、use school 连接到school数据库,使其成为当前数据库
4、create table class(classID int primary key identity not null)
创建一个名为class的表,其有一</div>
</li>
</ul>
</div>
</div>
</div>
<div>
<div class="container">
<div class="indexes">
<strong>按字母分类:</strong>
<a href="/tags/A/1.htm" target="_blank">A</a><a href="/tags/B/1.htm" target="_blank">B</a><a href="/tags/C/1.htm" target="_blank">C</a><a
href="/tags/D/1.htm" target="_blank">D</a><a href="/tags/E/1.htm" target="_blank">E</a><a href="/tags/F/1.htm" target="_blank">F</a><a
href="/tags/G/1.htm" target="_blank">G</a><a href="/tags/H/1.htm" target="_blank">H</a><a href="/tags/I/1.htm" target="_blank">I</a><a
href="/tags/J/1.htm" target="_blank">J</a><a href="/tags/K/1.htm" target="_blank">K</a><a href="/tags/L/1.htm" target="_blank">L</a><a
href="/tags/M/1.htm" target="_blank">M</a><a href="/tags/N/1.htm" target="_blank">N</a><a href="/tags/O/1.htm" target="_blank">O</a><a
href="/tags/P/1.htm" target="_blank">P</a><a href="/tags/Q/1.htm" target="_blank">Q</a><a href="/tags/R/1.htm" target="_blank">R</a><a
href="/tags/S/1.htm" target="_blank">S</a><a href="/tags/T/1.htm" target="_blank">T</a><a href="/tags/U/1.htm" target="_blank">U</a><a
href="/tags/V/1.htm" target="_blank">V</a><a href="/tags/W/1.htm" target="_blank">W</a><a href="/tags/X/1.htm" target="_blank">X</a><a
href="/tags/Y/1.htm" target="_blank">Y</a><a href="/tags/Z/1.htm" target="_blank">Z</a><a href="/tags/0/1.htm" target="_blank">其他</a>
</div>
</div>
</div>
<footer id="footer" class="mb30 mt30">
<div class="container">
<div class="footBglm">
<a target="_blank" href="/">首页</a> -
<a target="_blank" href="/custom/about.htm">关于我们</a> -
<a target="_blank" href="/search/Java/1.htm">站内搜索</a> -
<a target="_blank" href="/sitemap.txt">Sitemap</a> -
<a target="_blank" href="/custom/delete.htm">侵权投诉</a>
</div>
<div class="copyright">版权所有 IT知识库 CopyRight © 2000-2050 E-COM-NET.COM , All Rights Reserved.
<!-- <a href="https://beian.miit.gov.cn/" rel="nofollow" target="_blank">京ICP备09083238号</a><br>-->
</div>
</div>
</footer>
<!-- 代码高亮 -->
<script type="text/javascript" src="/static/syntaxhighlighter/scripts/shCore.js"></script>
<script type="text/javascript" src="/static/syntaxhighlighter/scripts/shLegacy.js"></script>
<script type="text/javascript" src="/static/syntaxhighlighter/scripts/shAutoloader.js"></script>
<link type="text/css" rel="stylesheet" href="/static/syntaxhighlighter/styles/shCoreDefault.css"/>
<script type="text/javascript" src="/static/syntaxhighlighter/src/my_start_1.js"></script>
</body>
</html><script data-cfasync="false" src="/cdn-cgi/scripts/5c5dd728/cloudflare-static/email-decode.min.js"></script>