iOS 组件化的三种方案
组件化
本文主要介绍iOS组件化的三种方案
1、常⽤的三种方案
- URL Scheme
- Target - Action
- Protocol - Class 匹配
1.1、 URL Scheme路由
- 使 URL 处理本地的跳转
- 通过中间层进⾏注册 & 调⽤ (load方法里把被调用者注册到中间层)
- 注册表⽆需使用反射
- 非懒加载 / 注册表的维护 / 参数
URL Scheme路由示例
//MTMediator.h --- start
typedef void(^MTMediatorProcessBlock)(NSDictionary *params);

+ (void)registerScheme:(NSString *)scheme processBlock:(MTMediatorProcessBlock)processBlock;

+ (void)openUrl:(NSString *)url params:(NSDictionary *)params;
//MTMediator.h --- end

//MTMediator.m --- start
+ (NSMutableDictionary *)mediatorCache{
    static NSMutableDictionary *cacheScheme;
    static dispatch_once_t onceToken;
    dispatch_once(&onceToken, ^{
        cacheScheme = @{}.mutableCopy;
    });

    return cacheScheme;
}

+ (void)registerScheme:(NSString *)scheme processBlock:(MTMediatorProcessBlock)processBlock{
    if (scheme.length > 0 && processBlock) {
        [[[self class] mediatorCache] setObject:processBlock forKey:scheme];
    }
}

+ (void)openUrl:(NSString *)url params:(NSDictionary *)params{
    MTMediatorProcessBlock block = [[[self class] mediatorCache] objectForKey:url];
    if (block) {
        block(params);
    }
}
//MTMediator.m --- end

//注册 --- start
+ (void)load {
    [MTMediator registerScheme:@"detail://" processBlock:^(NSDictionary * _Nonnull params) {
        NSString *url = (NSString *)[params objectForKey:@"url"];
        UINavigationController *navigationController = (UINavigationController *)[params objectForKey:@"controller"];
        MTDetailViewController *controller = [[MTDetailViewController alloc] initWithUrlString:url];
//        controller.title = [NSString stringWithFormat:@"%@", @(indexPath.row)];
        [navigationController pushViewController:controller animated:YES];
    }];
}
//注册 --- end

//调用 --- start
//URL Scheme
[MTMediator openUrl:@"detail://" params:@{@"url":item.articleUrl,@"controller":self.navigationController}];
//调用 --- end
复制代码- 参考了系统URL Scheme机制
- 参数传递通过dictionary,对调用者不透明
目前iOS上大部分路由工具都是基于URL 进行匹配的,或者命名约定,通过runtime方法进行动态调用
优点:实现简单
缺点:需要维护字符串表,依赖于命名约定,无法在编译时暴露出所有问题,需要在运行时才能发现错误。
MGJRouter
URL路由方式主要是以蘑菇街为代表的的MGJRouter
实现原理:
- App启动时实例化各组件模块,然后这些组件向
ModuleManager注册Url,有些时候不需要实例化,使用class注册 - 当组件A需要调用组件B时,向
ModuleManager传递URL,参数跟随URL以GET方式传递,类似openURL。然后由ModuleManager负责调度组件B,最后完成任务。
// 1、注册某个URL
MGJRouter.registerURLPattern("app://home") { (info) in
    print("info: (info)")
}

//2、调用路由
MGJRouter.openURL("app://home")
复制代码
URL 路由的优点
- 极高的动态性,适合经常开展运营活动的app
- 方便地统一管理多平台的路由规则
- 易于适配URL Scheme,可以下发
URl 路由的缺点
- 传参方式有限,并且无法利用编译器进行参数类型检查,因此所有的参数都是通过字符串转换而来
- 只适用于界面模块,不适用于通用模块
- 参数的格式不明确,是个灵活的 dictionary,也需要有个地方可以查参数格式。
- 不支持storyboard
- 依赖于字符串硬编码,难以管理,蘑菇街做了个后台专门管理。
- 无法保证所使用的的模块一定存在
- 解耦能力有限,url 的”注册”、”实现”、”使用”必须用相同的字符规则,一旦任何一方做出修改都会导致其他方的代码失效,并且重构难度大
1.2、Target - Action
- 抽离业务逻辑
- 通过中间层进行调⽤
- 中间层使⽤ runtime 反射
- 中间层代码优化
Target - Action示例
//MTMediator.h
#import
#import

NS_ASSUME_NONNULL_BEGIN

@interface MTMediator : NSObject

//target action
+ ( __kindof UIViewController *)detailViewControllerWithUrl:(NSString *)detailUrl;

@end

NS_ASSUME_NONNULL_END

//MTMediator.m
#import "MTMediator.h"

@implementation MTMediator

+ ( __kindof UIViewController *)detailViewControllerWithUrl:(NSString *)detailUrl{
    Class detailVC = NSClassFromString(@"MTDetailViewController");
    UIViewController *controller = [[detailVC alloc] performSelector:NSSelectorFromString(@"initWithUrlString:") withObject:detailUrl];

    return controller;
}

@end

//调用
//Target - Action
 UIViewController *vc = [MTMediator detailViewControllerWithUrl:item.articleUrl];
 vc.title = @"详情啊";
 [self.navigationController pushViewController:vc animated:YES];

复制代码 - 硬编码方式(直接调用,不利于维护和扩展)
- perform 最多能传递2个参数,可以传入字典避免参数过多
- initWithUrlString:方法必须实现 否则找不到sel崩溃
- 业务逻辑柔合在Mediator中,可以各个模块写各自的MTMediator扩展
CTMediator
原理是通过oc的runtime、category特性动态获取模块,例如通过NSClassFromString获取类并创建实例,通过performSelector + NSInvocation动态调用方法。
实现原理:
- 1、利用分类为路由添加新接口,在接口中通过字符串获取对应的类
- 2、通过runtime创建实例,动态调用实例的方法
CTMediator使用
//******* 1、分类定义新接口
extension CTMediator{
    @objc func A_showHome()->UIViewController?{

        //在swift中使用时,需要传入对应项目的target名称,否则会找不到视图控制器
        let params = [
            kCTMediatorParamsKeySwiftTargetModuleName: "CJLBase_Example"
        ]
        //CTMediator提供的performTarget:action:params:shouldCacheTarget:方法 通过传入name,找到对应的targer和action
        if let vc = self.performTarget("A", action: "Extension_HomeViewController", params: params, shouldCacheTarget: false) as? UIViewController{
            return vc
        }
        return nil
    }
}

//******* 2、模块提供者提供target-action的调用方式(对外需要加上public关键字)
class Target_A: NSObject {

    @objc func Action_Extension_HomeViewController(_ params: [String: Any])->UIViewController{

        let home = HomeViewController()
        return home
    }

}

//******* 3、使用
if let vc = CTMediator.sharedInstance().A_showHome() {
            self.navigationController?.pushViewController(vc, animated: true)
        }
复制代码
模块间的关系:
模块A——Mediator——target——模块B
优点
- 1、利用接口调用,实现了参数传递时的类型安全
- 2、直接使用模块的protocol接口,无需再重复封装
缺点
- 1、用框架来创建所有对象,创建方式不同,即不支持外部传入参数
- 2、用
OC runtime创建对象,不支持swift - 3、只做了
protocol和class的匹配,不支持更复杂的创建方式 和依赖注入 - 4、无法保证所使用的protocol 一定存在对应的模块,也无法直接判断某个protocol是否能用于获取模块
1.2、Protocol - Class
- 增加 Protocol Wrapper层 (中间件先注册Protocol和Class对应关系,将
protocol和对应的类进行字典匹配) - 中间件返回 Protocol 对应的 Class,然后
动态创建实例 - 解决硬编码的问题
Protocol - Class示例
//具体的Protocol
//MTMediator.h --- start
@protocol MTDetailViewControllerProtocol

+ (__kindof UIViewController *)detailViewControllerWithUrl:(NSString *)detailUrl;

@end

@interface MTMediator : NSObject
+ (void)registerProtol:(Protocol *)protocol class:(Class)cls;
+ (Class)classForProtocol:(Protocol *)protocol;
@end
//MTMediator.h --- end

//MTMediator.m --- start
+ (void)registerProtol:(Protocol *)protocol class:(Class)cls{
    if (protocol && cls) {
        [[[self class] mediatorCache] setObject:cls forKey:NSStringFromProtocol(protocol)];
    }
}

+ (Class)classForProtocol:(Protocol *)protocol{
    return [[[self class] mediatorCache] objectForKey:NSStringFromProtocol(protocol)];
}
//MTMediator.m --- end

//被调用
//MTDetailViewController.h --- start
@protocol MTDetailViewControllerProtocol;

@interface MTDetailViewController : UIViewController
@end
//MTDetailViewController.h --- end

//MTDetailViewController.m --- start
+ (void)load {
    [MTMediator registerProtol: @protocol(MTDetailViewControllerProtocol) class:[self class]];
}

#pragma mark - MTDetailViewControllerProtocol
+ ( __kindof UIViewController *)detailViewControllerWithUrl:(NSString *)detailUrl{
    return [[MTDetailViewController alloc]initWithUrlString:detailUrl];
}
//MTDetailViewController.m --- end

//调用
Class cls = [MTMediator classForProtocol: @protocol(MTDetailViewControllerProtocol)];
if ([cls respondsToSelector: @selector(detailViewControllerWithUrl:)]) {
        [self.navigationController pushViewController:[cls detailViewControllerWithUrl:item.articleUrl] animated:YES];
}

复制代码 - 被调用者先在中间件注册Protocol和Class对应关系,对外只暴漏Protocol
BeeHive
protocol比较典型的三方框架就是阿里的BeeHive。BeeHive借鉴了Spring Service、Apache DSO的架构理念,采用AOP+扩展App生命周期API形式,将业务功能、基础功能模块以模块方式以解决大型应用中的复杂问题,并让模块之间以Service形式调用,将复杂问题切分,以AOP方式模块化服务。
BeeHive 核心思想
- 1、各个模块间调用从直接调用对应模块,变成调用
Service的形式,避免了直接依赖。 - 2、App生命周期的分发,将耦合在
AppDelegate中逻辑拆分,每个模块以微应用的形式独立存在。
示例如下:
//******** 1、注册
[[BeeHive shareInstance] registerService:@protocol(HomeServiceProtocol) service:[BHViewController class]];

//******** 2、使用
#import "BHService.h"

id< HomeServiceProtocol > homeVc = [[BeeHive shareInstance] createService:@protocol(HomeServiceProtocol)];
复制代码
优点
- 1、利用接口调用,实现了参数传递时的类型安全
- 2、直接使用模块的protocol接口,无需再重复封装
缺点
- 1、用框架来创建所有对象,创建方式不同,即不支持外部传入参数
- 2、用
OC runtime创建对象,不支持swift - 3、只做了
protocol和class的匹配,不支持更复杂的创建方式 和依赖注入 - 4、无法保证所使用的protocol 一定存在对应的模块,也无法直接判断某个protocol是否能用于获取模块
建议:URL Scheme - handler 配合 Protocol - Class 使用
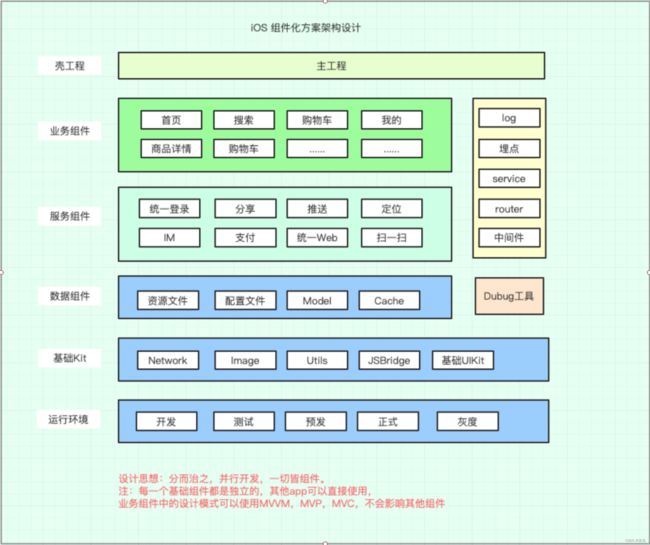
附带:iOS组件化方案架构设计图