【Linux入门指北】ansible 自动化运维实战
系列文章目录
提示:这里可以添加系列文章的所有文章的目录,目录需要自己手动添加
例如:第一章 Python 机器学习入门之pandas的使用
提示:写完文章后,目录可以自动生成,如何生成可参考右边的帮助文档
文章目录
- 系列文章目录
- 1.abstract-简介
- 2.install -部署
- 3.ssh-key(可选)
- 4.ansible基础
- 5.inventory-主机清单
- 6.Ad-Hoc-点对点模式
- 7.Yaml-yaml aint Markup Language-非标记语言
- 8.Role-角色扮演
- 总结
1.abstract-简介
2.install -部署
1.DNS resolve
环境:
ansible服务器:192.168.200.168
ansible客户机:192.168.200.136,192.168.200.138
域名解析:
#vim /etc/hosts
192.168.200.168 ansible
192.168.200.136 host1
192.168.200.169 host2
192.168.200.171 host3
ansible客户机
无须配置:ip、yum源
2.install ansible
ansible服务器
yum install -y elpl-release
安装epel源,可以使用阿里yum
rm -rf /etc/yum.repos.d/*
wget -O /etc/yum.repos.d/epel.repo http://mirros.aliyun.com/repo/epel-7.repo
wget -O /etc/yum.repos.d/CentOS-Base.repo http://mirrors.aliyun.com/repo/Centos-7.repo
yum install -y ansible
检测部署是否完成
rpm -ql ansible //列出所有文件
rpm -qc ansible //查看配置文件
ansible --hlep //查看ansible帮助文档
ansible-doc -l //查看所有模块,如(A10,华为,docker,EC2,aws等等大厂商设备)
ansible-doc -s yum //查看yum模块,了解其功能
3.ssh-key(可选)
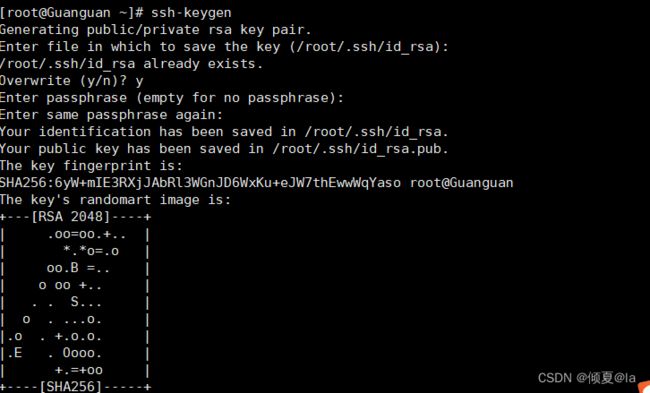
免密码ssh-key的方式
ssh-keygen
回车…完成
ls .ssh/
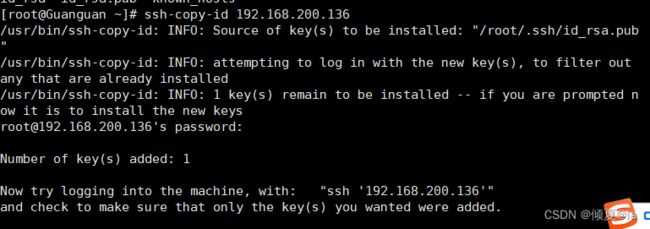
ssh-copy-id IP地址
ssh-copy-id root@192.168.200.136
ssh root@192.168.200.136
ip a | grep inet
4.ansible基础
1.定义主机清单
vim /etc/ansible/hosts
注意这里与/etc/hosts不同之处少了一个主机
2.测试连通性
![]()

ansible host2 -m ping
(输入密码登录,因为没有做免密登录)
ansible host2 -m ping -u root -k -o
去掉(yes/no)的询问
vim /etc/ssh/ssh_config

systemctl restart sshd
ansible host2 -m ping -u root -k -o
5.错误示范
ansible host3 -m ping -o -u root -k

登录不上host3,因为主机清单未标注主机

在主机清单加上host3

添加完host3就可以登录了
ansible host3 -m ping -o -u root -k
6.请注意ping和ssh是不同的两个程序
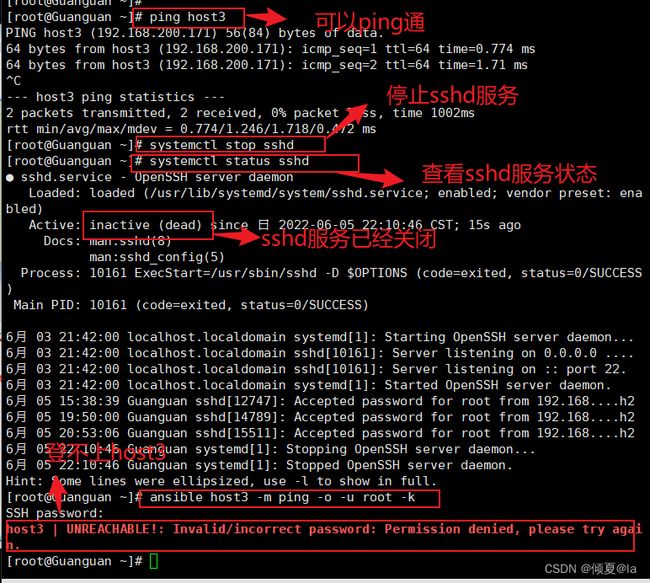
因为ping通不带表可以连通
ping host3
systemctl stop sshd
systemctl status sshd
ansible host3 -m ping -o -u root -k
systemctl start sshd
ansible host3 -m ping -o -u root -k
ping:ICMP:网际消息管理协议
关闭host1主机的sshd进程,进行ping连通测试
在使用ansible对host1进行联通测试,却是失败的
结论ansible的ping,是探测ssh程序是否连接,不是icmp协议
ansible host1 -m ping -u root -k
5.inventory-主机清单
含义:清查;存货清单;财产目录;主机清单
1.增加主机组
vim /etc/ansible/hosts
ansible webserver -m ping -o
2.增加用户名 密码

免密用户和密码成功,而guan这个没有成功是因为我没有这太客户机。

3.增加端口
列出端口
ss -anpt | grep sshd
示列:
将host3的sshd程序端口修改为2222

重启sshd服务
systemctl restart sshd
用host2登录host3
ssh root@192.168.200.171
ssh root@192.168.200.171 -p 2222
ansible webserver -m ping -o
因为已经host4已经修改了端口号,所以登录不上报端口错误

要想登录成功需要在配置文件中指定端口号
vim /etc/ansible/hosts
ansible webserver -m ping -o
将用户名密码和端口恢复原状
4.组:变量
ansible内部变量可以帮助我们简化主机清单的设置
vim /etc/ansible/hosts
ansible webserver -m ping -o
5.子分组
将不同的分组进行组合
vim /etc/ansible/hosts
``
调用子分组,host3没用登录成功是因为没有指定端口
ansible webserver -m ping -o
然后重启sshd服务
systemctl restart sshd
6.自定义主机列表
vim hostlist
ansible -i hostlist dockers -m ping -o //其中-i为调用文件的选项,hostlist为文件,dockers为组名
6.Ad-Hoc-点对点模式
简介:
临时的,在ansible中是指需要快速执行的单条命令,并且不需要保存的命令。对于复杂的命令则为playbook
1.shell模块
ansible-doc shell
ansible webserver -m shell -a 'hostname' -o
ansible webserver -m shell -a 'hostname' -o -f 2
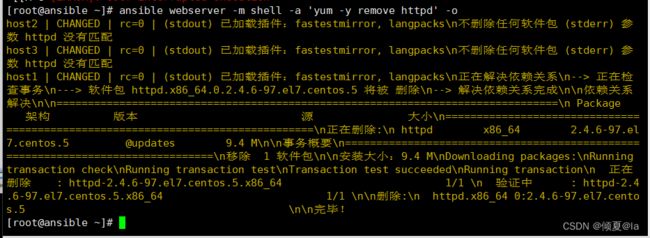
删除全部客户机上的httpd
ansible webserver -m shell -a 'yum -y remove httpd' -o
ansible webserver -m shell -a 'uptime' -o
其他shell指令同理
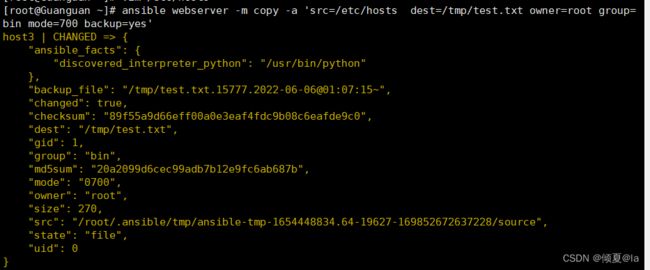
2.复制模块
示列:
用复制模块将/etc下的hosts文件拷贝到tmp目录下的test.txt文件
ansible webserver -m copy -a 'src=/etc/hosts dest=/tmp/test.txt'

到host1客户机看ansible服务器是否将host文件拷贝到host1客户机的tmp目录下的test.txt文件
ansible webserver -m copy -a 'src=/etc/hosts dest=/tmp/test.txt'
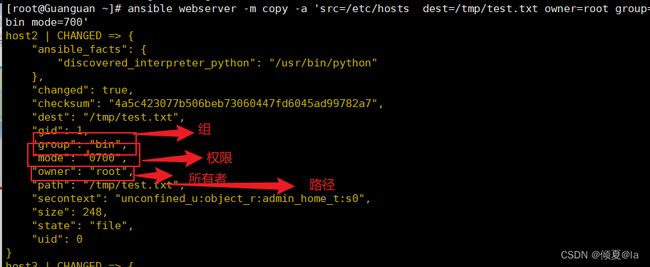
ansible webserver -m copy -a 'src=/etc/hosts dest=/tmp/test.txt owner=root group=bin mode=700'
ansible webserver -m copy -a 'src=/etc/hosts dest=/tmp/test.txt owner=root group=bin mode=700 backup=yes'
3.用户模块
帮助手册:ansible-doc user
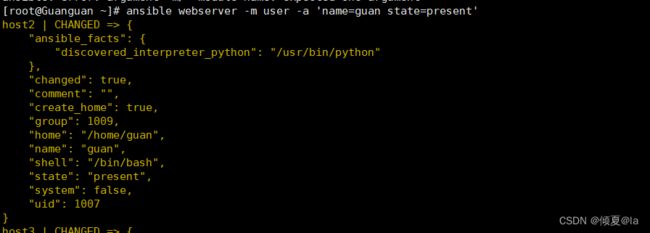
创建用户
ansible webserver -m user -a 'name=guan state=present'
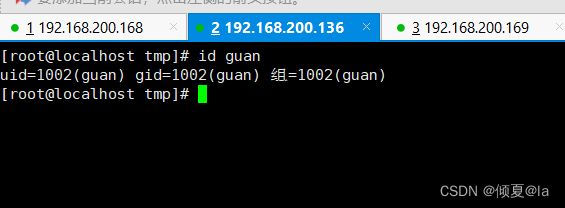
到host1查看是否创建了guan这个用户
id guan
修改密码
生成加密
echo ‘20030614’ | openssl passwd -1 -stdin 生成加密密码值: 1 1 1BYiyfiPS$VG12m8N3tL0diGqCHghFi0
其中’20030614’为我们要设的密码值, openssl为加密程序,passwd 密码 -1为密码类型 -stdin 为标准输入接收

修改密码
ansible webserver -m user -a 'name=guan password="$1$BYiyfiPS$VG12m8N3tL0diGqCHghFi0"'
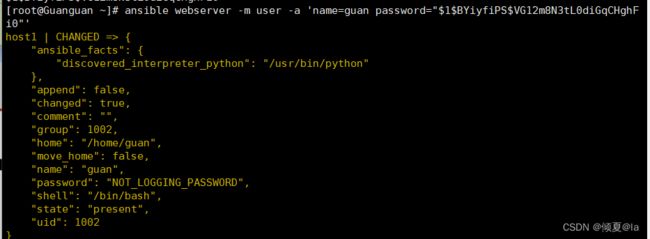
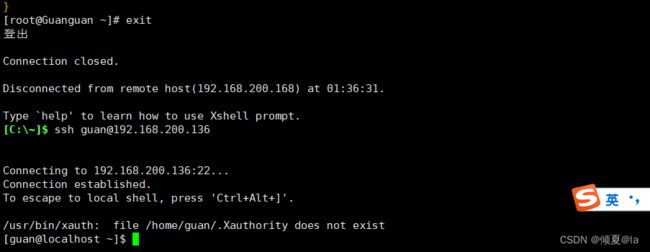
登录host1中的guan用户进行验证(其中密码为之前设置的20030614)
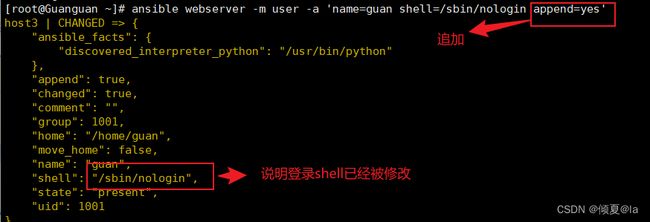
修改shell
切换到客户机host1查看是否把登录shell修改为/sbin/nologin

删除用户
ansible webserver -m user ‘name=guan state=absent’

切到客户机host1查看guan这个用户是否被删除

4.软件包管理模块
帮助手册:示列 ansible-doc yum
示列:
ansible host1 -m yum -a 'name=“*” state=latest ’ //升级所有包
ansible webserver -m yum -a ‘name=“httpd” state=latest’ //安装apache

切换到客户机host1看httpd是否安装好
yum list |grep httpd
其他软件包管理功能同理
5.服务模块
帮助手册:ansible-doc server
在host1客户机看httpd服务状态是没有开启的
systemctl status httpd
ansible webserver -m service -a 'name=httpd state=started'
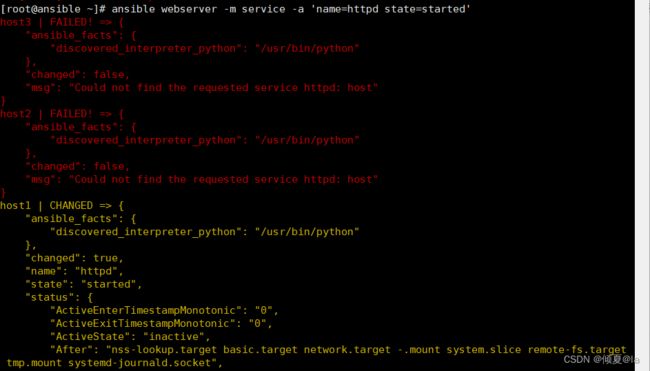
在切回host1客户机看httpd服务状态是否开启
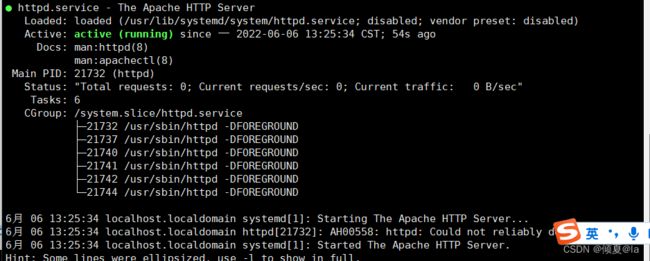
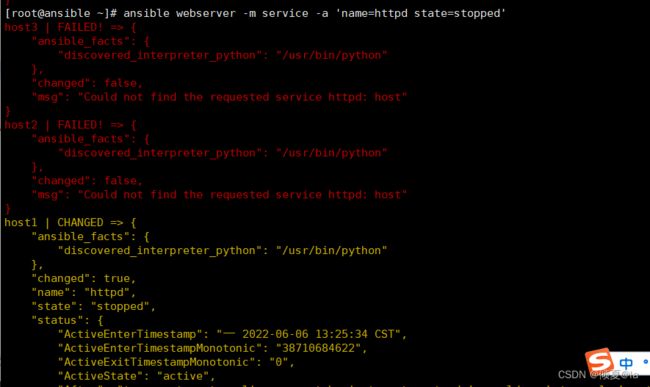
使用ansible客户机关闭全部客户机的httpd服务
ansible webserver -m service -a 'name=httpd state=stopped'
ansible webserver -m service -a 'name=httpd state=started enabled=yes'
重启httpd服务
ansible webserver -m service -a 'name=httpd state=restarted'
开机禁用启动
ansible webserver -m service -a 'name=httpd state=restarted enabled=no'
6.文件模块
帮助手册:ansible-doc file
示列:
创建文本,指定路径并指定权限
ansible webserver -m file -a ‘path=/tmp/test.txt mode=777 state=touch’

创建目录,指定路径并指定权限
ansible webserver -m file -a ‘path=/tmp/example.txt mode=777 state=directory’

7.收集模块
帮助手册:ansible-doc setup
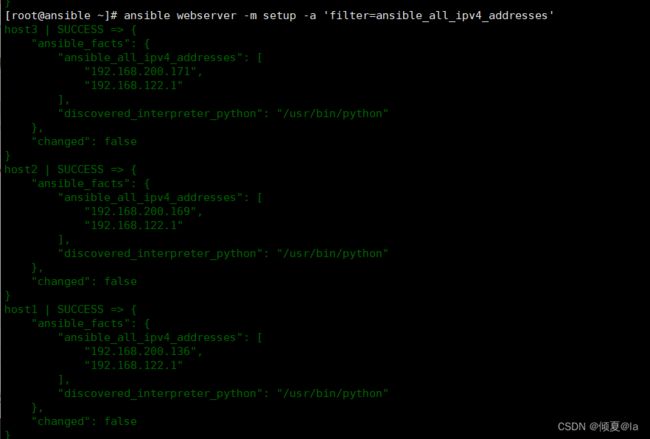
查看所有客户机的信息
ansible webserver -m setup
ansible webserver -m setup -a 'filter=ansible_all_ipv4_addresses'
7.Yaml-yaml aint Markup Language-非标记语言
语法:
列表
fruits:
-Apple
-Orange
-Strawbrry
字典
martin:
name:Martin Dvloper
job:Developer
skill:Elite
示列:
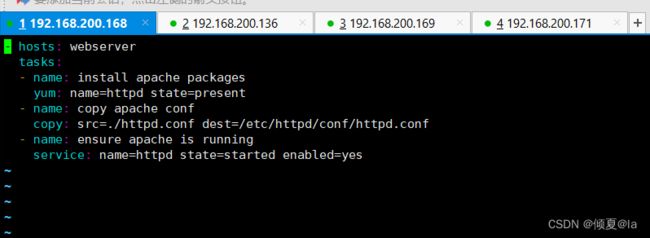
要求:通过yaml编写一个简单的剧本,完成web的部署,配置,启动的全过程。
ansible服务器
1.准备工作
卸载之前安装好的httpd
ansible all -m yum -a 'name=httpd state=removed' -o
yum list | grep httpd

卸载httpd-tools,防止在安装时发生冲突
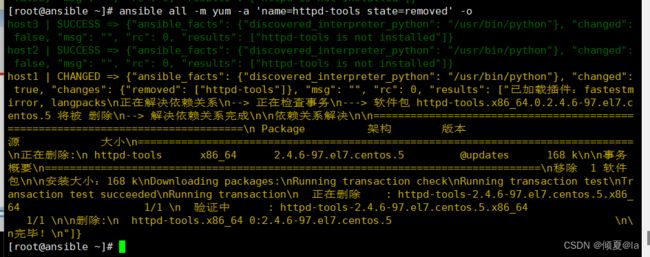
查看是否卸载干净
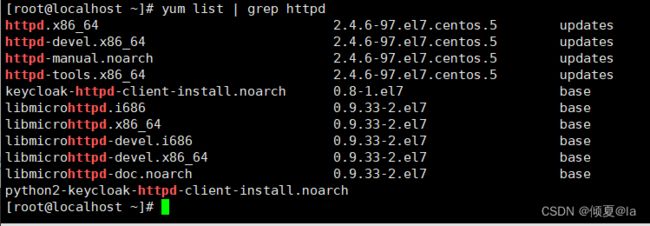
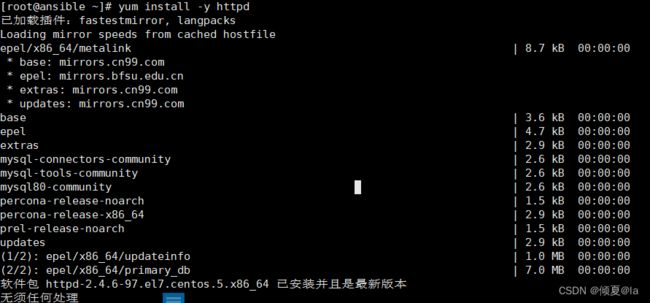
在ansible服务器上安装httpd
准备配置文件
mkdir apache
cd apache
cp -rf /etc/httpd/conf/httpd.conf .
ls
grep '^Listen' httpd.conf
vim apache.yaml
2.测试
1.测试语法(如下图说明没有语法错误,但不保证没有参数错误)
ansible-playbook apache.yaml --syntax -check
列出剧本任务
ansible-playbook apache.yaml --list-tasks
ansible-playbook apache.yaml
4.handlers(触发程序)
如果配置文件发生变化
修改配置文件为 --Listen 8080
ansible-playbook apache.yaml
vim apache.yaml

如果配置文件在发生变化
vim apache.yaml
ansible-playbook apache.yaml
再次执行,配置生效,触发成功
![]()
8.Role-角色扮演
简介
目的:通过role远程部署Nginx并配置
1.目录结构
创建目录
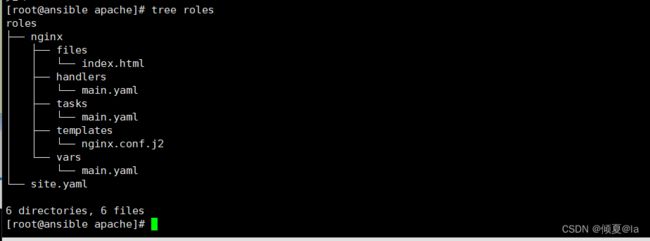
mkdir -p roles/nginx/{files,handlers,tasks,templates,vars}
然后用tree列出目录结构
tree roles
如果没有安装tree,用yum进行安装
yum install -y tree
创建index.html页面文本
echo Hello,Word! > roles/nginx/files/index.html
touch roles/site.yaml roles/nginx/{handlers,tasks,vars}/main.yaml
yum install -y nginx && cp /etc/nginx/nginx.conf roles/nginx/templates/nginx.conf.j2
2.编写任务
vim roles/nginx/tasks/main.yaml
3.准备配置文件
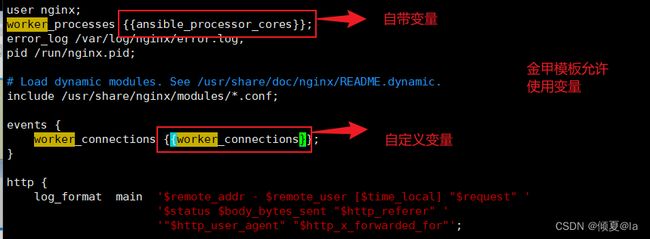
编辑金甲模板(允许使用变量)
vim roles/nginx/templates/nginx.conf.j2
worker_processes {{ansible_processor_cores}}; //自带变量
worker_connections {{worker_connections}}; //自定义变量
4.编写变量
编辑变量配置文件
vim roles/nginx/vars/main.yaml
5.编写处理程序
vim roles/nginx/handlers/main.yaml
6.编写剧本
vim roles/site.yaml
![]()
总结
提示:这里对文章进行总结:
例如:以上就是今天要讲的内容,本文仅仅简单介绍了pandas的使用,而pandas提供了大量能使我们快速便捷地处理数据的函数和方法。
