springboot
Springboot入门
Springboot入门
springboot 提供了一种快速使用spring项目的方式,而不是对spring功能的增强,本文参考
https://www.bilibili.com/video/BV1Lq4y1J77x?p=12&vd_source=0882f549dac54045384d4a921596e234
可搭配视频教程查看
快速入门springboot
spring的缺点
配置繁琐
依赖繁琐
spring-boot的特点
自动配置
起步依赖,依赖传递
还有一些赋值功能,比如内嵌服务器,健康监测
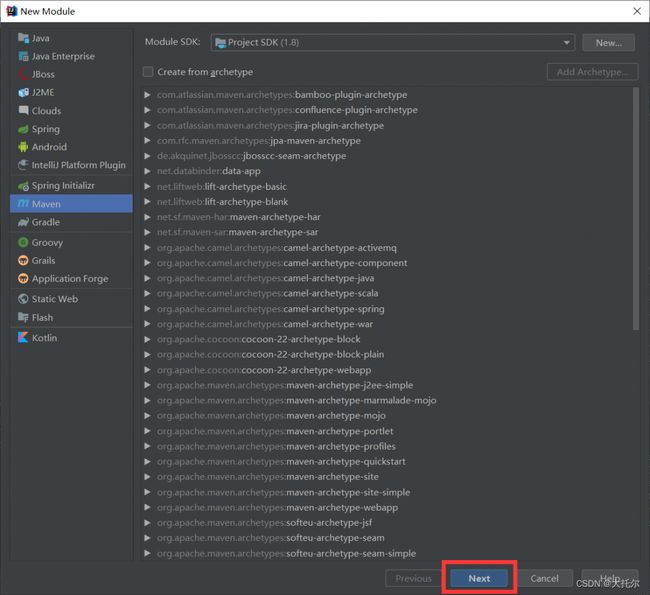
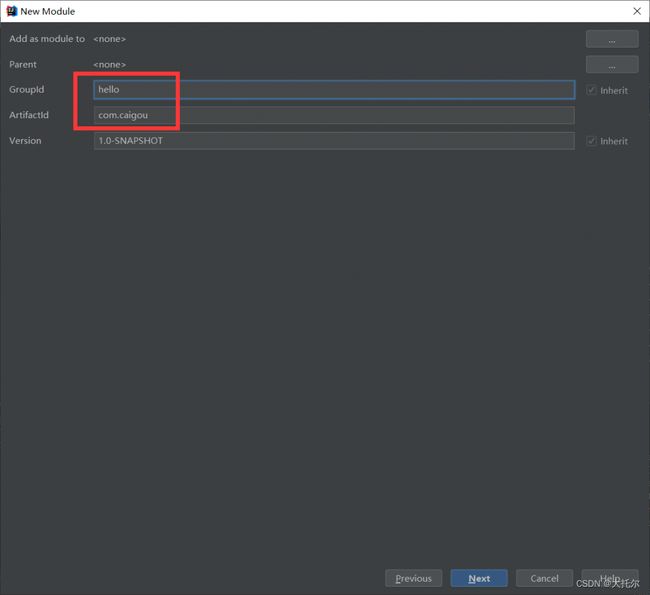
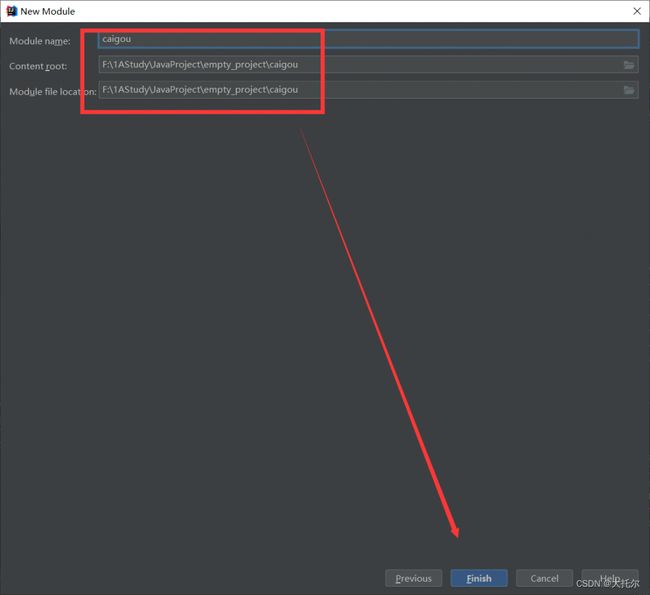
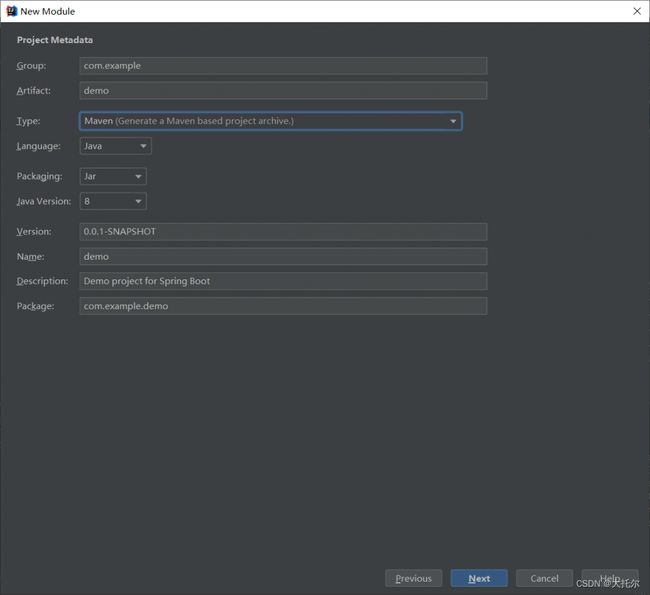
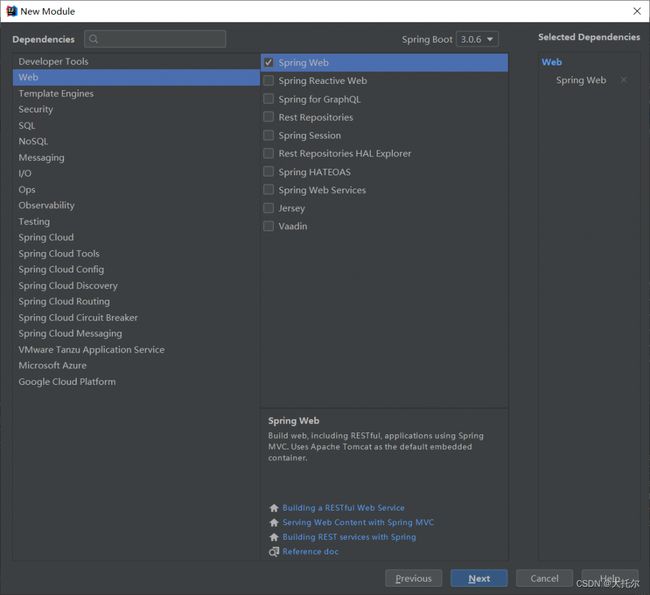
创建一个spring-boot项目
spring-boot使用jar的打包方式
spring和spring-boot的业务代码编写方式完全一样
通过运行spring-boot的入口类运行 web服务
修改配置文件以及代码
修改pom.xml
当项目的依赖发生变化时记得更新maven项目
<project xmlns="http://maven.apache.org/POM/4.0.0"
         xmlns:xsi="http://www.w3.org/2001/XMLSchema-instance"
         xsi:schemaLocation="http://maven.apache.org/POM/4.0.0 http://maven.apache.org/xsd/maven-4.0.0.xsd">
    <modelVersion>4.0.0modelVersion>

    <groupId>com.caigougroupId>
    <artifactId>helloartifactId>
    <version>1.0-SNAPSHOTversion>


    <parent>
        <groupId>org.springframework.bootgroupId>
        <artifactId>spring-boot-starter-parentartifactId>
        <version>2.1.3.RELEASEversion>
    parent>

    <dependencies>

        <dependency>
            <groupId>org.springframework.bootgroupId>
            <artifactId>spring-boot-starter-webartifactId>
        dependency>


        <dependency>
            <groupId>org.springframework.bootgroupId>
            <artifactId>spring-boot-starter-testartifactId>
            <scope>testscope>
        dependency>
    dependencies>

    <build>
        <plugins>
            <plugin>
                <groupId>org.springframework.bootgroupId>
                <artifactId>spring-boot-maven-pluginartifactId>
            plugin>
        plugins>
    build>
project>
- 添加HelloController
package com.caigou.controller;

//import org.springframework.stereotype.Controller;
import org.springframework.web.bind.annotation.RequestMapping;
import org.springframework.web.bind.annotation.RestController;

// 注意使用RestController 而不是Controller
@RestController
public class HelloController {

    @RequestMapping("/hello")
    public String hello(){
        return "hello spring";
    }
}
- 添加Application启动类
package com.caigou.controller;

import org.springframework.boot.SpringApplication;
import org.springframework.boot.autoconfigure.SpringBootApplication;

@SpringBootApplication
public class HelloApplication {
    public static void main(String[] args) {
        SpringApplication.run(HelloApplication.class, args);
    }

}
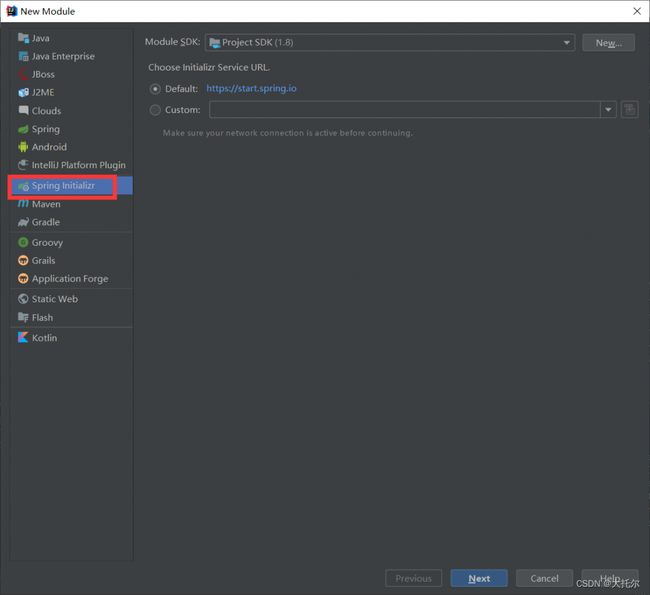
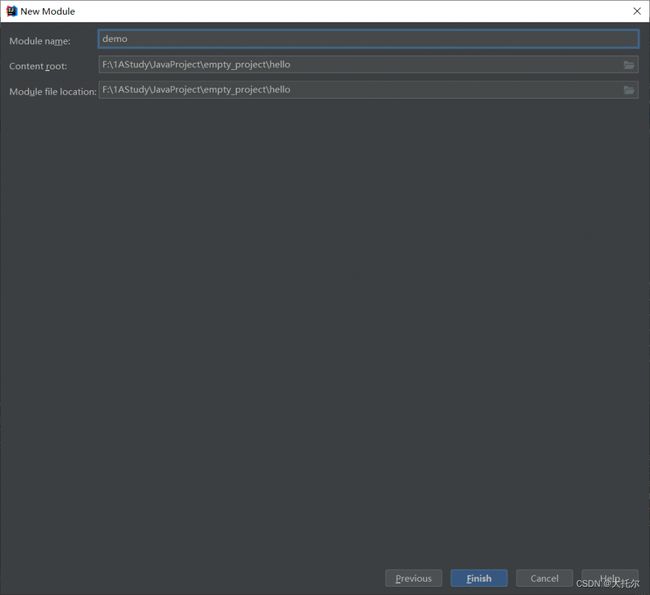
快速生成springboot项目
springboot起步依赖原理分析
在spring-boot-starter-parent中组合了各种技术信息,组合搭配了一套最优技术版本
在各种starter中,定义了完成该功能所需要的坐标合集,其中大部分版本信息来自于父工程
我们的工程继承parent,引入starter,通过依赖传递可以方便的获取需要的jar包,不会存在版本冲突的问题
springboot配置
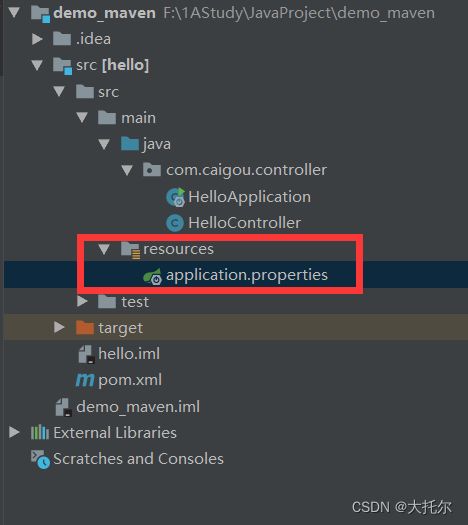
spring-boot是约定优于配置的,许多配置都有默认值,如果想更改这些配置的话,就要修改application.properties或者application.yml 文件
修改properties文件
# 更改服务端口
server.port=8081
# 自定义属性
name=abc
server:
  port: 8085
当一个目录中存在三种配置文件时,application.properties 优先级大于application.yml, application.yml 优先级大于application.yaml
yml文件示例以及注意事项
yml简介,以存储数据为目标,受多种语言的支持
# 缩进要使用空格, 统一文件内变量不能重名
# 对象
person:
  name: zhangsan
  age: 18

# 对象行内写法
person1: {name: zhangsan, age: 18}

# 数组
city:
  - beijing
  - shanghai

# 数组行内
city1: [beijing,shanghai]

# 常量
msg1: '13513 \n 11351'    # 不识别转义字符
msg2: "153135 \n 1531361" # 识别转义字符

#  参数引用
name: lisi

person2:
  name: ${name}
读取自定义配置文件内容
- @Value 和 autowired_environment 的代码
以下是获取yml文件中自定义属性的代码,两种方式获取值的字符串写法都一样,environment只需要注入一个environment,@Value 需要注入多个值,如果注入值比较少的话使用@Value比较好
package com.caigou.controller;

//import org.springframework.stereotype.Controller;
import org.springframework.beans.factory.annotation.Autowired;
import org.springframework.beans.factory.annotation.Value;
import org.springframework.core.env.Environment;
import org.springframework.web.bind.annotation.RequestMapping;
import org.springframework.web.bind.annotation.RestController;

// 注意使用RestController 而不是Controller
@RestController
public class HelloController {

    @Value("${name}")
    private String name;

    @Value("${person.age}")
    private int age;

    @Value("${city[0]}")
    private String city;

    @Value("${msg1}")
    private String msg1;

    @Value("${msg2}")
    private String msg2;

    @Autowired
    private Environment env;


    @RequestMapping("/hello")
    public String hello(){
        System.out.println(name);
        System.out.println(age);
        System.out.println(city);
        System.out.println(msg1);
        System.out.println(msg2);

        System.out.println(env.getProperty("person2.name"));
        return "hello spring";
    }
}
- 通过自定义bean
其中perfix用于指向配置文件中的自定义属性
package com.caigou.controller;


import org.springframework.boot.context.properties.ConfigurationProperties;
import org.springframework.stereotype.Component;

@Component
@ConfigurationProperties(prefix = "person")
public class Person {
    private String name;
    private String age;

    public void setName(String name) {
        this.name = name;
    }

    public String getAge() {
        return age;
    }

    @Override
    public String toString() {
        return "Person{" +
                "name='" + name + '\'' +
                ", age='" + age + '\'' +
                '}';
    }

    public void setAge(String age) {
        this.age = age;
    }

    public String getName() {
        return name;
    }
}
接着使用自动注入,便可以在代码中方便的使用属性
@Autowired
private Person person;
- 添加提示,修改pom.xml,在编写实体类和配置文件中会获得提示
<dependency>
            <groupId>org.springframework.bootgroupId>
            <artifactId>spring-boot-configuration-processorartifactId>
            <optional>trueoptional>
        dependency>
springboot profile
不同环境的配置文件不一样,profile是用于动态配置切换的
profile配置方式
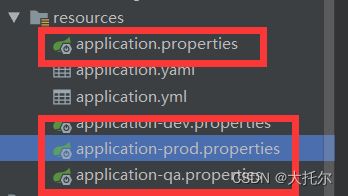
在主配置文件中添加如下代码,可选择使用的配置文件,等号后面的值,和文件application-后面的值要相同
spring.profiles.active=dev
---
server:
  port: 8081

spring:
  profiles: dev
---
server:
  port: 8082

spring:
  profiles: qa
---
server:
  port: 8083

spring:
  profiles: prod
---

spring:
  profiles:
    active: prod
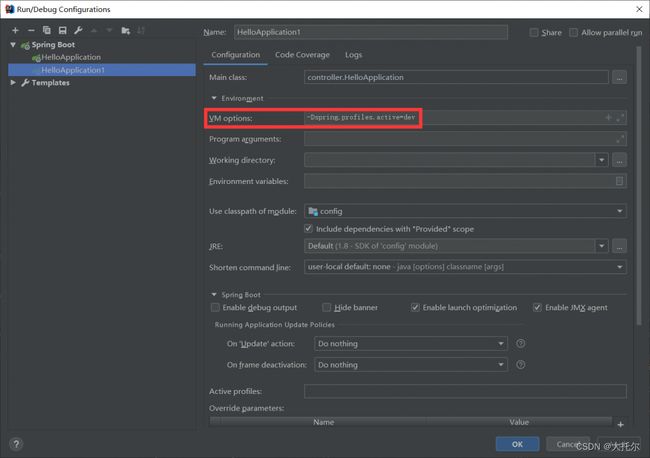
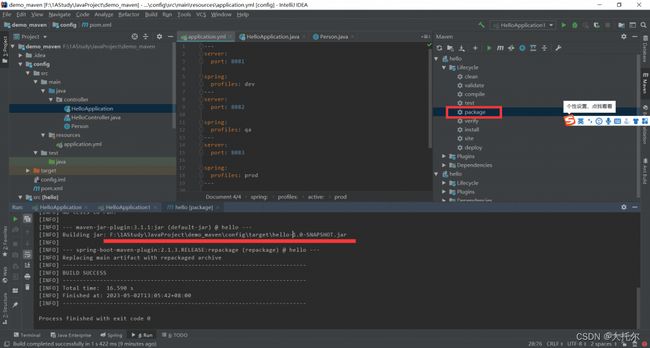
不同配置的启动方式
java -jar springboot_jar包名 --spring.profiles.activate=dev
java -jar hello-1.0-SNAPSHOT.jar --spring.profiles.active=qa
springboot 内部加载顺序
项目根目录config下的配置文件
项目根目录的配置文件
resources的config下的配置文件
resources下的配置文件
多个文件形成一个互补的关系,从上到下优先级依次降低,项目根目录config下的配置文件最牛
外部配置文件加载顺序
可以使用spring.config.application指定外部配置文件的位置,默认会加载jar包所在目录的外部配置文件,以及jar包config目录下的配置文件,外部配置文件的优先级要高于内部配置文件
spring boot 整合其他框架
- 编写业务代码
package controller;

import org.springframework.stereotype.Service;

@Service
public class UserService {
    public void print(){
        System.out.println("123");
    }
}
- 编写测试方法
package controller;

import org.junit.Test;
import org.junit.runner.RunWith;
import org.springframework.beans.factory.annotation.Autowired;
import org.springframework.boot.test.context.SpringBootTest;
import org.springframework.test.context.junit4.SpringRunner;


@RunWith(SpringRunner.class)
@SpringBootTest(classes = HelloApplication.class)
public class UserServiceTest {

    @Autowired
    private UserService userService;

    @Test
    public void testPrint(){
        userService.print();
    }
}
spring boot整合redis
测试代码
package controller;

import org.junit.Test;
import org.junit.runner.RunWith;
import org.springframework.beans.factory.annotation.Autowired;
import org.springframework.boot.test.context.SpringBootTest;
import org.springframework.data.redis.core.RedisTemplate;
import org.springframework.test.context.junit4.SpringRunner;

@RunWith(SpringRunner.class)
@SpringBootTest(classes = HelloApplication.class)
public class RedisTest {

    @Autowired
    private RedisTemplate redisTemplate;

    @Test
    public void setTest(){
        redisTemplate.boundValueOps("name").set("zhangsan1");
    }

    @Test
    public void getTest(){
        Object name = redisTemplate.boundValueOps("name").get();
        System.out.println(name);
    }

}
修改配置文件
spring:
  profiles: prod
  redis:
    host: 175.24.184.55
    password: *********
spring boot 整合mybatis
- 添加依赖
<dependency>
            <groupId>org.mybatis.spring.bootgroupId>
            <artifactId>mybatis-spring-boot-starterartifactId>
            <version>2.1.0version>
        dependency>

        <dependency>
            <groupId>mysqlgroupId>
            <artifactId>mysql-connector-javaartifactId>
        dependency>
- 编写Mapper,mapper包位于controller包下
package controller.mapper;

import domain.User;
import org.apache.ibatis.annotations.Mapper;
import org.apache.ibatis.annotations.Select;
import org.springframework.stereotype.Repository;

import java.util.List;

@Mapper
@Repository
public interface UserMapper {

    @Select("select * from user")
    List<User> findAll();

}
- 编写测试脚本
package controller;

import controller.mapper.UserMapper;
import domain.User;
import org.junit.Test;
import org.junit.runner.RunWith;
import org.springframework.beans.factory.annotation.Autowired;
import org.springframework.boot.test.context.SpringBootTest;
import org.springframework.test.context.junit4.SpringRunner;

import java.util.List;


@RunWith(SpringRunner.class)
@SpringBootTest(classes = HelloApplication.class)
public class UserTest {

    @Autowired
    private UserMapper userMapper;

    @Test
    public void testQueryAll(){
        List<User> result = userMapper.findAll();
        System.out.println(result);
    }
}
- 写配置文件
spring:
  datasource:
    url: jdbc:mysql://ip:3306/caigou?useSSL=false&serverTimezone=UTC
    username: root
    password: HI79+=B8b1nr
    driver-class-name: com.mysql.cj.jdbc.Driver
使用xml配置文件
- 编写mapper
package controller.mapper;

import domain.User;
import org.apache.ibatis.annotations.Mapper;
import org.apache.ibatis.annotations.Property;
import org.springframework.stereotype.Repository;

import java.util.List;

@Mapper
@Repository
public interface UserXmlMapper {

    List<User> findAll();
}
- 编写xml
<?xml version="1.0" encoding="UTF-8" ?>
<!DOCTYPE mapper
PUBLIC "-//mybatis.org//DTD Mapper 3.0//EN"
"http://mybatis.org/dtd/mybatis-3-mapper.dtd">
<mapper namespace="controller.mapper.UserXmlMapper">
<!-- //namespace的值是dao接口的全限定名称(即在哪个包下面要全部写出来-->
<!-- //增删改查子标签的id要和接口中的方法名一样-->
<!--实现查询功能的select子标签-->
<select id="findAll" resultType="domain.User">
select * from user order by id desc
</select>
<!--实现插入功能的insert子标签-->
<!-- <insert id="insertStudent">-->
<!-- insert into student values(#{id},#{name},#{email},#{age})-->
<!-- </insert>-->
<!-- <!–实现修改功能的update子标签–>-->
<!-- <update id="updateEmp">-->
<!-- UPDATE emp SET name = #{name} WHERE id = #{id};-->
<!-- </update>-->
<!-- <!–实现删除功能的delete子标签–>-->
<!-- <delete id="deleteEmp">-->
<!-- DELETE FROM emp WHERE id = #{id};-->
<!-- </delete>-->
</mapper>
文件位于
mybatis:
  mapper-locations: classpath:mapper/*Mapper.xml
spring boot高级.
spring-boot自动配置
condition, spring可以选择性的创建bean
spring boot 部署方式
打jar包
打war包
将jar包打包至服务器上,后台启动程序 https://blog.csdn.net/weixin_46504244/article/details/125628546
对部署好的springboot进行压测
可参考以下链接 https://blog.csdn.net/Loners_fan/article/details/127890332
ab -n 100 -c 100 http://172.16.1.6/
执行-n代表总请求数 -c 代表一次请求的发送的并发请求数
对于空负载的springboot web程序和python web程序两者在测试机器的表现是差不多的
