JavaScript的DOM操作(二)
一、元素的特性attribute
1.元素的属性和特性
前面我们已经学习了如何获取节点,以及节点通常所包含的属性,接下来我们来仔细研究元素Element。
我们知道,一个元素除了有开始标签、结束标签、内容之外,还有很多的属性(attribute)
浏览器在解析HTML元素时,会将对应的attribute也创建出来放到对应的元素对象上。
- 比如id、class就是全局的attribute,会有对应的id、class属性;
- 比如href属性是针对a元素的,type、value属性是针对input元素的;
接下来我们学习一下如何获取和设置这些属性。
2.attribute的分类
属性attribute的分类:
标准的attribute:某些attribute属性是标准的,比如id、class、href、type、value等;非标准的attribute:某些attribute属性是自定义的,比如abc、age、height等;
  <div class="box" id="main" name="kobe" abc="def" age="18">
    哈哈哈哈
  div>
3.attribute的操作
对于所有的attribute访问都支持如下的方法:
elem.hasAttribute(name)— 检查特性是否存在。elem.getAttribute(name)— 获取这个特性值。elem.setAttribute(name, value)— 设置这个特性值。elem.removeAttribute(name)— 移除这个特性。attributes:attr对象的集合,具有name、value属性;
attribute 具备以下特征:
- 它们的
名字是大小写不敏感的(id 与 ID 相同)。 - 它们的
值总是字符串类型的。
4.元素的属性(property)
对于标准的attribute,会在DOM对象上创建与其对应的property属性:
console.log(boxE1.id,boxEl.className) //box main
console.log(boxEl.abc, boxEl.age, boxEl.height) // undefined...
在大多数情况下,它们是相互作用的
- 改变
property,通过attribute获取的值,会随着改变; - 通过
attribute操作修改,property的值会随着改变;- 但是input的value修改只能通过attribute的方法;
除非特别情况,大多数情况下,设置、获取attribute,推荐使用property的方式:
- 这是因为它
默认情况下是有类型的;
toggleBtn.onclick = function () {
    checkBoxInput.checked = !checkBoxInput.checked;
}
5.HTML5的data-*自定义属性
前面我们有学习HTML5的data-*自定义属性,那么它们也是可以在dataset属性中获取到的:
// data-*
console.log(div2El.dataset);//DOMStringMap
console.log(typeof div2El.dataset);//object
console.log(div2El.dataset.name, div2El.dataset.age);
二、元素的class、style
1.JavaScript动态修改样式
有时候我们会通过JavaScript来动态修改样式,这个时候我们有两个选择:
- 选择一:在CSS中编写好对应的样式,
动态的添加class; - 选择二:
动态的修改style属性;
开发中如何选择呢?
- 在大多数情况下,如果可以动态修改class完成某个功能,更
推荐使用动态class; - 如果对于某些情况,无法通过动态修改class(比如精准修改某个css属性的值),那么就可以修改style属性;
接下来,我们对于两种方式分别来进行学习。
2.元素的className和classList
元素的class attribute,对应的property并非叫class,而是className:
- 这是因为JavaScript早期是
不允许使用class这种关键字来作为对象的属性,所以DOM规范使用了className; - 虽然现在JavaScript已经没有这样的限制,但是并不推荐,并且依然在使用
className这个名称;
我们可以对className进行赋值,它会替换整个类中的字符串。
var boxE1 = document.querySelector(".box");
boxE1.className = "why abc";
如果我们需要添加或者移除单个的class,那么可以使用classList属性。
elem.classList 是一个特殊的对象:
elem.classList.add(class):添加一个类elem.classList.remove(class):添加/移除类。elem.classList.toggle(class):如果类不存在就添加类,存在就移除它。elem.classList.contains(class):检查给定类,返回 true/false。
classList是可迭代对象,可以通过for of进行遍历。
3.元素的style属性
如果需要单独修改某一个CSS属性,那么可以通过style来操作:
- 对于
多词(multi-word)属性,使用驼峰式(camelCase )
boxEl.style.width = "100px';
boxEl.style.height = "50px";
boxE1.style.backgroundColor = "red";
如果我们将值设置为空字符串,那么会使用CSS的默认样式:
boxEl.style.display = "";
多个样式的写法,我们需要使用cssText属性:
h1El.style.color = "blue";
h1El.style.border = "1px solid red";
// 会覆盖上面的color和border配置
h1El.style.cssText = "font-size: 24px";
- 不推荐这种用法,因为它会替换整个字符串;
// 1.在property中使用的驼峰格式
// console.log(boxEl.style.backgroundColor)

// 2.如果将一个属性的值, 设置为空的字符串, 那么是使用默认值
// boxEl.style.display = ""
// boxEl.style.fontSize = ""

// 3.设置多个样式
// boxEl.style.fontSize = "30px"
// boxEl.style.color = "red"
boxEl.style.cssText = "font-size: 30px; color: red;"
4.元素style的读取 - getComputedStyle
如果我们需要读取样式:
- 对于
内联样式,是可以通过style.*的方式读取到的; - 对于
style、css文件中的样式,是读取不到的;
这个时候,我们可以通过getComputedStyle的全局函数来实现:
console.log(getComputedStyle(boxEl).fontSize)
四、元素的常见操作
1.创建元素
前面我们使用过 document.write 方法写入一个元素:
- 这种方式写起来非常便捷,但是对于
复杂的内容、元素关系拼接并不方便; - 它是在早期没有DOM的时候使用的方案,目前依然被保留了下来;
那么目前我们想要插入一个元素,通常会按照如下步骤:
- 步骤一:创建一个元素;
- 步骤二:插入元素到DOM的某一个位置;
创建元素: document.createElement(tag)
 // 创建元素
var div1El = document.createElement("div");
div1El.textContent = "我是div元素";
div1El.style.color = "red";
div1El.style.fontSize = "18px";
2.插入元素
插入元素的方式如下:
node.append(...nodes or strings)—— 在 node 末尾 插入节点或字符串,node.prepend(...nodes or strings)—— 在 node 开头 插入节点或字符串,node.before(...nodes or strings)—— 在 node 前面 插入节点或字符串,node.after(...nodes or strings)—— 在 node 后面 插入节点或字符串,node.replaceWith(...nodes or strings)—— 将 node 替换为给定的节点或字符串。
3.移除和克隆元素
移除元素我们可以调用元素本身的remove方法:
如果我们想要复制一个现有的元素,可以通过cloneNode方法:
- 可以传入一个Boolean类型的值,来决定是否是
深度克隆; - 深度克隆会克隆对应元素的子元素,否则不会;
<body>

  <button class="remove-btn">移除box</button>
  <button class="clone-btn">复制box</button>

  <div class="box">
    <h2>我是标题</h2>
    <p>我是文本, 哈哈哈哈哈</p>
  </div>

  <script>

    // 1.获取元素
    var boxEl = document.querySelector(".box")
    var removeBtnEl = document.querySelector(".remove-btn")
    var cloneBtnEl = document.querySelector(".clone-btn")

    // 2.监听removeBtn的点击
    removeBtnEl.onclick = function() {
      boxEl.remove()
    }

    // 3.复制box
    var counter = 0
    cloneBtnEl.onclick = function() {
      var newNode = boxEl.cloneNode(true)
      newNode.children[0].textContent = "我是标题" + counter
      // boxEl.after(newNode)
      document.body.append(newNode)

      counter++
    }

  </script>

</body>
4.旧的元素操作方法
在很多地方我们也会看到一些旧的操作方法:
parentElem.appendChild(node):- 在parentElem的父元素最后位置添加一个子元素
parentElem.insertBefore(node, nextSibling):- 在parentElem的nextSibling前面插入一个子元素;
parentElem.replaceChild(node, oldChild):- 在parentElem中,新元素替换之前的oldChild元素;
parentElem.removeChild(node):- 在parentElem中,移除某一个元素;
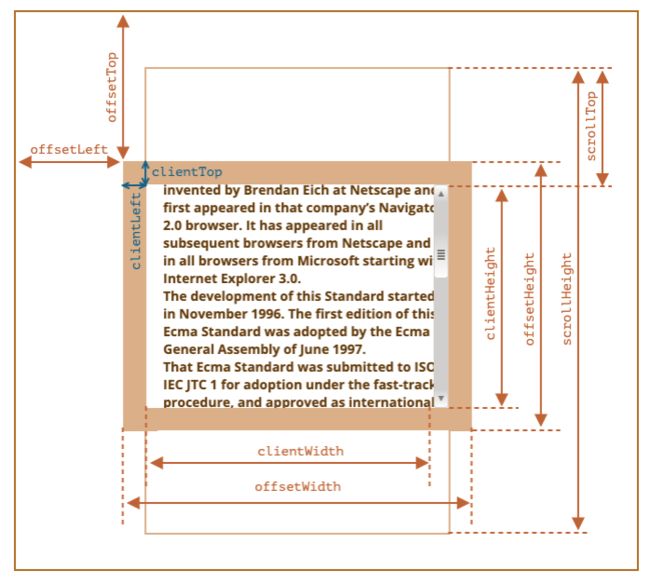
5.元素的大小和滚动
clientWidth:contentWith+padding(不包含滚动条)
clientHeight:contentHeight+padding
clientTop:border-top的宽度
clientLeft:border-left的宽度
offsetWidth:元素完整的宽度
offsetHeight:元素完整的高度
offsetLeft:距离父元素的x
offsetHeight:距离父元素的y
scrollHeight:整个可滚动的区域高度
scrollTop:滚动部分的高度
<!DOCTYPE html>
<html lang="en">
<head>
  <meta charset="UTF-8">
  <meta http-equiv="X-UA-Compatible" content="IE=edge">
  <meta name="viewport" content="width=device-width, initial-scale=1.0">
  <title>Document</title>
  <style>
    body {
      padding: 100px;
    }

    .box {
      width: 100px;
      height: 100px;
      padding: 20px;
      border: 10px solid red;
      /* box-sizing: border-box; */
      background-color: orange;

      overflow: auto;
    }
  </style>
</head>
<body>

  <div class="box">
    你去过国内最美的地方是哪# 我去过国内最美的地方是新疆喀纳斯。喀纳斯是一个美丽而神秘的地方,这里群山环抱,森林密布,湖水清澈,风景奇特。为国家级5A级景区,国家地质公园,国家森林公园。
  </div>

  <script>

    var boxEl = document.querySelector(".box")

    // 1.获取样式(局限性很强)
    var boxStyle = getComputedStyle(boxEl)
    console.log(boxStyle.width, boxStyle.height)

    // 2.获取更多信息
    console.log(boxEl.clientWidth)
    console.log(boxEl.clientHeight)

    console.log(boxEl.clientLeft)
    console.log(boxEl.clientTop)

    console.log(boxEl.offsetWidth)
    console.log(boxEl.offsetHeight)

    console.log(boxEl.offsetLeft)
    console.log(boxEl.offsetTop)

    console.log(boxEl.scrollHeight)
    console.log(boxEl.scrollTop)

    // window对象
    window.onclick = function() {
      console.log(boxEl.scrollTop)
    }

  </script>

</body>
</html>
五、window的大小和滚动
window的width和height
innerWidth、innerHeight:获取window窗口的宽度和高度(包含滚动条)outerWidth、outerHeight:获取window窗口的整个宽度和高度(包括调试工具、工具栏)documentElement.clientHeight、documentElement.clientWidth:获取html的宽度和高度(不包含滚动条)
window的滚动位置:
scrollX:X轴滚动的位置(别名pageXOffset)scrollY:Y轴滚动的位置(别名pageYOffset)
也有提供对应的滚动方法:
- 方法 scrollBy(x,y) :将页面滚动至 相对于当前位置的 (x, y) 位置;
- 方法 scrollTo(pageX,pageY) 将页面滚动至 绝对坐标;

