利用OpenCV检测图像块
本文摘录自 Blob Detection Using OpenCV ( Python, C++ ) 关于图像块的检测方法的总结,用于之后的学习和工程应用。
§00 前 言
本文摘录自 Blob Detection Using OpenCV ( Python, C++ ) 关于图像块的检测方法的总结,用于之后的学习和工程应用。
本文将会介绍使用OpenCV进行图像块简单检测算法。
0.1 什么是图像块?
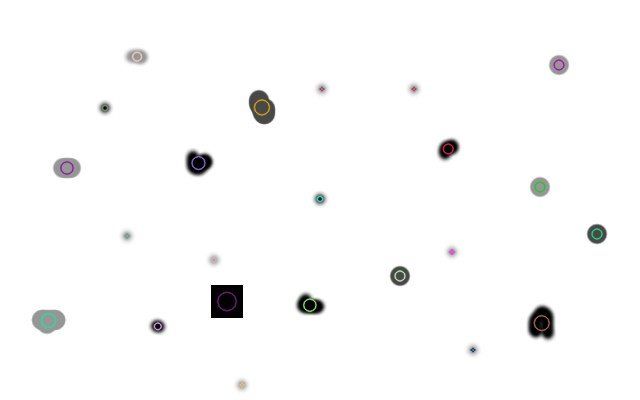
所谓图像块就是在图像中一组相邻的具有相同特性(比如灰度值)像素区域。在前面的图像中,那些紧挨在一起的黑色像素区域就是图像块。图像块检测就是找到并标记出这些区域。
0.2 检测样例代码
OpenCV提供了检测图像块的方便方法并使用不同特征将它们过滤出来。 下面以简单示例开始:
- Python
# Standard imports
import cv2
import numpy as np;

# Read image
im = cv2.imread("blob.jpg", cv2.IMREAD_GRAYSCALE)

# Set up the detector with default parameters.
detector = cv2.SimpleBlobDetector()

# Detect blobs.
keypoints = detector.detect(im)

# Draw detected blobs as red circles.
# cv2.DRAW_MATCHES_FLAGS_DRAW_RICH_KEYPOINTS ensures the size of the circle corresponds to the size of blob
im_with_keypoints = cv2.drawKeypoints(im, keypoints, np.array([]), (0,0,255), cv2.DRAW_MATCHES_FLAGS_DRAW_RICH_KEYPOINTS)

# Show keypoints
cv2.imshow("Keypoints", im_with_keypoints)
cv2.waitKey(0)
- C++
using namespace cv;
// Read image
Mat im = imread( "blob.jpg", IMREAD_GRAYSCALE );

// Set up the detector with default parameters.
SimpleBlobDetector detector;

// Detect blobs.
std::vector<KeyPoint> keypoints;
detector.detect( im, keypoints);

// Draw detected blobs as red circles.
// DrawMatchesFlags::DRAW_RICH_KEYPOINTS flag ensures the size of the circle corresponds to the size of blob
Mat im_with_keypoints;
drawKeypoints( im, keypoints, im_with_keypoints, Scalar(0,0,255), DrawMatchesFlags::DRAW_RICH_KEYPOINTS );

// Show blobs
imshow("keypoints", im_with_keypoints );
waitKey(0);
§01 检测方法
1.1 检测标准
SimpleBlockDetector,就像函数的名字一样,是基于下面刻画的简单算法。通过参数(下面文本中的黑色加粗字体)来控制算法并使用下面步骤来实现,通过下面部分了解这些参数是如何被设置的。
- Thresholding : Convert the source images to several binary images by thresholding the source image with thresholds starting at minThreshold. These thresholds are incremented by thresholdStep until maxThreshold. So the first threshold is minThreshold, the second is minThreshold + thresholdStep, the third is minThreshold + 2 x thresholdStep, and so on.
- Grouping : In each binary image, connected white pixels are grouped together. Let’s call these binary blobs.
- Merging : The centers of the binary blobs in the binary images are computed, and blobs located closer than minDistBetweenBlobs are merged.
- Center & Radius Calculation : The centers and radii of the new merged blobs are computed and returned.
1.2 检测参数
检测原理是通过图像块的颜色、尺寸和形状。通过 SimpleBlobDetector 的参数的设置制定检测方法,从而将相应的图像块过滤出来。
1.2.1 颜色
通过这个特征进行检测算法似乎已经不能持续了。通过代码的测试他表现出存在逻辑错误。
开始你需要设置 filterByColor=1。 设置 blockColor=0 选择黑色图像, blobColor=255 是检测亮的图像块。 通过尺寸:你可以通过参数 filterByArea=1来基于尺寸选择不同的图像块,选择恰当的 minArea, maxArea 参数设置检测范围。 比如设置 minArea=100是指图像块至少具有100个像素。 通过形状的方法:具有三种不同的参数。下面依次给出。
1.2.2 圆度
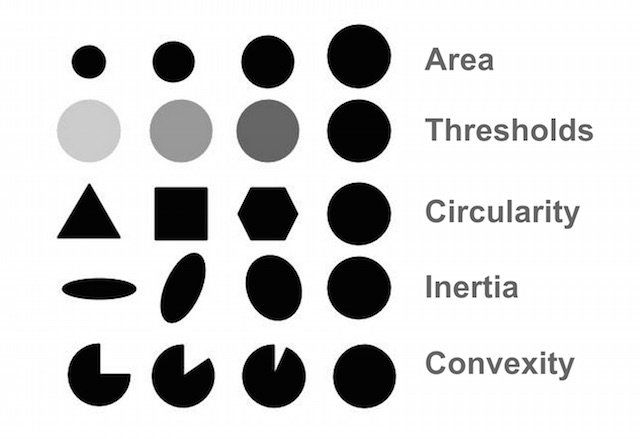
这是用来度量图像块与圆的相似度。 正六边形比正方向更接近于圆形。通过设置 filterByCircularity=1 来选择圆度方法。选择 minCircularity, maxCircularity 合适的参数圆度范围。 圆度的定义为在:
C i r c u l a r i t y = 4 π A r e a ( P e r i m e t e r ) 2 Circularity = {{4\pi Area} \over {\left( {Perimeter} \right)^2 }} Circularity=(Perimeter)24πArea
这表明圆的圆度为 1,方形具有 圆度 0.785,以此类推。
1.2.3 凸度
一图值千言。凸度定义为(图像块的面积/凸覆盖的面积)。凸覆盖是一个紧紧包围住图像的凸图形。 通过设置filterByConvexity=1来选择凸度来检测图像,使用 0 ≤ minConvexity ≤ 1 以及 maxConvexity ≤ 1 来指明检测参数范围。
1.2.4 惯性比
不要因为这个名词把你吓着。使用数学里这些难懂的词语可以非常简明的刻画物体特性。 你所需知道的就是 惯性比是对形状如何被拉长的度量, 比如,圆形,惯性比就是1。一个椭圆的惯性比在0 到 1 之间,对于直线,对应的惯性比则是0. 利用惯性比来过滤图像块需要设置 filterByInertia=1, 并通过在0 ~ 1之间的 minInertialRatio, maxInertiaRatio参数表明检测参数范围。
§02 实现代码
设置 SimpleBlobDetector 非常容易,下面给出了相应的代码示例。
- Python
# Setup SimpleBlobDetector parameters.
params = cv2.SimpleBlobDetector_Params()

# Change thresholds
params.minThreshold = 10;
params.maxThreshold = 200;

# Filter by Area.
params.filterByArea = True
params.minArea = 1500

# Filter by Circularity
params.filterByCircularity = True
params.minCircularity = 0.1

# Filter by Convexity
params.filterByConvexity = True
params.minConvexity = 0.87

# Filter by Inertia
params.filterByInertia = True
params.minInertiaRatio = 0.01

# Create a detector with the parameters
ver = (cv2.__version__).split('.')
if int(ver[0]) < 3 :
	detector = cv2.SimpleBlobDetector(params)
else :
	detector = cv2.SimpleBlobDetector_create(params)
- C++
与OpenCV3相比, OpenCV2 中设置SimpleBlobDetector参数存在少许的不同。下面代码中使用宏定义 CV_MAJOR_VERSION 来检查 OpenCV的版本。 在OpenCV3中,SimpleBlobDetector::create的方法创建一个灵活的指针。下面代码给出了相应的用法:
// Setup SimpleBlobDetector parameters.
SimpleBlobDetector::Params params;

// Change thresholds
params.minThreshold = 10;
params.maxThreshold = 200;

// Filter by Area.
params.filterByArea = true;
params.minArea = 1500;

// Filter by Circularity
params.filterByCircularity = true;
params.minCircularity = 0.1;

// Filter by Convexity
params.filterByConvexity = true;
params.minConvexity = 0.87;

// Filter by Inertia
params.filterByInertia = true;
params.minInertiaRatio = 0.01;

#if CV_MAJOR_VERSION < 3   // If you are using OpenCV 2

  // Set up detector with params
  SimpleBlobDetector detector(params);

  // You can use the detector this way
  // detector.detect( im, keypoints);

#else

  // Set up detector with params
  Ptr<SimpleBlobDetector> detector = SimpleBlobDetector::create(params);

  // SimpleBlobDetector::create creates a smart pointer.
  // So you need to use arrow ( ->) instead of dot ( . )
  // detector->detect( im, keypoints);

#endif
▲ 图2.1 不同检测方法示例
※ 总 结 ※
本文对 Blob Detection Using OpenCV ( Python, C++ ) 中介绍Si
mpleBlobDetector函数的使用方法进行总结,以备今后的学习和使用。
■ 相关文献链接:
- Blob Detection Using OpenCV ( Python, C++ )
● 相关图表链接:
- 图2.1 不同检测方法示例

