使用 Stable Diffusion XL 和 SDXL LoRA、ControlNet 生成图片
Stable Diffusion Quick Kit 是一个 Stable Diffusion 模型快速部署工具包,包括了一组示例代码、服务部署脚本、前端 UI,可以帮助可以快速部署一套 Stable Diffusion 的原型服务。我们已经陆续发布了 Quick Kit 基础篇,Dreambooth 微调篇,LoRA 使用以及微调篇,文章链接请参考附录。在本文中我们将介绍如何通过 Stable Diffusion Quick Kit 加载 Stable Diffusion XL(以下简称 SDXL)和适用于 SDXL 的 Lora 模型、ControlNet 模型进行推理。
01
什么是 Stable Diffusion XL
(SDXL)
1.1 Stable Diffusion XL 概要介绍
Stable Diffusion XL 是由 Stability AI 创建的一种新的图片生成模型。和之前的 Stable Diffusion 1.5 模型相比它主要做了以下的优化或者增强:
1)对于原有 Stable Diffusion 1.5 的 U-Net,VAE,CLIP Text Encode 做了改进;
2)在原有模型基础上上增加了一个 Refiner 模型,通过 Refiner 模型来提升图片的精细程度;
3)Stability AI 先发布了 Stable Diffusion XL 0.9 测试版本,基于用户使用体验和生成图片的情况,针对性增加数据集和使用 RLHF 技术优化迭代推出 Stable Diffusion XL 1.0 正式版。
1.2 基础架构介绍
Stable Diffusion XL 是一个由 Base 模型和 Refiner 模型组成的二阶段级联扩散模型,旨在提高生成图像的质量和细节。其中,Base 模型和 Stable Diffusion 一致,具备文生图、图生图和图像 inpainting 等能力。在 Base 模型生成图像后,Refiner 模型会级联在 Base 模型之后,对 Base 模型生成的图像 Latent 特征进行进一步的精细化处理,从而提高生成图像的质量和细节。
从 Stability AI 的论文(https://arxiv.org/pdf/2307.01952.pdf)里面我们可以看到 SDXL 的 UNet 参数数量是 2.6B,远远大于 SD 1.4/1.5 的 860M,SD 2.0/2.1 的 865M。
其中增加的 Spatial Transformer Blocks(Self Attention+ Cross Attention)占了新增参数量的主要部分:
1.3 Refiner 模型
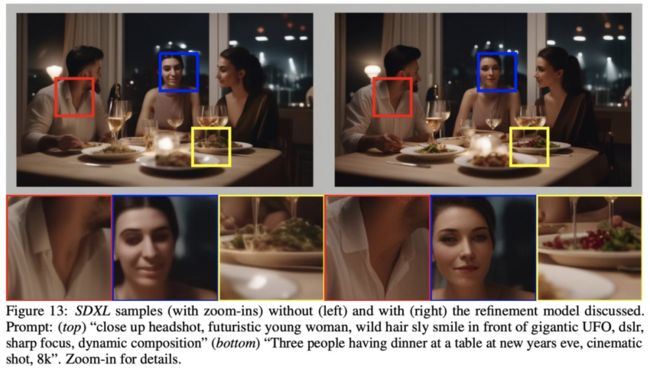
SDXL 与 SD 1.5/2.0 一个最大的不同是它提供了一个单独的 Refiner 模型,在 Stable Diffusion XL 2 阶段推理阶段,输入一个 prompt,通过 VAE 和 U-Net(Base)模型生成 Latent 特征,接着给这个 Latent 特征加一定的噪音,在此基础上,再使用 Refiner 模型进行去噪,以提升图像的整体质量与局部细节,本质上 Refiner 模型的本质就是在进行图生图的工作。
官方提供了一组 SDXL 没有使用 refiner 和使用 refiner 的对比图,可以看到使用了 refiner 后图片细节更加逼真, 以下是官方提供的图片:
02
如何在 diffusers 中使用 SDXL
在 Quick Kit 中我们使用了 HuggingFace diffusers(v0.19.3 或以上,项目链接见附录 2),在新版本中 diffusers 增加了 2 个新的 Pipeline 接口 StableDiffusionXLPipeline,StableDiffusionXLImg2ImgPipeline 用来加载 SDXL模型,同时提供了一个 StableDiffusionXLControlNetPipeline 来实现 SDXL ControlNet 模型的加载, 下面是基本代码说明:
#DiffusionPipeline
import torch
from diffusers import StableDiffusionXLPipeline, StableDiffusionXLImg2ImgPipeline


prompt = "Astronaut in a jungle, cold color palette, muted colors, detailed, 8k"


#加载SDXL base model
pipe = StableDiffusionXLPipeline.from_pretrained(
    "stabilityai/stable-diffusion-xl-base-1.0", torch_dtype=torch.float16, variant="fp16", use_safetensors=True
)
pipe.to("cuda")


image = pipe(prompt=prompt,output_type="latent").images[0]


#加载SDXL refiner model
refiner = StableDiffusionXLImg2ImgPipeline.from_pretrained(
    "stabilityai/stable-diffusion-xl-refiner-1.0", torch_dtype=torch.float16, variant="fp16", use_safetensors=True
)


#base model 输出,这里需output_type需要设置成为latent
images = pipe(prompt, output_type="latent").images
#refiner model 输出
images = refiner(prompt=prompt, image=images).images


#...images 保存处理


#controlnet模型初始化
def init_sdxl_control_net_pipeline(base_model,control_net_model):
    controlnet = ControlNetModel.from_pretrained(
            f"diffusers/controlnet-{control_net_model}-sdxl-1.0-small",
            variant="fp16",
            use_safetensors=True,
            torch_dtype=torch.float16,
        ).to("cuda")
    vae = AutoencoderKL.from_pretrained("madebyollin/sdxl-vae-fp16-fix", torch_dtype=torch.float16).to("cuda")
    pipe = StableDiffusionXLControlNetPipeline.from_pretrained(
            base_model,
            controlnet=controlnet,
            vae=vae,
            variant="fp16",
            use_safetensors=True,
            torch_dtype=torch.float16,
        ).to("cuda")
    return pipe
左滑查看更多
03
在 Quick Kit 中使用 SDXL 和 SDXL
(Kohya-style) LoRA,ControlNet
HuggingFace 的 Diffusers 目前最新版本是 0.19.3,新增加了 2 个类型 StableDiffusionXLPipeline,StableDiffusionXLImg2ImgPipeline 来匹配 SDXL 0.9/1.0 模型,同时也支持 SDXL Kohya-Style LoRA 模型,下面我们就来实际演示一下。
首先根据之前的 Stable Diffusion Quick Kit 动手实践 – 基础篇创建 SageMaker Notebook,并且使用 git 克隆最新的代码(https://github.com/aws-samples/sagemaker-stablediffusion-quick-kit),然后打开 inference/sagemaker/byoc_sdxl/中的 stable-diffusion-on-sagemaker-byoc-sdxl.ipynb。
HuggingFace 为 SDXL 提供了 Canny 和 Depth 2 个 Controlnet 模型,并且提供了 small 版本 https://huggingface.co/diffusers/controlnet-canny-sdxl-1.0-small, https://huggingface.co/diffusers/controlnet-depth-sdxl-1.0-small 比标准版本 size 小了 7 倍左右,可以在 diffusers 中快速加载。
3.1 创建 SageMaker Endpoint
在 SageMaker Notebook(stable-diffusion-on-sagemaker-byoc-sdxl.ipynb)中我们需要执行以下几个步骤:
升级 notebook 里的 boto3,sagemaker sdk(本次测试使用的版本:boto3-1.28.39 sagemaker-2.182.0)
编译 docker image,image 名字为 sdxl-inference-v2
设置推理服务参数,因为 SDXL 模型参数更大,图片默认尺寸更大(1024,1024),推荐使用 ml.g5.2xlarge,下面的具体的配置参数说明
# refiner 模型和 LoRA 模型是在推理参数中设置,这里只需要设置 base 模型
primary_container = {
    'Image': container,
    'ModelDataUrl': model_data,
    'Environment':{
        's3_bucket': bucket,
        'model_name':'stabilityai/stable-diffusion-xl-base-1.0' # 使用 SDXL 1.0 base 模型
    }
}


# InstanceType 推理服务的机器类型 ml.g5.2xlarge
response = client.create_endpoint_config(
    EndpointConfigName=endpoint_config_name,
    ProductionVariants=[
        {
            'VariantName': _variant_name,
            'ModelName': model_name,
            'InitialInstanceCount': 1,
            'InstanceType': 'ml.g5.2xlarge',
            'InitialVariantWeight': 1
        },
    ]
    ,
    AsyncInferenceConfig={
        'OutputConfig': {
            'S3OutputPath': f's3://{bucket}/stablediffusion/asyncinvoke/out/'
        }
    }
)
左滑查看更多
04
测试
SDXL 相关参数说明:
sdxl_refiner,是否开启 refiner 推理,可以设置为disable,enable
lora_name,lora_name 名字,必须是唯一的
loral_url,可以访问的 http 下载地址,可以使用 C 站下载链接
control_net_model,ControlNet 模型名字,目前支持 canny 和 depth 2 个模型
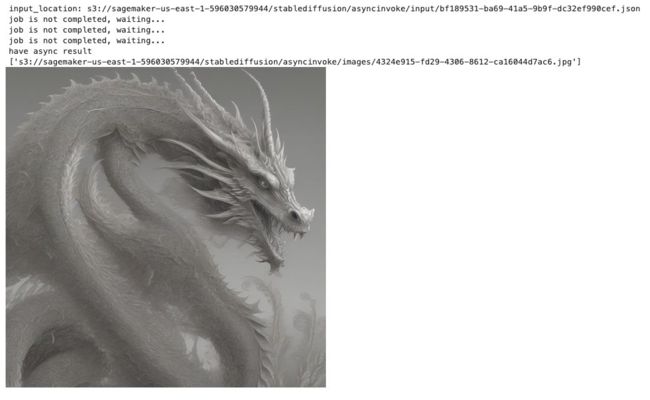
4.1 测试 SDXL 不使用 Refiner model
payload={
                    "prompt": "a fantasy creaturefractal dragon",
                    "steps":20,
                    "sampler":"euler_a",
                    "seed":43768,
                    "count":1,
                    "control_net_enable":"disable",
                    "SDXL_REFINER":"disable"
}


predict_async(endpoint_name,payload)
左滑查看更多
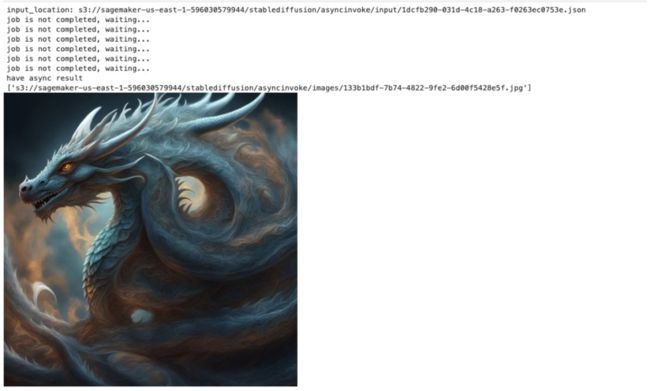
4.2 测试 SDXL 使用 Refiner model
将 4.1 中的参数 sdxl_refiner 设置为 enable 即可使用 refiner 模型。
payload={
                    "prompt": "a fantasy creaturefractal dragon",
                    "steps":20,
                    "sampler":"euler_a",
                    "seed":43768,
                    "count":1,
                    "control_net_enable":"disable",
                    "SDXL_REFINER":"enable"
}


predict_async(endpoint_name,payload)
左滑查看更多
4.3 测试 SDXL Lora
SDXL LoRA 和 之前的 SD 1.5 LoRA 模型不兼容,所以需要选择 SDXL 训练出来的的 LoRA 模型,Quick Kit 支持 LoRA 模型动态加载,这里我们选择了 C 站上的 Dragon Style LoRA 模型来进行测试。
LoRA 加载过程大致如下:后台服务解析 lora_name 和 lora_url 参数,首先在/tmp 目录中检查模型文件是否存在,如果文件不存在就使用 lora_url 下载模型并存储到/tmp 目录,首次推理需要等待 LoRA 模型下载,如果需要更换 LoRA 模型只需要在推理 request 中更改 lora_name,lora_url 参数即可。
payload={
                    "prompt": "a fantasy creaturefractal dragon",
                    "steps":20,
                    "sampler":"euler_a",
                    "count":1,
                    "control_net_enable":"disable",
                     "sdxl_refiner":"enable",
                    "lora_name":"dragon",
                    "lora_url":"https://civitai.com/api/download/models/129363"
}


predict_async(endpoint_name,payload)
左滑查看更多
4.3 测试 SDXL ControlNet
SDXL 需要使用与之匹配的 ControlNet 模型,本文中我们会测试 HuggingFace 提供的 canny 和 depth 2 个模型。
在 notebook 中我们使用使用了 HuggingFace 的例子来测试 canny 和 depth。
测试 Canny,设置 control_net_model 为“canny”。
payload={
    "prompt": "aerial view, a futuristic research complex in a bright foggy jungle, hard lighting",
    "steps":20,
    "sampler":"euler_a",
    "count":1,
    "control_net_enable":"enable",
    "sdxl_refiner":"enable",
    "control_net_model":"canny",
    "input_image":"https://huggingface.co/datasets/hf-internal-testing/diffusers-images/resolve/main/sd_controlnet/hf-logo.png"
  }


predict_async(endpoint_name,payload)
左滑查看更多
测试 Depth,设置 control_net_model 为“depth”
payload={
    "prompt": "aerial view, a futuristic research complex in a bright foggy jungle, hard lighting",
    "steps":20,
    "sampler":"euler_a",
    "count":1,
    "control_net_enable":"enable",
    "sdxl_refiner":"enable",
    "control_net_model":"depth",
    "input_image":"https://huggingface.co/datasets/hf-internal-testing/diffusers-images/resolve/main/sd_controlnet/hf-logo.png"
  }


predict_async(endpoint_name,payload)
左滑查看更多
05
总结
我们可以在 Quick Kit 中快速部署 SD XL Base 模型和 Refiner 模型推理服务,并且可以动态加载与之匹配的 LoRA 模型,也可以加载 HuggingFace 提供的 ControlNet SDXL canny 和 SDXL depth 模型。目前 diffusers 社区在迅速发展,其他 GUI 推理工具的很多特性已经通过社区贡献者的努力集成到 diffusers,但是目前还有几个重要的功能还在开发中,比如 diffusers 当前版本官方还不支持 multiple LoRA 加载,需要通过第三方脚本实现,diffusers 目前版本自带的 sampler/scheduler 和 SD WebUI 相比还比较少,这些都是我们在使用 diffusers 过程中需要注意和关注的。
参考材料
Stable Diffusion XL
https://arxiv.org/pdf/2307.01952.pdf
diffusers release note
https://github.com/huggingface/diffusers/releases
Canny Model
https://huggingface.co/diffusers/controlnet-canny-sdxl-1.0-small
Depth Model
https://huggingface.co/diffusers/controlnet-depth-sdxl-1.0-small
Stable Diffusion Quick Kit 动手实践 – 基础篇
https://aws.amazon.com/cn/blogs/china/stable-diffusion-quick-kit-hands-on-practice-basics/
Stable Diffusion Quick Kit 动手实践 – 使用 Dreambooth 进行模型微调在 SageMaker 上的优化实践
https://aws.amazon.com/cn/blogs/china/stable-diffusion-quick-kit-series-model-fine-tuning-with-dreambooth-optimization-practices-on-sagemaker/
Stable Diffusion Quick Kit 动手实践-在 SageMaker 中进行 LoRA fine tuning 及推理
https://aws.amazon.com/cn/blogs/china/lora-fine-tuning-and-reasoning-in-sagemaker/
本篇作者
粟伟
亚马逊云科技资深解决方案架构师,专注游戏行业, 开源项目爱好者,致力于云原生应用推广、落地。具有 15 年以上的信息技术行业专业经验,担任过高级软件工程师,系统架构师等职位,在加入亚马逊云科技之前曾就职于 Bea,Oracle,IBM 等公司。
严军
亚马逊云科技解决方案架构师,目前主要负责帮客户进行云架构设计和技术咨询,对容器化等技术方向有深入的了解,在云迁移方案设计和实施方面有丰富的经验。
星标不迷路,开发更极速!
关注后记得星标「亚马逊云开发者」
听说,点完下面4个按钮
就不会碰到bug了!


