腾讯数据持久化方案MMKV原理分析
提到数据持久化存储的方案,Android提供的手段有很多,在项目中常用的就是SharedPreference(简称SP),但是SP使用虽然简单,但是存在缺陷:
- 写入速度慢,尤其在主线程频繁执行写入操作易导致卡顿或者ANR;
- 不支持跨进程
因此针对这种缺陷,我们往往会换其他的技术方案,例如不能跨进程存取数据,那么就使用SQLite做数据存储,通过Provider对外提供数据,但是这种方案依然存在响应速度慢的问题,很有可能出现ANR,即便是放在了子线程中存取数据,但是依然会存在同步问题,直到MMKV的出现,好像一下就解决了上述的两个问题。
那么在文章开篇,我们通过一个小的demo验证一下SharedPreference和MMKV存储数据效率,看具体的效果如何。
object LocalStorageUtil {

    private const val TAG = "LocalStorageUtil"

    fun testSP(context: Context) {

        val sp = context.getSharedPreferences("spfile", Context.MODE_PRIVATE)
        //记录时间
        val currentTime = System.currentTimeMillis()
        for (index in 0..1000) {
            sp.edit().putInt("$index", index).apply()
        }
        Log.d(TAG, "testSP: cost ${System.currentTimeMillis() - currentTime}")
    }

    fun testMMKV(){
        val mmkv = MMKV.defaultMMKV()
        //记录时间
        val currentTime = System.currentTimeMillis()
        for (index in 0..1000) {
            mmkv.putInt("$index", index).apply()
        }
        Log.d(TAG, "testMMKV: cost ${System.currentTimeMillis() - currentTime}")
    }
}
看下耗时:
D/LocalStorageUtil: testSP: cost 182
D/LocalStorageUtil: testMMKV: cost 15
我们看到,通过MMKV存储数据的效率有SP的10倍之多,而且这只有1000次连续存储,在数据量越来越大的时候,MMKV的优势就越明显,那么接下来我们先通过分析SharedPreference的源码,有利于理解MMKV源码。
1 SharedPreference源码分析
/**
 * Retrieve and hold the contents of the preferences file 'name', returning
 * a SharedPreferences through which you can retrieve and modify its
 * values.  Only one instance of the SharedPreferences object is returned
 * to any callers for the same name, meaning they will see each other's
 * edits as soon as they are made.
 *
 * This method is thread-safe.
 *
 * If the preferences directory does not already exist, it will be created when this method
 * is called.
 *
 * If a preferences file by this name does not exist, it will be created when you retrieve an
 * editor ({@link SharedPreferences#edit()}) and then commit changes ({@link
 * SharedPreferences.Editor#commit()} or {@link SharedPreferences.Editor#apply()}).
 *
 * @param name Desired preferences file.
 * @param mode Operating mode.
 *
 * @return The single {@link SharedPreferences} instance that can be used
 *         to retrieve and modify the preference values.
 *
 * @see #MODE_PRIVATE
 */
public abstract SharedPreferences getSharedPreferences(String name, @PreferencesMode int mode);
首先我们在使用SP之前,首先会获取到SharedPreference实例,就是通过调用getSharedPreferences方法,最终返回值是SharedPreferences接口实例,具体实现类就是SharedPreferencesImpl。
1.1 SharedPreferencesImpl类分析
首先通过Context获取SharedPreferences实例时,会传入一个文件名
ContextImpl # getSharedPreferences
@Override
public SharedPreferences getSharedPreferences(String name, int mode) {
    // At least one application in the world actually passes in a null
    // name.  This happened to work because when we generated the file name
    // we would stringify it to "null.xml".  Nice.
    if (mPackageInfo.getApplicationInfo().targetSdkVersion <
            Build.VERSION_CODES.KITKAT) {
        if (name == null) {
            name = "null";
        }
    }

    File file;
    synchronized (ContextImpl.class) {
        if (mSharedPrefsPaths == null) {
            mSharedPrefsPaths = new ArrayMap<>();
        }
        file = mSharedPrefsPaths.get(name);
        if (file == null) {
            file = getSharedPreferencesPath(name);
            mSharedPrefsPaths.put(name, file);
        }
    }
    return getSharedPreferences(file, mode);
}
传入文件名之后,就会在mSharedPrefsPaths中查找是否创建过这个文件,我们可以看到mSharedPrefsPaths是一个Map,完成文件名与具体文件的映射。 如果这个文件不存在,那么就会创建一个文件,即调用getSharedPreferencesPath方法,然后将其存入mSharedPrefsPaths这个Map集合中。
@Override
public File getSharedPreferencesPath(String name) {
    return makeFilename(getPreferencesDir(), name + ".xml");
}
最终调用了另一个getSharedPreferences重载方法,在这个方法中,会拿到创建好的.xml文件构建SharedPreferencesImpl类。
public SharedPreferences getSharedPreferences(File file, int mode) {
    SharedPreferencesImpl sp;
    synchronized (ContextImpl.class) {
        final ArrayMap cache = getSharedPreferencesCacheLocked();
        sp = cache.get(file);
        if (sp == null) {
            checkMode(mode);
            if (getApplicationInfo().targetSdkVersion >= android.os.Build.VERSION_CODES.O) {
                if (isCredentialProtectedStorage()
                        && !getSystemService(UserManager.class)
                                .isUserUnlockingOrUnlocked(UserHandle.myUserId())) {
                    throw new IllegalStateException("SharedPreferences in credential encrypted "
                            + "storage are not available until after user is unlocked");
                }
            }
            sp = new SharedPreferencesImpl(file, mode);
            cache.put(file, sp);
            return sp;
        }
    }
    if ((mode & Context.MODE_MULTI_PROCESS) != 0 ||
        getApplicationInfo().targetSdkVersion < android.os.Build.VERSION_CODES.HONEYCOMB) {
        // If somebody else (some other process) changed the prefs
        // file behind our back, we reload it.  This has been the
        // historical (if undocumented) behavior.
        sp.startReloadIfChangedUnexpectedly();
    }
    return sp;
}
SharedPreferencesImpl的构造方法
SharedPreferencesImpl(File file, int mode) {
    mFile = file;
    mBackupFile = makeBackupFile(file);
    mMode = mode;
    mLoaded = false;
    mMap = null;
    mThrowable = null;
    startLoadFromDisk();
}
从SharedPreferencesImpl中的构造方法中可以看到,每次创建SharedPreferencesImpl都会调用startLoadFromDisk从磁盘中读取文件,我们看下具体实现。
private void startLoadFromDisk() {
    synchronized (mLock) {
        mLoaded = false;
    }
    new Thread("SharedPreferencesImpl-load") {
        public void run() {
            loadFromDisk();
        }
    }.start();
}
从源码中我们可以看到,是开启了一个名为SharedPreferencesImpl-load的线程去从磁盘中取文件,而且是通过new Thread这种方式,如果多次创建SharedPreferencesImpl对象,那么就会创建多个线程,会浪费系统资源。
SharedPreferencesImpl # loadFromDisk
private void loadFromDisk() {
    // ......

    // Debugging
    if (mFile.exists() && !mFile.canRead()) {
        Log.w(TAG, "Attempt to read preferences file " + mFile + " without permission");
    }

    Map map = null;
    StructStat stat = null;
    Throwable thrown = null;
    try {
        stat = Os.stat(mFile.getPath());
        if (mFile.canRead()) {
            BufferedInputStream str = null;
            try {
                str = new BufferedInputStream(
                        new FileInputStream(mFile), 16 * 1024);
                map = (Map) XmlUtils.readMapXml(str);
            } catch (Exception e) {
                Log.w(TAG, "Cannot read " + mFile.getAbsolutePath(), e);
            } finally {
                IoUtils.closeQuietly(str);
            }
        }
    } catch (ErrnoException e) {
        // An errno exception means the stat failed. Treat as empty/non-existing by
        // ignoring.
    } catch (Throwable t) {
        thrown = t;
    }

    synchronized (mLock) {
        mLoaded = true;

    // ......

}
在这个方法中,会通过BufferedInputStream(IO)从文件中读取数据,并将其转换为一个Map数据结构,其实我们通过查看文件中的数据格式,也能知道,其实就是key-value这种数据结构。
那么至此初始化的任务就完成了,这里需要注意一个同步的问题,就是加载磁盘数据时是异步的,所以有一个标志位mLoaded,在调用startLoadFromDisk时会设置为false,等到磁盘数据加载完成之后,才会设置为true。
所以这里我们需要关注几个耗时点:
- 从磁盘加载数据时,会把全量的数据加载进来,例如之前存在10_000条数据,那么也会全部读出来,因此IO读取会耗时;
- 数据读取完成之后,解析XML dom节点时也会耗时。
1.2 SharedPreference读写分析
前面我们介绍完初始化流程,接下来就是读写操作了,首先我们先看写操作;
sp.edit().putInt("$index", index).apply()
从文章开头的例子看,首先会通过SharedPreference获取到Editor对象,其实就是从SharedPreferenceImpl中获取Editor对象,对应的实现类就是EditorImpl。
SharedPreferenceImpl # EditorImpl
public final class EditorImpl implements Editor {
    private final Object mEditorLock = new Object();

    @GuardedBy("mEditorLock")
    private final Map mModified = new HashMap<>();

    @GuardedBy("mEditorLock")
    private boolean mClear = false;

    // ......

    @Override
    public Editor putInt(String key, int value) {
        synchronized (mEditorLock) {
            mModified.put(key, value);
            return this;
        }
    }
    // ......
}
在调用putInt方法时,会将其存储在HashMap中,然后可以调用apply或者commit方法将其写入文件,但是两者是有区别的。
EditorImpl # apply
@Override
public void apply() {
    final long startTime = System.currentTimeMillis();

    final MemoryCommitResult mcr = commitToMemory();
    final Runnable awaitCommit = new Runnable() {
            @Override
            public void run() {
                try {
                    mcr.writtenToDiskLatch.await();
                } catch (InterruptedException ignored) {
                }

                if (DEBUG && mcr.wasWritten) {
                    Log.d(TAG, mFile.getName() + ":" + mcr.memoryStateGeneration
                            + " applied after " + (System.currentTimeMillis() - startTime)
                            + " ms");
                }
            }
        };

    QueuedWork.addFinisher(awaitCommit);

    Runnable postWriteRunnable = new Runnable() {
            @Override
            public void run() {
                awaitCommit.run();
                QueuedWork.removeFinisher(awaitCommit);
            }
        };

    SharedPreferencesImpl.this.enqueueDiskWrite(mcr, postWriteRunnable);

    // Okay to notify the listeners before it's hit disk
    // because the listeners should always get the same
    // SharedPreferences instance back, which has the
    // changes reflected in memory.
    notifyListeners(mcr);
}
通过源码,我们看到在调用apply时写入磁盘的方式是异步的,在调用enqueueDiskWrite方法时传入了一个Runnable对象,这个时候不会阻塞主线程,但是没有写入是否成功的结果。
EditorImpl # commit
public boolean commit() {
    long startTime = 0;

    if (DEBUG) {
        startTime = System.currentTimeMillis();
    }

    MemoryCommitResult mcr = commitToMemory();

    SharedPreferencesImpl.this.enqueueDiskWrite(
        mcr, null /* sync write on this thread okay */);
    try {
        mcr.writtenToDiskLatch.await();
    } catch (InterruptedException e) {
        return false;
    } finally {
        if (DEBUG) {
            Log.d(TAG, mFile.getName() + ":" + mcr.memoryStateGeneration
                    + " committed after " + (System.currentTimeMillis() - startTime)
                    + " ms");
        }
    }
    notifyListeners(mcr);
    return mcr.writeToDiskResult;
}
而commit方法则是直接往磁盘中写数据,此时会阻塞线程直到数据写入完成,并返回写入成功或者失败的结果;所以两者具体在什么场景下调用,相信伙伴们应该能分辨的出来吧。
因为SharedPreference的读写操作依然是通过传统IO方式完成,所以这里就是一个耗时点,对于传统的读写操作涉及到应用层与Kernel的通信。

应用层只是发起读数据的指令,而真正的读写操作是在内核空间,其中传统的IO存储是两次拷贝,也是比较耗时的一种操作,如果将其换为零拷贝技术,那么就是一种极佳的优化策略,MMKV就是这么做的, 所以如果熟悉Binder通信以及mmap的伙伴可能就会明白,而不熟悉的伙伴,通过这篇文章则是会理解其中的原理。
2 mmap原理及使用
前面我们提到,在优化传统IO存储时,不想通过用户空间与内核空间上下文的调度来实现文件读写,所以就会想到mmap能够实现零拷贝读写文件,在效率上面肯定要比传统的磁盘IO要快,那么首先我们先看下mmap函数是如何使用,这里可能会涉及到C++以及JNI的知识储备。
2.1 mmap的使用
首先定义一个方法writeBymmap,在native层通过调用mmap函数实现文件的读写。
class NativeLib {

    /**
     * A native method that is implemented by the 'nativelib' native library,
     * which is packaged with this application.
     */
    external fun stringFromJNI(): String

    external fun writeBymmap(fileName:String)


    companion object {
        // Used to load the 'nativelib' library on application startup.
        init {
            System.loadLibrary("nativelib")
        }
    }
}
对于mmap函数的参数定义,我们需要了解其中的意义。
void* mmap(void* __addr, size_t __size, int __prot, int __flags, int __fd, off_t __offset);
- _addr : 指向要映射的内存起始地址,一般设置为null由系统决定,映射成功之后会返回这块内存地址;
- _size : 将文件中多大的长度映射到内存空间;
- _port : 内存保护标志 ,一般为以下四种方式 -> PROT_EXEC 映射区域可被执行 PROT_READ 映射区域可被读取 PROT_WRITE 映射区域可被写入 PROT_NONE 映射区域不能存取;
- _flags : 这块映射区域是否可以被其他进程共享,如果是私有的,那么只有当前进程可映射;如果是共享的,那么其他进程也可以获取此映射内存;
- _fd : 要映射到内存中的文件描述符,通过open函数可以获取,存储完成之后,需要调用close;
- _offset : 文件映射的偏移量,一般设置为0.
extern "C"
JNIEXPORT void JNICALL
Java_com_lay_nativelib_NativeLib_writeBymmap(JNIEnv *env, jobject thiz, jstring file_name) {

    std::string file = env->GetStringUTFChars(file_name, nullptr);
    //获取文件描述符
    int fd = open(file.c_str(), O_RDWR | O_CREAT, S_IRWXU);
    //设置文件大小
    ftruncate(fd, 4 * 1024);
    //调用mmap函数,返回的是物理映射的虚拟内存地址
    int8_t *ptr = static_cast(mmap(0, 4 * 1024, PROT_READ | PROT_WRITE, MAP_SHARED, fd,
                                             0));

    //要写入文件的内容
    std::string data("这里是要写入文件的内容");
    //用户空间可以操作这个虚拟内存地址
    memcpy(ptr, data.data(), data.size());
}
通过调用了mmap函数可以拿到磁盘映射的物理内存的虚拟地址,看下图:
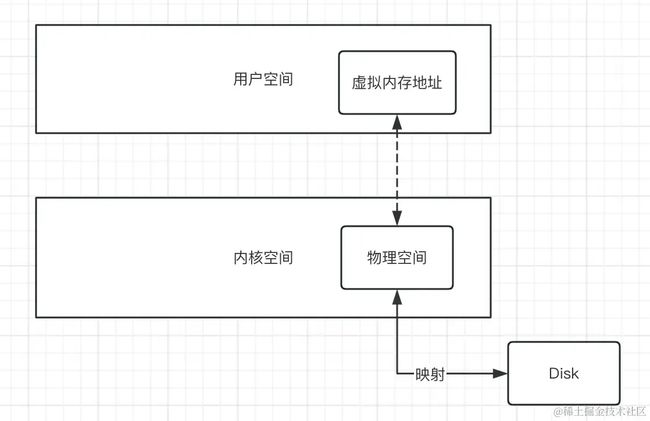
在内核空间有一块与磁盘空间映射的物理内存区域,而在用户空间是能够拿到这块物理内存的虚拟内存地址,即通过调用mmap函数获取;那么后续想要执行写入操作,那么只需要在用户空间操作虚拟内存即可,就可以将数据写入到磁盘中,不需要通过用户空间和内核空间的上下文调度,从而提高了效率。
经过测试,调用了NativeLib()的writeBymmap方法,在文件中写入了数据。
fun testMmap(fileName: String) {

    //记录时间
    val currentTime = System.currentTimeMillis()
    for (index in 0..1000) {
        NativeLib().writeBymmap(fileName)
    }
    Log.d(TAG, "testMmap: cost ${System.currentTimeMillis() - currentTime}")
}
我们可以采用这种方式计算一下,最终拿到的结果是:
D/LocalStorageUtil: testSP: cost 166
D/LocalStorageUtil: testMmap: cost 16
我们看到与MMKV的效率基本一致,但是前面我们自定义的mmap写文件方式是存在缺陷的:如果我们只想写1个字节的数据,但最终会写入4k的数据,会比较浪费内存。

2.2 跨进程读写数据
对于SharedPreference存储方式来说,无法支持跨进程读写数据,只能在单一进程存储,而如果想要实现跨进程数据存取,其实也很简单,看下图:
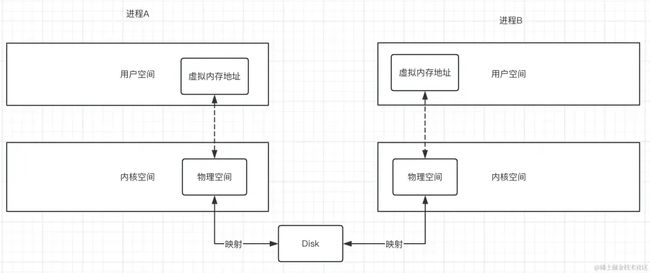
因为磁盘文件存储在手机sd卡中,在其他进程也可以通过读取文件的方式从磁盘获取,但这样又无法避免内核态到用户态的切换 ,因此通过上图看,进程A写入到磁盘数据之后,进程B也可以通过虚拟内存地址拷贝一份数据到本地,从而完成跨进程读数据。
extern "C"
JNIEXPORT jstring JNICALL
Java_com_lay_nativelib_NativeLib_getDataFromDisk(JNIEnv *env, jobject thiz, jstring file_name) {
    std::string file = env->GetStringUTFChars(file_name, nullptr);
    //获取文件描述符
    int fd = open(file.c_str(), O_RDWR | O_CREAT, S_IRWXU);
    //设置文件大小
    ftruncate(fd, 4 * 1024);
    //调用mmap函数,返回的是物理映射的虚拟内存地址
    int8_t *ptr = static_cast(mmap(0, 4 * 1024, PROT_READ | PROT_WRITE, MAP_SHARED, fd,
                                             0));
    //需要一块buffer存储数据
    char *buffer = static_cast(malloc(100));
    //将物理内存拷贝到buffer
    memcpy(buffer, ptr, 100);
    //取消映射
    munmap(ptr, 4 * 1024);
    close(fd);
    //char 转 jstring
    return env->NewStringUTF(buffer);
}
具体的调用为:
NativeLib().getDataFromDisk("/data/data/com.tal.pad.appmarket/files/NewTextFile.txt").also {
    Log.d("MainActivity", "getDataFromDisk: $it")
}
D/MainActivity: getDataFromDisk: 这里是要写入文件的内容
至此,通过mmap获取物理内存映射的虚拟内存地址后,只需要一次拷贝(memcpy)就能够实现文件的读写,而且支持跨进程的存取,这也是MMKV的核心原理。

上面这张图是从官网copy的一张图,这里显示了使用SharedPreference和MMKV的写入效率,其实为什么MMKV能够提升了几十倍的写入效率,还是得益于mmap的内存映射避免了内核态与用户态的切换,从而突破了传统IO瓶颈(二次拷贝), 从下篇文章开始,我们将会带着伙伴一起手写一套MMKV框架,能够对MMKV和mmap有更加深入的了解。
Android 学习笔录
Android 性能优化篇:https://qr18.cn/FVlo89
Android Framework底层原理篇:https://qr18.cn/AQpN4J
Android 车载篇:https://qr18.cn/F05ZCM
Android 逆向安全学习笔记:https://qr18.cn/CQ5TcL
Android 音视频篇:https://qr18.cn/Ei3VPD
Jetpack全家桶篇(内含Compose):https://qr18.cn/A0gajp
OkHttp 源码解析笔记:https://qr18.cn/Cw0pBD
Kotlin 篇:https://qr18.cn/CdjtAF
Gradle 篇:https://qr18.cn/DzrmMB
Flutter 篇:https://qr18.cn/DIvKma
Android 八大知识体:https://qr18.cn/CyxarU
Android 核心笔记:https://qr21.cn/CaZQLo
Android 往年面试题锦:https://qr18.cn/CKV8OZ
2023年最新Android 面试题集:https://qr18.cn/CgxrRy
Android 车载开发岗位面试习题:https://qr18.cn/FTlyCJ
音视频面试题锦:https://qr18.cn/AcV6Ap