Git学习笔记8
Gitlab:
Gitlab是利用Ruby on Rails 一个开源的版本管理系统,实现一个自托管的git项目仓库,可通过web界面进行访问公开或私有的项目。
Gitlab安装:
安装之前,将虚拟机的内存改成了4个G。内存如果太小,会有502的错误提示信息。
在清华源中下载gitlab-ce最新的版本:
Index of /gitlab-ce/yum/el7/ | 清华大学开源软件镜像站 | Tsinghua Open Source Mirror
gitlab安装和配置:
wget https://mirrors.tuna.tsinghua.edu.cn/gitlab-ce/yum/el7/gitlab-ce-16.2.6-ce.0.el7.x86_64.rpm
[root@git-server soft]# ll
total 1302648
-rw-r--r-- 1 root root 1333910957 Sep 13 02:04 gitlab-ce-16.2.6-ce.0.el7.x86_64.rpm
[root@git-server soft]#

[root@git-server soft]# rpm -ivh gitlab-ce-16.2.6-ce.0.el7.x86_64.rpm
warning: gitlab-ce-16.2.6-ce.0.el7.x86_64.rpm: Header V4 RSA/SHA1 Signature, key ID f27eab47: NOKEY
error: Failed dependencies:
        policycoreutils-python is needed by gitlab-ce-16.2.6-ce.0.el7.x86_64


[root@git-server soft]# yum install -y policycoreutils-python
[root@git-server soft]# rpm -ivh gitlab-ce-16.2.6-ce.0.el7.x86_64.rpm
warning: gitlab-ce-16.2.6-ce.0.el7.x86_64.rpm: Header V4 RSA/SHA1 Signature, key ID f27eab47: NOKEY
Preparing...                          ################################# [100%]
Updating / installing...
   1:gitlab-ce-16.2.6-ce.0.el7        ################################# [100%]
It looks like GitLab has not been configured yet; skipping the upgrade script.

       *.                  *.
      ***                 ***
     *****               *****
    .******             *******
    ********            ********
   ,,,,,,,,,***********,,,,,,,,,
  ,,,,,,,,,,,*********,,,,,,,,,,,
  .,,,,,,,,,,,*******,,,,,,,,,,,,
      ,,,,,,,,,*****,,,,,,,,,.
         ,,,,,,,****,,,,,,
            .,,,***,,,,
                ,*,.


     _______ __  __          __
    / ____(_) /_/ /   ____ _/ /_
   / / __/ / __/ /   / __ `/ __ \
  / /_/ / / /_/ /___/ /_/ / /_/ /
  \____/_/\__/_____/\__,_/_.___/


Thank you for installing GitLab!
GitLab was unable to detect a valid hostname for your instance.
Please configure a URL for your GitLab instance by setting `external_url`
configuration in /etc/gitlab/gitlab.rb file.
Then, you can start your GitLab instance by running the following command:
  sudo gitlab-ctl reconfigure

For a comprehensive list of configuration options please see the Omnibus GitLab readme
https://gitlab.com/gitlab-org/omnibus-gitlab/blob/master/README.md

Help us improve the installation experience, let us know how we did with a 1 minute survey:
https://gitlab.fra1.qualtrics.com/jfe/form/SV_6kVqZANThUQ1bZb?installation=omnibus&release=16-2
看上面的英文信息:
请为你的Gitlab instance 配置一个URL,通过设置external_url这一项在gitlab.rb 这个文件中。
然后再执行sudo gitlab-ctl reconfigure命令。
修改配置文件vim /etc/gitlab/gitlab.rc:
external_url 'http://192.168.17.118' # 修改为gitlab服务器的IP地址,对外服务。
初始化:gitlab-ctl reconfigure
时间比较久,需要3分钟左右的时间,会自动配置各个组件,并启动。
然后是查看状态:
gitlab-ctl status
从 /etc/gitlab/initial_root_password文件中得到密码,先登录,然后再更改下密码。
gitlab设置:
配置邮件服务的用途:
1)账号注册的时候,有邮件验证;
2)有合并请求的时候,邮件通知;
3)修改密码的时候,通过邮件修改;
Gitlab创建仓库:
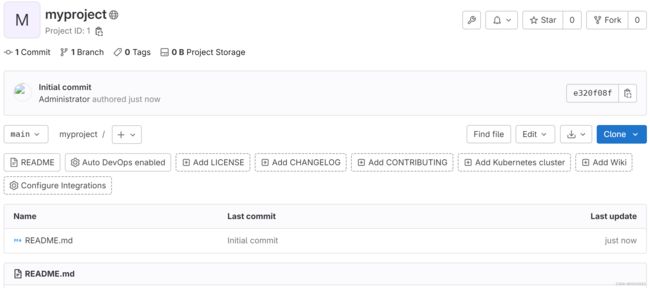
第一步:在gitlab上创建项目(其实也就是存放代码的仓库)。
第二步:自定义项目名称等信息,现在比较新的版本已经没有描述信息了:
页面的信息跟github几乎是相同的。
设置SSH配置:
直接将之前生成的公钥信息拷贝过来。
这样开发者跟gitlab也做成了免密的了。
再看下项目名称:
[root@git-server ~]# git clone [email protected]:root/myproject.git
Cloning into 'myproject'...
The authenticity of host '192.168.17.118 (192.168.17.118)' can't be established.
ECDSA key fingerprint is SHA256:4dogA08L5gdfaA69BGekE13kzSuIP2vcRp9rsqYnpn0.
ECDSA key fingerprint is MD5:93:34:b9:61:03:cd:00:92:b9:91:3d:b6:6c:7a:84:95.
Are you sure you want to continue connecting (yes/no)? yes
Warning: Permanently added '192.168.17.118' (ECDSA) to the list of known hosts.
remote: Enumerating objects: 3, done.
remote: Counting objects: 100% (3/3), done.
remote: Compressing objects: 100% (2/2), done.
remote: Total 3 (delta 0), reused 0 (delta 0), pack-reused 0
Receiving objects: 100% (3/3), done.


[root@git-server ~]# ll
total 4
-rw-------. 1 root root 1518 Sep  2 02:39 anaconda-ks.cfg
drwxr-xr-x  3 root root   54 Sep 19 12:10 GitTest
drwxr-xr-x  3 root root   35 Sep 20 00:23 myproject
drwxr-xr-x  3 root root   97 Sep 19 21:52 Shell-100-Days
drwxr-xr-x  2 root root   50 Sep 19 23:19 soft
drwxr-xr-x  3 root root   59 Sep 19 20:43 test
git clone将整个myproject项目克隆下来。
然后我们再执行代码上传。
[root@git-server myproject]# echo 111 > 1.py
[root@git-server myproject]# git add *
[root@git-server myproject]# git commit -m "Added 1.py"
[main 7686461] Added 1.py
 1 file changed, 1 insertion(+)
 create mode 100644 1.py


[root@git-server myproject]# git push -uf origin main
Counting objects: 4, done.
Delta compression using up to 2 threads.
Compressing objects: 100% (2/2), done.
Writing objects: 100% (3/3), 273 bytes | 0 bytes/s, done.
Total 3 (delta 0), reused 0 (delta 0)
To [email protected]:root/myproject.git
   e320f08..7686461  main -> main
Branch main set up to track remote branch main from origin.
是main分支,不是github上的master分支。


