Three.js(1)--->基础篇-导入3d模型
Three.js基础篇-导入3d模型
- 本篇实现效果:
- 安装/配置
- 基本概念及说明
- 代码实现
-
- 下一篇
本篇实现效果:
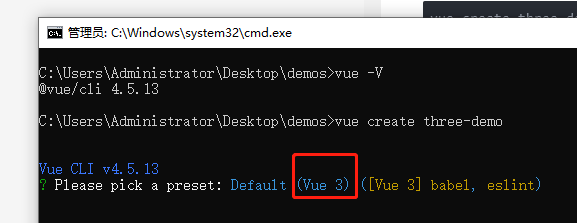
安装/配置
我们这里将使用最新的Vue3以及最新的Three.js(0.132.2)进行开发
1.使用vue-cli创建一个Vue3的项目
vue create three-demo
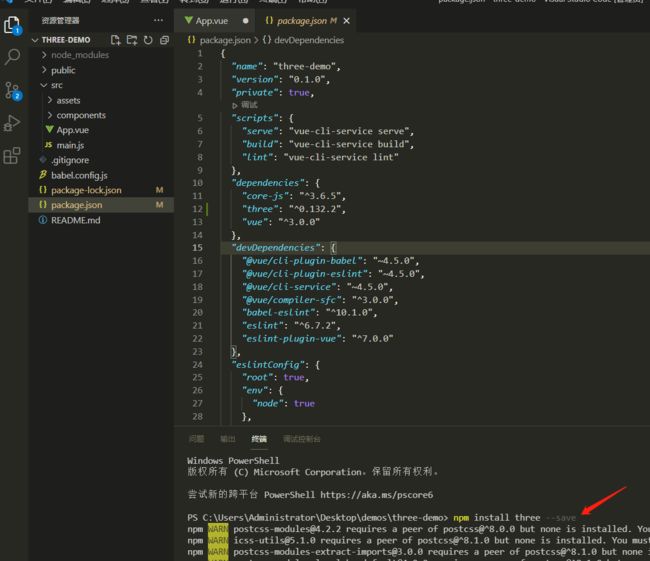
 2.在项目里安装three.js
npm install three --save
基本概念及说明
本篇文章仅适用于有vue的基础下(当然没有基础也可以跟着弄一下看一下效果)
写代码前我们需要了解一些关于three.js的基本概念(当然如果你已经了解了就不用看这段了)我们这里只粗略的介绍一下更详细的可以查看官网或者是查看大佬的详细教学文章
在Three.js中有几大必备的组件/要素(必备的):
- 场景(Scene):场景能够让你在什么地方、摆放什么东西来交给three.js来渲染,这是你放置物体、灯光和摄像机的地方。相当于我们生活中的舞台
- 相机(camera):常用的有两种(透视相机(PerspectiveCamera)和 正交相机(OrthographicCamera))关于相机的详细介绍,本篇不做深究。
- 渲染器(Renderer):渲染器就是告诉它用什么样的方式来渲染出来
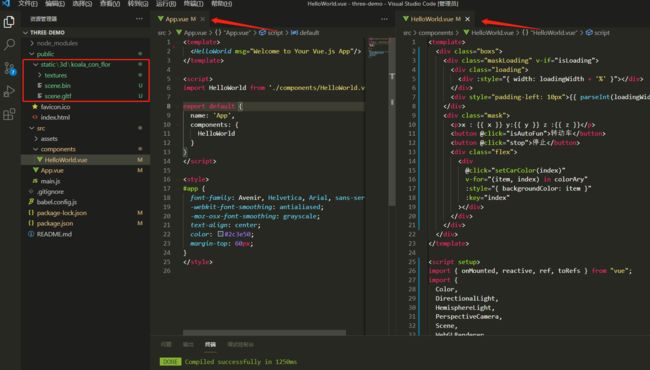
代码实现
<template>
  <div class="boxs">
    <div class="maskLoading" v-if="isLoading">
      <div class="loading">
        <div :style="{ width: loadingWidth + '%' }"></div>
      </div>
      <div style="padding-left: 10px">{{ parseInt(loadingWidth) }}%</div>
    </div>
    <div class="mask">
      <p>x : {{ x }} y:{{ y }} z :{{ z }}</p>
      <button @click="isAutoFun">转动车</button>
      <button @click="stop">停止</button>
      <div class="flex">
        <div
          @click="setCarColor(index)"
          v-for="(item, index) in colorAry"
          :style="{ backgroundColor: item }"
          :key="index"
        ></div>
      </div>
    </div>
  </div>
</template>

<script setup>
import { onMounted, reactive, ref, toRefs } from "vue";
import {
  Color,
  DirectionalLight,
  HemisphereLight,
  PerspectiveCamera,
  Scene,
  WebGLRenderer,
} from "three";
import { OrbitControls } from "three/examples/jsm/controls/OrbitControls.js";
import { GLTFLoader } from "three/examples/jsm/loaders/GLTFLoader";
//颜色数组
const colorAry = [
  "rgb(216, 27, 67)",
  "rgb(142, 36, 170)",
  "rgb(81, 45, 168)",
  "rgb(48, 63, 159)",
  "rgb(30, 136, 229)",
  "rgb(0, 137, 123)",
  "rgb(67, 160, 71)",
  "rgb(251, 192, 45)",
  "rgb(245, 124, 0)",
  "rgb(230, 74, 25)",
  "rgb(233, 30, 78)",
  "rgb(156, 39, 176)",
  "rgb(0, 0, 0)",
]; // 颜色数组
const loader = new GLTFLoader(); //引入模型的loader实例
const defaultMap = {
  x: 0,
  y: 0,
  z: 5,
}; // 相机的默认坐标
const map = reactive(defaultMap); //把相机坐标设置成可观察对象
const { x, y, z } = toRefs(map); //输出坐标给模板使用
let scene,
  camera,
  renderer,
  controls,
  directionalLight,
  hemisphereLight; // 定义所有three实例变量
let isLoading = ref(true); //是否显示loading  这个load模型监听的进度
let loadingWidth = ref(0); // loading的进度

//创建灯光
const setLight = () => {
  directionalLight = new DirectionalLight(0xffffff, 0.9);
  directionalLight.position.set(-4, 8, 4);
  hemisphereLight = new HemisphereLight(0xffffff, 0xffffff, 0.8);
  hemisphereLight.position.set(0, 8, 0);
  scene.add(directionalLight);
  scene.add(hemisphereLight);
};

// 创建场景
const setScene = () => {
  scene = new Scene();
  renderer = new WebGLRenderer();
  renderer.setSize(innerWidth, innerHeight);
  document.querySelector(".boxs").appendChild(renderer.domElement);
};

// 创建相机
const setCamera = () => {
  const { x, y, z } = defaultMap;
  camera = new PerspectiveCamera(60, innerWidth / innerHeight, 1, 1000);
  camera.position.set(x, y, z);
};

// 设置模型控制
const setControls = () => {
  controls = new OrbitControls(camera, renderer.domElement);
  // controls.maxPolarAngle = (0.9 * Math.PI) / 2;
  controls.enableZoom = true;
  controls.addEventListener("change", render);
};

//返回坐标信息
const render = () => {
  map.x = Number.parseInt(camera.position.x);
  map.y = Number.parseInt(camera.position.y);
  map.z = Number.parseInt(camera.position.z);
};

// 循环场景 、相机、 位置更新
const loop = () => {
  requestAnimationFrame(loop);
  renderer.render(scene, camera);
  controls.update();
};

//是否自动转动
const isAutoFun = () => {
  controls.autoRotate = true;
};
//停止转动
const stop = () => {
  controls.autoRotate = false;
};

//设置颜色
const setCarColor = (index) => {
  const currentColor = new Color(colorAry[index]);
  scene.traverse((child) => {
    if (child.isMesh) {
      console.log(child.name);
      if (child.name.includes("mesh_0")) {
        child.material.color.set(currentColor);
      }
    }
  });
};

const loadFile = (url) => {
  return new Promise((resolve, reject) => {
    loader.load(
      url,
      (gltf) => {
        resolve(gltf);
      },
      ({ loaded, total }) => {
        let load = Math.abs((loaded / total) * 100);
        loadingWidth.value = load;
        if (load >= 100) {
          setTimeout(() => {
            isLoading.value = false;
          }, 1000);
        }
        console.log((loaded / total) * 100 + "% loaded");
      },
      (err) => {
        reject(err);
      }
    );
  });
};

//初始化所有函数
const init = async () => {
  setScene();
  setCamera();
  setLight();
  setControls();
  const gltf = await loadFile("/static/3d/koala_con_flor/scene.gltf");
  scene.add(gltf.scene);
  loop();
};
//用vue钩子函数调用
onMounted(init);
</script>

<style>
body {
  margin: 0;
}

.maskLoading {
  background: #000;
  position: fixed;
  display: flex;
  justify-content: center;
  align-items: center;
  top: 0;
  left: 0;
  bottom: 0;
  right: 0;
  z-index: 1111111;
  color: #fff;
}

.maskLoading .loading {
  width: 400px;
  height: 20px;
  border: 1px solid #fff;
  background: #000;
  overflow: hidden;
  border-radius: 10px;
}

.maskLoading .loading div {
  background: #fff;
  height: 20px;
  width: 0;
  transition-duration: 500ms;
  transition-timing-function: ease-in;
}

canvas {
  width: 100%;
  height: 100%;
  margin: auto;
}

.mask {
  color: #fff;
  position: absolute;
  bottom: 0;
  left: 0;
  width: 100%;
}

.flex {
  display: flex;
  flex-wrap: wrap;
  padding: 20px;
}

.flex div {
  width: 10px;
  height: 10px;
  margin: 5px;
  cursor: pointer;
}
</style>
项目结构图:
代码地址:demo-1
下一篇
相关文档及资源链接:
文档:
https://threejs.org/docs/index.html#manual/zh/introduction/Creating-a-scene(官方文档)
https://threejsfundamentals.org/threejs/lessons/zh_cn/threejs-fundamentals.html(大佬的教学文档)
https://blog.csdn.net/oqqeric61495217/article/details/118601732?spm=1001.2014.3001.5501(参考文章)
资源:
https://sketchfab.com(模型下载)