二、怎么简单使用vuex
目录
-
- 前提步骤:
- 正式开始vuex的相关操作:
-
- 一、安装vuex:
- 二、项目配置VUEX:
- 三、创建相关文件:
-
- 1、state
- 2、getters
- 3、mutations
- 4、actions
- 5、modules
前提步骤:
1、 搭建一个vue2项目
2、 修改App.vue文件;修改App.vue组件里面引入的子组件内容(在src文件夹下新建pages文件夹,新建index.vue页面,以供使用);
正式开始vuex的相关操作:
一、安装vuex:
npm install vuex --save
注意,以上的命令安装的会是最新版本的。如果没有指定版本,npm会默认获取最新版本。但是vue2.0只能安装vuex3.x版本,最高3.6.2,vue3.0才能装vuex4.x版本。因此如果是vue2项目要指定版本:
npm install [email protected] --save
二、项目配置VUEX:
项目src目录下创建store目录,并在store下创建index.js,初始化Vuex。
三、创建相关文件:
1、state
概念:
state:存储应用状态数据的对象,与vue中data类似
步骤:
(1)比如创建state.js文件的内容如下:
export default {
    state1: "状态1"
}
(2)在store文件夹下的index.js文件下引入:
import Vue from 'vue'
import Vuex from 'vuex'
Vue.use(Vuex)

import state from '@/store/state.js'

const store = new Vuex.Store({
    // 用来存入状态
    state: state
})

export default store
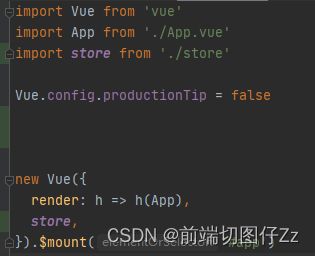
(3)接下来,将store挂载到vue实例中,在src文件夹下的main.js文件中添加:
…
import store from './store'
new Vue({
  …
  store,
}).$mount('#app')
(4)在组件中使用vuex。可直接使用或者使用辅助函数
1>直接使用:this.$store.state.xxx
<template>
    <div>
        状态数据1:{{this.$store.state.state1}}
	div>
template>
2>使用辅助函数:mapState
<template>
    <div>
        状态数据1:{{state1}}
    div>
template>

<script>
   import { mapState } from 'vuex'
    export default {
       computed:{
           ...mapState(['state1']) // 使用对象展开运算符将此对象混入到外部对象中
       }
       // 没使用对象展开运算符的写法为:
       // computed: mapState(['state1'])
    }
script>
2、getters
概念:
getters: 类似vue的计算属性,store中数据的变化,getters的数据也会发生变化
步骤:
(1)创建getters.js文件内容可如下:
export default {
  numSum:(state)=>{
    var sum=0;
    for(var i=0; i<state.numbers.length; i++){
      sum +=state.numbers[i]
    }
    return sum;
  }
}
(2)在store文件夹下的index.js文件下引入(参照引入state.js)
(3)将store挂载到vue实例中(state已经实现了这步操作)
(4)在组件中使用(参考state里面数据的使用,使用辅助函数mapGetters也类似)
3、mutations
概念:
mutations: 提交mutation来修改store中的状态,同步操作
步骤:
(1)创建mutations.js文件内容可如下:
export default {
    mutEditStat1(state){
        state.state1 = '状态111改变了'
    }
}
(2)在store文件夹下的index.js文件下引入(参照引入state.js)
(3)将store挂载到vue实例中(state已经实现了这步操作)
(4)在组件中使用:
1>直接使用:
<template>
    <div>
        {{state1}}
        <button @click="update1()">点击改变状态button>
    div>
template>

<script>
    export default {
        methods: {
            update1(){
               this.$store.commit('mutEditStat1') // 唤醒一个 mutation 处理函数mutEditStat1
            }
        }
    }
script>
2>使用mapMutations辅助函数:
<template>
    <div>
        {{state1}}
        <button @click="update1()">点击改变状态button>
    div>
template>

<script>
import { mapMutations } from 'vuex'
    export default {
        methods: {
			...mapMutations(['mutEditStat1']),
            update1(){
               this.mutEditStat1()
			 }
        }
    }
script>
若带有参数,
Mutations文件内容可如下:
export default {
    mutEditStat2(state,req){
	    state.state2="状态2" + req;
	}
}
其它内容和无参数的内容一样,只是在用的时候传参:
update3(){
    this.mutEditStat2('传参过来的')
}
4、actions
概念:
actions:与mutations类似,提交修改state的行为,处理异步任务(提交的是mutation,不是直接修改状态)
步骤:
(1)创建ations.js文件内容可如下:
export default {
    actEditStat1(context){
        setTimeout(()=>{
            context.commit("mutEditStat1")
        }, 3000)  //我们此时就可以在 action 内部执行异步操作了,解决mutation 必须同步执行的问题
    }
	// 带参数
	actEditStat1(context,num){
	      setTimeout(()=>{
	        context.commit("mutEditStat1")
	      }, 3000)
	    console.log(num)
	}

}
(2)在store文件夹下的index.js文件下引入(参照引入state.js)
(3)将store挂载到vue实例中(state已经实现了这步操作)
(4)在组件中使用:
1>直接使用:
<template>
    <div>
        {{state1}}
        <button @click="update()">actions提交mutation更新状态button>

    div>
template>

<script>
    export default {
        methods: {
         update(){
			this.$store.dispatch('actEditStat1') //分发 Action。Action 通过 store.dispatch 方法触发
			// 若是带参数:
			// this.$store.dispatch('actEditStat1',22)
          }
        }
    }
script>
使用mapActions辅助函数:
<template>
    <div>
        {{state1}}
        <button @click="update1()">点击改变状态button>
    div>
template>

<script>
import { mapActions } from 'vuex'
    export default {
        methods: {
			...mapActions(['actEditStat1']),  // `this.mutEditStat1()` 映射为 `this.$store.commit('mutEditStat1')`
            update1(){
               this.actEditStat1()
 			}
        }
    }
script>
注意: mutation 必须是同步函数
辅助函数总结:
mapState和mapGetters写在computed中,mapMutations和mapActions写在methods中
5、modules
概念:
modules:模块化状态管理,为了开发大型项目,方便状态管理而使用的
使用后目录大概如下:

模块内内容没变化,主要需要修改的index.js文件内容:
import Vue from 'vue'
import Vuex from 'vuex'
Vue.use(Vuex)

import userInfo from '@/store/modules/userInfo.js'
import shopCart from '@/store/modules/shopCart.js'

export default new Vuex.Store({
  state: {},
  getters: {},
  mutations: {},
  actions: {},
  modules:{
    userInfo,
    shopCart
  }
})
shopCart.js文件内容:
import state from '@/store/modules/shopCart/state.js'
import getters from '@/store/modules/shopCart/getters.js'
import mutations from '@/store/modules/shopCart/mutations.js'
import actions from '@/store/modules/shopCart/actions.js'

export default {
  namespaced: true, //开启命名空间

  state:state,

  getters: getters,

  mutations: mutations,

  actions: actions
}
userInfo.js文件内容类似。自行修改。
组件中使用示例1:
export default {
  methods: {
    login(){
      if(this.$store.state.userInfo.isLogin){ // modules中直接使用state: this.$store.state.模块名.xxx;
        this.$store.commit('userInfo/logout'); // modules中直接使用mutations:this.$store.commit('模块名/mutation名', 参数);
      }else{
        this.$store.commit('userInfo/login');
      }
    }
  },
}
示例2:
computed:{
  	// modules中使用mapState辅助函数:
	// computed: {
	//       ...mapState('模块名', ['xxx']),
	//       ...mapState('模块名', {'新名字': 'xxx'})
	// }
    ...mapState({
      userInfo:state=>state.userInfo
    })

  },
示例3:
 computed:{
 	// modules中使用mapGetters辅助函数:
	// computed: {
	//       ...mapGetters('模块名', ['xxx']),
	//       ...mapGetters('模块名', {'新名字': 'xxx'})
	// }
    ...mapGetters("shopCart", {   // 对象形式
      countGoods: "countGoods"
    }),
  },

