sersync实现数据实时同步
seRsync实现数据实时同步
环境准备:
10.0.0.8 客户端
10.0.0.18 服务器端
第一步:安装
在服务器端18上安装:dnf -y install rsync-daemon (安装守护进程,自动提供services文件)

写入配置
[root@Centos18 ~]#vim /etc/rsyncd.conf
uid = root
gid = root
max connections = 0
ignore errors
exclude = lost+found/
log file = /var/log/rsyncd.log
pid file = /var/run/rsyncd.pid
lock file = /var/run/rsyncd.lock
reverse lookup = no
[backup]
path = /data/backup/
comment = backup dir
read only = no
auth users = rsyncuser
secrets file = /etc/rsync.pas
建立backup
[root@Centos18 ~]#mkdir /data/backup/

由于用户和组都是root 所以不需要改权限
#创建连接rsynd服务器的用户密码文件,并必须修改权限生成密码:
[root@Centos8 ~]#echo "rsyncuser:123456" > /etc/rsync.pas
[root@Centos8 ~]#cat /etc/rsync.pas
rsyncuser:123456
chmod 600 /etc/rsync.pas
由于之前services已经配置启动
只需要 设置 systemctl enable --now rsyncd 可以看到873端口已经启动

#客户端8上需要安装rsync
[root@Centos8 ~]#yum -y install rsync
先在8 测试看看 能不能远程看到18的共享连接
[root@Centos18 ~]#rsync rsync://10.0.0.18
[root@Centos18 ~]#rsync rsync://[email protected]/backup
[root@Centos8 ~]#rsync anaconda-ks.cfg rsync://[email protected]/backup
[root@Centos18 ~]#ls /data/backup/
anaconda-ks.cfg
[root@Centos8 ~]#echo 123456 > /etc/rsync.pas
[root@Centos8 ~]#chmod 600 /etc/rsync.pas
[root@Centos8 ~]#rsync --password-file=/etc/rsync.pas  rsync://[email protected]/backup
drwxr-xr-x             29 2021/06/05 09:04:31 .
-rw-------          1,475 2021/06/05 09:04:31 anaconda-ks.cfg
root@Centos8 ~]#rsync --password-file=/etc/rsync.pas  [email protected]::backup
drwxr-xr-x             29 2021/06/05 09:04:31 .
-rw-------          1,475 2021/06/05 09:04:31 anaconda-ks.cf
至此:客户端的rsync设置完成,可以拷贝数据到服务器
#在客户端8 安装sersync来实现同步;
实验前我这已经下载好直接rz上传
![]()
![]()
然后执行解压;
[root@Centos8 ~]#tar -xf sersync2.5.4_64bit_binary_stable_final.tar.gz
将GNU-Linux-x86移动到local下 并且改名为sersync
[root@Centos8 ~]#mv GNU-Linux-x86/ /usr/local/sersync
[root@Centos8 ~]#ln -s /usr/local/sersync/sersync2 /usr/bin/
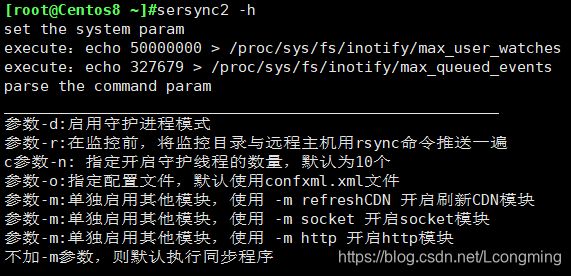
查看sersync命令的帮助:
[root@Centos8 ~]#sersync2 -h
[root@Centos8 sersync]#mkdir /data/www/

修改sersync配置文件
```php
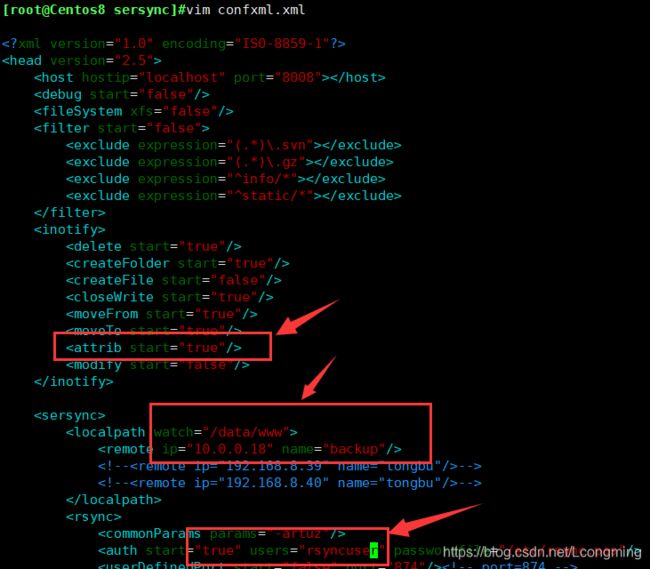
[root@Centos8 sersync]#vim confxml.xml
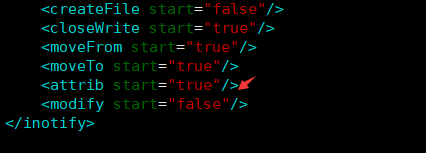
#修改此行为true,文件属性变化后也会同步:

#修改此行,需要同步的源目录或文件,建议同步目录

#修改此行为true,指定备份服务器的rsync配置的用户和密码文件

第二步:测试;
首先查看18服务器端
![]()
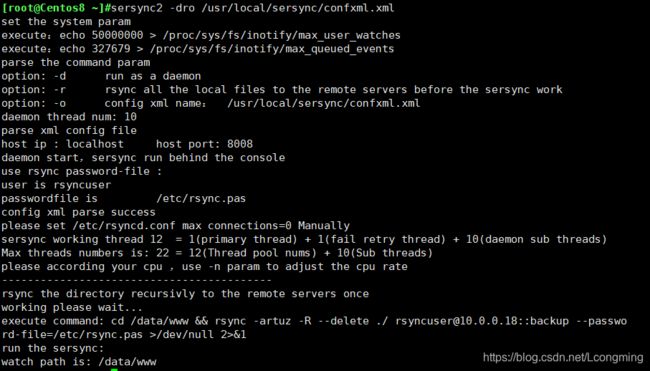
在8上运行 先同步一次运行:sersync2 -dro /usr/local/sersync/confxml.xml

执行后查看,已经没有数据了

继续测试
在服务器端18 执行
[root@Centos18 ~]#watch -n0.5 ls -l /data/backup/
[root@Centos8 sersync]#chmod 000 /data/www/f1.tx
[root@Centos8 sersync]#mv /data/www/f1.txt /data/www/f2.txt
dd if=/dev/zero of=/data/www/f3.img bs=1M count=100
易错点
第一个易错点:
个人感觉这个实验的易错点是 建立软链接这步
因为只有一个二进制程序
放进path变量 或者直接建立软链接 都是可以的
echo 'PATH=/usr/local/sersync:$PATH' > /etc/profile.d/sersync.sh
source /etc/profile.d/sersync.s                  #这是设置变量
ln -s /usr/local/sersync/sersync2  /usr/bin/     #设置软链接
第二个易错点:在设置/etc/rsyncd.conf文本这一步,对于初学者来说,要严格检查每一个间隔
第三个易错点:在设置 confxml.xml文本这一步:要更改的只有三个方框里面。

人生艰难,且行且努力


