flash builder_使用Flash Builder进行数据驱动的开发,第一部分
flash builder
In the first instalment in this series we learned how to import mockup artwork into Adobe Flash Catalyst, and start converting the various elements into working components. By the end of that exercise, we had a living, breathing prototype of a simple contact application that we could run in Adobe Flash Catalyst and interact with.
在本系列的第一部分中,我们学习了如何将模型图稿导入Adobe Flash Catalyst,并开始将各种元素转换为工作组件。 在该练习结束时,我们有了一个简单而生动的原型,该原型可以在Adobe Flash Catalyst中运行并与之交互。
This article will show you how to take the next step: moving from Adobe Flash Catalyst to Adobe Flash Builder. We’ll use the Data Driven Development features of Adobe Flash Builder to integrate our Flash Builder application with PHP, and rapidly create CRUD services to support our fledgling application.
本文将向您展示如何进行下一步:从Adobe Flash Catalyst迁移到Adobe Flash Builder。 我们将使用Adobe Flash Builder的数据驱动开发功能将Flash Builder应用程序与PHP集成在一起,并快速创建CRUD服务以支持我们刚刚起步的应用程序。
I’ll assume you have basic familiarity with the Eclipse platform: as long as you understand perspectives, editors, and views you should be fine. Some initial familiarity with Flex and MXML is also assumed. You should have PHP and MySQL running on a local web server, and be comfortable creating databases and tables and adding data to them.
我假设您对Eclipse平台有基本的了解:只要您了解透视图,编辑器和视图,就可以了。 还假定最初对Flex和MXML有一定的了解。 您应该在本地Web服务器上运行PHP和MySQL,并乐于创建数据库和表并向其中添加数据。
To follow along, you should have the Flex project we created in the last tutorial. That project, as well as a completed version that includes all the code we’ll be adding, are contained in the sample code archive for this article. Should you want to look at the finished project, you’ll still need to set up a PHP/MySQL data source as outlined in the section called “Set Up PHP Connections”. I’d recommend just using the start.fxp file and working through the tutorial step by step, as you’ll gain a better understanding of how to connect to a data source from a Flex project.
要继续学习,您应该拥有我们在上一个教程中创建的Flex项目。 该项目以及包含我们将要添加的所有代码的完整版本都包含在本文的示例代码档案中 。 如果您想查看完成的项目,则仍然需要按照“设置PHP连接”部分中的概述设置PHP / MySQL数据源。 我建议您仅使用start.fxp文件并逐步完成本教程,因为您将更好地了解如何从Flex项目连接到数据源。
After reading the article, be sure to test yourself in our Article quiz, sponsored by Adobe!
阅读文章后,请确保在 Adobe赞助的文章测验中测试自己 !
项目回顾 (Project Recap)
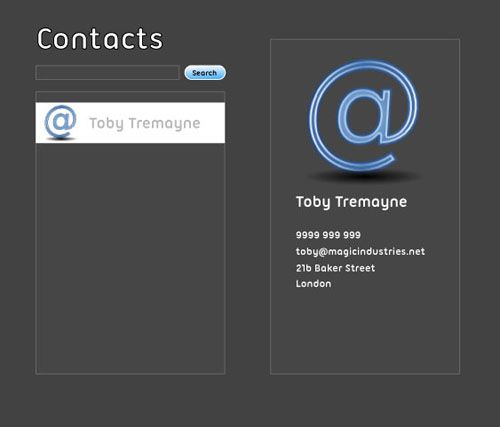
In the first article, we began building a very simple contact list application that provides a contact list, search box, and contact view pane, as shown in Figure 1, “Contact application mockup”.
在第一篇文章中 ,我们开始构建一个非常简单的联系人列表应用程序,该应用程序提供联系人列表,搜索框和联系人视图窗格, 如图1“联系人应用程序模型”所示 。
Figure 1. Contact application mockup
图1.联系应用程序模型
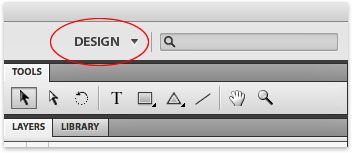
If we load up our Flash Catalyst project, we can take a look at the code that’s been generated for us. Click on the Workspaces pop-up menu shown in Figure 2, “Design workspace”. This menu allows you to switch between design and code workspaces. It will say DESIGN.
如果加载Flash Catalyst项目,我们可以看看为我们生成的代码。 单击工作空间弹出菜单, 如图2“设计工作空间”所示 。 此菜单使您可以在设计工作区和代码工作区之间切换。 它会说DESIGN 。
Figure 2. Design workspace
图2.设计工作区
Click on it and switch to the CODE workspace. If you expand the PROJECT NAVIGATOR panel on the right-hand side, you’ll see the various packages, skins, and classes that Flash Catalyst has generated for us. Take a moment to poke through them and get used to the package layout.
单击它并切换到CODE工作区。 如果在右侧展开PROJECT NAVIGATOR面板,您将看到Flash Catalyst为我们生成的各种程序包,外观和类。 花点时间戳一下它们,并习惯于包装的布局。
从Catalyst迁移到Flash Builder (Moving from Catalyst to Flash Builder)
Flash Catalyst and Flash Builder share a common project file format, which allows us to easily switch between the two. Follow these steps to get your project up and running in Flash Builder.
Flash Catalyst和Flash Builder共享一种通用的项目文件格式,这使我们可以轻松地在两者之间进行切换。 请按照以下步骤操作,以使您的项目在Flash Builder中启动并运行。
Open Flash Builder.
打开Flash Builder。
Click on the File menu and choose Import Flex Project (FXP)….
单击文件菜单,然后选择导入Flex项目(FXP)… 。
Make sure the File: option is selected, then click the corresponding Browse… button.
确保选择了File:选项,然后单击相应的Browse ...按钮。
Navigate to the location where you saved the catalyst project file (the file is named
start.fxpif you downloaded it from the link at the beginning of this article), select it, and click OK.导航到保存催化剂项目文件的位置(如果您从本文开头的链接中下载了文件,则名为
start.fxp),选择它,然后单击OK 。
创建数据库 (Create the Database)
To make our contact application useful, we need an actual database in which to store our contact data. All we need for now is a single table to hold contact records, so simply create a new database named contacts in MySQL, and use this script to create the contact table:
为了使我们的联系人应用程序有用,我们需要一个实际的数据库来存储我们的联系人数据。 现在,我们只需要一个表来保存联系人记录,因此只需在MySQL中创建一个名为contacts的新数据库,然后使用此脚本创建contact表即可:
CREATE TABLE contact ( contact_id int(11) NOT NULL AUTO_INCREMENT, first_name varchar(20) NOT NULL, last_name varchar(20) NOT NULL, phone varchar(20) DEFAULT NULL, email varchar(150) DEFAULT NULL, address1 varchar(30) DEFAULT NULL, address2 varchar(30) DEFAULT NULL, state varchar(10) DEFAULT NULL, city varchar(20) DEFAULT NULL, country varchar(20) DEFAULT NULL, postcode varchar(10) DEFAULT NULL, PRIMARY KEY (contact_id)) ENGINE=MyISAM DEFAULT CHARSET=latin1;
We’re going to be using Flash Builder’s functionality to connect to this database, so add a user for this database by executing the following command in MySQL:
我们将使用Flash Builder的功能连接到该数据库,因此,可以通过在MySQL中执行以下命令来为此数据库添加一个用户:
grant all on contacts.* to fb@'127.0.0.1' identified by 'catalyst2';
设置PHP连接 (Set Up PHP Connections)
The next step is to get Flash Builder configured to connect to PHP.
下一步是将Flash Builder配置为连接到PHP。
In the Package Explorer panel of Flash Builder, right-click on your new project. From the context menu, choose Properties. When the Properties dialog appears, choose Flex Server from the items on the left hand side, and configure the options to match those shown in Figure 3, “Flex Server settings”.
在Flash Builder的Package Explorer面板中,右键单击新项目。 从上下文菜单中,选择“ 属性” 。 出现“ 属性”对话框时,从左侧的项目中选择“ Flex Server” ,然后配置选项以使其与图3“ Flex Server设置”中显示的选项匹配。
Figure 3. Flex Server settings
图3. Flex服务器设置

You will need to change the web root and root URL to match your PHP setup—use the Validate Configuration button to make sure Flash Builder can connect to the location you give it. When it’s all working, click OK to save your settings.
您将需要更改Web根目录和根URL,以匹配您PHP设置-使用“ 验证配置”按钮来确保Flash Builder可以连接到您指定的位置。 一切正常后,单击“ 确定”保存您的设置。
翻译自: https://www.sitepoint.com/data-development-flash-builder-part-1/
flash builder