springboot整合rabbitmq完成公众号发送消息
springboot整合rabbitmq完成公众号发送消息
1、下载rabbitmq
可以采用brew下载
brew install rabbitmq
可能会出现问题,没有请忽略
fatal: not in a git directory Error: Command failed with exit 128: git
解决方式:
分别执行,执行完成后然后重新:brew install rabbitmq
git config --global --add safe.directory /opt/homebrew/Library/Taps/homebrew/homebrew-core
git config --global --add safe.directory /opt/homebrew/Library/Taps/homebrew/homebrew-cask
2、查看rabbitmq是否成功
执行rabbitmq-server 如出现下面图说明成功启动

3、编写代码
3.1 导入pom依赖
    4.0.0

    org.example
    whispers
    1.0-SNAPSHOT

        org.springframework.boot
        spring-boot-starter-parent
        2.3.9.RELEASE


        8
        8
        UTF-8
        Hoxton.SR10


                com.baomidou
                mybatis-plus-boot-starter
                3.2.0


            org.projectlombok
            lombok
            1.18.26


            org.springframework.boot
            spring-boot-starter-web
            2.3.9.RELEASE


            mysql
            mysql-connector-java
            8.0.13


            com.alibaba
            fastjson
            1.2.71


            org.springframework.cloud
            spring-cloud-starter-bus-amqp
            2.2.3.RELEASE
3.2 application.yml文件配置
spring:
  datasource:
    url: jdbc:mysql://localhost:3306/whisper?useSSL=false&serverTimezone=UTC&allowPublicKeyRetrieval=true
    username: root
    password: 123456
    driver-class-name: com.mysql.jdbc.Driver
  rabbitmq:
    host: 127.0.0.1
    username: test
    port: 5672
    virtual-host: /whhx
    password: 123456

server:
  port: 9999
mybatis:
  mapper-locations:
    - classpath:/mapper/*.xml
wx:
  app-id: wxaa64d0c144ca81b5
  app-secret: fcb7b645ecb419b5e55868706dd842d5
  token-url: https://api.weixin.qq.com/cgi-bin/token?grant_type=client_credential&appid=%s&secret=%s
  message-url: https://api.weixin.qq.com/cgi-bin/message/template/send?access_token=%s

management:
  health:
    rabbit:
      enabled: false
3.3 新建MqSendMsgConfig配置类
package com.xxx.config;

import com.xxx.constant.QueueConstant;
import org.springframework.amqp.core.Binding;
import org.springframework.amqp.core.BindingBuilder;
import org.springframework.amqp.core.DirectExchange;
import org.springframework.amqp.core.Queue;
import org.springframework.context.annotation.Bean;
import org.springframework.context.annotation.Configuration;

@Configuration
public class MqSendMsgConfig {

    // 微信消息队列
    @Bean
    public Queue sendWxQueue(){
        return new Queue(QueueConstant.WX_SEND_QUEUE);
    }

    @Bean
    public DirectExchange sendWxEx(){
        return new DirectExchange(QueueConstant.WX_SEND_EX);
    }

    @Bean
    public Binding sendWxBind(){
        return BindingBuilder.bind(sendWxQueue()).to(sendWxEx()).with(QueueConstant.WX_SEND_KEY);
    }
}
3.4 新建WxAutoConfiguration配置类
package com.xxx.config;

import com.alibaba.fastjson.JSONObject;
import lombok.extern.slf4j.Slf4j;
import org.springframework.beans.factory.annotation.Autowired;
import org.springframework.boot.context.properties.EnableConfigurationProperties;
import org.springframework.context.annotation.Configuration;
import org.springframework.scheduling.annotation.Scheduled;
import org.springframework.util.StringUtils;
import org.springframework.web.client.RestTemplate;

import javax.annotation.PostConstruct;

@Configuration
@EnableConfigurationProperties(value = WxProperties.class)
@Slf4j
public class WxAutoConfiguration {

    @Autowired
    private RestTemplate restTemplate;

    private String wxAccessToken;

    /**
     * spring实现注解规范:方法在所有的Bean对象创建之后, 项目启动完成之前执行
     * 限制:不能有返回值,也不能有参数
     */
    @PostConstruct
    public void tokenInit(){
        getAccessToken();
    }

    @Scheduled(initialDelay = 0, fixedRate = 7100 * 1000)
    public void getAccessToken(){
        String url = String.format("https://api.weixin.qq.com/cgi-bin/token?grant_type=client_credential&appid=%s&secret=%s", "wxaa64d0c144ca81b5", "d81bb0ef2dc54f1754e7d2eef91df3f1");
        String accessTokenJsonStr = restTemplate.getForObject(url, String.class);
        JSONObject accessTokenJson = JSONObject.parseObject(accessTokenJsonStr);
        String accessToken = accessTokenJson.getString("access_token");
        if (!StringUtils.isEmpty(accessToken)){
            wxAccessToken = accessToken;
        }else {
            log.error("获取access_token失败");
        }

    }

    public String getWxAccessToken() {
        return wxAccessToken;
    }

    public void setWxAccessToken(String wxAccessToken) {
        this.wxAccessToken = wxAccessToken;
    }

}
3.5 新建WxProperties配置类
package com.xxx.config;

import lombok.Data;
import org.springframework.boot.context.properties.ConfigurationProperties;

@Data
@ConfigurationProperties(prefix = "wx")
public class WxProperties {

    private String appID;

    private String appSecret;

    private String accessTokenUrl;

    private String sendMsgUrl;

}
3.6 新建QueueConstant接口
package com.xxx.constant;

public interface QueueConstant {

    /**
     * 发送微信消息的队列
     */
    String WX_SEND_QUEUE = "wx.send.queue";

    /**
     * 发送微信消息的交换机
     */
    String WX_SEND_EX = "wx.send.ex";

    /**
     * 发送微信消息的路由key
     */
    String WX_SEND_KEY = "wx.send.key";

}
3.7 新建controller
  @PostMapping("p/sms/sendWxMsg")
    public ResponseEntity sendWxMsg(@RequestBody OpenIdName openIdName){
        userService.sendWxMsg(openIdName.getOpenId(), openIdName.getUserName());
        return ResponseEntity.ok().build();

    }
3.8 新建OpenIdName类
package com.xxx.entity;

import lombok.AllArgsConstructor;
import lombok.Data;
import lombok.NoArgsConstructor;

@Data
@AllArgsConstructor
@NoArgsConstructor
public class OpenIdName {

    private String openId;

    private String userName;
}
3.9 新建service实现类
package com.xxx.service.impl;


import com.alibaba.fastjson.JSON;
import com.baomidou.mybatisplus.extension.service.impl.ServiceImpl;
import com.xxx.constant.QueueConstant;
import com.xxx.entity.User;
import com.xxx.mapper.UserMapper;
import com.xxx.model.WxMsgModel;
import com.xxx.service.UserService;
import org.springframework.amqp.rabbit.core.RabbitTemplate;
import org.springframework.beans.factory.annotation.Autowired;
import org.springframework.stereotype.Service;

import java.util.Date;
import java.util.HashMap;
import java.util.Map;

@Service
public class UserServiceImpl extends ServiceImpl implements UserService {

    @Autowired
    private RabbitTemplate rabbitTemplate;


    /**
     * 发送微信消息
     *
     * @param openId
     * @param name
     */
    @Override
    public void sendWxMsg(String openId, String name) {
        WxMsgModel wxMsgModel = new WxMsgModel();
        wxMsgModel.setToUser(openId);
        wxMsgModel.setTemplateId("ByimXumDgKGmfDlqGPA2kgYCQK36hqGZy8e5KkCU2Dg");
        wxMsgModel.setUrl("https://www.baidu.com");
        wxMsgModel.setTopColor("#FF0000");

        HashMap> data = new HashMap<>();
        data.put("userName", WxMsgModel.buildMap(name, "#173177"));
        data.put("time", WxMsgModel.buildMap(new Date().toString(), "173177"));
        data.put("product", WxMsgModel.buildMap("女朋友", "173177"));
        data.put("money", WxMsgModel.buildMap("0.1", "173177"));
        wxMsgModel.setData(data);

        //用mq发送消息
        rabbitTemplate.convertAndSend(QueueConstant.WX_SEND_EX, QueueConstant.WX_SEND_KEY, JSON.toJSONString(wxMsgModel));
    }
}
3.10 新建service接口
    /**
     * 发送微信消息
     * @param openId
     * @param name
     */
    void sendWxMsg(String openId, String name);
3.11 新建WxMsgModel类
package com.xxx.model;

import com.fasterxml.jackson.annotation.JsonProperty;
import lombok.AllArgsConstructor;
import lombok.Data;
import lombok.NoArgsConstructor;

import java.util.HashMap;
import java.util.Map;

@Data
@NoArgsConstructor
@AllArgsConstructor
public class WxMsgModel {

    // 注意使用的@JsonProperty
    @JsonProperty(value = "touser")
    private String toUser;

    @JsonProperty(value = "template_id")
    private String templateId;

    @JsonProperty(value = "url")
    private String url;

    @JsonProperty(value = "topcolor")
    private String topColor;

    @JsonProperty(value = "data")
    private Map> data;

    public static Map buildMap(String value, String color){
        HashMap hashMap = new HashMap<>();
        hashMap.put("value", value);
        hashMap.put("color", color);
        return hashMap;
    }
}
3.12 新建监听器
package com.xxx.listener;

import com.alibaba.fastjson.JSONObject;
import com.rabbitmq.client.Channel;
import org.springframework.amqp.core.Message;
import com.xxx.config.WxAutoConfiguration;
import com.xxx.config.WxProperties;
import com.xxx.constant.QueueConstant;
import com.xxx.model.WxMsgModel;
import lombok.extern.slf4j.Slf4j;
import org.springframework.amqp.rabbit.annotation.RabbitListener;
import org.springframework.beans.factory.annotation.Autowired;
import org.springframework.stereotype.Component;
import org.springframework.web.client.RestTemplate;

@Component
@Slf4j
public class WxListener {

    @Autowired
    private WxProperties wxProperties;

    @Autowired
    private WxAutoConfiguration wxAutoConfiguration;

    @Autowired
    private RestTemplate restTemplate;


    /**
     * 处理微信公众号消息
     */
    @RabbitListener(queues = QueueConstant.WX_SEND_QUEUE, concurrency = "3-5")
    public void wxHandler(Message message, Channel channel){
        String msgStr = new String(message.getBody());
        WxMsgModel wxMsgModel = JSONObject.parseObject(msgStr, WxMsgModel.class);
        try {
            String response = sendWxMsg(wxMsgModel);
            log.info("发送微信公众号消息成功");
            channel.basicAck(message.getMessageProperties().getDeliveryTag(), false);

        } catch (Exception e){
            log.error("发送微信公众号消息失败");
        }
    }

    /**
     * 发送微信消息
     */
    private String sendWxMsg(WxMsgModel wxMsgModel){
        String accessTokenUrl = "https://api.weixin.qq.com/cgi-bin/message/template/send?access_token=%s";
        String wxAccessToken = wxAutoConfiguration.getWxAccessToken();
        String url = String.format(accessTokenUrl, wxAccessToken);
        return restTemplate.postForObject(url, wxMsgModel, String.class);
    }
}
3.13 启动类
package com.xxx;

import org.mybatis.spring.annotation.MapperScan;
import org.springframework.boot.SpringApplication;
import org.springframework.boot.autoconfigure.SpringBootApplication;
import org.springframework.context.annotation.Bean;
import org.springframework.scheduling.annotation.EnableScheduling;
import org.springframework.web.client.RestTemplate;

@SpringBootApplication
@MapperScan(basePackages = "com.xxx.mapper")
@EnableScheduling
public class WhisperServiceApplication {

    public static void main(String[] args) {
        SpringApplication.run(WhisperServiceApplication.class,args);
    }

    @Bean
    public RestTemplate restTemplate(){
        return new RestTemplate();
    }

}
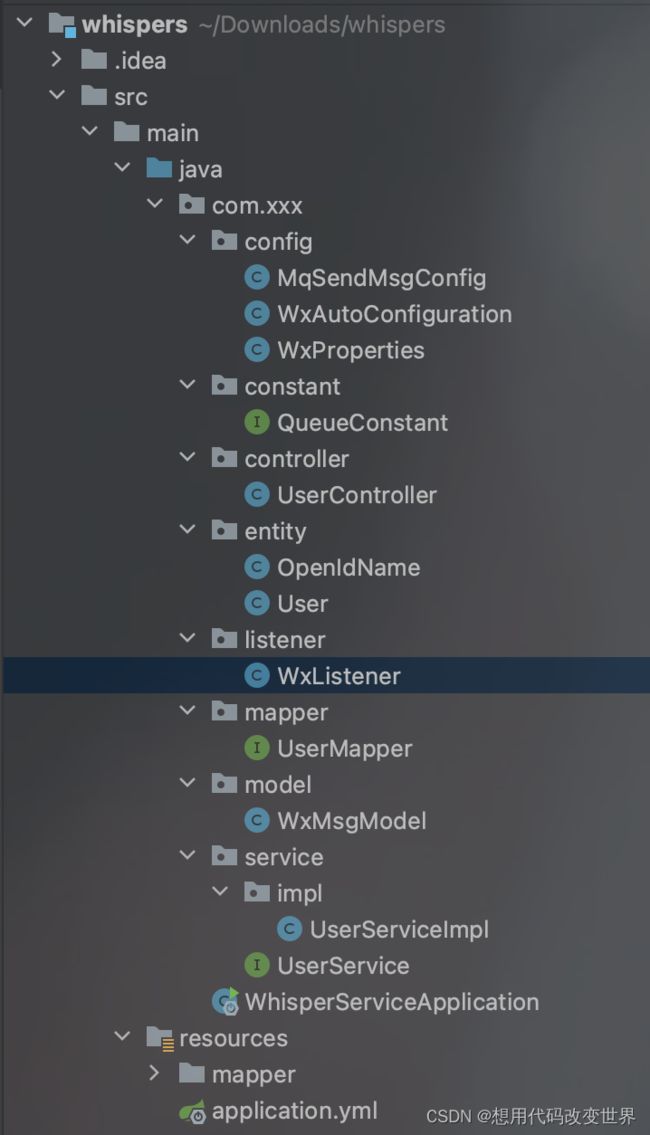
4、整体项目图片 (user相关的可以忽略)
本项目是在一个demo上继续开发的,和user相关的可以不用管

5、rabbitmq的页面
页面输入网址:http://localhost:15672
登录账号密码:guest
5.1 项目启动会出现的问题
1、An unexpected connection driver error occured
2、Restarting Consumer@43f3c557: tags=[[]], channel=null, acknowledgeMode=AUTO
等等,不管出现啥问题,和mq相关的一般都是mq连接不上,这个时候需要在页面里面新建test测试账号
可以参考链接:https://blog.csdn.net/theRengar/article/details/118933418。 很简单的
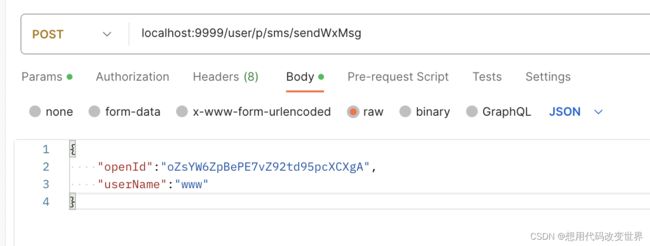
6、项目启动测试
可以用debug的方式测试,这边消息一经发送,监听器那边就会立马拿到消息,然后进行消费。请添加图片描述


