SpringBoot 学习笔记(九)SpringBoot整合MySQL和MyBatis
一、整合MySQL
这里我们使用JdbcTemplate连接MySQL
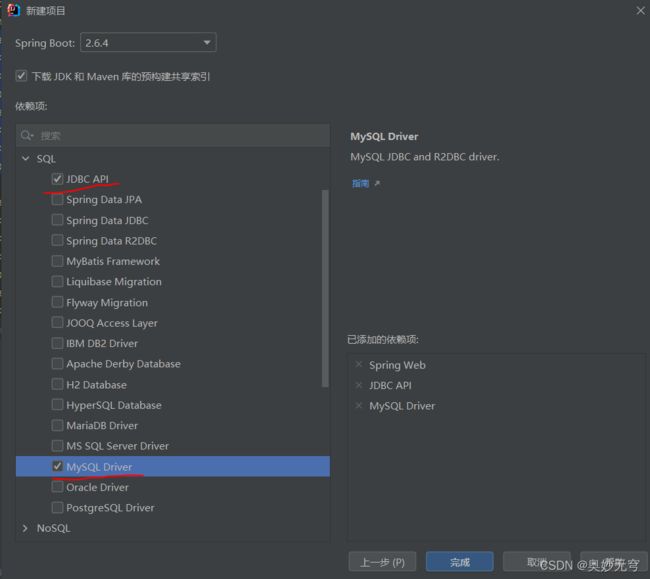
- 引入依赖
        <dependency>
            <groupId>org.springframework.boot</groupId>
            <artifactId>spring-boot-starter-jdbc</artifactId>
        </dependency>
        <dependency>
            <groupId>org.springframework.boot</groupId>
            <artifactId>spring-boot-starter-web</artifactId>
        </dependency>
- 添加数据库配置
在application.yml(也就是application.properties改个名)文件中添加配置
spring:
  datasource:
    #MySQL连接信息,后面一连串的是用于解决时区时间差报错问题
    url: jdbc:mysql://localhost:3306/test?useUnicode=true&characterEncoding=UTF-8&serverTimezone=UTC
    #账号
    username: root
    #密码
    password: 642724890
    #驱动类
    driver-class-name: com.mysql.jdbc.Driver

server:
  port: 8082
- 设计表和实体User
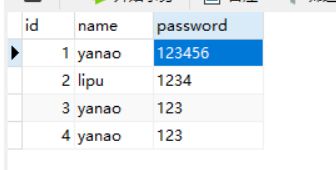
建一个数据库Test,然后再建一个user表,然后加三个属性,数据自己编哈
package com.example.demomysqlmybatis.entity;

public class User {
    private int id;
    private String name;
    private String password;

    public User(int id, String name, String password) {
        this.id = id;
        this.name = name;
        this.password = password;
    }

    public User() {
    }

    public int getId() {
        return id;
    }

    public void setId(int id) {
        this.id = id;
    }

    public String getName() {
        return name;
    }

    public void setName(String name) {
        this.name = name;
    }

    public String getPassword() {
        return password;
    }

    public void setPassword(String password) {
        this.password = password;
    }

    @Override
    public String toString() {
        return "User{" +
                "id=" + id +
                ", name='" + name + '\'' +
                ", password='" + password + '\'' +
                '}';
    }
}
- 控制层UserController类
package com.example.demomysqlmybatis.Controller;

import com.example.demomysqlmybatis.entity.User;
import org.springframework.beans.factory.annotation.Autowired;
import org.springframework.jdbc.core.JdbcTemplate;
import org.springframework.jdbc.core.RowMapper;
import org.springframework.stereotype.Controller;
import org.springframework.web.bind.annotation.RequestMapping;
import org.springframework.web.bind.annotation.ResponseBody;

import java.sql.ResultSet;
import java.sql.SQLException;
import java.util.List;

@Controller
public class UserController {
    @Autowired
    JdbcTemplate jdbcTemplate;

    @ResponseBody
    @RequestMapping("/list")
    public List mySqlTest(){
        String sql="select * from user";
        //query()是JdbcTemplate对象中的方法,RowMapper对象可以查询数据库中的数据,此处将函数作为参数
        //此处可替换为lambda,lambda表达式可简单理解为前端的箭头函数
        List<User> users=jdbcTemplate.query(sql,new RowMapper<User>(){
            @Override
            //RowMapper对象通过调用mapRow()方法将数据库中的每一行数据封装成User对象,并返回
            public User mapRow(ResultSet rs, int i)throws SQLException{
                User user=new User();
                user.setId(rs.getInt("id"));
                user.setName(rs.getString("name"));
                user.setPassword(rs.getString("password"));
                return user;
            }
        });
        System.out.println("查询成功:"+users);
        return users;
    }
}
二、整合MyBatis
- 添加依赖
pom.xml
        <dependency>
            <groupId>org.springframework.boot</groupId>
            <artifactId>spring-boot-starter-web</artifactId>
        </dependency>
        <dependency>
            <groupId>org.mybatis.spring.boot</groupId>
            <artifactId>mybatis-spring-boot-starter</artifactId>
            <version>2.2.2</version>
        </dependency>
- 设计表和实体类
跟上面是一个表和实体类User
- 配置文件
application.yml
#基本属性
spring:
  datasource:
    #MySQL连接信息,后面一连串的是用于解决时区时间差报错问题
    url: jdbc:mysql://localhost:3306/test?useUnicode=true&characterEncoding=UTF-8&serverTimezone=UTC
    #账号
    username: root
    #密码
    password: 642724890
    #驱动类
    driver-class-name: com.mysql.cj.jdbc.Driver

#MyBatis的相关配置
mybatis:
  #Mapper映射XML文件,建议写在resources目录下
  mapper-locations: classpath:mappers/*.xml
  #Mapper接口存放的目录
  type-aliases-package: com.example.demo.Mapper
  #开启驼峰命名
  configuration:
    map-underscore-to-camel-case: true

server:
  port: 8082
- Mapper接口
创建Mapper文件夹和UserMapper接口
package com.example.demo.Mapper;

import com.example.demo.entity.User;
import org.apache.ibatis.annotations.Mapper;

import java.util.List;

@Mapper
public interface UserMapper {
    List<User> findAll();
    int addUser(User user);
}
- Mapper映射
在resources中创建mapper目录,并创建UserMapper.xml文件
<?xml version="1.0" encoding="UTF-8" ?>
<!DOCTYPE mapper PUBLIC "-//mybatis.org//DTD Mapper 3.0//EN"
        "http://mybatis.org/dtd/mybatis-3-mapper.dtd">
<mapper namespace="com.example.demo.Mapper.UserMapper">
    <resultMap id="UserResult" type="com.example.demo.entity.User">
        <id column="id" property="id"></id>
        <result column="name" property="name"></result>
        <result column="password" property="password"></result>
    </resultMap>
    <select id="findAll" resultMap="UserResult">
        SELECT * FROM user
    </select>
    <insert id="addUser" parameterType="com.example.demo.entity.User">
        INSERT INTO user(name,password) values(#{name},#{password})
    </insert>
</mapper>
- Service和Controller
UserService类
package com.example.demo.Service;

import com.example.demo.Mapper.UserMapper;
import com.example.demo.entity.User;
import org.springframework.beans.factory.annotation.Autowired;
import org.springframework.stereotype.Service;

import java.util.List;

@Service
public class UserService {
    @Autowired
    private UserMapper userMapper;

    public List<User> findAll(){
        return userMapper.findAll();
    }

    public int addUser(User user){
        return userMapper.addUser(user);
    }
}
UserController类
package com.example.demo.Controller;

import com.example.demo.Service.UserService;
import com.example.demo.entity.User;
import org.springframework.beans.factory.annotation.Autowired;
import org.springframework.jdbc.core.JdbcTemplate;
import org.springframework.jdbc.core.RowMapper;
import org.springframework.web.bind.annotation.PostMapping;
import org.springframework.web.bind.annotation.RequestMapping;
import org.springframework.web.bind.annotation.ResponseBody;
import org.springframework.web.bind.annotation.RestController;

import java.sql.ResultSet;
import java.sql.SQLException;
import java.util.List;

@RestController
@RequestMapping("/user")
public class UserController {
//    @Autowired
//    JdbcTemplate jdbcTemplate;
//
//    @ResponseBody
//    @RequestMapping("/list")
//    public List mySqlTest(){
//        String sql="select * from user";
//        //query()是JdbcTemplate对象中的方法,RowMapper对象可以查询数据库中的数据,此处将函数作为参数
//        //此处可替换为lambda,lambda表达式可简单理解为前端的箭头函数
//        List users=jdbcTemplate.query(sql,new RowMapper(){
//            @Override
//            //RowMapper对象通过调用mapRow()方法将数据库中的每一行数据封装成User对象,并返回
//            public User mapRow(ResultSet rs, int i)throws SQLException{
//                User user=new User();
//                user.setId(rs.getInt("id"));
//                user.setName(rs.getString("name"));
//                user.setPassword(rs.getString("password"));
//                return user;
//            }
//        });
//        System.out.println("查询成功:"+users);
//        return users;
//    }

    @Autowired
    private UserService userService;
    @RequestMapping("/findAll")
    public List<User> findAll(){
        return userService.findAll();
    }
    @PostMapping("/add")
    public String add(User user){
        int i= userService.addUser(user);
        if(i>0){
            return "success";
        }
        return "fail";
    }
}


