Spring笔记一
1.绪论
1) 怎么样的架构的程序,我们认为是一个优秀的架构?
答:可维护性好,可扩展性好,性能高.
可扩展性好: 就是可以做到在原来代码基础上,不断增加代码,但是可以不修改原来的代码.
2) 什么样的程序可以叫做可维护性好,可扩展性好?
答:高内聚,低耦合
高内聚: 就是尽量将代码写在与之功能描述一致的模块.例如User表的操作写在UserDao里面就不用写在非UserDao的类里面
低耦合 : 就是尽量减少类与类之间的直接关系.(重点)
Spring框架就是通过IOC(控制反转)实现程序的解耦.从而提高程序的可维护性和扩展性.
2.Spring概述
2.1 Spring是什么
Spring是一个JavaEE轻量级的一站式开发框架.
JavaEE : 就是用于开发B/S的程序.(企业级)
轻量级 : 使用最少的代码启动框架,然后根据你的需求选择,选择你需要的模块使用.
重量级 : 早期的EJB,缺点: 开发一个HelloWord程序需要引入EJB的全部模块.
一站式 : 提供了表示层(Strus2 /SpringMVC ),服务层,持久层的所有支持
2.2 Spring框架出现的历史背景
在世界第一套有Java官方Sun公司推出的企业级开发框架EJB出现后,瞬间风靡全球。被各大公司所应用。
Spring之父,Rod Jonhson是一个音乐博士,在Sun公司的大力推广下,也成为EJB框架的使用者。
在深入研究完EJB框架(由Sun主导开发的一个JavaEE开发框架),无法接收这么一个框架被吹成世界第一,具体查看他吐槽EJB的书《Expert one on one J2EE design and development》
其中突出被他吐槽最厉害的一个点就EJB的重量级,就是只要使用EJB里面任何一个组件。都要将所有EJB的jar导进去。
于是他就提供了一个他的解决方案:轻量级的一站式企业开发框架。
那么什么是轻量级呢?
就是除内核模块(4个jar),其他模块由开发者自由选择使用,同时支持整合其他框架。
也可以称为就是可插拔式开发框架,像插头和插座一样,插上就用。这就是Spring框架核心理念。(Ioc)
那么什么是一站式呢?
就是Spring框架提供涵盖了JavaEE开发的表示层,服务层,持久层的所有组件功能。也就是说,原则上,学完一套Spring框架,不用其他框架就可以完成网站一条流程的开发。
如图:

2.3 Spring框架的作用
根据以上章节的描述,Spring是一个JavaEE一站式的开发框架.它提供的功能涵盖了JavaEE程序中的表示层,服务层,持久层功能组件.这意味着,
使用了Spring框架,一个框架就可以满足整个JavaEE程序的开发.
但Spring框架,更加强调的是它的轻量级(模块的可插拔)!!也就是说,除了内核以外的模块,如果你不想使用就可以不用,
它能够整合任何第三方的框架.
所以,在现实开发中,Spring主要用于整合其他框架.
2.4 Spring框架的总结
1.Spring是一个一站式的企业级(JavaEE)开发框架,意味着仅仅使用一个Spring框架就可以满足JavaEE开发的表示层,服务层,持久层的开发
2.Spring强调的理念是,轻量级.意味着Spring提供的功能模块,除了内核模块以外,开发人员可以选择性使用.
3.所以,Spring框架在现实开发中,主要的功能用于整合,各种框架来开发项目.
2.5 Spring框架包
Spring官方网站:
| https://spring.io/ |
2.5.1 框架包的下载
spring官方提供的Maven方式的项目下载
| https://start.spring.io/ |
但是基于简单入门的原则,我们要通过导入包的方式来学习。需要下载框架的zip包
路径为:http://repo.springsource.org/libs-release-local/org/springframework/spring/
2.5.2 目录说明
根目录:

类库规则:

包说明:
| 包名 |
说明 |
| spring-aop-4.3.2.RELEASE.jar |
实现了AOP的支持 |
| spring-aspects-4.3.2.RELEASE.jar |
AOP框架aspects支持包 |
| spring-beans-4.3.2.RELEASE.jar |
内核支撑包,实现了处理基于xml对象存取 |
| spring-context-4.3.2.RELEASE.jar |
内核支撑包,实现了Spring对象容器 |
| spring-context-support-4.3.2.RELEASE.jar |
容器操作扩展包,扩展了一些常用的容器对象的设置功能 |
| spring-core-4.3.2.RELEASE.jar |
内核支撑包,Spring的内核 |
| spring-expression-4.3.2.RELEASE.jar |
内核支撑包,实现了xml对Spring表达式的支持 |
| spring-instrument-4.3.2.RELEASE.jar |
提供了一些类加载的的工具类 |
| spring-instrument-tomcat-4.3.2.RELEASE.jar |
提供了一些tomcat类加载的的工具类,实现对应Tomcat服务的调用 |
| spring-jdbc-4.3.2.RELEASE.jar |
SpringJDBC实现包,一个操作数据库持久层的子框架 |
| spring-jms-4.3.2.RELEASE.jar |
集成jms的支持,jms:Java消息服务。 |
| spring-messaging-4.3.2.RELEASE.jar |
集成messaging api和消息协议提供支持 |
| spring-orm-4.3.2.RELEASE.jar |
ORM框架集成包,实现了Hibernate,IBatis,JDO的集成。 |
| spring-oxm-4.3.2.RELEASE.jar |
Spring OXM对主流O/X Mapping框架做了一个统一的抽象和封装。就是对应XML读写框架的支持 |
| spring-test-4.3.2.RELEASE.jar |
Spring集成JUnit测试 |
| spring-tx-4.3.2.RELEASE.jar |
事务代理的支持 |
| spring-web-4.3.2.RELEASE.jar |
SpringWeb通用模块 |
| spring-webmvc-4.3.2.RELEASE.jar |
SpringMVC子框架 |
| spring-webmvc-portlet-4.3.2.RELEASE.jar |
Spring对门户技术(portlet)的支持 |
| spring-websocket-4.3.2.RELEASE.jar |
Spring对websocket的支持 |
3.Spring入门实例
Spring之所以可以实现模块的可插拔是支持依赖注入,所谓的依赖注入/控制反转就是不用new就可以创建对象
需求 : 使用Spring框架不用new创建一个对象
3.1 Spring框架包

1 创建一个普通的类.
2 创建一个Spring的配置文件,用于描述类与类之间的关系
3 创建ApplicationContext容器对象根据Spring配置文件的描述,将对象创建并且放在Spring容器里面
4 使用ApplicationContext 容器对象的getBean方法,调用Spring容器里面的对象.
3.2 Spring框架配置步骤说明
1 导入包
2 创建一个普通类
3 创建一个Spring配置文件(去官方文档上拷贝约束)
4 编写一个测试类,使用ApplicationContext的子类对象根据配置文件创建容器,并且在容器里面获得创建的对象
3.3 Spring框架配置步骤
3.3.1 第一步 : 搭建环境
1 创建一个Java项目

选中创建

创建目录结构:
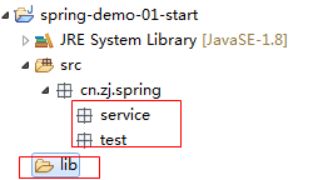
2.导入包,String的基础支撑包和依赖的日志包复制到lib文件下,并且加入项目中
---导入Spring基础支撑包

--导入Spring依赖的日志包
![]()
3.3.2 第二步 : 搭建配置文件
1在项目的src下面创建配置文件applicationContext.xml中完成配置文件的约束,约束查找位置(Spring框架/docs/spring-framework-reference/html/beans.html)
1 23 xmlns:xsi="http://www.w3.org/2001/XMLSchema-instance" 4 xsi:schemaLocation="http://www.springframework.org/schema/beans 5 http://www.springframework.org/schema/beans/spring-beans.xsd"> 6 7 8
3.3.3 第三步 : 创建对象到容器里面
1 创建一个类
package com.zj.service;

public class HelloWorldService {

    public void say(){
        System.out.println("--你好世界!--");
    }

}
2 applicationContext.xml配置文件加入配置
class="com.zj.service.HelloWorldService">
3 测试使用getBean获得容器中的对象
package com.zj.test;

import org.junit.Test;
import org.springframework.context.support.ClassPathXmlApplicationContext;

import com.zj.service.HelloWorldService;

public class HelloWorldServiceTest {

    @Test
    public void say(){
        //创建一个ApplicationContext对象,根据xml配置创建一个对象
        //直接读取Spring的src目录下的配置文件的子类是ClassPathXmlApplicationContext
        ApplicationContext context=new ClassPathXmlApplicationContext("applicationContext.xml");
        HelloWorldService helloWorldService = context.getBean("helloWorldService", HelloWorldService.class);
        //调用方法
        helloWorldService.say();
    }
}
通过代码得到,Spring框架果然不用new就可以创建对象.
3.4 Eclipse提示xml文件语法
2.手动关联约束window->preferences |

3.5 Spring容器的两个实现

ClassPathXmlApplicationContext:通过classpath路径直接获得加载的xml文件(推荐使用)
FileSystemXmlApplicationContext:通过文件路径来获得加载的xml文件。

3.6 ApplicationContext类图结构图(了解)
Spring框架容器对象的继承体系

通过结构图可以看到,Spring容器顶级接口是BeanFactory,ApplicationContext是它的子接口。
4.Spring的IOC控制反转和依赖注入-重点-spring核心之一
IOC: Inverse of Control(控制反转) :
读作:"反转控制",为了更好地理解,他不是什么技术,而是一种设计思想,好比于MVC.就是将原本在程序中手动创建对象的控制权,交由spring框架来管理.
正控 : 若调用者需要使用某个对象,其自身就得负责该对象的创建.
反控 : 调用者只管负责从Spring容器中获得需要使用的对象,不关心对象的创建过程,也就是把创建对象的控制权反转给了Spring框架.
(Don’t call me ,I’ll call you)
DI: Dependency Injection(依赖注入)
从字面上分析:
IOC:指对象的创建权,反转给了Spring容器;
DI : 指Spring创建对象的过程中,将对象依赖属性(简单值,集合,对象)通过配置设置给该对象.
IOC和DI其实是同一个概念的不同角度描述,DI相对于IOC而言,明确描述了"被注入对象IOC容器配置依赖对象".
Container : 容器,在生活中容器就是一一种盛放东西的器皿,从程序设计的角度看做是装对象,因为存在对象对象的存入,取出等操作,所以容器还要关丽丽对象的生命周期

4.1. IoC(控制反转)的概述
Spring号称是一个可以实现模块可插拔的JavaEE开发框架。那么它是如何实现程序的可插拔的呢?
实现程序可以插拔的核心理念就是,控制反转(Inversion of Control,英文缩写为IoC)
所谓的控制反转,就是将代码的调用权从调用方转移给被调用方(服务提供方)。
如图所示:
- 强耦合调用方式
将A调用B的对象修改为C类的对象,修改的是调用方的代码,所以我们认为代码的调用权在调用方。
|
|
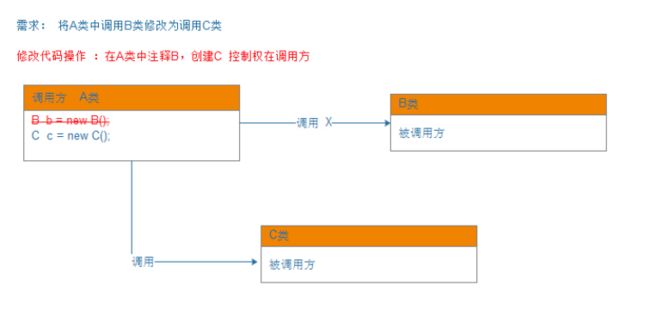
- 基于IoC(控制反转)的调用方式
将上图的需求,修改为使用Ioc的调用代码方式。就是将代码的控制权从调用方修改为被调用方,意味着,代码的调用权转移给被调用方(我们也称为服务方),不用修改调用方的的代码
只要修改配置文件就实现对象的切换。
如下图:将A类调用B类的对象修改为C类的对象,修改的是被调用方的配置文件的代码,所以代码的调用权转移到了被调用方。通过控制反转,我们可以实现增加模块或者移除模块统一由配置文件关联,增加或者移除模块,配置XML配置文件即可。
我们将代码的调用权(控制权)从调用方转移给被调用方(服务提供方)的设计模式称为控制反转(IoC)
|
|

根据上图可以的得出,实现一个IoC的框架,必须要解决两个问题:
1.被调用方(服务方),在程序启动时就要创建好对象,放在一个容器里面。
2.调用方使用一个接口或类的引用(不用使用new),就可以创建获得对象。
我们将这种不用new,而是根据接口或者类的引用就可以从被调用的容器里获得创建的对象的方式称为依赖注入。
所以,控制反转(Ioc),就是依赖注入加上面向接口的编程思想的实现。
在这里,我们首先抓住一个重点:Spring之所以可以实现可插拔程序,是实现了不用new,使用类或接口就可以获得获得对象!
1.2. 项目目录结构
|
|

1.3. 示例代码
1.3.1. CustomerService接口代码
| package cn.zj.spring.service;
public interface CustomerService { /** * 保存方法 */ public void save(); }
|
1.3.2. CustomerServiceImpl子类
| package cn.zj.spring.service.impl;
import cn.zj.spring.service.CustomerService;
public class CustomerServiceImpl implements CustomerService {
@Override public void save() { System.out.println("-保存客户-CustomerServiceImpl"); }
}
|
1.3.3. CustomerServiceImpl2子类
| package cn.zj.spring.service.impl;
import cn.zj.spring.service.CustomerService;
public class CustomerServiceImpl2 implements CustomerService {
@Override public void save() { System.out.println("-保存客户-CustomerServiceImpl2"); }
}
|
1.3.4. CustomerClient类(调用方)
| package cn.zj.spring.client;
import cn.zj.spring.service.CustomerService;
public class CustomerClient {
//1.声明一个父接口的引用 private CustomerService customerService;
//2.使用set方法注入对象,我们将通过方法注入的对象的方式称为依赖注入 public void setCustomerService(CustomerService customerService) { this.customerService = customerService; }
public void save(){ //调用服务端的方法 customerService.save();; }
}
|
1.3.5. 配置文件applicationContext.xml
| "1.0" encoding="UTF-8"?> xmlns:xsi="http://www.w3.org/2001/XMLSchema-instance" xsi:schemaLocation="http://www.springframework.org/schema/beans http://www.springframework.org/schema/beans/spring-beans.xsd">
|
1.3.6. 测试代码
| package cn.zj.spring.test;
import org.junit.Test; import org.springframework.context.ApplicationContext; import org.springframework.context.support.ClassPathXmlApplicationContext;
import cn.zj.spring.client.CustomerClient;
public class ClientTest { @Test public void testSave() throws Exception { ApplicationContext context = new ClassPathXmlApplicationContext("applicationContext.xml"); CustomerClient customerClient = context.getBean("customerClient", CustomerClient.class); // 调用方法 customerClient.save(); } }
|
1.3.7. 7.测试结果
|
|

2. 标签说明
2.1. alias标签
作用:为已配置的bean设置别名
| "1.0" encoding="UTF-8"?> xmlns:xsi="http://www.w3.org/2001/XMLSchema-instance" xsi:schemaLocation="http://www.springframework.org/schema/beans http://www.springframework.org/schema/beans/spring-beans.xsd">
|
--测试代码
| import org.springframework.context.ApplicationContext; import org.springframework.context.support.ClassPathXmlApplicationContext;
import cn.zj.entity.User;
public class Test { public static void main(String[] args) { // 读取Spring配置文件 ApplicationContext context = new ClassPathXmlApplicationContext( "applicationContext.xml");
// 通过id获取User对象 User user = (User) context.getBean("user"); // 测试对象 System.out.println(user); System.out.prntln("====================================="); // 通过alias获取User对象 user = (User) context.getBean("user1"); // 测试对象 System.out.println(user); } } |
2.2. bean标签的配置
2.2.1. bean标签作用
用于声明一个类,在启动Spring框架的时候根据该配置的类创建对象到容器里面
2.2.2. 属性说明
|
|
2.2.3. Bean作用范围
| singleton
|
单例 ,在Spring IoC容器中仅存在一个Bean实例 (默认的scope) |
| prototype |
多例 ,每次从容器中调用Bean时,都返回一个新的实例,即每次调用getBean()时 ,相当于执行new XxxBean(): |
| request |
用于web开发,将Bean放入request范围 ,request.setAttribute("xxx") , 在同一个request 获得同一个Bean
|
| session |
用于web开发,将Bean 放入Session范围,在同一个Session 获得同一个Bean |
在开发中主要使用 scope="singleton"、 scope="prototype"
对于MVC中的Action/Controller使用prototype类型,其他使用singleton
|
|
|
|
在Web开发的三层架构中
Web:一般都是多例
Service :单例
DAO :单例
2.3. 实例化Bean的四种方式
2.3.1. 构造器实例化(无参数构造器),最标准,使用最多。
| public class SomeBean1 { public SomeBean1() { System.out.println("SomeBean.SomeBean1()"); } } |
| 配置文件 |
| |
2.3.2. 通过静态方法工厂创建(了解)
--静态工厂类
| SomeBean2/SomeBean2Facotry public class SomeBean2 { public SomeBean2() { System.out.println("SomeBean.SomeBean2()"); } } public class SomeBean2Facotry { //静态工厂方法 public static SomeBean2 getSomeBean2() { System.out.println("执行静态工厂方法"); return new SomeBean2(); } } |
--静态工厂配置
| factory-method="getSomeBean2"> |
2.3.3. 通过实体工厂创建(了解)
--实体工厂
| public class SomeBean3 { public SomeBean3() { System.out.println("SomeBean.SomeBean3()"); } } public class SomeBean3Facotry { //实例工厂方法 public SomeBean3 getSomeBean3() { System.out.println("执行实例工厂方法"); return new SomeBean3(); } } |
--配置方式
| |
2.3.4. 实现FactoryBean接口实例化:实例工厂变种(了解)
实现FactoryBean接口,MyBatis和Spring集成就是使用的这种方式
此种方式,如果没有使用Bean对应的对象,Spring就不会自动创建,只有在使用的时候Spring才会创建对应的对象
| public class SomeBean4 { public SomeBean4() { System.out.println("SomeBean4.SomeBean4()"); } } public class SomeBean4ObjectFactory implements FactoryBean
//返回的泛型类型对应的对象 @Override public SomeBean4 getObject() throws Exception { SomeBean4 bean4 = new SomeBean4(); return bean4; } @Override public Class getObjectType() { return null; }
} |
--配置方式
| |
2.4. 初始化和销毁方法
比如DataSource,SessionFactory最终都需要关闭资源:在Bean销毁之前,都要调用close方法.
init-method="该类中初始化方法名" destroy-method="该类中销毁方法名">
init-method:bean生命周期初始化方法,对象创建后就进行调用
destroy-method:容器被销毁的时候,如果bean被容器管理,会调用该方法。
default-init-method
分析原理:
如果bean的scope="prototype",那么容器只负责创建和初始化,它并不会被spring容器管理。交给用户自己调用.
| xmlns:xsi="http://www.w3.org/2001/XMLSchema-instance" xsi:schemaLocation="http://www.springframework.org/schema/beans http://www.springframework.org/schema/beans/spring-beans.xsd"
default-init-method="init"> init-method="init" destroy-method="destory"> |
3. Spring依赖注入 DI
DI:Dependency Injection(依赖注入)
从字面上分析:
IoC:指将对象的创建权,反转给了Spring容器;
DI :指Spring创建对象的过程中,将对象依赖属性(简单值,集合,对象)通过配置设值给该对象。
IoC和DI其实是同一个概念的不同角度描述,DI相对IoC而言,明确描述了“被注入对象依赖IoC容器配置依赖对象”。
所谓的依赖注入,就是属性不创建对象,通过配置文件的配置将Spring容器里面的对象注入给对应的属性
依赖注入有四种方式
3.1. setter注入,(属性注入)
| 1.setter注入,(也可以称之为属性注入) 使用setter注入: 1,使用bean元素的 1,简单类型值,直接使用value赋值; 2,引用类型,使用ref赋值; 3,集合类型,直接使用对应的集合类型元素即可。 2,spring通过属性的setter方法注入值; 3,在配置文件中配置的值都是string,spring可以自动的完成类型的转换 |
| public class Employee { private Integer age; private String name; private Department dept; public Integer getAge() { return age; } public void setAge(Integer age) { this.age = age; } public String getName() { return name; } public void setName(String name) { this.name = name; } public Department getDept() { return dept; } public void setDept(Department dept) { this.dept = dept; } @Override public String toString() { return "Employee [age=" + age + ", name=" + name + ", dept=" + dept + "]"; } } |
| public class Department { private Integer id; private String name; public Integer getId() { return id; } public void setId(Integer id) { this.id = id; } public String getName() { return name; } public void setName(String name) { this.name = name; } } |
| "1.0" encoding="UTF-8"?> xmlns:xsi="http://www.w3.org/2001/XMLSchema-instance" xsi:schemaLocation="http://www.springframework.org/schema/beans http://www.springframework.org/schema/beans/spring-beans.xsd">
|
3.2. 构造器注入
|
|
3.3. p命名空间注入
使用p命名空间注入先在约束上面引入 p标签(红色部分)
| "1.0" encoding="UTF-8"?> xmlns:p="http://www.springframework.org/schema/p" xmlns:xsi="http://www.w3.org/2001/XMLSchema-instance" xsi:schemaLocation="http://www.springframework.org/schema/beans http://www.springframework.org/schema/beans/spring-beans.xsd">
p:id="123" p:name="销售部"/>
p:id="111" p:name="西门吹雪" p:dept-ref="department"/> |
3.4. 集合类型值注入
在处理的数据中,
有标量类型=基础数据类型以及包装类+String -- value属性
也有Spring容器里面的对象 --ref属性
还要很多数据JDK内置的数据结构:
- 键值对 Map 、Properties
- 数组
- 集合Set、List
| public class CollectionBean { private Set private List private String[] array; private Map private Properties prop; //读取本地 xxx.properties文件(本质就是一个Map集合) } |
| |
4. 获得properties文件的值
Spring配置文件支持通过xxx.properties文件的Key获得对应的值。实现该功能是通过
通过${Key}来获得Properties文件对应Key的值
使用Spring读取配置文件必须导入新的命名空间 context
导入命名空间方法
将命名空间和约束重新拷贝一份,将对于的全部替换成 context,然后关联context本地schema约束
| "1.0" encoding="UTF-8"?> xmlns:p="http://www.springframework.org/schema/p" xmlns:context="http://www.springframework.org/schema/context" xmlns:xsi="http://www.w3.org/2001/XMLSchema-instance" xsi:schemaLocation="http://www.springframework.org/schema/beans http://www.springframework.org/schema/beans/spring-beans.xsd http://www.springframework.org/schema/context http://www.springframework.org/schema/context/spring-context.xsd "> |
4.1. 使用Spring创建阿里巴巴 Druid连接池,读取配置文件
4.1.1. 拷贝Mysql驱动包和druid连接池jar包到项目中
|
|

4.1.2. 创建 db.properites
| jdbc.driverClassName=com.mysql.jdbc.Driver jdbc.url=jdbc:mysql://localhost:3306/jdbcdemo jdbc.username=root jdbc.password=root jdbc.maxActive=10 |
4.1.3. applicationContext.xml配置
| "1.0" encoding="UTF-8"?> xmlns:p="http://www.springframework.org/schema/p" xmlns:context="http://www.springframework.org/schema/context" xmlns:xsi="http://www.w3.org/2001/XMLSchema-instance" xsi:schemaLocation="http://www.springframework.org/schema/beans http://www.springframework.org/schema/beans/spring-beans.xsd http://www.springframework.org/schema/context http://www.springframework.org/schema/context/spring-context.xsd ">
value="${jdbc.driverClassName}" /> |
4.1.4. 测试代码
| @Test public void testSave() throws Exception { ApplicationContext context = new ClassPathXmlApplicationContext("applicationContext.xml");
DataSource dataSource = context.getBean(DataSource.class, "dataSource"); Connection conn = dataSource.getConnection(); System.out.println("数据库连接对象:"+conn); } |
4.1.5. 效果
|
|

5. 模拟注册功能
此功能重点在于将每一层对象的创建交给Spring管理,对象之间的依赖关系交给Spring来维护
5.1. Dao层接口以及实现代码
| public interface UserDao { void insert(User user); } public class UserDaoImpl implements UserDao { @Override public void insert(User user) { System.out.println("注册的Dao方法执行"); } } |
5.2. Service层接口以及实现代码
| public interface UserService { void register(User user); } public class UserServiceImpl implements UserService { /*private UserDao dao = new UserDaoImpl(); 传统做法 * 现在交给Spring管理,使用Spring的setter方法注入 *因为要交给Spring的setter方法注入,所以(必须)提供set方法 */ private UserDao dao;
@Override public void register(User user) { dao.insert(user); } //因为要用 public void setDao(UserDao dao) { this.dao = dao; } } |
5.3. Web表现层实现代码
| public class UserServlet { /* 传统做法 * private UserService service = new UserServiceImpl(); * 现在交给Spring管理,使用Spring的setter方法注入 * 因为要交给Spring的setter方法注入,所以(必须)提供set方法 */ private UserService service;
public void register(User user) {
service.register(user); } public void setService(UserService service) { this.service = service; } } |
5.4. applicationContext.xml文件配置代码(重点),一定要掌握每层的配置,和每层之间对象的依赖关系的维护
| !-- 配置 项目的bean -->
|
5.5. 测试代码
| @Test public void testRegister() throws Exception { //创建用户对象:模拟接受用户参数,封装对象的过程 User user = new User(); user.setUsername("张三"); user.setPassword("admin"); ApplicationContext context = new ClassPathXmlApplicationContext("applicationContext.xml"); //获取表现层的Servlet即可 UserServlet userServlet = context .getBean("userServlet", UserServlet.class); //执行注册操作 userServlet.register(user); }
|
6. 小结
- 优秀的项目架构的特点
(1) 高内聚
① 项目分层开发(每次处理各自的任务,职责分明)
(2) 低耦合
① 对象与对象之间有不直接产生依赖(不直接new对象)
- 低耦合的解决方案
(1) 开发者自己底层使用反射进行封装相关代码
(2) 使用优秀的框架 Spring
- 什么是Spring?
(1) 轻量级一站式框架
(2) 轻量级
① Spring有20个模块,只需要四个模块即可启动Spring框架,其他模块按需引入即可
(3) 一站式
① Web开发的三层架构 ,Web层、Service层,Dao层 全部使用Spring框架完成
- Spring如何实现解耦
(1) IOC :控制反转
① 将对象创建权交给Spring管理
② 负责对象生命周期(有效期)
③ 初始化方法,销毁方法
④ IOC创建对象实例有四种方式
1) 直接使用无参数构造函数-推荐
2) 使用静态工厂创建bean
3) 使用实例工厂创建bean
4) 使用变种实例工厂,工厂类实现 FactoryBean接口
(2) DI :依赖注入
① 将对象的属性通过Spring赋值
② Setter方法(属性)注入
③ 构造器注入
④ P命名空间注入
⑤ 支持值类型,引用类型和支持各种集合数据类型的注入
- Spring读取 .Properteis配置文件
- 综合案例-模拟注册功能-使用Spring管理对象