数据可视化(箱线图、直方图、散点图、联合分布图)
数据可视化
箱线图可视化
箱线图(Box plot)也称箱须图(Box-whisker Plot)、箱线图、盒图,可以用来反映一组或多组连续型定量数据分布的中心位置和散布范围。
连续型数据:在一定区间内可以任意取值的变量叫连续变量,其数值是连续不断的。可视化这类数据的图表主要有箱形图和直方图。
离散型数据:数值只能用自然数或整数单位计算的则为离散变量。大多数图表可视化的都是这类数据,比如柱状图、折线图等。
箱线图中的数据含义
离散度度量:
- 四分位数:
- 四分位数:Q1(第25百分位),Q3(第75百分位)
- 四分位数极差:IQR = Q3 - Q1
- 五点概况:
- min,Q1,median,Q3,max
- 箱线图(boxplot):min,Q1,median,Q3,max
- 离群点:通常情况下,一个值高于或低于1.5xIQR
m a x = Q 3 + 1.5 × I Q R m i n = Q 1 − 1.5 × I Q R \begin{align} max = Q3 + 1.5 \times IQR \end{align} \\ \begin{align} min = Q1 -1.5 \times IQR \end{align} max=Q3+1.5×IQRmin=Q1−1.5×IQR
箱线图绘制箱线图
参考:https://blog.csdn.net/H_lukong/article/details/90139700
参考:https://www.cnblogs.com/star-zhao/p/9847082.html
参考:https://blog.csdn.net/weixin_44052055/article/details/121442449
这里对matplotlib中的boxplot()函数中的参数做以下记录。主要需要知道x,vert,
boxplot(
x, notch=None, sym=None, vert=None, whis=None,
positions=None, widths=None, patch_artist=None,
bootstrap=None, usermedians=None, conf_intervals=None,
meanline=None, showmeans=None, showcaps=None, showbox=None,
showfliers=None, boxprops=None, labels=None, flierprops=None,
medianprops=None, meanprops=None, capprops=None,
whiskerprops=None, manage_ticks=True, autorange=False,
zorder=None, *, data=None):

x:指定要绘制箱线图的数据,可以是一组数据也可以是多组数据;
notch:是否以凹口的形式展现箱线图,默认非凹口;
sym:指定异常点的形状,默认为蓝色的+号显示;
vert:是否需要将箱线图垂直摆放,默认垂直摆放;
whis:指定上下须与上下四分位的距离,默认为1.5倍的四分位差;
positions:指定箱线图的位置,默认为range(1, N+1),N为箱线图的数量;
widths:指定箱线图的宽度,默认为0.5;
patch_artist:是否填充箱体的颜色,默认为False;
meanline:是否用线的形式表示均值,默认用点来表示;
showmeans:是否显示均值,默认不显示;
showcaps:是否显示箱线图顶端和末端的两条线,默认显示;
showbox:是否显示箱线图的箱体,默认显示;
showfliers:是否显示异常值,默认显示;
boxprops:设置箱体的属性,如边框色,填充色等;
labels:为箱线图添加标签,类似于图例的作用;
flierprops:设置异常值的属性,如异常点的形状、大小、填充色等;
medianprops:设置中位数的属性,如线的类型、粗细等;
meanprops:设置均值的属性,如点的大小、颜色等;
capprops:设置箱线图顶端和末端线条的属性,如颜色、粗细等;
whiskerprops:设置须的属性,如颜色、粗细、线的类型等;
manage_ticks:是否自适应标签位置,默认为True;
autorange:是否自动调整范围,默认为False;
使用boxblot()函数绘制箱线图,这里绘制箱线图需要传入数据给x,其次是labels信息,这个也是需要传入参数的,默认labels是[1,2,3···]这样的信息。
import pandas as pd
import matplotlib.pyplot as plt

filename = 'iris_dataset/iris.csv'
dataset = pd.read_csv(filename)
print(dataset.describe()) # 会计算每一列数值的mean,std,min, 25%,50%,75%,max的值

labels = dataset.columns[1:5]
fig, ax = plt.subplots()
plt.grid(True, color='Blue')
ax.boxplot(x=dataset.iloc[:, 1:5],
           medianprops={'color':'red', 'linewidth':'1.5'},
           meanline=True,
           showmeans=True,
           meanprops={'color': 'blue', 'ls': '--', 'linewidth': '1.5'},
           flierprops={'marker': 'o', 'markerfacecolor': 'red', 'markersize': 10},
           labels=labels)

plt.show()
使用pandas.DataFrame对象的plot()函数也可以绘制箱线图。首先,我们使用pandas来读取一个.csv表格,这些数据就被存储到一个DataFrame对象的实例之中。而DataFrame对象有一个plot()函数,可以绘制图像。在方法中,我们可以传入数据给参数data,也可以不用传入参数,因为对象的实例本身也是数据;通过传入不同的值给kind参数,我们可以绘制多种图像,kind={‘hist’, ‘boxplot’, ‘sctter’, …}等值,我们也可以通过colorDic来对箱线图的样式进行控制,包括箱体boxes的颜色,whisker须线的颜色,medians中位数线的颜色,以及上下最大(小)值caps的颜色。
这里,dataset.iloc[:, 1:5]就是传入plot函数中的数据,实际上传入的数据是Sepal.Length Sepal.Width Petal.Length Petal.Width,而dataset.iloc[:, 1:5]本身仍是一个DataFrame的对象:
import pandas as pd
import matplotlib.pyplot as plt

filename = 'iris_dataset/iris.csv'
dataset = pd.read_csv(filename)

colorDic = dict(boxes='DarkGreen', whiskers='DarkOrange', medians='DarkBlue', caps='Gray')
dataset.iloc[:, 1:5].plot(kind='box', color=colorDic, sym='ro')
这是函数的其他一些参数。
Parameters
    ----------
    data : Series or DataFrame
        The object for which the method is called.
    x : label or position, default None
        Only used if data is a DataFrame.
    y : label, position or list of label, positions, default None
        Allows plotting of one column versus another. Only used if data is a
        DataFrame.
    kind : str
        The kind of plot to produce:

        - 'line' : line plot (default)
        - 'bar' : vertical bar plot
        - 'barh' : horizontal bar plot
        - 'hist' : histogram
        - 'box' : boxplot
        - 'kde' : Kernel Density Estimation plot
        - 'density' : same as 'kde'
        - 'area' : area plot
        - 'pie' : pie plot
        - 'scatter' : scatter plot (DataFrame only)
        - 'hexbin' : hexbin plot (DataFrame only)
    ax : matplotlib axes object, default None
        An axes of the current figure.
    subplots : bool, default False
        Make separate subplots for each column.
    sharex : bool, default True if ax is None else False
        In case ``subplots=True``, share x axis and set some x axis labels
        to invisible; defaults to True if ax is None otherwise False if
        an ax is passed in; Be aware, that passing in both an ax and
        ``sharex=True`` will alter all x axis labels for all axis in a figure.
    sharey : bool, default False
        In case ``subplots=True``, share y axis and set some y axis labels to invisible.
    layout : tuple, optional
        (rows, columns) for the layout of subplots.
    figsize : a tuple (width, height) in inches
        Size of a figure object.
    use_index : bool, default True
        Use index as ticks for x axis.
    title : str or list
        Title to use for the plot. If a string is passed, print the string
        at the top of the figure. If a list is passed and `subplots` is
        True, print each item in the list above the corresponding subplot.
    grid : bool, default None (matlab style default)
        Axis grid lines.
    legend : bool or {'reverse'}
        Place legend on axis subplots.
    style : list or dict
        The matplotlib line style per column.
    logx : bool or 'sym', default False
        Use log scaling or symlog scaling on x axis.
        .. versionchanged:: 0.25.0

    logy : bool or 'sym' default False
        Use log scaling or symlog scaling on y axis.
        .. versionchanged:: 0.25.0

    loglog : bool or 'sym', default False
        Use log scaling or symlog scaling on both x and y axes.
        .. versionchanged:: 0.25.0

    xticks : sequence
        Values to use for the xticks.
    yticks : sequence
        Values to use for the yticks.
    xlim : 2-tuple/list
        Set the x limits of the current axes.
    ylim : 2-tuple/list
        Set the y limits of the current axes.
    xlabel : label, optional
        Name to use for the xlabel on x-axis. Default uses index name as xlabel, or the
        x-column name for planar plots.

        .. versionadded:: 1.1.0

        .. versionchanged:: 1.2.0

           Now applicable to planar plots (`scatter`, `hexbin`).

    ylabel : label, optional
        Name to use for the ylabel on y-axis. Default will show no ylabel, or the
        y-column name for planar plots.

        .. versionadded:: 1.1.0

        .. versionchanged:: 1.2.0

           Now applicable to planar plots (`scatter`, `hexbin`).

    rot : int, default None
        Rotation for ticks (xticks for vertical, yticks for horizontal
        plots).
    fontsize : int, default None
        Font size for xticks and yticks.
    colormap : str or matplotlib colormap object, default None
        Colormap to select colors from. If string, load colormap with that
        name from matplotlib.
    colorbar : bool, optional
        If True, plot colorbar (only relevant for 'scatter' and 'hexbin'
        plots).
    position : float
        Specify relative alignments for bar plot layout.
        From 0 (left/bottom-end) to 1 (right/top-end). Default is 0.5
        (center).
    table : bool, Series or DataFrame, default False
        If True, draw a table using the data in the DataFrame and the data
        will be transposed to meet matplotlib's default layout.
        If a Series or DataFrame is passed, use passed data to draw a
        table.
    yerr : DataFrame, Series, array-like, dict and str
        See :ref:`Plotting with Error Bars ` for
        detail.
    xerr : DataFrame, Series, array-like, dict and str
        Equivalent to yerr.
    stacked : bool, default False in line and bar plots, and True in area plot
        If True, create stacked plot.
    sort_columns : bool, default False
        Sort column names to determine plot ordering.
    secondary_y : bool or sequence, default False
        Whether to plot on the secondary y-axis if a list/tuple, which
        columns to plot on secondary y-axis.
    mark_right : bool, default True
        When using a secondary_y axis, automatically mark the column
        labels with "(right)" in the legend.
    include_bool : bool, default is False
        If True, boolean values can be plotted.
    backend : str, default None
        Backend to use instead of the backend specified in the option
        ``plotting.backend``. For instance, 'matplotlib'. Alternatively, to
        specify the ``plotting.backend`` for the whole session, set
        ``pd.options.plotting.backend``.

        .. versionadded:: 1.0.0
这是根据鸢尾花数据绘制的箱线图,这里红色实线是数据均值线,蓝色虚线是中位数线。从箱线图中可以看到花萼宽度(Sepal.Width)有一些离群值,其他属性没有离群值点。同样花萼宽度(Sepal.Width)的数据也比较集中,尤其是箱体比较扁。花萼长度、花萼宽度、花瓣宽度的中位数与均值距离较近,花瓣长度(Petal.Length)的均值和中位数有很大差别。
绘制直方图
参考:https://blog.csdn.net/H_lukong/article/details/90139700
参考:https://blog.cnblogs.com/star-zhao/p/9847082.html
参考:https://blog.csdn.net/Arwen_H/article/details/81985567
第三个,对参数有较为详细的解释。
import numpy as np
import pandas as pd
import matplotlib.pyplot as plt

filename = 'iris_dataset/iris.csv'
dataset = pd.read_csv(filename)
# 根据箱线图绘制的思想,很容易想到可以用Pandas.DataFrame的对象的plot方法来绘制直方图。
dataset.iloc[:, 1:5].plot(kind='hist') # 这里可以应用一个bins参数来控制图画的细致程度
plt.show()
上述这段代码是利用Pandas.DataFrame对象的plot方法来绘图,
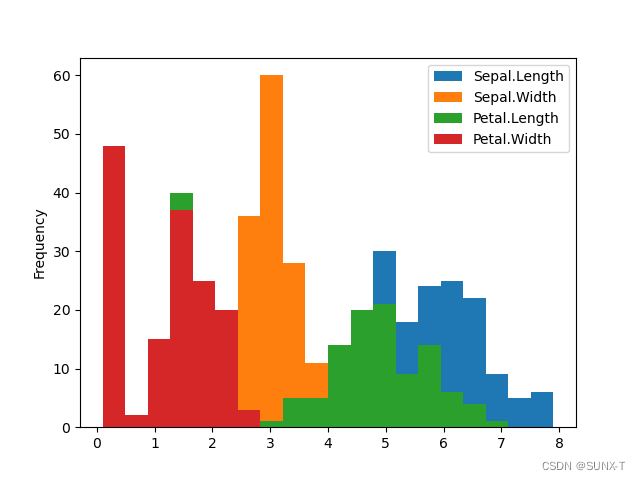
我们也可以使用专门的绘图库。matplotlib.pyplot来进行绘制,
import pandas as pd
import matplotlib.pyplot as plt

filename = 'iris_dataset/iris.csv'
dataset = pd.read_csv(filename)
# 使用matplotlib.pyplot来进行绘制直方图,这种直方图我认为比直接用Pandas.DataFrame的plot方法有更多细节可以控制,
fig, ax = plt.subplots()
ax.hist(dataset['Sepal.Length'], bins=10, color='blue', label='Sepal.Length')
ax.hist(dataset['Sepal.Width'], bins=10, color='orange', label='Sepal.Width')
ax.hist(dataset['Petal.Length'], bins=10, color='green', label='Petal.Length')
ax.hist(dataset['Petal.Width'], bins=10, color='red', label='Petal.Width')
plt.legend()
plt.show()
这里面的bins有一些不同,对于Pandas.DataFrame的直方图,似乎是统计了所有属性,然后得到一个整个空间的取值范围,然后再划分bins。而对于matplotlib.pyplot方法中,我是单独传一列属性进入,所以也只对单独传入的属性统计取值范围划分bins。这里的bins参数值得研究一下。
bins:整数值或序列。如果bins为整数值,则bins为柱子个数,根据数据的取值范围和柱子个数bins计算每个柱子的范围值,柱宽=(x.max()-x.min())/bins。如果bins取值为序列,则该序列给出每个柱子的范围值(即边缘)。除最后一个柱子外,其他柱子的取值范围均为半开(左闭右开)。
# 单属性直方图组图
import pandas as pd
import matplotlib.pyplot as plt

filename = 'iris_dataset/iris.csv'
dataset = pd.read_csv(filename)
labels = ['Sepal.Length', 'Sepal.Width', 'Petal.Length', 'Petal.Width']
colorDic = ['blue', 'orange', 'green', 'red']

fig = plt.figure()
for i in range(0, 4):
    ax = plt.subplot(2, 2, i+1)
    ax.hist(dataset[labels[i]], color=colorDic[i], label=labels[i])
    plt.legend() # 图例说明
plt.show()
这里我特意贴出了画在一起的直方图和单属性直方图组图。如果想仔细分析单个属性,还是单属性直方图更为恰当?在第一张直方图的绘制中,可以看到有一些属性的图像是被另一属性的图像覆盖了一部分。这样有什么意义呢?分类算法特征分析:我们可以看到花瓣长度在3个类别下的分布具有差异。
散点图
参考:https://blog.csdn.net/H_lukong/article/details/90139700
参考:https://www.cnblogs.com/star-zhao/p/9847082.html
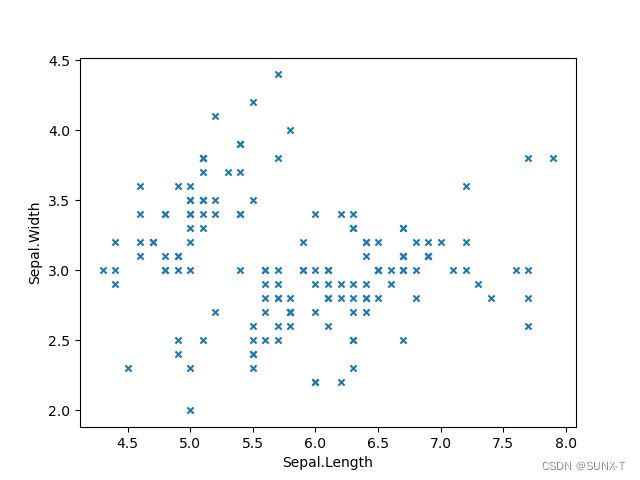
Pandas.DataFrame对象的plot方法,在使用时,令参数kind='sctter’即可。值得注意的是,散点图是描述的两个属性之间的相关性,是一个二维图,需要一个x,y,这两个值是需要自己进行指定的。
import pandas as pd
import matplotlib.pyplot as plt

filename = 'iris_dataset/iris.csv'
dataset = pd.read_csv(filename)

# 利用Pandas进行绘制散点图的重要参数包括x,y,kind,size,color,colormap,marker,label
dataset.plot(x='Sepal.Length', y='Sepal.Width', kind='scatter', marker='x')
pkt.show()
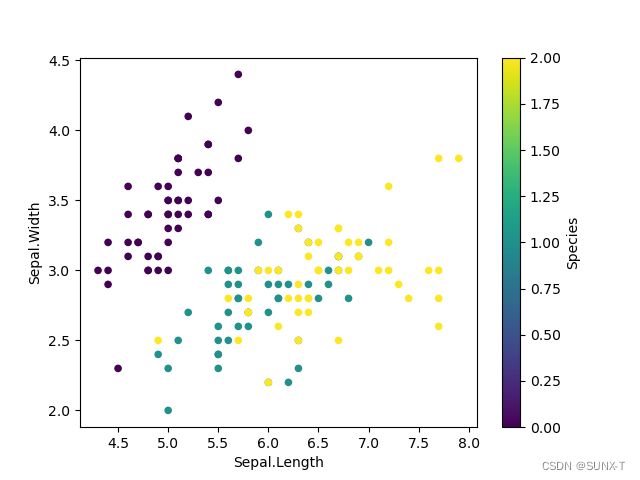
color属性可以是表中的一个属性列,但是这个属性列必须是数字或者是颜色值,由于我这里的’Species’是str型数据,所以会报错,所以这里,如果想再使用不同颜色对不同类别进行上色,需要将类别属性数值化。
# color还可以是一列属性 可以与colormap共同使用,
# 'c' argument must be a color, a sequence of colors, or a sequence of numbers, not str
# dataset.plot(x='Sepal.Length', y='SePal.Width', c='Species', kind='scatter', colormap='viridis')
这里的三种颜色分别代表鸢尾花的三种子类setosa,versicolor和virginica,深紫色是setosa,versicolor是绿色,viginica是黄色。
import pandas as pd
import matplotlib.pyplot as plt

filename = 'iris_dataset/iris2.csv'
dataset = pd.read_csv(filename)

# 散布图矩阵pandas.plotting.scatter_matrix, diagonal 取值只能是{‘hist’, 'kde'},hist表示直方图,kde表示核密度估计(kernel Density Estimation)
# 函数原型声明scatter_matrix(frame, alpha=0.5, c,figsize=None, ax=None, diagonal='hist', marker='.', density_kwds=None,hist_kwds=None, range_padding=0.05, **kwds)
# ax, 可选一般为None,说明散布图也可以作为子图存在
pd.plotting.scatter_matrix(dataset.iloc[:, 1:5], diagonal='kde', color='red', alpha=0.3, )
plt.show()
从散布图矩阵,可以看出各个属性之间的相关性,鸢尾花数据集iris.csv共有四个属性花瓣长度(Petal.Length)、花瓣宽度(Petal.Width)、花萼长度(Sepal.Length)、花萼宽度(Sepal.Width),故散布图矩阵共有16张子图。属性a与属性a所画的是核密度估计曲线图,属性a与属性b之间所画的是散点图。根据散点图矩阵,可以看出,花瓣长度(Petal.Length)和花萼宽度(Petal.Width)存在非常明显的线性相关。花瓣长度(Petal.Length)与花萼长度(Sepal.Length)、以及花瓣宽度(Petal.Width)与花萼长度(Petal.Length)之间存在着一定的线性相关,这种线性相关与鸢尾花的品种存在着某些关系?。
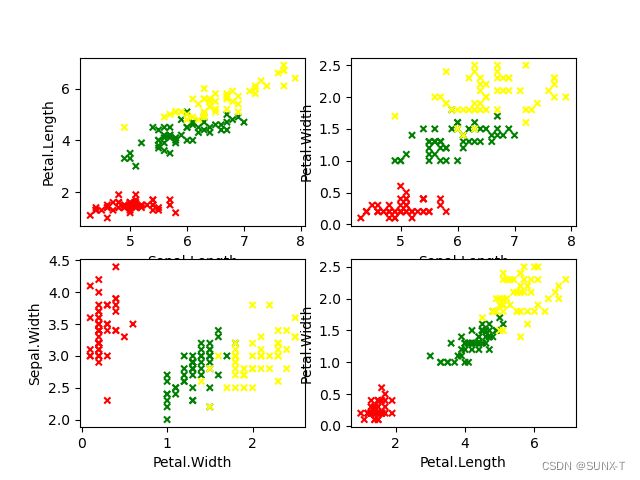
利用matplotlib.pyplot绘制一个更加详细的散点组图,这一次我们对上面散布图矩阵中认为存在着一定线性相关的一些属性,绘制为一个组图,并要体现出这些线性相关是否与鸢尾花的子类别具有什么关系。
import pandas as pd
import matplotlib.pyplot as plt

filename = 'iris_dataset/iris2.csv'
dataset = pd.read_csv(filename)

# for循环声明一个子图对象队列
fig = plt.figure()
ax = []
for i in range(1, 5):
    ax.append(plt.subplot(2, 2, i))
# 散点图组图
labels = ['Sepal.Length', 'Sepal.Width', 'Petal.Length', 'Petal.Width']
dataset.plot(x=labels[0], y=labels[2], kind='scatter', marker='x', ax=ax[0], c='Species', colormap='viridis')
dataset.plot(x=labels[0], y=labels[3], kind='scatter', marker='x', ax=ax[1], c='Species')
dataset.plot(x=labels[3], y=labels[1], kind='scatter', marker='x', ax=ax[2], c='Species')
dataset.plot(x=labels[2], y=labels[3], kind='scatter', marker='x', ax=ax[3], c='Species')
从这张更为细致的图里,可以证实前面的推断,鸢尾花依据其子类别属性,在花瓣长度、花瓣宽度、花萼长度和花萼宽度之间有明确的线性关系,并且在其子类别versicolor和virginica中,这种线性关系更加明显。
使用seaborn绘制散点图,
import pandas as pd
import seaborn as sns
import matplotlib.pyplot as plt

filename = 'iris_dataset/iris.csv'
dataset = pd.read_csv(filename)

fig = plt.figure()
ax = []
for i in range(1, 5):
    ax.append(fig.add_subplot(2, 2, i))

# sns.jointplot(x='Sepal.Length', y='Sepal.Width', hue='Species', data=dataset, kind='scatter', ax=ax1)
sns.set(font_scale=1.2)
sns.scatterplot(x='Sepal.Length', y='Petal.Length', hue='Species', data=dataset, ax=ax[0], marker='x')
sns.scatterplot(x='Sepal.Length', y='Petal.Width', hue='Species', data=dataset, ax=ax[1], marker='x')
sns.scatterplot(x='Petal.Width', y='Sepal.Width', hue='Species', data=dataset, ax=ax[2], marker='x')
sns.scatterplot(x='Petal.Length', y='Petal.Width', hue='Species', data=dataset, ax=ax[3], marker='x')

ax[0].legend(bbox_to_anchor=(2.5, 1.3), loc='best', frameon=False)
ax[1].legend_.remove()
ax[2].legend_.remove()
ax[3].legend_.remove()
plt.show()
联合图
#联合分布图函数原型声明
#seaborn.jointplot(x, y, data=None, kind=’scatter’, stat_func=, color=None, size=6, ratio=5, space=0.2, dropna=True, xlim=None, ylim=None, joint_kws=None, marginal_kws=None, annot_kws=None, **kwargs)
#hue:基于某列的类别将y分成不同颜色的点
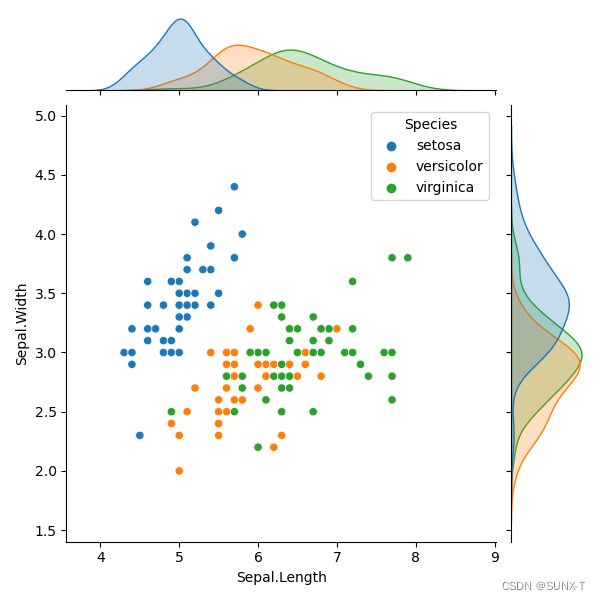
sns.jointplot(x='Sepal.Length', y='Sepal.Width', hue='Species', data=dataset, kind='scatter')
联合分布图不仅能看到数据属性之间的相关性,也能看到对于某个类别的某个属性值是如何分布的。
