Mybatis
目录
一.Mybatis
1.什么是Mybatis
2.优化JDBC流程
二.Mybatis框架
1.建立数据库
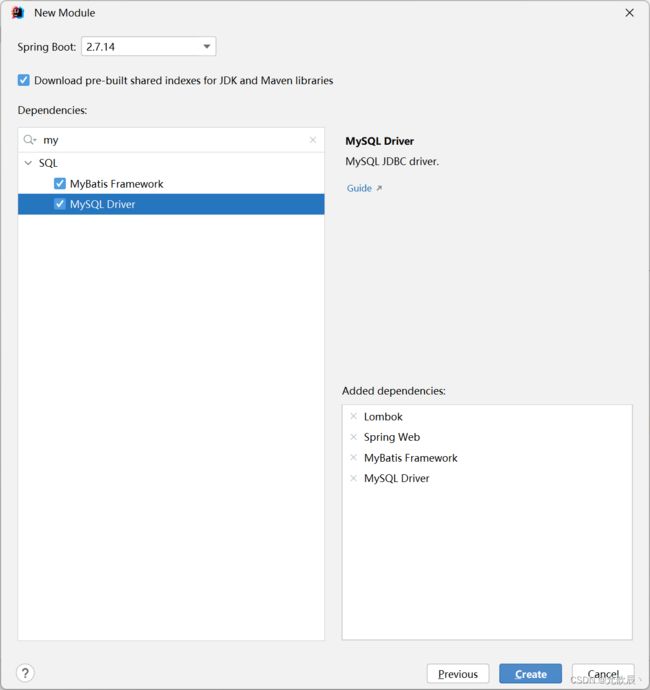
2.添加Mybatis支持
3.配置application.yml文件
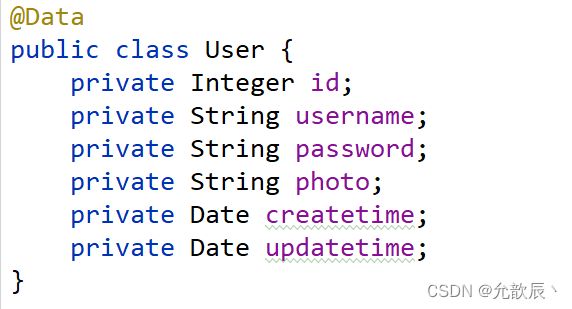
4.创建实体类
5.创建mapper接口
6.创建mapper.xml文件
7.进行单元测试
8.可能发生的错误
1.Invalid bound statement (not found)
2.数据库相关的配置错误
3. Failed to load ApplicationContext
4.yml格式错误
三.传参的方式
1.一个参数
2.多个参数
四.增删改查
1.插入数据
2.修改数据
3.删除数据
4.查找数据
五.$和#之间的区别
1.$替换Interger类型的sql语句
编辑
2.$替换String类型的sql语句
3.SQL注入的问题
4.不得不使用$的理由
1.当我们需要按顺序查询数据的时候
2.like模糊查询的时候
六.返回类型
1.resultType
2.resultMap
七.多表查询
1.准备工作
1.创建文章表
2.创建文章实体类
3.创建ArticleMapper类
4.创建ArticleMapper.xml
5.创建测试类
八.动态SQL的使用
1.什么是动态SQL
2.if标签
编辑
3.trim标签
4.where标签
5.set标签
6.foreach标签
九.注解方式
1.注解演示
一.Mybatis
1.什么是Mybatis
2.优化JDBC流程
后端开发的两个重要组成部分:①后端程序 ②数据库
而Mybatis就是优化后端程序与数据库交互的框架
之前我们使用JDBC与数据库进行交互的.
回顾JDBC流程
接来下学习MyBatis框架
二.Mybatis框架
1.建立数据库
-- 创建数据库
        drop database if exists mycnblog;
        create database mycnblog default character set utf8mb4;
        -- 使⽤数据数据
        use mycnblog;
        -- 创建表[⽤户表]
        drop table if exists userinfo;
        create table userinfo(
        id int primary key auto_increment,
        username varchar(100) not null,
        password varchar(32) not null,
        photo varchar(500) default '',
        createtime datetime default now(),
        updatetime datetime default now(),
        `state` int default 1
        ) default charset 'utf8mb4';

        -- 添加⼀个⽤户信息
        insert into `mycnblog`.`userinfo` (`id`, `username`, `password`, `photo`,
        `createtime`, `updatetime`, `state`) values
        (1, 'admin', 'admin', '', '2021-12-06 17:10:48', '2021-12-06 17:10:48', 1)
        ;
2.添加Mybatis支持
之后pom文件的依赖有如下
			org.springframework.boot
			spring-boot-starter-web


			org.mybatis.spring.boot
			mybatis-spring-boot-starter
			2.3.1


			com.mysql
			mysql-connector-j
			runtime


			org.projectlombok
			lombok
			true


			org.springframework.boot
			spring-boot-starter-test
			test


			org.mybatis.spring.boot
			mybatis-spring-boot-starter-test
			2.3.1
			test
3.配置application.yml文件
# 数据库连接配置
spring:
  datasource:
    url: jdbc:mysql://localhost:13306/mycnblog?characterEncoding=utf8&useSSL=false
    username: root
    password: woaini520
    driver-class-name: com.mysql.cj.jdbc.Driver

#  mybatis xml 配置路径
mybatis:
  mapper-locations: classpath:mapper/**Mapper.xml
  configuration: # 配置打印 MyBatis 执行的 SQL
    log-impl: org.apache.ibatis.logging.stdout.StdOutImpl
在配置文件中配置configuration.log-iml内容,可以打印sql执行的细节
4.创建实体类
package com.javastudy.mybatisdemo4.model;

import lombok.Data;

import java.sql.Date;

/**
 * @author Chooker
 * @create 2023-07-25 14:03
 */
@Data
public class User {
    private Integer id;
    private String username;
    private String password;
    private String photo;
    private Date createtime;
    private Date updatetime;
}
5.创建mapper接口
package com.javastudy.mybatisdemo4.mapper;

import com.javastudy.mybatisdemo4.model.User;
import org.apache.ibatis.annotations.Mapper;

import java.util.List;

/**
 * @author Chooker
 * @create 2023-07-25 14:02
 */
@Mapper
public interface UserMapper {

    List selectAll();

}
6.创建mapper.xml文件
7.进行单元测试
package com.javastudy.mybatisdemo4.mapper;

import com.javastudy.mybatisdemo4.model.User;
import lombok.extern.slf4j.Slf4j;
import org.junit.jupiter.api.Test;
import org.springframework.beans.factory.annotation.Autowired;
import org.springframework.boot.test.context.SpringBootTest;

import java.util.List;

/**
 * @author Chooker
 * @create 2023-07-25 14:12
 */
@Slf4j
@SpringBootTest
class UserMapperTest {
    @Autowired
    private UserMapper userMapper;

    @Test
    void selectAll() {
        List users = userMapper.selectAll();
        log.info(users.toString() );
    }
}
8.可能发生的错误
1.Invalid bound statement (not found)
定义的mapper映射和接口定义的方法名不一致.
mybatis配置路径错误
2.数据库相关的配置错误
可能是数据库账号或者密码出现错误,也可能是数据库相关的配置出现错误
3. Failed to load ApplicationContext
类不存在,检查路径是否出现错误
4.yml格式错误
三.传参的方式
1.一个参数
@Mapper
public interface UserMapper {

    User selectById(Integer id);

} 这个时候我们可以直接传参数,并且当 User selectById(Integer aaa);参数与xml文件里不一致的时候,也是可以查到相应数据的.
当我们使用参数进行重命名的时候
User selectById(@Param("uid") Integer id);
此时xml文件里面必须为uid,否则就会报如下错误
2.多个参数
多个参数的时候必须一致,不然可能会报错
四.增删改查
1.插入数据
Integer insert(User user);
insert into userinfo(username,password,photo) values(#{username},#{password},#{photo})
可以看到此时是成功插入数据了的
如果使用@Param注解,需要这样进行修改
Integer insert2(@Param("userInfo") User user);
总结:如果设置了@Param注解,就要使用@Param注解里的参数
这样就不会报binding error
当我们需要拿到自增的id的时候,我们可以采取如下的方式
insert into userinfo(username,password,photo) values(#{userInfo.username},#{userInfo.password},#{userInfo.photo})
    @Test
    void insert() {
        User user = new User();
        user.setUsername("ljl");
        user.setPassword("147258");
        user.setPhoto("123abc");
        Integer result = userMapper.insert2(user);
        log.info("影响了" + result + "行"+",userId="+user.getId());
}![]()
通过user.getId()即可拿到自增的id.
2.修改数据
void update(User user);
update userinfo set username=#{username},password=#{password},id=#{id} where id=#{id}
![]()
![]() 可以观察到修改成功
可以观察到修改成功
3.删除数据
Integer deleteById(Integer id);
delete from userinfo where id=#{id}
可以观察到删除成功
4.查找数据
List selectAll(); 上面都有具体的代码,这里不做过多的演示
五.$和#之间的区别
1.$替换Interger类型的sql语句
是可以正常查询到数据的
2.$替换String类型的sql语句
    @Test
    void selectByName() {
        User user = userMapper.selectByName("xcl");
        log.info(user.toString());
    }
此时会发生一定的问题
可以看到username=xcl并没有给后面的内容加引号,因此我们可以进行相应的修改可以符合条件
此时查询是没有问题的
3.SQL注入的问题
使用$可能会发生SQL注入的情况
什么是SQL注入?下面拿用户登录的例子来演示以下
正常的情况:使用#
UserMapper接口
User selectByNameAndPassword(String username,String password);
UserMapper.xml文件
测试方法: 当正确输入账号和密码,这个时候是登陆成功的
    @Test
    void selectByNameAndPassword() {
        String username="xcl";
        String password="147258";
        User user = userMapper.selectByNameAndPassword(username, password);
        if (user == null) {
            log.info("登陆失败");
        } else {
            log.info("登陆成功:" + user.toString());
        }
}![]()
当SQL注入错误输入密码时:登陆失败,符合预期
    @Test
    void selectByNameAndPassword() {
        String username="xcl";
        String password=" or 1=1";
        User user = userMapper.selectByNameAndPassword(username, password);
        if (user == null) {
            log.info("登陆失败");
        } else {
            log.info("登陆成功:" + user.toString());
        }
    }
#的情况时用占位符的方式进行替换,预编译的方式将内容变为password的值进行替换
异常的情况:使用$
UserMapper接口
User selectByNameAndPassword(String username,String password);
UserMapper.xml文件
测试方法: 当SQL注入错误输入密码时:报错误,不符合预期
    @Test
    void selectByNameAndPassword() {
        String username = "xcl";
        String password = "' or 1='1";

        User user = userMapper.selectByNameAndPassword(username, password);
        if (user == null) {
            log.info("登陆失败");
        } else {
            log.info("登陆成功:" + user.toString());
        }
}注意:此时数据库只有一个用户信息,这只是为了演示SQL注入的问题.
总结:对于查询的语句,尽量使用#符号
4.不得不使用$的理由
1.当我们需要按顺序查询数据的时候
List selectByOrder(String order);
    @Test
    void selectByOrder() {
        List users = userMapper.selectByOrder("DESC");
        log.info(users.toString());
    }
当数据类型为String的时候,自动就加引号,但是此时我们不需要引号,因此只能使用$
改为这样就正确了:
但是$存在SQL注入的问题,我们该怎么样解决呢?
我们在购物平台的时候,都是自己点击前端提供的参数然后进行排序的,不让用户自己输入,而是前端提供几个选项,选择完成之后传入后端,让后端进行拼接,这样就不会存在sql注入的问题了.
2.like模糊查询的时候
List selectByLike(String name);
    @Test
    void selectByLike() {
        List users = userMapper.selectByLike("l");
        log.info(users.toString());
    }
此时使用#就会发生上面的错误,因为我们穿的参数也是String类型的,而模糊查询里面相当于引号里面还有引号了,此时我们只能使用$进行查询
替换为$符号就不会发生问题
但是这样之后还是会发生SQL注入的问题?该如何解决呢?
此时需要使用mysql的一个内置函数concat()
此时就不会发生错误
总结:
$和#的区别
- $存在SQL注入问题,原因:#预编译,$是字符直接替换
- order by只能使用$,如何避免SQL注入,后端控制参数的输入,只能为desc, asc
- #直接用于like查询会报错,需要使用mysql内置函数concat
六.返回类型
1.resultType
绝大多数的情况直接返回resultType即可,当返回的JDK中定义的数据类型,只需要指明所在的位置即可,例如
此时返回的是String类型的username,返回类型resultType即为String所在的位置.
当返回的是自定义的对象的时候,比如数据库一个表对应java中的一个自定义的对象,如果返回类型还未resultType,那么此时要求数据库表中的字段名与java自定义的对象的名称一一对应且名字相同,否则找不到相应的字段数据.之前我们都是字段名与自定义的实体类相同的,所以返回的可以使resultType.
当我们字段名与实体类的名称不一致了,会发生什么情况呢?
此时可以看到name为null,pwd为null,说明在数据库中没有找到相匹配的字段名进行赋值,其他的属性还是可以被赋值的.
这种情况该如何解决呢?接下来resultMap闪亮登场!!!
2.resultMap
通过把resultType改为resultMap,并重建一个resultMap,将实体类的property(属性)和数据库中的column(字段)一一对应起来,mybatis就知道该如何进行赋值了.
其中id为主键,property为java属性字段名,colum为数据库字段名,
一般来说通常将实体类的属性一一与数据库字段名进行对应,我们定义的user实体类只有name和pwd与数据库不同,后面的属性与数据库字段名相同,所以可以不写,但在这里还是建议所有的属性与字段名都要进行联系起来,即使相同.
此时可以看到可以查询出来想要的结果了.
七.多表查询
1.准备工作
1.创建文章表
        -- 创建⽂章表
        drop table if exists articleinfo;
        create table articleinfo(
        id int primary key auto_increment,
        title varchar(100) not null default "默认名字",
        content text not null,
        createtime datetime default now(),
        updatetime datetime default now(),
        uid int not null,
        rcount int not null default 1,
        `state` int default 1
        )default charset 'utf8mb4';
        -- 创建视频表
        drop table if exists videoinfo;
        create table videoinfo(
        vid int primary key,
        `title` varchar(250),
        `url` varchar(1000),
        createtime datetime default now(),
        updatetime datetime default now(),
        uid int
        )default charset 'utf8mb4';

        -- ⽂章添加测试数据
        insert into articleinfo(title,content,uid)
        values('java','java正⽂',1);

        -- 添加视频
        insert into videoinfo(vid,title,url,uid) values(1,'java title','http://ww
        w.baidu.com',1);
2.创建文章实体类
package com.javastudy.mybatisdemo4.model;

import lombok.Data;

import java.sql.Date;

/**
 * @author Chooker
 * @create 2023-07-26 10:30
 */
@Data
public class Article {
    private Integer id;
    private String title;
    private String content;
    private Date createtime;
    private Date updatetime;
    private Integer rcount;
    private Integer state;
    //作者相关信息
    private User user;

}
3.创建ArticleMapper类
@Mapper
public interface ArticleMapper {

    List selectAll();

}
4.创建ArticleMapper.xml
通过 association 可以使Article实体类中的user对象与UserMap.xml中的resultMap进行关联,从而使其查询出来的内容赋值到user对象中.
5.创建测试类
/**
 * @author Chooker
 * @create 2023-07-26 11:46
 */
@SpringBootTest
@Slf4j
class ArticleMapperTest {
    @Autowired
    ArticleMapper articleMapper;

    @Test
    void selectAll() {
        List articles = articleMapper.selectAll();
        log.info(articles.toString());
    }
}
但是通常我们不直接写User,而是将User中的某些属性(主键和经常使用到的属性)放在Article实体类中.
@Data
public class Article {
    private Integer id;
    private String title;
    private String content;
    private Date createtime;
    private Date updatetime;
    private Integer rcount;
    private Integer state;
    //作者相关信息
//    private User user;

    private Integer userId;
    private String username;

}
八.动态SQL的使用
1.什么是动态SQL
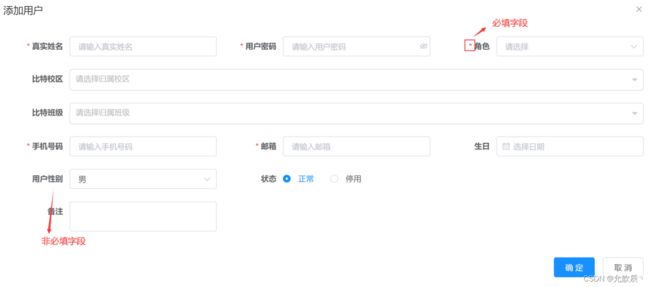
当我们添加用户信息的时候,有些信息是必填的,有些信息是非必填的,也就是说插入数据的时候,有些数据有时候可能是不需要插入的,如果我们使用静态SQL,我们需要写很多的SQL语句进行插入,如果我们使用动态SQL,一条SQL语句就可以针对不同的场景进行插入数据了.
动态SQL:根据输入的参数不同,动态的拼接SQL.
可能会有些人这样考虑,用户没有输入值的属性,我们就直接赋值为null不就可以了吗?但是建立表的时候,有些字段是由默认值的,因此用户没有输入值的时候应该为默认值,如果直接赋值为null,就不符合常规了.
2.if标签
之前我们创建表的时候,如果没有state的值,state默认为1.
当不给state赋值的时候:
    @Test
    void insertByCondition() {
        Article article = new Article();
        article.setTitle("测试文章");
        article.setContent("测试文章内容");
        article.setUserId(2);
        Integer result = articleMapper.insertByCondition(article);
        log.info("总共插入了" + result + "条数据");
    }
此时我们并没有设置文章的状态,按逻辑来说文章状态应该赋值为默认值1
当给state赋值的时候:
    @Test
    void insertByCondition() {
        Article article = new Article();
        article.setTitle("测试文章");
        article.setContent("测试文章内容");
        article.setUserId(2);
        article.setState(0);
        Integer result = articleMapper.insertByCondition(article);
        log.info("总共插入了" + result + "条数据");
    }
可以看到我们成功的用一条语句完成了两条SQL语句的工作,这就是动态SQL的魅力.
可能会出现的问题
如果统一把逗号放在字段前面
当title为null时,整个SQL最前面就会多一个逗号
为了解决这个问题,我们可以使用trim标签
3.trim标签
- prefix:表示整个语句块,以prefix的值作为前缀
- suffix:表示整个语句块,以suffix的值作为后缀
- prefixOverrides:表示整个语句块要去除掉的前缀
- suffixOverrides:表示整个语句块要去除掉的后缀
        insert into articleinfo


                ,title

            ,content,uid

                ,state


        values


                ,#{title}
            ,#{content},#{userId}

                ,#{state}
不设置最前面的title属性
不设置最后面的state属性
可以看到是成功插入数据了
4.where标签
当我们需要查询操作的时候,我们可以根据where条件筛选出我们需要的条件进行查询,但是有时候会选择多个条件或一个条件,因此where后面的条件也可以使用动态sql进行拼接.
这里我们先尝试使用if标签来完成功能
List selectByCondition(String uid,Integer state);
这里使用1=1这个语句可以解决and冗余的问题.
    @Test
    void selectByCondition() {
        String uid = "2";
        Integer state = 1;
        List articles = articleMapper.selectByCondition(uid, state);
        log.info(articles.toString());
    }
可以看到这里的查询是成功的.
但是这里1=1这个条件是没有用的,这里可以使用where标签来解决这个问题.
先来说说where标签的作用,去除前导的and和生成where关键字
当uid和state都为null时,可以看到两个条件都被去除了
可以看到是成功的将前导0给去除了
但是where标签是不能去除后导0的
5.set标签
更新多个字段的时候也会发生更新选择的问题,和上面的where标签的问题一样,这里我们就直接来介绍set标签的作用了
set标签:生成set关键字,去除最后一个逗号
Integer updateByCondition(String uid,Integer state);
        update articleinfo


                uid=#{uid},


                state=#{state},
6.foreach标签
- collection:绑定方法参数中的集合,如 List,Set,Map或数组对象
- item:遍历时的每⼀个对象
- open:语句块开头的字符串
- close:语句块结束的字符串
- separator:每次遍历之间间隔的字符串
Integer batchDelete(List ids);
        delete from articleinfo
        where id in

            #{id}
    @Test
    void batchDelete() {
        List list = new ArrayList<>();
        list.add(2);
        list.add(6);
        list.add(7);
        Integer result = articleMapper.batchDelete(list);
        log.info("删除了" + result + "行");
    }
可以看到是删除成功了的.
注意:item的数据要和foreach标签里面的#{}的数据名称一致.
如果 Integer batchDelete(@Param("ids") List
foreach的collection要和@Param里面的内容一致.
到这里为止mybatis的全部内容就讲完了,接下来我们简单介绍一下关于注解方式
九.注解方式
1.注解演示
@Mapper
public interface UserMapper2 {
    @Select("select * from userinfo")
    List queryAll();

    @Select("select * from userinfo where id = #{id}")
    User queryById(Integer id);
}
@SpringBootTest
class UserMapper2Test {
    @Autowired
    UserMapper2 userMapper2;

    @Test
    void queryAll() {
        List users = userMapper2.queryAll();

    }

    @Test
    void queryById() {
        User user = userMapper2.queryById(1);
    }
}
通过这两个例子可以看出对于简单的sql语句,使用注解方式的写法是比xml方式是简单的,但是对于动态sql语句,注解方式就很难写的.所以这里推荐还是使用xml方式进行mybatis代码的撰写.
对于Mybatis有一个增强的框架为Mybatis Plus,很好用,建议在掌握Mybatis内容后进行了解,对之后的开发有很好的的帮助:
一篇很好的关于Mybatis Plus的文章:Mybatis-plus


