contos7部署环境docker minio,mysql redis nps内网穿透等等
1.docker安装
#1.卸载旧版本
sudo yum remove docker \
                  docker-client \
                  docker-client-latest \
                  docker-common \
                  docker-latest \
                  docker-latest-logrotate \
                  docker-logrotate \
                  docker-engine
#2.安装依赖
yum -y install gcc
yum -y install gcc-c++

#3.安装软件包
yum install -y yum-utils

#4.设置stable镜像仓库
# 使用国内阿里云仓库链接下载
yum-config-manager --add-repo https://download.docker.com/linux/centos/docker-ce.repo

#5.更新yum软件包索引
yum makecache fast

#6.安装Docker 引擎
yum -y install docker-ce docker-ce-cli containerd.io docker-compose-plugin

#7.启动Docker
systemctl start docker    # 启动
systemctl status docker   # 查看状态
systemctl enable docker   # 设置开机自启
ps -ef | grep docker      # 查看进程

#换源
#通用的方法就是编辑/etc/docker/daemon.json
# 进入文件
vim /etc/docker/daemon.json

# 修改文件

{
  "registry-mirrors" : [
    "http://hub-mirror.c.163.com"
  ],
  "insecure-registries" : [
    "registry.docker-cn.com",
    "docker.mirrors.ustc.edu.cn"
  ],
  "debug" : true,
  "experimental" : true
}

# 重启 docker 服务
sudo systemctl restart docker
2.安装mysql
- docker中安装mysql
[root@hadoop-104 module]# docker pull mysql:5.7
5.7: Pulling from library/mysql
123275d6e508: Already exists
27cddf5c7140: Pull complete
c17d442e14c9: Pull complete
2eb72ffed068: Pull complete
d4aa125eb616: Pull complete
52560afb169c: Pull complete
68190f37a1d2: Pull complete
3fd1dc6e2990: Pull complete
85a79b83df29: Pull complete
35e0b437fe88: Pull complete
992f6a10268c: Pull complete
Digest: sha256:82b72085b2fcff073a6616b84c7c3bcbb36e2d13af838cec11a9ed1d0b183f5e
Status: Downloaded newer image for mysql:5.7
docker.io/library/mysql:5.7
2.查看镜像
[root@hadoop-104 module]# docker images
REPOSITORY  TAG    IMAGE ID     CREATED       SIZE
mysql       5.7    f5829c0eee9e 2 hours ago   455MB
[root@hadoop-104 module]#
3.启动mysql
sudo docker run -p 3306:3306 --name mysql \
-v /mydata/mysql/logs:/logs \
-v /mydata/mysql/data:/var/lib/mysql \
-v /mydata/mysql/conf:/etc/mysql/conf.d \
-e MYSQL_ROOT_PASSWORD=密码 \
-d mysql:5.7
4.修改配置
[root@hadoop-104 conf]# pwd
/mydata/mysql/conf


[root@hadoop-104 conf]# cat my.cnf
[client]
default-character-set=utf8
[mysql]
default-character-set=utf8
[mysqld]
init_connect='SET collation_connection = utf8_unicode_ci'
init_connect='SET NAMES utf8'
character-set-server=utf8
collation-server=utf8_unicode_ci
skip-character-set-client-handshake
skip-name-resolve
[root@hadoop-104 conf]#

[root@hadoop-104 conf]# docker restart mysql
mysql
[root@hadoop-104 conf]#
5.进入容器查看配置:
[root@hadoop-104 conf]# docker exec -it mysql /bin/bash
root@b3a74e031bd7:/# whereis mysql
mysql: /usr/bin/mysql /usr/lib/mysql /etc/mysql /usr/share/mysql

root@b3a74e031bd7:/# ls /etc/mysql
my.cnf
root@b3a74e031bd7:/# cat /etc/mysql/my.cnf
[client]
default-character-set=utf8
[mysql]
default-character-set=utf8
[mysqld]
init_connect='SET collation_connection = utf8_unicode_ci'
init_connect='SET NAMES utf8'
character-set-server=utf8
collation-server=utf8_unicode_ci
skip-character-set-client-handshake
skip-name-resolve
root@b3a74e031bd7:/#
6.设置启动docker时,即运行mysql
[root@hadoop-104 ~]# docker update mysql --restart=always
mysql
7.开放端口
#安装iptables-services :
yum install iptables-services
#开放端口
vi /etc/sysconfig/iptables
#添加
-A INPUT -m state --state NEW -m tcp -p tcp --dport 6379 -j ACCEPT
-A INPUT -p tcp -m state --state NEW -m tcp --dport 8086-j ACCEPT
-A INPUT -p tcp -m state --state NEW -m tcp --dport 9000 -j ACCEPT
-A INPUT -p tcp -m state --state NEW -m tcp --dport 9001 -j ACCEPT
-A INPUT -p tcp -m state --state NEW -m tcp --dport 80 -j ACCEPT
-A INPUT -p tcp -m state --state NEW -m tcp --dport 443 -j ACCEPT
#重启配置
service iptables restart
3.安装redis
[root@hadoop-104 ~]# docker pull redis
Using default tag: latest
latest: Pulling from library/redis
123275d6e508: Already exists
f2edbd6a658e: Pull complete
66960bede47c: Pull complete
79dc0b596c90: Pull complete
de36df38e0b6: Pull complete
602cd484ff92: Pull complete
Digest: sha256:1d0b903e3770c2c3c79961b73a53e963f4fd4b2674c2c4911472e8a054cb5728
Status: Downloaded newer image for redis:latest
docker.io/library/redis:latest
2.启动
[root@hadoop-104 ~]# mkdir -p /mydata/redis/conf
[root@hadoop-104 ~]# touch /mydata/redis/conf/redis.conf
[root@hadoop-104 ~]# echo "appendonly yes"  >> /mydata/redis/conf/redis.conf
[root@hadoop-104 ~]# docker run -p 6379:6379 --name redis -v /mydata/redis/data:/data \
-v /mydata/redis/conf/redis.conf:/etc/redis/redis.conf \
-d redis redis-server /etc/redis/redis.conf --requirepass "密码"
ce7ae709711986e3f90c9278b284fe6f51f1c1102ba05f3692f0e934ceca1565
[root@hadoop-104 ~]#
3.连接到docker的redis
[root@hadoop-104 ~]# docker exec -it redis redis-cli
127.0.0.1:6379> set key1 v1
OK
127.0.0.1:6379> get key1
"v1"
127.0.0.1:6379>
4.设置redis容器在docker启动的时候启动
[root@hadoop-104 ~]# docker update redis --restart=always
redis
4.flowable 安装
docker run -p 8086:8080 -d flowable/flowable-ui
http://ip::8086/flowable-ui
5.nginx安装,非docker版
使用 yum 进行 Nginx 安装时,Nginx 配置文件在 /etc/nginx 目录下。
# 安装 nginx
yum -y install nginx

# 卸载 nginx
yum remove nginx

# 设置开机启动
systemctl enable nginx

# 启动 nginx 服务
service nginx start

# 停止 nginx 服务
service nginx stop

# 重启 nginx 服务
service nginx restart

# 重新加载配置,一般是在修改过 nginx 配置文件时使用。
service nginx reload
nginx 配置,多域名走443(参考)
user  nginx;
worker_processes  1;

error_log  /var/log/nginx/error.log warn;
pid        /var/run/nginx.pid;


events {
	# 最大连接数
    worker_connections  1024;
}


http {
    include       /etc/nginx/mime.types;
    default_type  application/octet-stream;
	# 用来设置日志格式;
    log_format  main  '$remote_addr - $remote_user [$time_local] "$request" '
                      '$status $body_bytes_sent "$http_referer" '
                      '"$http_user_agent" "$http_x_forwarded_for"';
 	# 用来指定日志文件的存放路径、格式
    access_log  /var/log/nginx/access.log  main;
 	# 指定是否使用sendfile系统调用来传输文件。
    sendfile        on;
    #tcp_nopush     on;

    keepalive_timeout  65;

    #gzip  on;

    upstream appointment {
        # 请将xxx.xxx.xxx.xxx:8081 更换称自己的IP地址
        server xxx.xxx.xxx.xxx:8081 weight=1 max_fails=2 fail_timeout=20;
    }

    server {
        listen 80;
		# 注意这里域名改写成自己的域名!!!
		server_name www.域名.com;
		# http请求时直接重定向到https
    	rewrite ^(.*)$ https://${server_name}$1 permanent;
		root /usr/share/nginx/html;
		index index.html index.htm;
        location / {
        }
    }

	# Settings for a TLS enabled server.
#
    server {
        listen       443 ssl;
        listen       [::]:443 ssl;
        server_name  localhost;
	 ssl on;

        # root 根目录配置,这里设置的是 location/ 匹配访问路径的上一层目录,可根据需要重新配置
		root /usr/share/nginx/html;
		index index.html index.htm;

		#证书文件名称 注意证书的放置位置
        ssl_certificate cert/a.crt;
        #私钥文件名称
        ssl_certificate_key cert/a.key;

        ssl_session_cache shared:SSL:1m;
        ssl_session_timeout  5m;
	ssl_ciphers ECDHE-RSA-AES128-GCM-SHA256:ECDHE:ECDH:AES:HIGH:!NULL:!aNULL:!MD5:!ADH:!RC4;
        ssl_protocols TLSv1 TLSv1.1 TLSv1.2;
	ssl_prefer_server_ciphers on;
        # Load configuration files for the default server block.
        include /etc/nginx/default.d/*.conf;

		location / {
        }


        error_page 404 /404.html;
            location = /40x.html {
        }
        error_page 500 502 503 504 /50x.html;
            location = /50x.html {
        }
    }


    server {
		# 二级域名的SSL配置
        listen       443 ssl;
		# 注意这里域名改写成自己的域名!!!
        server_name  api.域名.com;
	 ssl on;


		#证书文件名称 注意证书的放置位置
        ssl_certificate cert/api.crt;
        #私钥文件名称
        ssl_certificate_key cert/api.key;

        ssl_session_cache shared:SSL:1m;
        ssl_session_timeout  5m;
	ssl_ciphers ECDHE-RSA-AES128-GCM-SHA256:ECDHE:ECDH:AES:HIGH:!NULL:!aNULL:!MD5:!ADH:!RC4;
        ssl_protocols TLSv1 TLSv1.1 TLSv1.2;
	ssl_prefer_server_ciphers on;
        # Load configuration files for the default server block.
        include /etc/nginx/default.d/*.conf;


		location / {
		# 注意这里改写成自己的域名!!!
		# 把8100端口映射到二级域名下,完成二级域名HTTPS
		proxy_pass http://www.域名.com:8100;

		 proxy_set_header Host $host;
        # 获取请求的ip地址
        proxy_set_header X-real-ip $remote_addr;
        # 获取请求的多级ip地址,当请求经过多个反向代理时,会获取多个ip,英文逗号隔开

        }

		root /usr/share/nginx/html;
		index index.html index.htm;

        error_page 404 /404.html;
            location = /40x.html {
        }
        error_page 500 502 503 504 /50x.html;
            location = /50x.html {
        }
    }


	server {
	# 配置8100端口,用于二级域名使用
        listen       8100 default_server;
        listen       [::]:8100 default_server;
        server_name  _;

       # root 根目录配置,这里设置的是端口8100 location/ 匹配访问路径的上一层目录,可根据需要重新配置
        root         /usr/share/nginx/html;

        # Load configuration files for the default server block.
        include /etc/nginx/default.d/*.conf;

        location / {
        }

        error_page 404 /404.html;
            location = /40x.html {
        }

        error_page 500 502 503 504 /50x.html;
            location = /50x.html {
        }
    }


    include /etc/nginx/conf.d/*.conf;
}
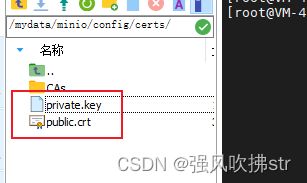
6.minio安装
启动配置https,centos7 要映射ip 域名关系,本地ip 域名
echo "10.0.4.4 xxxx.com" >> /etc/hosts
docker run --network=host -dit -p 9000:9000 -p 9001:9001 --name minio -d --restart=always -e "MINIO_ROOT_USER=账号" -e "MINIO_ROOT_PASSWORD=至少八位密码" -v /mydata/minio/data:/data -v /mydata/minio/config:/root/.minio minio/minio server /data --address "xxxx.com:9000" --console-address ":9001"
把ssh证书放到这边,名字改成我图片一样的
7.安装rabbitmq
1.安装rabbitmq
docker run -d --name rabbitmq -e RABBITMQ_DEFAULT_USER=admin -e RABBITMQ_DEFAULT_PASS=admin --restart=always -p 4369:4369 -p 5671:5671 -p 5672:5672 -p 15671:15671 -p 25672:25672 -p 15672:15672 rabbitmq:management
2.进入rabbitmq网站选择下载延迟队列插件
点击进入:GitHub下载直达

3.将插件拷贝至rabbitmq容器内
# 拷贝插件
docker cp /opt/soft-ware/rabbitmq_delayed_message_exchange-3.11.1.ez  rabbitmq:/opt/rabbitmq/plugins/

# 进入容器内
docker exec -it rabbitmq bash

# 查看插件列表
rabbitmq-plugins list

# 开启插件支持
rabbitmq-plugins enable rabbitmq_delayed_message_exchange

# 退出容器
exit

# 重启容器
docker restart rabbitmq
#如果重启报错就重启docker
systemctl restart docker
访问 ip:15672

8 内网穿透nps
参考
# 创建 /opt/nps 目录存放配置文件
mkdir /opt/nps

# 安装wget并且下载配置文件
yum install -y wget && wget https://img.zeruns.tech/down/conf.zip

# 解压配置文件到 /opt/nps 目录
unzip conf.zip -d /opt/nps

# 拉取 ffdfgdfg/nps 镜像
docker pull ffdfgdfg/nps

# 运行 nps 容器,配置文件夹 conf 在 /opt/nps/conf 目录下
docker run -p 19000-19010:19000-19010 -d --name=nps --restart=always -v /opt/nps/conf:/conf ffdfgdfg/nps

# 查看日志
docker logs nps
配置也修改下,账号密码 自己改自己的
appname = nps
#Boot mode(dev|pro)
runmode = dev

#HTTP(S) proxy port, no startup if empty
http_proxy_ip=0.0.0.0
http_proxy_port=19000
https_proxy_port=19001
https_just_proxy=true
#default https certificate setting
https_default_cert_file=conf/server.pem
https_default_key_file=conf/server.key

##bridge
bridge_type=tcp
bridge_port=19002
bridge_ip=0.0.0.0

# Public password, which clients can use to connect to the server
# After the connection, the server will be able to open relevant ports and parse related domain names according to its own configuration file.
public_vkey=123

#Traffic data persistence interval(minute)
#Ignorance means no persistence
#flow_store_interval=1

# log level LevelEmergency->0  LevelAlert->1 LevelCritical->2 LevelError->3 LevelWarning->4 LevelNotice->5 LevelInformational->6 LevelDebug->7
log_level=7
#log_path=nps.log

#Whether to restrict IP access, true or false or ignore
#ip_limit=true

#p2p
#p2p_ip=127.0.0.1
#p2p_port=6000

#web
web_host=a.o.com
web_username=账号
web_password=密码
web_port = 19003
web_ip=0.0.0.0
web_base_url=
web_open_ssl=false
web_cert_file=conf/server.pem
web_key_file=conf/server.key
# if web under proxy use sub path. like http://host/nps need this.
#web_base_url=/nps

#Web API unauthenticated IP address(the len of auth_crypt_key must be 16)
#Remove comments if needed
#auth_key=test
auth_crypt_key =1234567812345678

#allow_ports=9001-9009,10001,11000-12000

#Web management multi-user login
allow_user_login=false
allow_user_register=false
allow_user_change_username=false


#extension
allow_flow_limit=false
allow_rate_limit=false
allow_tunnel_num_limit=false
allow_local_proxy=false
allow_connection_num_limit=false
allow_multi_ip=false
system_info_display=false

#cache
http_cache=false
http_cache_length=100

#get origin ip
http_add_origin_header=false

#pprof debug options
#pprof_ip=0.0.0.0
#pprof_port=9999

#client disconnect timeout
disconnect_timeout=60
安装完后在浏览器打开:http://你服务器IP:19003
使用用户名和密码登陆(默认admin/123,正式使用一定要更改,修改/opt/nps/conf/nps.conf配置文件中的web_password)
8.Elasticsearch-7.6.1
# 创建配置文件目录,数据目录
mkdir -p /mydata/elasticsearch/{config,data}

# 将文件夹中文件都可读可写
chmod -R 777 /mydata/elasticsearch/

# 配置任意机器可以访问 elasticsearch
echo "http.host: 0.0.0.0" > /mydata/elasticsearch/config/elasticsearch.yml
docker run --name elasticsearch -p 9200:9200 -p 9300:9300 \
-e  "discovery.type=single-node" \
-e ES_JAVA_OPTS="-Xms1g -Xmx2g" \
-v /mydata/elasticsearch/config/elasticsearch.yml:/usr/share/elasticsearch/config/elasticsearch.yml \
-v /mydata/elasticsearch/data:/usr/share/elasticsearch/data \
-v /mydata/elasticsearch/logs:/usr/share/elasticsearch/logs \
-v  /mydata/elasticsearch/plugins:/usr/share/elasticsearch/plugins \
-d elasticsearch:7.6.1
docker update elasticsearch --restart=always
启动可视化Kibana
docker run --name kibana \
-e ELASTICSEARCH_HOSTS=http://42.192.248.112:9200 \
-p 5601:5601 \
-d kibana:7.6.1
更改kibana配置,将可视化设置成中文
#进入容器
docker exec -it kibana /bin/bash
cd config/
vi kibana.yml
kibana.yml文件配置
在后面加上一行 i18n.locale: “zh-CN”
配置ik分词器
cd /mydata/elasticsearch
wget https://github.com/medcl/elasticsearch-analysis-ik/releases/download/v7.6.1/elasticsearch-analysis-ik-7.6.1.zip
docker cp  /mydata/elasticsearch/elasticsearch-analysis-ik-7.6.1.zip   f74f755e4a39:/usr/share/elasticsearch/plugins

# 进入 es 容器
docker exec -it f74f755e4a39 /bin/bash
# 进入到es 插件目录
cd  /usr/share/elasticsearch/plugins
# 创建 ik 文件夹,并移动压缩包到此目录
mkdir ik
mv elasticsearch-analysis-ik-7.6.1.zip ik/
# 解压压缩包
cd ik/
unzip elasticsearch-analysis-ik-7.6.1.zip
# 删除压缩包
rm -rf elasticsearch-analysis-ik-7.6.1.zip

# 退出容器
exit
# 重启容器
docker  restart  containerId